Cook it once
  • Home
  • Privacy Policy
  • Recipes
    • KETO
    • LC
    • WW
  • Tips
  • Contact
Cook it once
  • Home
  • Privacy Policy
  • Recipes
    • KETO
    • LC
    • WW
  • Tips
  • Contact
Category:

General Recipes

General Recipes

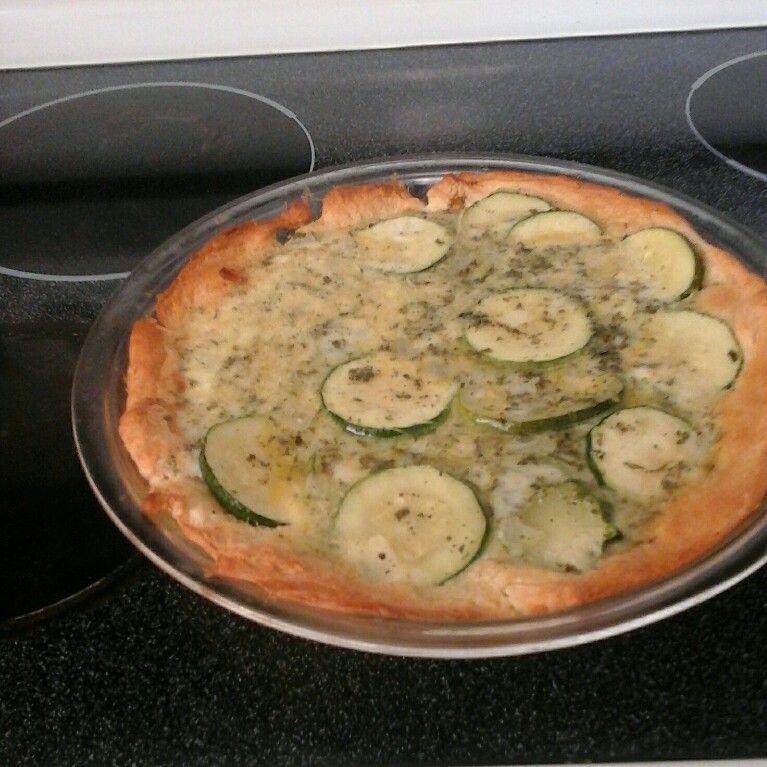
ZUCCHINI PIE: A Healthy, Classic Recipe

by Rebecca September 19, 2022
written by Rebecca

Prep Time: 10 mins | Cook Time: 40 mins | Total Time: 50 mins | Servings: 6–8

This Zucchini Pie recipe is an amazing way to use all your extra fresh summer produce. This pie takes only 10 minutes to prep. This pie is great to pair with fried chicken, grilled steak, or pork chops. If you love vegetarian entrees, this zucchini pie is also wonderful to serve with a simple green salad. Enjoy a satisfying dinner with this delicious Zucchini Pie all year round!

Zucchini along with yellow squash is a wonderful association of summer. Because this zucchini pie is beyond amazing, this not only become our go-to summer dish, but our favorite all-season pie!

This is a savory pie made with layers of thinly sliced zucchini along with other pantry staples. I adore the texture of this pie. It is like a cross between a savory cake/muffin and a quiche. Super flavorful, moist, and decadent!

If you have not tried this Zucchini Pie, you are already missing out! This pie is a must and a wonderful option to use all your extra zucchini. This zucchini pie is best to serve for lunch or dinner as a vegetarian main dish. You can also pair this with your favorite protein.

Ingredients

3 c. thinly-sliced zucchini

1 c. Bisquick (or other similar all-purpose baking mixes)

4 eggs

½ c. grated Parmesan cheese

½ c. vegetable oil

½ c. grated cheddar cheese

1 small sweet onion, diced

½ tsp kosher salt

HOW TO MAKE ZUCCHINI PIE

Step 1: Prepare the oven. Preheat it to 350 degrees F or 180 degrees C. Using cooking spray, grease a 9-inch deep-dish pie plate. Set aside.

Step 2: In a large bowl, place the Bisquick oil, eggs, salt, and oil. Mix well until blended, then whisk in the Parmesan cheese and cheddar cheeses. Next, add the onion along with the zucchini.

Step 3: Into the prepared dish, transfer the mixture. Place in the preheated oven and bake for about 40 to 45 minutes or until golden brown.

ZUCCHINI PIE: A Healthy, Classic Recipe

Rebecca Prep Time: 10 mins | Cook Time: 40 mins | Total Time: 50 mins | Servings: 6–8 This Zucchini Pie recipe is an amazing way to use all your extra… General Recipes ZUCCHINI PIE: A Healthy, Classic Recipe European Print This
Serves: 6-8 Prep Time: 10 mins Cooking Time: 40 mins 40 mins
Nutrition facts: 200 calories 20 grams fat
Rating: 5.0/5
( 1 voted )

Ingredients

  • 3 c. thinly-sliced zucchini
  • 1 c. Bisquick (or other similar all-purpose baking mixes)
  • 4 eggs
  • ½ c. grated Parmesan cheese
  • ½ c. vegetable oil
  • ½ c. grated cheddar cheese
  • 1 small sweet onion, diced
  • ½ tsp kosher salt

Instructions

Step 1: Prepare the oven. Preheat it to 350 degrees F or 180 degrees C. Using cooking spray, grease a 9-inch deep-dish pie plate. Set aside.

Step 2: In a large bowl, place the Bisquick oil, eggs, salt, and oil. Mix well until blended, then whisk in the Parmesan cheese and cheddar cheeses. Next, add the onion along with the zucchini.

Step 3: Into the prepared dish, transfer the mixture. Place in the preheated oven and bake for about 40 to 45 minutes or until golden brown.

September 19, 2022 0 comment
0 FacebookTwitterPinterestEmail
General Recipes

HAM AND POTATO CASSEROLE

by Rebecca September 17, 2022
written by Rebecca

Total Cooking Time: 60 mins | Servings: 4

Creamy, cheesy, and insanely delicious – this ham and potato casserole is another casserole that you can easily make at any time! I love to serve this casserole for a hearty breakfast, and this is excellent, too as a post-holiday dinner!

Ingredients

¼ c. butter

6 small potatoes, peeled and cubed

2 c. cubed fully cooked ham

3 tbsp butter

1 small onion, finely chopped

1 ½ c. milk

1 (8 oz.) package of shredded Cheddar cheese

3 tbsp all-purpose flour

¼ c. bread crumbs

Salt and ground black pepper to taste

HOW TO MAKE HAM AND POTATO CASSEROLE

Step 1: Into a large pot, place the potatoes. Cover the potatoes with salted water. Bring to a boil. Once boiling, adjust the heat to medium-low and simmer for about 20 minutes until the potatoes are tender. Drain when done.

Step 2: Prepare the oven. Preheat it to 350 degrees F or 175 degrees C. Ready an 11/2-quart baking dish. Grease and set aside.

Step 3: In a skillet, melt 2 tbsp butter over medium heat. Once the butter has melted, add the ham and onion to the skillet. Stir and cook for about 5 minutes until the onion has softened and translucent.

Step 4: Into the ham mixture, stir in the potatoes. Pour the mixture into the prepared baking dish.

Step 5: In a saucepan, melt 1/4 c. butter over medium heat. To the melted butter, stir in the flour until smooth.

Step 6: Into the flour mixture, slowly whisk in the milk. To taste, season with salt and black pepper. Cook further, stirring until the mixture has thickened. This takes another 2 minutes. Then, adjust the heat to medium-low and add the cheddar cheese. Stir well until blended.

Step 7: Over the ham and potatoes, pour the sauce and sprinkle with bread crumbs. Place in the preheated oven and bake for about 30 minutes or until the sauce is bubbly and the casserole is browned.

Step 8: Remove from the oven when done and serve the casserole immediately. Enjoy!

Tips:

For this recipe, use cooked ham. Leftover ham or precooked is a great option.

Keep any leftovers in the fridge for up to 4 days. Reheat in the microwave at 50% power for about 2 minutes, stirring once.

Nutritional Facts:

Per Serving: 578 calories; protein 24.3g; carbohydrates 40.3g; fat 35.8g; cholesterol 104.9mg; sodium 973.7mg.

HAM AND POTATO CASSEROLE

Rebecca Total Cooking Time: 60 mins | Servings: 4 Creamy, cheesy, and insanely delicious – this ham and potato casserole is another casserole that you can easily make at any time!… General Recipes HAM AND POTATO CASSEROLE European Print This
Serves: 4 Prep Time: 60 mins
Nutrition facts: 578 calories 35.8 fat
Rating: 5.0/5
( 1 voted )

Ingredients

  • ¼ c. butter
  • 6 small potatoes, peeled and cubed
  • 2 c. cubed fully cooked ham
  • 3 tbsp butter
  • 1 small onion, finely chopped
  • 1 ½ c. milk
  • 1 (8 oz.) package of shredded Cheddar cheese
  • 3 tbsp all-purpose flour
  • ¼ c. bread crumbs
  • Salt and ground black pepper to taste

Instructions

Step 1: Into a large pot, place the potatoes. Cover the potatoes with salted water. Bring to a boil. Once boiling, adjust the heat to medium-low and simmer for about 20 minutes until the potatoes are tender. Drain when done.

Step 2: Prepare the oven. Preheat it to 350 degrees F or 175 degrees C. Ready an 11/2-quart baking dish. Grease and set aside.

Step 3: In a skillet, melt 2 tbsp butter over medium heat. Once the butter has melted, add the ham and onion to the skillet. Stir and cook for about 5 minutes until the onion has softened and translucent.

Step 4: Into the ham mixture, stir in the potatoes. Pour the mixture into the prepared baking dish.

Step 5: In a saucepan, melt 1/4 c. butter over medium heat. To the melted butter, stir in the flour until smooth.

Step 6: Into the flour mixture, slowly whisk in the milk. To taste, season with salt and black pepper. Cook further, stirring until the mixture has thickened. This takes another 2 minutes. Then, adjust the heat to medium-low and add the cheddar cheese. Stir well until blended.

Step 7: Over the ham and potatoes, pour the sauce and sprinkle with bread crumbs. Place in the preheated oven and bake for about 30 minutes or until the sauce is bubbly and the casserole is browned.

Step 8: Remove from the oven when done and serve the casserole immediately. Enjoy!

Notes

For this recipe, use cooked ham. Leftover ham or precooked is a great option. Keep any leftovers in the fridge for up to 4 days. Reheat in the microwave at 50% power for about 2 minutes, stirring once.

September 17, 2022 0 comment
0 FacebookTwitterPinterestEmail
General Recipes

REUBEN CRESCENT BAKE

by Rebecca September 17, 2022
written by Rebecca

Prep time: 10 mins | Cook time: 25 mins | Additional time: 5 mins | Total time: 40 mins | Servings: 4

This Reuben Crescent Bake tastes fantastic and is insanely easy to make. This Reuben Crescent Bake has been one of my favorites! I love to serve this with homemade soup for a simple dinner any time!

Ingredients

¾ lb thin-sliced cooked corned beef

⅓ c. thousand island salad dressing

8 slices of Swiss cheese

¾ c. sauerkraut – drained and squeezed dry

1 beaten egg white

1 (8 oz.) tube refrigerated crescent rolls (such as Pillsbury®)

HOW TO MAKE REUBEN CRESCENT BAKE

Step 1: Prepare the oven. Preheat it to 375 degrees. Ready an 8 x 8-inch baking dish. Grease and set aside.

Step 2: In a bowl, place the sauerkraut and thousand island salad dressing. Mix well until blended. After unrolling the crescent roll dough, cut it in half. Onto a floured surface, place one-half of the dough. To make 1 sheet, pinch the perforations of the dough closed.

Step 3: To about 12-inch square, roll the dough sheet and fit it into the prepared baking sheet. Pinch the perforations closed on 2nd half of the dough and roll it out to about 9-inch square. Set aside.

Step 4: Place the crust into the preheated oven and bake for about 8 to 10 minutes or until lightly browned.

Step 5: Take the crust out of the oven. Into the bottom of the crust, place 4 slices of cheese and top with the corned beef followed by the sauerkraut mixture. On top, place the rest of the 4 slices of Swiss cheese and top with the sauerkraut mixture.

Step 6: Onto the filled baking sheet, lay the second crescent roll dough sheet, pressing the top crust onto the edges to seal. Then, brush with the beaten egg white.

Step 7: Return to the oven and bake for about 15 to 20 minutes or until the cheese has melted and the crust is golden brown. Remove from the oven when done and allow the Reuben Crescent Bake to cool for about 5 minutes.

Step 8: Slice and serve. Enjoy!

Nutritional Facts:

Per Serving: 658 calories; protein 36.9g; carbohydrates 32.1g; fat 42.1g; cholesterol 114.6mg; sodium 2122.9mg.

REUBEN CRESCENT BAKE

Rebecca Prep time: 10 mins | Cook time: 25 mins | Additional time: 5 mins | Total time: 40 mins | Servings: 4 This Reuben Crescent Bake tastes fantastic and is… General Recipes REUBEN CRESCENT BAKE European Print This
Serves: 4 Prep Time: 10 mins Cooking Time: 30 mins 30 mins
Nutrition facts: 658 calories 42.1 fat
Rating: 5.0/5
( 1 voted )

Ingredients

  • ¾ lb thin-sliced cooked corned beef
  • ⅓ c. thousand island salad dressing
  • 8 slices of Swiss cheese
  • ¾ c. sauerkraut - drained and squeezed dry
  • 1 beaten egg white
  • 1 (8 oz.) tube refrigerated crescent rolls (such as Pillsbury®)

Instructions

Step 1: Prepare the oven. Preheat it to 375 degrees. Ready an 8 x 8-inch baking dish. Grease and set aside.

Step 2: In a bowl, place the sauerkraut and thousand island salad dressing. Mix well until blended. After unrolling the crescent roll dough, cut it in half. Onto a floured surface, place one-half of the dough. To make 1 sheet, pinch the perforations of the dough closed.

Step 3: To about 12-inch square, roll the dough sheet and fit it into the prepared baking sheet. Pinch the perforations closed on 2nd half of the dough and roll it out to about 9-inch square. Set aside.

Step 4: Place the crust into the preheated oven and bake for about 8 to 10 minutes or until lightly browned.

Step 5: Take the crust out of the oven. Into the bottom of the crust, place 4 slices of cheese and top with the corned beef followed by the sauerkraut mixture. On top, place the rest of the 4 slices of Swiss cheese and top with the sauerkraut mixture.

Step 6: Onto the filled baking sheet, lay the second crescent roll dough sheet, pressing the top crust onto the edges to seal. Then, brush with the beaten egg white.

Step 7: Return to the oven and bake for about 15 to 20 minutes or until the cheese has melted and the crust is golden brown. Remove from the oven when done and allow the Reuben Crescent Bake to cool for about 5 minutes.

Step 8: Slice and serve. Enjoy!

September 17, 2022 0 comment
0 FacebookTwitterPinterestEmail
General Recipes

Pistachio Pudding Cake

by Rebecca September 17, 2022
written by Rebecca

Prep Time: 10 mins | Cook Time: 45 mins | Total Time: 55 mins | Servings: 16

This Pistachio Pudding Cake is my newest favorite cake! Tender with a sweet and shiny white icing decorated with chopped pistachios. This one-bowl pistachio pudding cake is one of the best!

Ingredients

1 box yellow cake mix (15 oz. box)

Flour for dusting your bundt pan

4 large eggs

1 package instant pistachio pudding mix (3.4 oz. package)

1 c. milk

½ c. chopped pistachios

½ c. (1 stick) unsalted butter, melted and cooled (plus more for greasing your pan)

Icing:

2 tablespoons milk

2 c. confectioners’ sugar

¼ teaspoon finely chopped pistachios

2 teaspoons vanilla extract

How to make Pistachio Pudding Cake

Step 1: Prepare the oven. Preheat it to 350 degrees F. Ready a bundt pan. Grease and flour, then tap the excess flour off.

Step 2: Place the cake mix and pudding mix in a large bowl. Mix well until combined. Then, add the eggs, milk, and melted butter. Beat on medium until blended. Next, fold in the pistachios.

Step 3: Into the prepared pan, spoon the batter. Using a spatula, smooth the top. Place in the preheated oven and bake for about 40 to 45 minutes or until a toothpick inserted in the center of the cake comes out clean. Remove from the oven when done and allow the cake to cool for about 5 minutes in the pan, then invert onto a wire rack to cool fully.

Step 4: For the icing, mix the powdered sugar, milk, and vanilla in a large bowl until smooth, and you have a thick but spreadable consistency. If needed, add more milk, about 1 tbsp at a time.

Step 5: On top of the bundt cake, spoon the icing, allowing it to drip on the sides of the cake. Then, sprinkle the cake with pistachios.

Step 6: Slice and serve. Enjoy!

Notes:

14 WW Freestyle points for a slice of cake with icing

10 WW Freestyle points for a slice of cake without icing

Nutrition Facts:

Serving: 1slice | Calories: 309 kcal | Carbohydrates: 45g | Protein: 4g | Fat: 12g | Saturated Fat: 6g | Cholesterol: 63mg | Sodium: 355mg | Fiber: 1g | Sugar: 34g

Pistachio Pudding Cake

Rebecca Prep Time: 10 mins | Cook Time: 45 mins | Total Time: 55 mins | Servings: 16 This Pistachio Pudding Cake is my newest favorite cake! Tender with a sweet… General Recipes Pistachio Pudding Cake European Print This
Serves: 16 Prep Time: 10 mins Cooking Time: 45 mins 45 mins
Nutrition facts: 309 calories 12 fat
Rating: 5.0/5
( 1 voted )

Ingredients

  • 1 box yellow cake mix (15 oz. box)
  • Flour for dusting your bundt pan
  • 4 large eggs
  • 1 package instant pistachio pudding mix (3.4 oz. package)
  • 1 c. milk
  • ½ c. chopped pistachios
  • ½ c. (1 stick) unsalted butter, melted and cooled (plus more for greasing your pan)
  • Icing:
  • 2 tablespoons milk
  • 2 c. confectioners' sugar
  • ¼ teaspoon finely chopped pistachios
  • 2 teaspoons vanilla extract

Instructions

Step 1: Prepare the oven. Preheat it to 350 degrees F. Ready a bundt pan. Grease and flour, then tap the excess flour off.

Step 2: Place the cake mix and pudding mix in a large bowl. Mix well until combined. Then, add the eggs, milk, and melted butter. Beat on medium until blended. Next, fold in the pistachios.

Step 3: Into the prepared pan, spoon the batter. Using a spatula, smooth the top. Place in the preheated oven and bake for about 40 to 45 minutes or until a toothpick inserted in the center of the cake comes out clean. Remove from the oven when done and allow the cake to cool for about 5 minutes in the pan, then invert onto a wire rack to cool fully.

Step 4: For the icing, mix the powdered sugar, milk, and vanilla in a large bowl until smooth, and you have a thick but spreadable consistency. If needed, add more milk, about 1 tbsp at a time.

Step 5: On top of the bundt cake, spoon the icing, allowing it to drip on the sides of the cake. Then, sprinkle the cake with pistachios.

Step 6: Slice and serve. Enjoy!

Notes

14 WW Freestyle points for a slice of cake with icing 10 WW Freestyle points for a slice of cake without icing

September 17, 2022 0 comment
0 FacebookTwitterPinterestEmail
General Recipes

Tomato Pie: Our Southern Classic

by Rebecca September 17, 2022
written by Rebecca

Prep time: 10 mins | Cook time: 45 mins | Serves: 6

I am obsessed with this Southern Classic Tomato Pie! Flaky pie loaded with fresh, bright tomatoes in a creamy sauce. If you love pie, this recipe is a must! It is incredibly easy to whip up and ready in a breeze. It is a wonderful option if you are craving a savory pie. This recipe also is amazing to use all your extra tomatoes!

INGREDIENTS

4-5 Roma or beefsteak tomatoes, sliced

1/4 c. fresh basil leaves, chopped

1 9” pie crust, unbaked

2 cloves garlic, minced

1 c. sharp cheddar cheese, grated

1 c. mozzarella cheese, grated

3/4 c. mayonnaise

1/2 c. butter cracker crumbs (like Ritz, about 12 crackers)

1/2 tsp salt

1 tsp black pepper

How to make Southern Classic Tomato Pie

Step 1: Prepare the oven. Preheat it to 350 degrees F. Using parchment paper, line a pie shell. Then, fill with dried beans or pie weights. Place in the oven and bake for about 20 minutes until lightly golden.

Step 2: Take the parchment and beans or pie weights off. On a wire rack, set the crust and allow it to cool.

Step 3: To make the filling, arrange the tomatoes on a double layer of paper towels. Sprinkle the tomatoes with salt and let them rest for 10 minutes. Using paper towels, pat dry the tomatoes. In the pie shell, layer the tomatoes. Make sure to set aside some slices of tomato for later.

Step 4: Place the mayo, garlic, cheeses, and black pepper in a small bowl. Mix well until combined, then spread this over the tomatoes. On top, sprinkle the cracker crumbs and lay the reserved tomato slices over.

Step 5: Place in the preheated oven and bake for about 40 to 45 minutes or until the pie is bubbly and golden brown. Remove from the oven when done and allow the pie to rest for about 15 minutes.

Step 6: Slice the tomato pie and serve. Enjoy!

Tomato Pie: Our Southern Classic

Rebecca Prep time: 10 mins | Cook time: 45 mins | Serves: 6 I am obsessed with this Southern Classic Tomato Pie! Flaky pie loaded with fresh, bright tomatoes in a… General Recipes Tomato Pie: Our Southern Classic European Print This
Serves: 6 Prep Time: 10 mins Cooking Time: 45 mins 45 mins
Nutrition facts: 200 calories 20 grams fat
Rating: 5.0/5
( 1 voted )

Ingredients

  • 4-5 Roma or beefsteak tomatoes, sliced
  • 1/4 c. fresh basil leaves, chopped
  • 1 9” pie crust, unbaked
  • 2 cloves garlic, minced
  • 1 c. sharp cheddar cheese, grated
  • 1 c. mozzarella cheese, grated
  • 3/4 c. mayonnaise
  • 1/2 c. butter cracker crumbs (like Ritz, about 12 crackers)
  • 1/2 tsp salt
  • 1 tsp black pepper

Instructions

Step 1: Prepare the oven. Preheat it to 350 degrees F. Using parchment paper, line a pie shell. Then, fill with dried beans or pie weights. Place in the oven and bake for about 20 minutes until lightly golden.

Step 2: Take the parchment and beans or pie weights off. On a wire rack, set the crust and allow it to cool.

Step 3: To make the filling, arrange the tomatoes on a double layer of paper towels. Sprinkle the tomatoes with salt and let them rest for 10 minutes. Using paper towels, pat dry the tomatoes. In the pie shell, layer the tomatoes. Make sure to set aside some slices of tomato for later.

Step 4: Place the mayo, garlic, cheeses, and black pepper in a small bowl. Mix well until combined, then spread this over the tomatoes. On top, sprinkle the cracker crumbs and lay the reserved tomato slices over.

Step 5: Place in the preheated oven and bake for about 40 to 45 minutes or until the pie is bubbly and golden brown. Remove from the oven when done and allow the pie to rest for about 15 minutes.

Step 6: Slice the tomato pie and serve. Enjoy!

September 17, 2022 0 comment
0 FacebookTwitterPinterestEmail
General Recipes

Green Enchilada Chicken Soup

by Rebecca September 17, 2022
written by Rebecca

Prep time: 5 mins | Cook time: 20 mins | Serves: 6

If you are searching for a budget-friendly and the perfect weeknight dinner that your entire family will surely love, then you are in the right place. This green chicken enchilada soup combines two classic dishes. Enjoy your favorite chicken enchilada soup with a twist with this easy recipe.

This is a hearty, zesty, and mouthwatering soup that you’ll crave over and over again! To make this soup, all you need are simple ingredients. Throw this delightful, slurpy soup together any time in less than twenty minutes!

INGREDIENTS

2 pounds boneless, skinless chicken breasts

2 tbsp olive oil

2 cloves garlic, minced

3 c. chicken broth

1 (28 ounces) can of green enchilada sauce

1 c. heavy cream

1 small yellow onion, diced

1/2 tsp ground cumin

2 c. Monterey Jack cheese, grated

4 ounces cream cheese, softened

2-4 corn tortillas, halved and cut into strips

1/2 c. salsa verde

Kosher salt and freshly ground black pepper, to taste

Fresh cilantro, for serving

How to make Green Enchilada Chicken Soup

Step 1: Heat the olive oil in a large pot over medium heat. Once the oil is hot, add the onion to the pot and cook for about 3 to 4 minutes or until the onion is tender and translucent. Then, add the garlic and continue to cook for another minute.

Step 2: To the pot, add the chicken breasts and pour in the broth. Bring everything to a simmer and cook the chicken until easily shredded with a fork. Once done, take the chicken out of the pot and shred it.

Step 3: Place the shredded chicken back in the pot and add the enchilada sauce, cumin, heavy cream, cream cheese, salsa verde, and Monterey Jack. Cook further until the cheese has melted, stirring occasionally.

Step 4: To taste, season with salt and pepper. Then, add the tortilla chips. Stir to combine.

Step 5: Ladle the Green Enchilada Chicken Soup into serving bowls and serve. Enjoy!

Green Enchilada Chicken Soup

Rebecca Prep time: 5 mins | Cook time: 20 mins | Serves: 6 If you are searching for a budget-friendly and the perfect weeknight dinner that your entire family will surely… General Recipes Green Enchilada Chicken Soup European Print This
Serves: 6 Prep Time: 5 mins Cooking Time: 20 mins 20 mins
Nutrition facts: 200 calories 20 grams fat
Rating: 5.0/5
( 1 voted )

Ingredients

  • 2 pounds boneless, skinless chicken breasts
  • 2 tbsp olive oil
  • 2 cloves garlic, minced
  • 3 c. chicken broth
  • 1 (28 ounces) can of green enchilada sauce
  • 1 c. heavy cream
  • 1 small yellow onion, diced
  • 1/2 tsp ground cumin
  • 2 c. Monterey Jack cheese, grated
  • 4 ounces cream cheese, softened
  • 2-4 corn tortillas, halved and cut into strips
  • 1/2 c. salsa verde
  • Kosher salt and freshly ground black pepper, to taste
  • Fresh cilantro, for serving

Instructions

Step 1: Heat the olive oil in a large pot over medium heat. Once the oil is hot, add the onion to the pot and cook for about 3 to 4 minutes or until the onion is tender and translucent. Then, add the garlic and continue to cook for another minute.

Step 2: To the pot, add the chicken breasts and pour in the broth. Bring everything to a simmer and cook the chicken until easily shredded with a fork. Once done, take the chicken out of the pot and shred it.

Step 3: Place the shredded chicken back in the pot and add the enchilada sauce, cumin, heavy cream, cream cheese, salsa verde, and Monterey Jack. Cook further until the cheese has melted, stirring occasionally.

Step 4: To taste, season with salt and pepper. Then, add the tortilla chips. Stir to combine.

Step 5: Ladle the Green Enchilada Chicken Soup into serving bowls and serve. Enjoy!

September 17, 2022 0 comment
0 FacebookTwitterPinterestEmail
General Recipes

A Refreshing Mandarin Orange Chicken Salad Recipe

by Rebecca September 17, 2022
written by Rebecca

Prep time: 15 mins | Cook time: 4 hrs | Serves: 4-6

This Mandarin Orange Chicken Salad is very refreshing. It is super delicious, creamy, and easy to whip up! Chicken salad is a favorite at home. It’s our number one option whenever we crave salad. This Orange Chicken Salad put a fun, tasty, and refreshing taste to our usual chicken salad. It is loaded with fresh, sweet mandarin oranges along with bright green onions and slivered nuts, which added a great texture to this salad. I enjoy this Mandarin Orange Chicken salad on its own, but this is also wonderful as a sandwich filling.

To make this salad, all you need are just basic ingredients. To make life easier, use leftover chicken or rotisserie chicken. Dice or shred the chicken and toss them with the creamy mixture along with the celery, almonds, green onions, and mandarin oranges. Make sure to gently stir to avoid breaking the oranges. Serve this salad chilled. Bring this potlucks, and picnics, or serve this on any occasion. Beware, this salad is addictive!

INGREDIENTS

1 c. celery, thinly sliced

4 c. cooked chicken, shredded or diced

1 c. slivered almonds

1 (15 ounces) can of mandarin oranges, drained

1/2 c. green onion, thinly sliced

1 c. mayonnaise

8 ounces cream cheese, softened

2 tsp Worcestershire sauce

Kosher salt and freshly ground black pepper, to taste

1/2 tsp garlic powder

How to Make A Refreshing Mandarin Orange Chicken Salad

Step 1: Place the cream cheese, mayonnaise, Worcestershire sauce, garlic powder, and salt and pepper in a large mixing bowl. Mix well until smooth and creamy.

Step 2: To the bowl, add the chicken along with the celery, mandarin oranges, almonds, and green onion. Then, gently stir, making sure not to break the oranges.

Step 3: Cover the bowl and place it in the fridge to chill for about 4 to 6 hours.

Step 4: Once chilled, remove from the fridge and serve the salad. Enjoy!

A Refreshing Mandarin Orange Chicken Salad Recipe

Rebecca Prep time: 15 mins | Cook time: 4 hrs | Serves: 4-6 This Mandarin Orange Chicken Salad is very refreshing. It is super delicious, creamy, and easy to whip up!… General Recipes A Refreshing Mandarin Orange Chicken Salad Recipe European Print This
Serves: 4-6 Prep Time: 15 mins Cooking Time: 4 hrs 4 hrs
Nutrition facts: 200 calories 20 grams fat
Rating: 5.0/5
( 1 voted )

Ingredients

  • 1 c. celery, thinly sliced
  • 4 c. cooked chicken, shredded or diced
  • 1 c. slivered almonds
  • 1 (15 ounces) can of mandarin oranges, drained
  • 1/2 c. green onion, thinly sliced
  • 1 c. mayonnaise
  • 8 ounces cream cheese, softened
  • 2 tsp Worcestershire sauce
  • Kosher salt and freshly ground black pepper, to taste
  • 1/2 tsp garlic powder

Instructions

Step 1: Place the cream cheese, mayonnaise, Worcestershire sauce, garlic powder, and salt and pepper in a large mixing bowl. Mix well until smooth and creamy.

Step 2: To the bowl, add the chicken along with the celery, mandarin oranges, almonds, and green onion. Then, gently stir, making sure not to break the oranges.

Step 3: Cover the bowl and place it in the fridge to chill for about 4 to 6 hours.

Step 4: Once chilled, remove from the fridge and serve the salad. Enjoy!

September 17, 2022 0 comment
0 FacebookTwitterPinterestEmail
General Recipes

Easy Pepperoni Cheese Stuffed Pizza Bites

by Rebecca September 17, 2022
written by Rebecca

Prep Time: 5 mins | Cook Time: 12 mins | Total Time: 17 mins | Yield: 24

Delicious and easy to make. These cheese-stuffed pizza bites are the perfect homemade pizza excellent for pizza night. Made with homemade or canned pizza dough topped with mozzarella sticks, and pepperoni, then lightly coated with olive oil. On top, sprinkle with garlic, herbs, and Parmesan. Then, these pizza bites are baked to golden and cheesy perfection. You are welcome to double the double if desired.

Ingredients

2 tbsp Olive Oil

1 Roll Refrigerated Pizza Crust Dough or Homemade Pizza Dough

8 Mozzarella String Cheeses, cut into thirds or smaller pieces

24 Pepperoni Slices

1 tsp Italian Seasoning

2 tbsp Shredded Parmesan Cheese

Pizza or Marinara Sauce for Dipping

1/2 tsp Garlic Powder

How to make Easy Pepperoni Cheese Stuffed Pizza Bites

Step 1: Prepare the oven. Preheat it to 400 degrees. Using a non-stick spray, grease a round glass baking dish or cake pan.

Step 2: After unwrapping the mozzarella string cheese, cut each into thirds using a pizza cutter. If desired, cut each third into smaller pieces.

Step 3: On a pan or large cutting board, spread out the canned or homemade pizza dough. Into 24 even pieces, slice the crust using a pizza cutter. It is easier to make three cuts a long way. Cut the three cuts in half horizontally, then each half three ways. This way you’ll get even pieces.

Step 4: On each piece, place the pepperoni and top each with the string mozzarella. Into a tight ball, roll each piece, then pinch the seams together on the bottom. Into the prepared baking dish, place the bites-by-side, bottom side down.

Step 5: Combine the seasonings and shredded Parmesan, then mix with the olive oil. Using a pastry brush, evenly brush the tops of the cheese-stuffed pizza bites with the mixture.

Step 6: Bake the pizza bites in the preheated oven for about 10 to 12 minutes or until light golden brown.

Step 7: Remove from the oven when done and serve the Pepperoni Cheese Stuffed Pizza Bites immediately with the pizza sauce. Enjoy!

Notes:

You can keep any leftovers in an airtight container and store them in the fridge for up to 4 days.

Reheat in the microwave for 30 seconds at a time until the bites are warm and the cheese has melted.

Easy Pepperoni Cheese Stuffed Pizza Bites

Rebecca Prep Time: 5 mins | Cook Time: 12 mins | Total Time: 17 mins | Yield: 24 Delicious and easy to make. These cheese-stuffed pizza bites are the perfect homemade… General Recipes Easy Pepperoni Cheese Stuffed Pizza Bites European Print This
Serves: 24 Prep Time: 5 mins Cooking Time: 12 mins 12 mins
Nutrition facts: 200 calories 20 grams fat
Rating: 5.0/5
( 1 voted )

Ingredients

  • 2 tbsp Olive Oil
  • 1 Roll Refrigerated Pizza Crust Dough or Homemade Pizza Dough
  • 8 Mozzarella String Cheeses, cut into thirds or smaller pieces
  • 24 Pepperoni Slices
  • 1 tsp Italian Seasoning
  • 2 tbsp Shredded Parmesan Cheese
  • Pizza or Marinara Sauce for Dipping
  • 1/2 tsp Garlic Powder

Instructions

Step 1: Prepare the oven. Preheat it to 400 degrees. Using a non-stick spray, grease a round glass baking dish or cake pan.

Step 2: After unwrapping the mozzarella string cheese, cut each into thirds using a pizza cutter. If desired, cut each third into smaller pieces.

Step 3: On a pan or large cutting board, spread out the canned or homemade pizza dough. Into 24 even pieces, slice the crust using a pizza cutter. It is easier to make three cuts a long way. Cut the three cuts in half horizontally, then each half three ways. This way you’ll get even pieces.

Step 4: On each piece, place the pepperoni and top each with the string mozzarella. Into a tight ball, roll each piece, then pinch the seams together on the bottom. Into the prepared baking dish, place the bites-by-side, bottom side down.

Step 5: Combine the seasonings and shredded Parmesan, then mix with the olive oil. Using a pastry brush, evenly brush the tops of the cheese-stuffed pizza bites with the mixture.

Step 6: Bake the pizza bites in the preheated oven for about 10 to 12 minutes or until light golden brown.

Step 7: Remove from the oven when done and serve the Pepperoni Cheese Stuffed Pizza Bites immediately with the pizza sauce. Enjoy!

Notes

You can keep any leftovers in an airtight container and store them in the fridge for up to 4 days. Reheat in the microwave for 30 seconds at a time until the bites are warm and the cheese has melted.

September 17, 2022 0 comment
0 FacebookTwitterPinterestEmail
General Recipes

Crunchy Taco Cups

by Rebecca September 17, 2022
written by Rebecca

Prep Time: 20 mins | Cook Time: 12 mins | Total Time: 32 mins | Yield: 12 taco cups

These little taco cups are awesome! They are made in a muffin tin using just a few simple ingredients. These Crunchy Taco Cups are always a huge hit! They have double layers of crunchy taco shells topped with seasoned beef, spicy tomatoes, and melted cheese. All this goodness in one perfect bite!

My husband loves soft tacos. I prefer crunchy tacos. Whenever we have taco nights, we make sure to have both on the table. But with this recipe, we get the best of both worlds! Crisp and crunchy tacos and the inside is soft and melty! No wonder why my family is obsessed with these tasty Crunchy Taco Cups!

For this recipe, I used a can of diced tomatoes and green chilies. If desired, you can swap the tomatoes with regular, petite diced tomatoes and skip the heat. We love our Crunchy Taco Cups with a little kick so we stick to this recipe. When done baking, you’ll have cheesy, gooey, melty, crunchy, and delicious taco cups!

Ingredients

24 wonton wrappers

1 pound lean ground beef, browned and drained

1 envelope (3 tbsp) taco seasoning

1 1/2 c. sharp cheddar cheese, shredded (or Mexican blend)

1 (10 ounces) can Ro-Tel Diced Tomatoes and Green Chiles drained

How to make Crunchy Taco Cups

Step 1: Prepare the oven. Preheat it to 375 degrees F. Using nonstick cooking spray, generously grease a standard-size muffin tin.

Step 2: In a bowl, place the cooked beef, taco seasoning, and tomatoes. Mix well until combined.

Step 3: With a wonton wrapper, line each cup of the prepared muffin tin. In each cup, add 1 1/2 tbsp of the taco mixture and top with 1 tbsp each of cheese. On top, press another layer of wonton wrapper, then taco mixture and cheese.

Step 4: Place in the preheated oven and bake the taco cups for about 11 to 13 minutes or until completely heated and the edges of the cups are golden.

Nutrition Facts:

Serving Size: 3 taco cups, Serves: 4
Amount Per Serving: Calories 463, Total Fat 18.4g 24%, Cholesterol 114.1mg 38%, Sodium 789.6mg 34%, Total Carbohydrate 32.8g 12%, Sugars 2.4g, Protein 39.8g 80%, Vitamin A19%, Vitamin C11%

Crunchy Taco Cups

Rebecca Prep Time: 20 mins | Cook Time: 12 mins | Total Time: 32 mins | Yield: 12 taco cups These little taco cups are awesome! They are made in a… General Recipes Crunchy Taco Cups European Print This
Serves: 12 Prep Time: 20 mins Cooking Time: 12 mins 12 mins
Nutrition facts: 463 calories 18.4 fat
Rating: 5.0/5
( 1 voted )

Ingredients

  • 24 wonton wrappers
  • 1 pound lean ground beef, browned and drained
  • 1 envelope (3 tbsp) taco seasoning
  • 1 1/2 c. sharp cheddar cheese, shredded (or Mexican blend)
  • 1 (10 ounces) can Ro-Tel Diced Tomatoes and Green Chiles drained

Instructions

Step 1: Prepare the oven. Preheat it to 375 degrees F. Using nonstick cooking spray, generously grease a standard-size muffin tin.

Step 2: In a bowl, place the cooked beef, taco seasoning, and tomatoes. Mix well until combined.

Step 3: With a wonton wrapper, line each cup of the prepared muffin tin. In each cup, add 1 1/2 tbsp of the taco mixture and top with 1 tbsp each of cheese. On top, press another layer of wonton wrapper, then taco mixture and cheese.

Step 4: Place in the preheated oven and bake the taco cups for about 11 to 13 minutes or until completely heated and the edges of the cups are golden.

September 17, 2022 0 comment
0 FacebookTwitterPinterestEmail
General Recipes

This Chicken Crunch Casserole Recipe Is Perfect For A Crowd

by Rebecca September 17, 2022
written by Rebecca

Prep time: 5 mins | Cook time: 30 mins | Serves: 6

I have another casserole recipe I want to share with everyone. This crunchy chicken casserole has been one of my favorite casseroles for years! I started making this casserole way before I am married. To make this casserole all you need are a few basic ingredients. In under thirty minutes, you’ll have this delicious crunchy chicken casserole on your table. if you are looking to feed a crowd, this casserole is a great option. This casserole is also perfect for potlucks!

This casserole is loaded with goodness! Creamy noodles topped with crispy fried onions, then baked to perfection! I am sure that everyone will fall head over heels with this crunchy, creamy, very comforting casserole! This casserole is o doubt a must and for keeps!

INGREDIENTS

1 (10.5 ounces) can cream of chicken soup

2 c. chicken, cooked and shredded

1 c, sour cream

1 c. cheddar cheese, grated and divided

1 tsp garlic powder

1 1/2 c. French fried onions

8 ounces egg noodles

How to make Chicken Crunch Casserole

Step 1: Prepare the oven. Preheat it to 350 degrees F. Using cooking spray, grease a 10-inch square baking dish.

Step 2: Following the package directions, cook the noodles. When done, drain the noodles and transfer them into a large bowl.

Step 3: To the bowl with the noodles, add the chicken, sour cream, soup, garlic powder, and cheese. Toss well.

Step 4: Into the prepared baking dish, transfer the mixture. Place in the preheated oven and bake for about 25 minutes or until the casserole is golden brown and bubbly. Remove from the oven and top the casserole with the fried onions. Return to the oven and continue baking the casserole for another 5 to 10 minutes.

Step 5: Once the casserole is done, take it out of the oven and allow it to cool for about 5 minutes.

Step 6: Serve and enjoy!

This Chicken Crunch Casserole Recipe Is Perfect For A Crowd

Rebecca Prep time: 5 mins | Cook time: 30 mins | Serves: 6 I have another casserole recipe I want to share with everyone. This crunchy chicken casserole has been one… General Recipes This Chicken Crunch Casserole Recipe Is Perfect For A Crowd European Print This
Serves: 6 Prep Time: 5 mins Cooking Time: 30 mins 30 mins
Nutrition facts: 200 calories 20 grams fat
Rating: 5.0/5
( 2 voted )

Ingredients

  • 1 (10.5 ounces) can cream of chicken soup
  • 2 c. chicken, cooked and shredded
  • 1 c, sour cream
  • 1 c. cheddar cheese, grated and divided
  • 1 tsp garlic powder
  • 1 1/2 c. French fried onions
  • 8 ounces egg noodles

Instructions

Step 1: Prepare the oven. Preheat it to 350 degrees F. Using cooking spray, grease a 10-inch square baking dish.

Step 2: Following the package directions, cook the noodles. When done, drain the noodles and transfer them into a large bowl.

Step 3: To the bowl with the noodles, add the chicken, sour cream, soup, garlic powder, and cheese. Toss well.

Step 4: Into the prepared baking dish, transfer the mixture. Place in the preheated oven and bake for about 25 minutes or until the casserole is golden brown and bubbly. Remove from the oven and top the casserole with the fried onions. Return to the oven and continue baking the casserole for another 5 to 10 minutes.

Step 5: Once the casserole is done, take it out of the oven and allow it to cool for about 5 minutes.

Step 6: Serve and enjoy!

September 17, 2022 0 comment
0 FacebookTwitterPinterestEmail
Newer Posts
Older Posts

Popular Posts

  • 1

    Crispy Crunchy Parmesan Potatoes

    March 21, 2020
  • 2

    CROCK POT SMOTHERED PORK CHOPS

    March 21, 2020
  • Facebook
  • Twitter

@2019 - All Right Reserved.


Back To Top