Cook it once
  • Home
  • Privacy Policy
  • Recipes
    • KETO
    • LC
    • WW
  • Tips
  • Contact
Cook it once
  • Home
  • Privacy Policy
  • Recipes
    • KETO
    • LC
    • WW
  • Tips
  • Contact
Category:

Main Dish Recipes

Main Dish Recipes

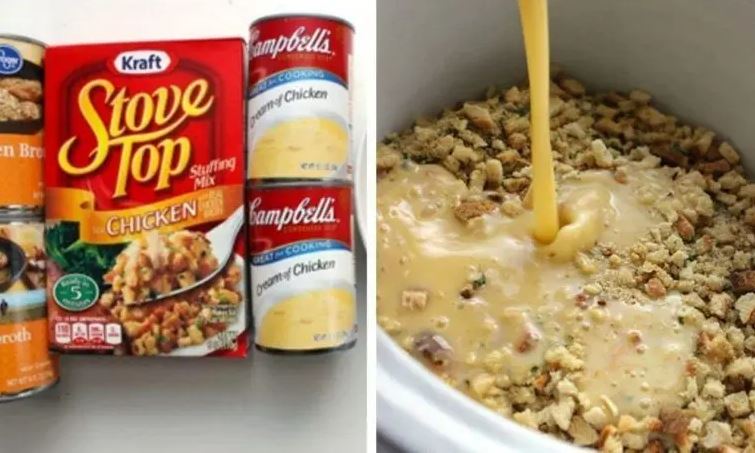
DUMP 4 INGREDIENTS INTO A SLOW COOKER. END RESULT IS A HEARTY, TASTY CHICKEN AND STUFFING

by Rebecca September 21, 2020
written by Rebecca

This too good to be true side dish calls for only five, yes, five ingredients to make – chicken breasts, chicken broth, cream of chicken soup, stuffing mix, and water. Simple ingredients cooked slowly in a slow cooker to give you the best chicken and stuffing. A no fussy side dish that is hearty, mouthwatering, and does not require you to spend eternity in the kitchen. This has been one of my go-to, especially during busy days. I just put everything in the slow cooker and set to cook for several hours. Then, come dinner, I just transfer this on a serving plate. Easy, peasy! With this recipe, you are guaranteed to have the tastiest, moist chicken breasts with the best stuffing you’ll ever savor. And chicken as we all know is a great source of protein, so that is a plus point. If you have kids like me who are obsessed with anything chicken, then this recipe is worth everything. And this slow-cooked chicken and stuffing will save you always. I am a working mom, busy almost every day, therefore, most of the time I resort to slow cooker recipes and they never fail me, not once. I can tell you that this slow cooker chicken and stuffing is a keeper and a must-have.

INGREDIENTS

4 skinless, boneless chicken breasts

1 cup chicken broth

1 can of cream of chicken soup

1 box of stuffing mix

1/2 cup of water

HOW TO MAKE SLOW COOKER CHICKEN AND STUFFING

Step 1: Place the chicken into the slow cooker and pour in the broth.

Step 2: In a bowl, add the soup, stuffing, and water. Mix well.

Step 3: Then, add in the stuffing into the slow cooker.

Step 4: On a low setting, cook the chicken and the ingredients for about 7 hours.
DUMP 4 INGREDIENTS INTO A SLOW COOKER. END RESULT IS A HEARTY, TASTY CHICKEN AND STUFFING

Rebecca This too good to be true side dish calls for only five, yes, five ingredients to make – chicken breasts, chicken broth, cream of chicken soup, stuffing mix, and water.… Main Dish Recipes DUMP 4 INGREDIENTS INTO A SLOW COOKER. END RESULT IS A HEARTY, TASTY CHICKEN AND STUFFING European Print This
Nutrition facts: 200 calories 20 grams fat
Rating: 5.0/5
( 1 voted )

Ingredients

  • 4 skinless, boneless chicken breasts
  • 1 cup chicken broth
  • 1 can of cream of chicken soup
  • 1 box of stuffing mix
  • 1/2 cup of water

Instructions

Step 1: Place the chicken into the slow cooker and pour in the broth.

Step 2: In a bowl, add the soup, stuffing, and water. Mix well.

Step 3: Then, add in the stuffing into the slow cooker.

Step 4: On a low setting, cook the chicken and the ingredients for about 7 hours.
September 21, 2020 0 comment
0 FacebookTwitterPinterestEmail
Main Dish Recipes

PERFECT PRIME RIB

by Rebecca September 19, 2020
written by Rebecca

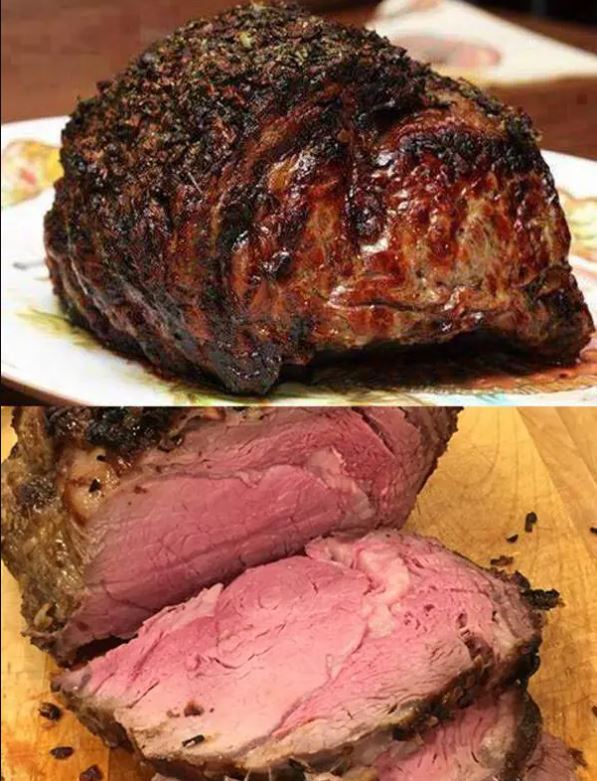
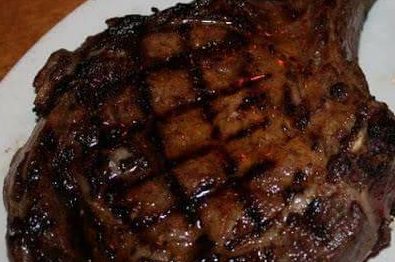
It is amazing how steak restaurants prepare a perfect prime or roast beef. In my opinion, it is an art itself. Maybe not that complicated but if you don’t know how to do it right, you’ll be left with either uncooked or overcooked beef. Many times I failed in this department until I stumbled upon this recipe. The step by step instruction on how to prepare the perfect prime rib is very straightforward yet it’ll give you the result you always wanted. Either you want your rib rare, medium, or well done. The secret is to leave the prime rib or roast beef in the oven undisturbed for 2 hours before slicing. This is gonna perfect for Christmas, the holiday season, or if you want prime rib for Thanksgiving in addition to your turkey. A well-cooked prime rib is guaranteed to give you the juiciest, flavorful, and mouthwatering rib you’ll ever make in your entire life! Making the perfect prime rib is surprisingly easy. Just follow these simple steps and your prime rib will be perfect every time.

INGREDIENTS

1 prime rib roast with or without bone (any size)

Garlic powder

Salt

Pepper

HOW TO MAKE PERFECT PRIME RIB

Step 1: Prepare the oven. Preheat it to 550 degrees F.

Step 2: To make a rub for the meat, combine the salt, pepper, and garlic powder. Rub the meat to coat and transfer them fat side up in a shallow roasting pan.

Step 3: Place inside the preheated oven and roast for about 5 minutes per pound for rare, 6 minutes for medium, and for well done, 7 minutes per pound.

Step 4: Then, turn the oven off to end the cooking time but don’t open the oven door just yet.

Step 5: After 2 hours take the meat out of the oven and slice.

NOTE:

This works perfectly for Roast beef as well.

PERFECT PRIME RIB

Rebecca It is amazing how steak restaurants prepare a perfect prime or roast beef. In my opinion, it is an art itself. Maybe not that complicated but if you don’t know… Main Dish Recipes PERFECT PRIME RIB European Print This
Nutrition facts: 200 calories 20 grams fat
Rating: 5.0/5
( 1 voted )

Ingredients

  • 1 prime rib roast with or without bone (any size)
  • Garlic powder
  • Salt
  • Pepper

Instructions

Step 1: Prepare the oven. Preheat it to 550 degrees F.

Step 2: To make a rub for the meat, combine the salt, pepper, and garlic powder. Rub the meat to coat and transfer them fat side up in a shallow roasting pan.

Step 3: Place inside the preheated oven and roast for about 5 minutes per pound for rare, 6 minutes for medium, and for well done, 7 minutes per pound.

Step 4: Then, turn the oven off to end the cooking time but don't open the oven door just yet.

Step 5: After 2 hours take the meat out of the oven and slice.

NOTE:

This works perfectly for Roast beef as well.

September 19, 2020 0 comment
0 FacebookTwitterPinterestEmail
Main Dish Recipes

CAJUN SHRIMP IN FOIL

by Rebecca September 19, 2020
written by Rebecca

Yield: 4 | Serving Size: 1 packet

I always love Cajun Shrimp. It is simply delicious – packed with shrimps, sausage, and summer vegetables in mouthwatering cajun spices. You will never go wrong with this dish and it is perfect whenever. My go-to for a quick and easy meal, potlucks, or when I have friends coming over.

INGREDIENTS

1 tablespoon Cajun or Creole seasoning

24 (1 pound) cleaned large shrimp

1 1/2 cups corn kernels

1/4 cup chopped fresh Italian parsley leaves

1/4 cup chopped fresh basil leaves

1/4 cup dry white wine, such as Pinot Grigio

3 ounces fully cooked Turkey/Chicken Andouille sausage (Applegate), very thinly sliced

1 medium zucchini (8 ounces each), sliced into 1/4-inch thick rounds

1 large red bell pepper, seeded and cut into thin strips

2 tbsp olive oil

HOW TO MAKE CAJUN SHRIMP IN FOIL

Step 1: Combine the Cajun seasoning, salt, and pepper in a medium bowl. Then, add in the shrimps and toss to coat.

Step 2: On a flat surface, put 4 large 10 x 18-inch heavy-duty aluminum foil.

Step 3: Among the foil, arrange the sausage, zucchini, bell peppers, and corn. Arrange the vegetables in the center of each. Top them with about 6 pieces of shrimps and sprinkle each piece with a tablespoon fo parsley and basil.

Step 4: Then, drizzle over a tablespoon of wine vinegar and about a half tablespoon of oil.

Step 5: To form a packet, fold the foils and tightly seal. making sure though to leave a small room inside so the air can circulate. You can refrigerate or freeze the packets until ready to bake.

Step 6: When ready to cook, prepare the oven. Preheat it to 425 degrees F.

Step 7: On a baking sheet, arrange the packets, Place inside the preheated oven and bake for about 13 minutes or until the shrimp is thoroughly cooked and the veggies are crisp-tender.

Step 8: Remove from the oven and slowly open the packets. Be careful with the hot steam.

Step 9: Place the shrimp, vegetables, and the accumulated sauce to separate bowls or rimmed plates.

NOTE: To freeze and heat:

Grab a gallon-sized bag and put the uncooked packets inside, making sure to keep them level and upright. Store in the freezer for up to 2 months. When ready to cook, there is no need to thaw.

To heat, take the frozen packets out of the bag, and transfer them on a baking tray. Then, bake at 425 degrees.

The oven is not preheated so once it comes to temperature, continue cooking for 35 to 40 minutes.

NUTRITION INFORMATION

Amount Per Serving:

Calories: 310 calories – Total Fat: 12g – Cholesterol: 188.5mg – Sodium: 1318mg – Carbohydrates: 21g – Fiber: 3.5g – Sugar: 3g – Protein: 29g

CAJUN SHRIMP IN FOIL

Rebecca Yield: 4 | Serving Size: 1 packet I always love Cajun Shrimp. It is simply delicious – packed with shrimps, sausage, and summer vegetables in mouthwatering cajun spices. You will… Main Dish Recipes CAJUN SHRIMP IN FOIL European Print This
Serves: 1
Nutrition facts: 310 calories 12 fat
Rating: 5.0/5
( 1 voted )

Ingredients

  • 1 tablespoon Cajun or Creole seasoning
  • 24 (1 pound) cleaned large shrimp
  • 1 1/2 cups corn kernels
  • 1/4 cup chopped fresh Italian parsley leaves
  • 1/4 cup chopped fresh basil leaves
  • 1/4 cup dry white wine, such as Pinot Grigio
  • 3 ounces fully cooked Turkey/Chicken Andouille sausage (Applegate), very thinly sliced
  • 1 medium zucchini (8 ounces each), sliced into 1/4-inch thick rounds
  • 1 large red bell pepper, seeded and cut into thin strips
  • 2 tbsp olive oil

Instructions

Step 1: Combine the Cajun seasoning, salt, and pepper in a medium bowl. Then, add in the shrimps and toss to coat.

Step 2: On a flat surface, put 4 large 10 x 18-inch heavy-duty aluminum foil.

Step 3: Among the foil, arrange the sausage, zucchini, bell peppers, and corn. Arrange the vegetables in the center of each. Top them with about 6 pieces of shrimps and sprinkle each piece with a tablespoon fo parsley and basil.

Step 4: Then, drizzle over a tablespoon of wine vinegar and about a half tablespoon of oil.

Step 5: To form a packet, fold the foils and tightly seal. making sure though to leave a small room inside so the air can circulate. You can refrigerate or freeze the packets until ready to bake.

Step 6: When ready to cook, prepare the oven. Preheat it to 425 degrees F.

Step 7: On a baking sheet, arrange the packets, Place inside the preheated oven and bake for about 13 minutes or until the shrimp is thoroughly cooked and the veggies are crisp-tender.

Step 8: Remove from the oven and slowly open the packets. Be careful with the hot steam.

Step 9: Place the shrimp, vegetables, and the accumulated sauce to separate bowls or rimmed plates.

NOTE: To freeze and heat:

Grab a gallon-sized bag and put the uncooked packets inside, making sure to keep them level and upright. Store in the freezer for up to 2 months. When ready to cook, there is no need to thaw.

To heat, take the frozen packets out of the bag, and transfer them on a baking tray. Then, bake at 425 degrees.

The oven is not preheated so once it comes to temperature, continue cooking for 35 to 40 minutes.

September 19, 2020 0 comment
0 FacebookTwitterPinterestEmail
Main Dish Recipes

CAKE MIX WAFFLES

by Rebecca September 19, 2020
written by Rebecca

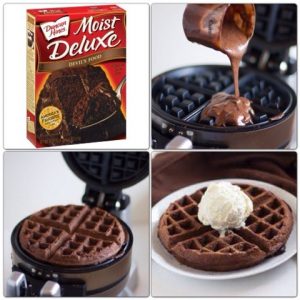
Simplicity at its finest. This decadent waffle doesn’t require you to turn the oven on. All you need is a cake mix box in any flavor you preferred and a waffle maker. For the toppings, you can add anything you want from fresh fruit, ice cream, nuts, cherries, sprinkles, fudge, caramel, or strawberry drizzle. My favorite though is peanut butter – nothing beats chocolate waffle with peanut butter and more nuts!

This has been my go-to whenever I need something easy and quick. Plus, you only need a boxed cake mix, so why not? My kid’s favorite breakfast aside from pancakes. This on-the-go waffle saved my life many times especially if I have no time to prepare breakfast during busy days. I just follow the direction written on the package of a boxed cake mix, prepare my waffle maker, and pour the batter in. Ready the toppings and in a heartbeat the waffles are ready! Breakfast couldn’t get easier and quicker without this cake mix waffles. Or dessert for that matter. And most importantly these waffles out of a cake box are simply delicious! Surprisingly, they taste like cake! If you don’t have time to get fancy, I assure you this will save you. I surprised my husband with this cake mix waffle, topped it with cherry, and drizzled over caramel sauce on the morning of our Anniversary and he was so happy. I never would have thought that this simple cake mix waffle can be fancy.

INGREDIENTS

Any boxed cake mix you’d like – (Red Velvet, Devil’s Food, Strawberry, Chocolate, etc.)

HOW TO MAKE CAKE MIX WAFFLES

Step 1: To make the mix, simply follow the cake box direction.

Step 2: Prepare your waffle maker to make your waffles. You don’t need to turn the oven on for this!

Step 3: Serve your waffles with your desired toppings – fresh fruit, ice cream, nuts, cherries, sprinkles, fudge, caramel, or strawberry drizzle.

Step 4: Serve and enjoy!

CAKE MIX WAFFLES

Rebecca Simplicity at its finest. This decadent waffle doesn’t require you to turn the oven on. All you need is a cake mix box in any flavor you preferred and a… Main Dish Recipes CAKE MIX WAFFLES European Print This
Nutrition facts: 200 calories 20 grams fat
Rating: 5.0/5
( 1 voted )

Ingredients

  • Any boxed cake mix you’d like - (Red Velvet, Devil’s Food, Strawberry, Chocolate, etc.)

Instructions

Step 1: To make the mix, simply follow the cake box direction.

Step 2: Prepare your waffle maker to make your waffles. You don't need to turn the oven on for this!

Step 3: Serve your waffles with your desired toppings - fresh fruit, ice cream, nuts, cherries, sprinkles, fudge, caramel, or strawberry drizzle.

Step 4: Serve and enjoy!

September 19, 2020 0 comment
0 FacebookTwitterPinterestEmail
Main Dish Recipes

HOW TO MAKE OREO DELIGHT

by Rebecca September 19, 2020
written by Rebecca

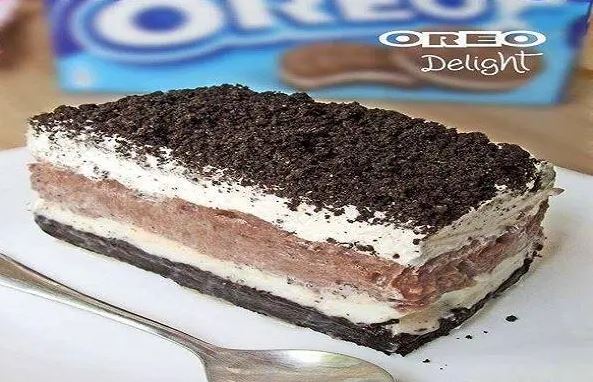
My daughter’s most requested – Oreo Delight. This no-bake dessert is everything you need today. Pretty simple, not fussy pick me up a dessert that you can make whenever. If you love Oreo, then, this is for you. I remembered when my daughter turned eight this year she specifically requested this Oreo Delight. She loves Oreo more than anything! She twists the Oreo, licks the filling, and dunk it in milk but now she found a new way to enjoy her favorite. This simple, delightful Oreo cake is perfect in every way and heaven in every bite. This cake is so addictingly good, you can eat the whole thing without realizing it! I am a fan of no-bakes and this is one of the best no-bakes recipes I love. This is for all the chocoholic and Oreoholic out there!

INGREDIENTS

1 pkg of regular Oreos

8 oz cream cheese softened

1 large pkg chocolate instant pudding

6 tablespoons melted butter

16 oz cool whip

1 cup powdered sugar

2 ¾ cups milk

Crush cookies – save about 1 cup to sprinkle on top

HOW TO MAKE OREO DELIGHT

Step 1: Add the rest of the crumbs along with butter in a small bowl. Mix well.

Step 2: Into the bottom of a 9 x 13-inch cake pan, press the crumbs-butter mixture to form crust.

Step 3: To make the chocolate pudding, just follow the package direction. Store the pudding in the fridge to set.

Step 4: In a large bowl, add half of the cool whip, softened cream cheese, and powdered sugar. Mix with an electric mixer.

Step 5: Evenly spread the cream cheese mixture over the Oreo crust.

Step 6: Take the pudding out of the fridge and spread it over the cream cheese layer.

Step 7: Top it all up with the rest of the cream cheese mixture.

Step 8: Place in the fridge to set.

Step 9: When ready to serve. Remove from the fridge. Enjoy!

HOW TO MAKE OREO DELIGHT

Rebecca My daughter’s most requested – Oreo Delight. This no-bake dessert is everything you need today. Pretty simple, not fussy pick me up a dessert that you can make whenever. If… Main Dish Recipes HOW TO MAKE OREO DELIGHT European Print This
Nutrition facts: 200 calories 20 grams fat
Rating: 5.0/5
( 1 voted )

Ingredients

  • 1 pkg of regular Oreos
  • 8 oz cream cheese softened
  • 1 large pkg chocolate instant pudding
  • 6 tablespoons melted butter
  • 16 oz cool whip
  • 1 cup powdered sugar
  • 2 ¾ cups milk
  • Crush cookies - save about 1 cup to sprinkle on top

Instructions

Step 1: Add the rest of the crumbs along with butter in a small bowl. Mix well.

Step 2: Into the bottom of a 9 x 13-inch cake pan, press the crumbs-butter mixture to form crust.

Step 3: To make the chocolate pudding, just follow the package direction. Store the pudding in the fridge to set.

Step 4: In a large bowl, add half of the cool whip, softened cream cheese, and powdered sugar. Mix with an electric mixer.

Step 5: Evenly spread the cream cheese mixture over the Oreo crust.

Step 6: Take the pudding out of the fridge and spread it over the cream cheese layer.

Step 7: Top it all up with the rest of the cream cheese mixture.

Step 8: Place in the fridge to set.

Step 9: When ready to serve. Remove from the fridge. Enjoy!

September 19, 2020 0 comment
0 FacebookTwitterPinterestEmail
Main Dish Recipes

BANANA PUDDING CAKE

by Rebecca September 19, 2020
written by Rebecca

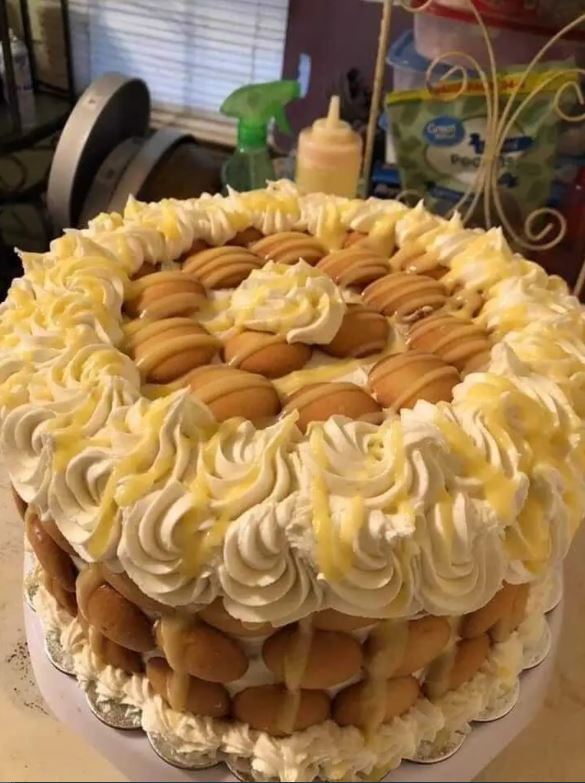
This decadent and heavenly cake is the moistest banana cake recipe you’ll ever make with creamy pudding, fresh bananas, whipped cream, and vanilla wafers. A gorgeous cake for any occasion that captivates the texture and flavor of classic banana pudding.

INGREDIENTS

Cake:

2 sticks butter, softened

1 3/4 cups sugar

3 eggs + 2 egg whites

3 tsp vanilla

3 cups all-purpose flour

3 1/2 tsp baking powder

One 1.34oz box instant, sugar-free banana pudding mix

1 cup milk

Filling:

Add these to a mixing bowl and whisk until incorporated. Place in the fridge for at least 10 minutes while you assemble the cake.

One 1.34oz box instant, sugar-free vanilla pudding mix

1 1/4 cups skim milk

1 cup Cool Whip (or whipped cream)

To brush on layers:

Just mix these two:

1 Tbsp sweetened condensed milk

1 Tbsp skim milk

You will also need:

2-3 medium ripe bananas

3-4 cups Cool Whip for frosting

HOW TO MAKE BANANA PUDDING CAKE

To make the Cake:

Step 1: Prepare the oven. Preheat it to 350 degrees F.

Step 2: Using a parchment paper, line the bottom of three 8-inch round pans.

Step 3: In a mixing bowl, add the butter with sugar and cream until light and fluffy. Gradually add in the eggs and egg whites, a piece at a time, beating every after each addition. Then, stir in the vanilla until incorporated.

Step 4: Combine the flour, baking powder, and pudding mix in another bowl. In three separate additions, add this into the wet ingredients. Don’t over mix, stir just until just combined.

Step 5: Pour in the milk and stir until combined.

Step 6: Distribute the batter into the pans. Place inside the preheated oven and bake for about 22 to 25 minutes or until the cake is golden and starts to separate from the sides of the pan.

Step 7: Remove from the oven and let the cakes cool for at least 15 minutes. Then, loosen each cake to remove from the pan. Transfer them on the wire racks and let the cakes cool for another 1 to 2 hours.

To layer:

Step 8: Put the first layer on a cake plate, then, brush with a small amount of milk mixture.

Step 9: Layer the slices of banana on top of the cake before spreading over 1/3 to 1/2 of the filling mix.

Step 10: Then, add the next cake layer on top of the filling. Do the same as the first layer – milk mix, filling, and the final layer.

To Frost:

Step 11: Decorate the cake with the Cool Whip frosting. You can even crush some mini Nilla wafers and spread it over the cake like what I did. And using the rest of the Nilla wafers, decorate the sides of the cake or put them in between the layers.

NOTE:

Remember to store this cake in the fridge because this has many perishable ingredients.

BANANA PUDDING CAKE

Rebecca This decadent and heavenly cake is the moistest banana cake recipe you’ll ever make with creamy pudding, fresh bananas, whipped cream, and vanilla wafers. A gorgeous cake for any occasion… Main Dish Recipes BANANA PUDDING CAKE European Print This
Nutrition facts: 200 calories 20 grams fat
Rating: 4.3/5
( 6 voted )

Ingredients

  • Cake:
  • 2 sticks butter, softened
  • 1 3/4 cups sugar
  • 3 eggs + 2 egg whites
  • 3 tsp vanilla
  • 3 cups all-purpose flour
  • 3 1/2 tsp baking powder
  • One 1.34oz box instant, sugar-free banana pudding mix
  • 1 cup milk
  • Filling:
  • Add these to a mixing bowl and whisk until incorporated. Place in the fridge for at least 10 minutes while you assemble the cake.
  • One 1.34oz box instant, sugar-free vanilla pudding mix
  • 1 1/4 cups skim milk
  • 1 cup Cool Whip (or whipped cream)
  • To brush on layers:
  • Just mix these two:
  • 1 Tbsp sweetened condensed milk
  • 1 Tbsp skim milk
  • You will also need:
  • 2-3 medium ripe bananas
  • 3-4 cups Cool Whip for frosting

Instructions

To make the Cake:

Step 1: Prepare the oven. Preheat it to 350 degrees F.

Step 2: Using a parchment paper, line the bottom of three 8-inch round pans.

Step 3: In a mixing bowl, add the butter with sugar and cream until light and fluffy. Gradually add in the eggs and egg whites, a piece at a time, beating every after each addition. Then, stir in the vanilla until incorporated.

Step 4: Combine the flour, baking powder, and pudding mix in another bowl. In three separate additions, add this into the wet ingredients. Don't over mix, stir just until just combined.

Step 5: Pour in the milk and stir until combined.

Step 6: Distribute the batter into the pans. Place inside the preheated oven and bake for about 22 to 25 minutes or until the cake is golden and starts to separate from the sides of the pan.

Step 7: Remove from the oven and let the cakes cool for at least 15 minutes. Then, loosen each cake to remove from the pan. Transfer them on the wire racks and let the cakes cool for another 1 to 2 hours.

To layer:

Step 8: Put the first layer on a cake plate, then, brush with a small amount of milk mixture.

Step 9: Layer the slices of banana on top of the cake before spreading over 1/3 to 1/2 of the filling mix.

Step 10: Then, add the next cake layer on top of the filling. Do the same as the first layer - milk mix, filling, and the final layer.

To Frost:

Step 11: Decorate the cake with the Cool Whip frosting. You can even crush some mini Nilla wafers and spread it over the cake like what I did. And using the rest of the Nilla wafers, decorate the sides of the cake or put them in between the layers.

NOTE:

Remember to store this cake in the fridge because this has many perishable ingredients.

September 19, 2020 0 comment
0 FacebookTwitterPinterestEmail
Main Dish Recipes

ONE PAN SHRIMP FETTUCCINE ALFREDO

by Rebecca September 19, 2020
written by Rebecca

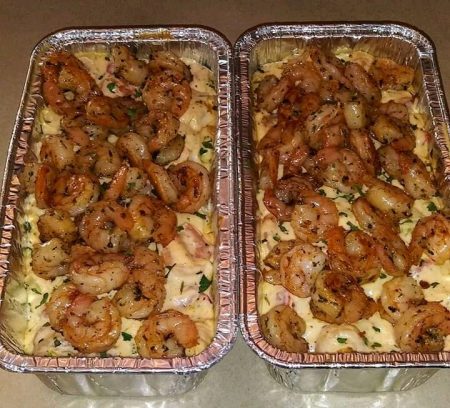
This lovely One-Pan Shrimp Fettuccine Alfredo is an easy peasy dish you can make in a breeze – not fussy, undeniably delicious, and full of flavor. The greatest comfort food and an excellent addition to your weeknight menu. I am certain that your family will dig this, especially if they love shrimp as I do. This loaded one-pan meal has everything good life can offer – shrimps, pasta, cheese, and butter. I promise this is worth it. To die for and to keep.

INGREDIENTS

3 tablespoons unsalted butter divided

16 ounces large shrimp peeled, deveined, and tails removed

2 cloves garlic minced

2 cups chicken broth

1 cup milk

8 ounces fettuccine noodles dry

1 cup parmesan cheese grated

1/2 cup heavy cream

1/4 teaspoon pepper

pinch nutmeg

parsley as a garnish

HOW TO MAKE ONE-PAN SHRIMP FETTUCCINE ALFREDO

Step 1: Heat two tablespoons of butter in a skillet over medium heat. Sautee the shrimp and cook for about a minute or two on each side or until opaque.

Step 2: Place the cooked shrimp to a plate or bowl. Don’t forget to cover the shrimps to keep them warm.

Step 3: Into the same pan, add the rest of the butter, then, the minced garlic. Sautee and cook for just 30 seconds for the garlic not to burn.

Step 4: Pour in the chicken broth, milk, then add in the fettuccine noodles. To separate the noodles, stir, then, cover and let the liquid boil. Adjust the heat to low and simmer for about 11 minutes or until al dente.

Step 5: When halfway through, stir again the noodles to separate. Uncover. At this point, most of the liquid should be absorbed by the noodles.

Step 6: Then, add in the heavy cream, parmesan cheese, pepper, and nutmeg. Continuously stir until the cheese has melted before stirring in the shrimp.

Step 7: Take the pan out of the heat and allow the sauce to thicken for at least 5 minutes.

Step 8: Before serving, garnish with parsley. Enjoy!

ONE PAN SHRIMP FETTUCCINE ALFREDO

Rebecca This lovely One-Pan Shrimp Fettuccine Alfredo is an easy peasy dish you can make in a breeze – not fussy, undeniably delicious, and full of flavor. The greatest comfort food… Main Dish Recipes ONE PAN SHRIMP FETTUCCINE ALFREDO European Print This
Nutrition facts: 200 calories 20 grams fat
Rating: 4.3/5
( 3 voted )

Ingredients

  • 3 tablespoons unsalted butter divided
  • 16 ounces large shrimp peeled, deveined, and tails removed
  • 2 cloves garlic minced
  • 2 cups chicken broth
  • 1 cup milk
  • 8 ounces fettuccine noodles dry
  • 1 cup parmesan cheese grated
  • 1/2 cup heavy cream
  • 1/4 teaspoon pepper
  • pinch nutmeg
  • parsley as a garnish

Instructions

Step 1: Heat two tablespoons of butter in a skillet over medium heat. Sautee the shrimp and cook for about a minute or two on each side or until opaque.

Step 2: Place the cooked shrimp to a plate or bowl. Don't forget to cover the shrimps to keep them warm.

Step 3: Into the same pan, add the rest of the butter, then, the minced garlic. Sautee and cook for just 30 seconds for the garlic not to burn.

Step 4: Pour in the chicken broth, milk, then add in the fettuccine noodles. To separate the noodles, stir, then, cover and let the liquid boil. Adjust the heat to low and simmer for about 11 minutes or until al dente.

Step 5: When halfway through, stir again the noodles to separate. Uncover. At this point, most of the liquid should be absorbed by the noodles.

Step 6: Then, add in the heavy cream, parmesan cheese, pepper, and nutmeg. Continuously stir until the cheese has melted before stirring in the shrimp.

Step 7: Take the pan out of the heat and allow the sauce to thicken for at least 5 minutes.

Step 8: Before serving, garnish with parsley. Enjoy!

September 19, 2020 0 comment
0 FacebookTwitterPinterestEmail
Main Dish Recipes

TEXAS ROADHOUSE STEAK SEASONING RECIPE

by Rebecca September 19, 2020
written by Rebecca

Ever wonder how they make the best tasting Roadhouse Steak? Well, your prayers are answered. Introducing the Texas Roadhouse Steak Seasoning – simple yet will give you that exact flavor you always love even better in a Roadhouse Steak. This copy cat is to die for and to keep. Make Roadhouse Texas in the comfort of your home and watch everyone go crazy. This will undeniably impress the crowd. This is the perfect gift you can give to your loved ones this Holiday Season. Say goodbye to takeouts and dining in because you have found the secret to the best Texas Roadhouse Steak Seasoning you’re obsessing for eternity. I never would have thought that all I need are a few simple ingredients that I already have sitting in my pantry. Surprisingly they worked wonders every time!

INGREDIENTS

2 tablespoons kosher salt

2 teaspoons brown sugar

1 teaspoon freshly ground black pepper

½ teaspoon paprika

½ teaspoon chili powder

¼ teaspoon garlic powder

¼ teaspoon garlic salt

¼ teaspoon onion powder

¼ teaspoon turmeric

HOW TO MAKE TEXAS ROADHOUSE STEAK SEASONING

Step 1: In a medium-sized bowl, add 2 tablespoons of kosher salt. Add in 2 tablespoons of brown sugar or standard white sugar, 1/4 teaspoon of garlic powder, garlic salt, onion powder, and turmeric.

Step 2: For a bit of spice, add in half a teaspoon of paprika and chili powder.

Step 3: I prefer the fresh ground, medium-sized pepper but you can use whatever is available. Measure the black pepper out to 1 teaspoon and add it in the bowl.

Step 4: Mix well until everything is incorporated,

Step 5: Grab your gallon-sized plastic bag and pour the seasonings in. Seal the bag and shake until the seasonings seem evenly combined.

Step 6: Cut one bottom edge of the bag in diagonal, small enough for the tip to comfortably fit into an empty spice jar.

Step 7: Carefully transfer the seasonings into the spice container.

TEXAS ROADHOUSE STEAK SEASONING RECIPE

Rebecca Ever wonder how they make the best tasting Roadhouse Steak? Well, your prayers are answered. Introducing the Texas Roadhouse Steak Seasoning – simple yet will give you that exact flavor… Main Dish Recipes TEXAS ROADHOUSE STEAK SEASONING RECIPE European Print This
Nutrition facts: 200 calories 20 grams fat
Rating: 3.5/5
( 4 voted )

Ingredients

  • 2 tablespoons kosher salt
  • 2 teaspoons brown sugar
  • 1 teaspoon freshly ground black pepper
  • ½ teaspoon paprika
  • ½ teaspoon chili powder
  • ¼ teaspoon garlic powder
  • ¼ teaspoon garlic salt
  • ¼ teaspoon onion powder
  • ¼ teaspoon turmeric

Instructions

Step 1: In a medium-sized bowl, add 2 tablespoons of kosher salt. Add in 2 tablespoons of brown sugar or standard white sugar, 1/4 teaspoon of garlic powder, garlic salt, onion powder, and turmeric.

Step 2: For a bit of spice, add in half a teaspoon of paprika and chili powder.

Step 3: I prefer the fresh ground, medium-sized pepper but you can use whatever is available. Measure the black pepper out to 1 teaspoon and add it in the bowl.

Step 4: Mix well until everything is incorporated,

Step 5: Grab your gallon-sized plastic bag and pour the seasonings in. Seal the bag and shake until the seasonings seem evenly combined.

Step 6: Cut one bottom edge of the bag in diagonal, small enough for the tip to comfortably fit into an empty spice jar.

Step 7: Carefully transfer the seasonings into the spice container.

September 19, 2020 0 comment
0 FacebookTwitterPinterestEmail
Main Dish Recipes

SEAFOOD MAC AND CHEESE

by Rebecca September 19, 2020
written by Rebecca

Mac and cheese and seafood? Oh my! This is heaven! Super mouthwatering, has amazing flavors that burst in your mouth, and a no-fussy. One of my favorite comfort food and a dream come true for all the seafood-lovers. This creamy, cheesy, loaded with seafood mac and cheese is to die for!

INGREDIENTS

2 cups of dry Macaroni

6 oz. Claw Crab Meat

8 oz. Shrimp, peeled and deveined

8 oz. Sour Cream

4 tablespoons Butter

2 tablespoons Flour

1 Spring Onion

1 can Evaporated Milk

8 oz. block Sharp White Cheddar Cheese

4 oz. block Mozzarella Cheese

¼ cup Panko Bread Crumbs

Salt, Black Pepper, to taste

HOW TO MAKE SEAFOOD MAC AND CHEESE

Step 1: Prepare the oven. Preheat it to 350 degrees.

Step 2: If needed, peel and de-vein the shrimp.

Step 3: Follow the package direction to cook the macaroni, then, drain well.

Step 4: In a large mixing bowl, add the drained macaroni with the sour cream. Mix well until the macaroni is completely coated before adding the crab meat. Again stirring well to coat.

Step 5: Chop the green onions finely and set aside.

Step 6: Set aside the grated white cheddar cheese. Then, the mozzarella, grate, and set aside.

Step 7: In a medium saucepan or skillet, melt the butter. Once melted, add in the shrimp and stir until gently done.

Step 8: Take the shrimp out of the pan. Allow cooling before chopping slightly. Then, add the chopped shrimps into the macaroni mixture.

Step 9: Into the saucepan, sautee the finely chopped onions until tender before sprinkling over the flour. Mix well and cook for about a minute until brown. Gradually add in the milk while constantly stirring until the mixture has thickened. Sprinkle the grated cheddar cheese and stir until melted.

Step 10: Pour the cheese mixture over the macaroni and seafood mixture and stir to incorporate.

Step 11: Season with salt and pepper to taste.

Step 12: Transfer the mixture in a thoroughly buttered baking dish and sprinkle over the grated mozzarella cheese, then, the bread crumbs.

Step 13: To add color, lightly sprinkle over the paprika.

Step 14: Place inside the preheated oven and bake for about 20 to 25 minutes or until the top is lightly golden.

Step 15: Remove from the oven and serve warm. Enjoy!

NOTE:

To make this dish, you can use your preferred seafood combination. You can even add an extra half a cup of milk when you add the evaporated milk to make this a bit creamier.

SEAFOOD MAC AND CHEESE

Rebecca Mac and cheese and seafood? Oh my! This is heaven! Super mouthwatering, has amazing flavors that burst in your mouth, and a no-fussy. One of my favorite comfort food and… Main Dish Recipes SEAFOOD MAC AND CHEESE European Print This
Nutrition facts: 200 calories 20 grams fat
Rating: 3.7/5
( 15 voted )

Ingredients

  • 2 cups of dry Macaroni
  • 6 oz. Claw Crab Meat
  • 8 oz. Shrimp, peeled and deveined
  • 8 oz. Sour Cream
  • 4 tablespoons Butter
  • 2 tablespoons Flour
  • 1 Spring Onion
  • 1 can Evaporated Milk
  • 8 oz. block Sharp White Cheddar Cheese
  • 4 oz. block Mozzarella Cheese
  • ¼ cup Panko Bread Crumbs
  • Salt, Black Pepper, to taste

Instructions

Step 1: Prepare the oven. Preheat it to 350 degrees.

Step 2: If needed, peel and de-vein the shrimp.

Step 3: Follow the package direction to cook the macaroni, then, drain well.

Step 4: In a large mixing bowl, add the drained macaroni with the sour cream. Mix well until the macaroni is completely coated before adding the crab meat. Again stirring well to coat.

Step 5: Chop the green onions finely and set aside.

Step 6: Set aside the grated white cheddar cheese. Then, the mozzarella, grate, and set aside.

Step 7: In a medium saucepan or skillet, melt the butter. Once melted, add in the shrimp and stir until gently done.

Step 8: Take the shrimp out of the pan. Allow cooling before chopping slightly. Then, add the chopped shrimps into the macaroni mixture.

Step 9: Into the saucepan, sautee the finely chopped onions until tender before sprinkling over the flour. Mix well and cook for about a minute until brown. Gradually add in the milk while constantly stirring until the mixture has thickened. Sprinkle the grated cheddar cheese and stir until melted.

Step 10: Pour the cheese mixture over the macaroni and seafood mixture and stir to incorporate.

Step 11: Season with salt and pepper to taste.

Step 12: Transfer the mixture in a thoroughly buttered baking dish and sprinkle over the grated mozzarella cheese, then, the bread crumbs.

Step 13: To add color, lightly sprinkle over the paprika.

Step 14: Place inside the preheated oven and bake for about 20 to 25 minutes or until the top is lightly golden.

Step 15: Remove from the oven and serve warm. Enjoy!

NOTE:

To make this dish, you can use your preferred seafood combination. You can even add an extra half a cup of milk when you add the evaporated milk to make this a bit creamier.

September 19, 2020 0 comment
0 FacebookTwitterPinterestEmail
Main Dish Recipes

BEST EVER BEEF AND BARLEY SOUP

by Rebecca September 19, 2020
written by Rebecca

Servings: 10 servings | Cook Time: 40 minutes

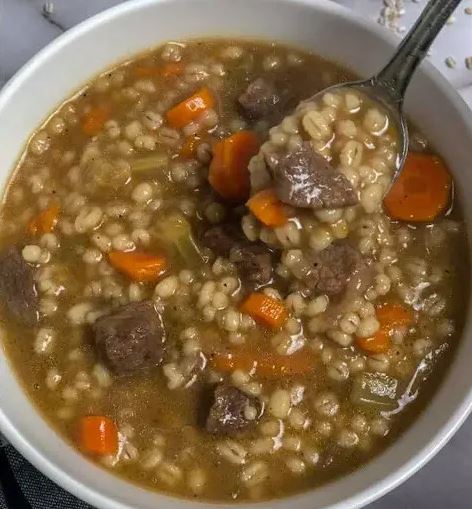
This recipe is an excellent way to use up those leftover beef. A homestyle rich and hearty beef and barley soup that will bring a smile to your face. You got all the amazing flavors, you got the smell, then, you got the texture in a snap that just cracks in your mouth. My family’s favorite soup, perfect for cold nights or every night. Another crockpot dish is a must-try and to keep. I first tasted this when we visited my in-laws and I loved it immediately. I asked for the recipe and I have been making this since. This soup will fill you up with warmth and all the goodness a soup can bring. So much flavor in one sip, I could not ask for anything more! Pretty easy to whip up but takes time to cook so all the exciting flavors will be blended perfectly. Worth the wait!

INGREDIENTS

1 pound boneless chuck roast trimmed and cut into 1/2-inch pieces

1 1/2 cups carrots thinly sliced

1 1/2 cups celery thinly sliced

2/3 cup onion chopped

1 package pre-sliced mushrooms 8-ounce

2 tbs beef base (this is different than beef broth it is a base that makes beef broth)

8-10 cups water

1 large bay leaf

HOW TO MAKE BEST EVER BEEF AND BARLEY SOUP

Step 1: In a nonstick frypan, cook the beef until browned while frequently stirring.

Step 2: Once done, remove the cooked beef from the pan and transfer it in a crockpot. Then, add in the carrot, celery, onion, and mushrooms, beef base, water, garlic, and bay leaf.

Step 3: Cook the beef along with the rest of the ingredients on high for about an hour. Before adjusting the heat to low, add in the pearl barley and continue cooking until the vegetables and beef are tender. Season with salt and pepper.

Step 4: Remove the bay leaf and serve. Enjoy!

BEST EVER BEEF AND BARLEY SOUP

Rebecca Servings: 10 servings | Cook Time: 40 minutes This recipe is an excellent way to use up those leftover beef. A homestyle rich and hearty beef and barley soup that… Main Dish Recipes BEST EVER BEEF AND BARLEY SOUP European Print This
Serves: 10 Cooking Time: 40 mins 40 mins
Nutrition facts: 200 calories 20 grams fat
Rating: 4.7/5
( 3 voted )

Ingredients

  • 1 pound boneless chuck roast trimmed and cut into 1/2-inch pieces
  • 1 1/2 cups carrots thinly sliced
  • 1 1/2 cups celery thinly sliced
  • 2/3 cup onion chopped
  • 1 package pre-sliced mushrooms 8-ounce
  • 2 tbs beef base (this is different than beef broth it is a base that makes beef broth)
  • 8-10 cups water
  • 1 large bay leaf

Instructions

Step 1: In a nonstick frypan, cook the beef until browned while frequently stirring.

Step 2: Once done, remove the cooked beef from the pan and transfer it in a crockpot. Then, add in the carrot, celery, onion, and mushrooms, beef base, water, garlic, and bay leaf.

Step 3: Cook the beef along with the rest of the ingredients on high for about an hour. Before adjusting the heat to low, add in the pearl barley and continue cooking until the vegetables and beef are tender. Season with salt and pepper.

Step 4: Remove the bay leaf and serve. Enjoy!

September 19, 2020 0 comment
0 FacebookTwitterPinterestEmail
Newer Posts
Older Posts

Popular Posts

  • 1

    Crispy Crunchy Parmesan Potatoes

    March 21, 2020
  • 2

    CROCK POT SMOTHERED PORK CHOPS

    March 21, 2020
  • Facebook
  • Twitter

@2019 - All Right Reserved.


Back To Top