Cook it once
  • Home
  • Privacy Policy
  • Recipes
    • KETO
    • LC
    • WW
  • Tips
  • Contact
Cook it once
  • Home
  • Privacy Policy
  • Recipes
    • KETO
    • LC
    • WW
  • Tips
  • Contact
Category:

General Recipes

General Recipes

HOW TO MAKE A WENDY’S FROSTY

by Rebecca October 6, 2022
written by Rebecca

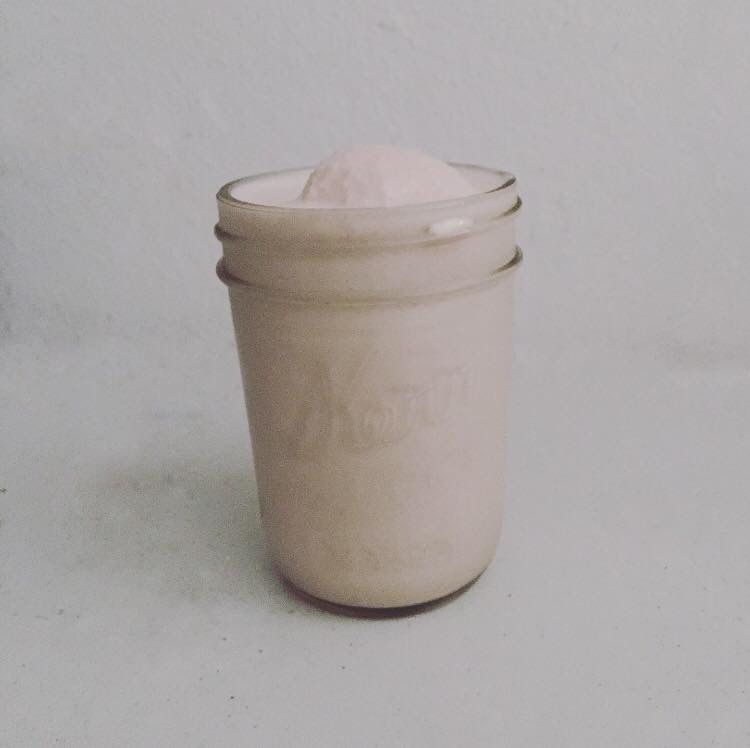
Wendy’s Frosty has been my favorite since the first time I tasted it. Cold, creamy, and great to pair with hot and crispy fries. This iconic Wendy’s Frosty is everyone’s favorite! Your visit to Wendy’s would never be complete without ordering this heavenly Frosty! And to be able to make this Frosty at home is an awesome experience!

Ingredients

1/2-1 c. heavy cream – add more if needed

5 c. chocolate milk, frozen in ice cube trays

1 teaspoon vanilla extract

1/4 c. sweetened condensed milk – to taste

HOW TO MAKE A WENDY’S FROSTY

Step 1: Grab some ice trays and fill them with chocolate milk. Place in the freezer overnight or until the milk is fully frozen.

Step 2: Place about half of the chocolate milk ice cubes in a blender along with cream, sweetened condensed milk, and vanilla. Pulse until smooth and creamy. If needed, add extra cream to thin out the mixture. Or if you want to make it thicker, you can add more ice cubes. As needed, scrape down the sides of the blender.

Step 3: Into cups, spoon the Wendy’s Frosty. Enjoy!

Notes:

Easily make homemade chocolate milk by combining 5 c milk with 1/4 c cocoa powder, 3 to 4 tablespoons of powdered sugar, 1 tablespoon of vanilla extract, and a pinch of salt in a blender. Store this in the fridge for up to a week.

If you like a hint of malt to your Frosty, you are welcome to add some chocolate Malt mix to the chocolate mix.

To make coffee/chocolate Frosty, create some ice cubes using coffee or espresso and throw a couple in the blender.

In a freezer bag, store any leftover chocolate milk.

Or store it in the freezer. To make them soft again, leave them for about 20 to 30 minutes at room temperature

HOW TO MAKE A WENDY’S FROSTY

Rebecca Wendy’s Frosty has been my favorite since the first time I tasted it. Cold, creamy, and great to pair with hot and crispy fries. This iconic Wendy’s Frosty is everyone’s… General Recipes HOW TO MAKE A WENDY’S FROSTY European Print This
Nutrition facts: 200 calories 20 grams fat
Rating: 5.0/5
( 1 voted )

Ingredients

  • 1/2-1 c. heavy cream – add more if needed
  • 5 c. chocolate milk, frozen in ice cube trays
  • 1 teaspoon vanilla extract
  • 1/4 c. sweetened condensed milk – to taste

Instructions

Step 1: Grab some ice trays and fill them with chocolate milk. Place in the freezer overnight or until the milk is fully frozen.

Step 2: Place about half of the chocolate milk ice cubes in a blender along with cream, sweetened condensed milk, and vanilla. Pulse until smooth and creamy. If needed, add extra cream to thin out the mixture. Or if you want to make it thicker, you can add more ice cubes. As needed, scrape down the sides of the blender.

Step 3: Into cups, spoon the Wendy’s Frosty. Enjoy!

Notes

Easily make homemade chocolate milk by combining 5 c milk with 1/4 c cocoa powder, 3 to 4 tablespoons of powdered sugar, 1 tablespoon of vanilla extract, and a pinch of salt in a blender. Store this in the fridge for up to a week. If you like a hint of malt to your Frosty, you are welcome to add some chocolate Malt mix to the chocolate mix. To make coffee/chocolate Frosty, create some ice cubes using coffee or espresso and throw a couple in the blender. In a freezer bag, store any leftover chocolate milk. Or store it in the freezer. To make them soft again, leave them for about 20 to 30 minutes at room temperature
October 6, 2022 0 comment
0 FacebookTwitterPinterestEmail
General Recipes

Olive Garden Slow Cooker Pasta Fagioli

by Rebecca October 6, 2022
written by Rebecca

Easily make everyone’s favorite at home with this easy slow cooker Olive Garden Pasta Fagioli recipe. Serve this flavor-packed soup with a crusty baguette or breadsticks and a side of green salad for a filling and comforting meal all year round!

Ingredients

1/2 pound lean ground beef

1 tbsp extra-virgin olive oil

1/2 pound ground Italian sausage

4 celery stalks, diced

2 whole carrots, diced

1 medium onion, diced

3 (14.5 oz. can) beef broth

1 (28 oz. can) crushed tomatoes

1 tbsp Italian seasoning

1 (15 oz. can) red kidney beans, drained and rinsed

1 (15 oz. can) cannellini beans, drained and rinsed

1 c. ditalini pasta, uncooked

1 Shaved Parmesan – optional

2 whole bay leaves

salt and pepper to taste

How to make Olive Garden Slow Cooker Pasta Fagioli

Step 1: In a large skillet, heat the olive oil. Once hot, add the ground beef and sausage and cook until no longer pink.

Step 2: In a slow cooker, transfer the meat mixture and add the remaining ingredients except for the pasta, Parmesan, and beans. Set to cook for 7 to 8 hours on low or 3 to 4 hours on high.

Step 3: Stir in the beans and ditalini thirty minutes before serving. To taste, season with salt and pepper.

Step 4: Remove the bay leaves and discard them.

Step 5: Serve the Pasta Fagioli right away. If desired, sprinkle Parmesan on top and enjoy with a crusty baguette or breadsticks.

Notes:

You can store the soup for up to 4 days in the fridge. Simply keep the soup in an airtight container.

To reheat, place the soup in a medium pot and heat for about 5 to 10 minutes over medium-high heat until completely heated.

You can swap ditalini pasta with Tubettini, macaroni, orzo, conchigliette, and others. Make sure to choose a small-sized pasta.

You can also substitute the beef broth with chicken broth.

For a more authentic flavor and texture, use a combination of beef and sausage. If desired, you can leave out the sausage and just use beef. Or use turkey sausage instead.

Olive Garden Slow Cooker Pasta Fagioli

Rebecca Easily make everyone’s favorite at home with this easy slow cooker Olive Garden Pasta Fagioli recipe. Serve this flavor-packed soup with a crusty baguette or breadsticks and a side of… General Recipes Olive Garden Slow Cooker Pasta Fagioli European Print This
Nutrition facts: 200 calories 20 grams fat
Rating: 5.0/5
( 1 voted )

Ingredients

  • 1/2 pound lean ground beef
  • 1 tbsp extra-virgin olive oil
  • 1/2 pound ground Italian sausage
  • 4 celery stalks, diced
  • 2 whole carrots, diced
  • 1 medium onion, diced
  • 3 (14.5 oz. can) beef broth
  • 1 (28 oz. can) crushed tomatoes
  • 1 tbsp Italian seasoning
  • 1 (15 oz. can) red kidney beans, drained and rinsed
  • 1 (15 oz. can) cannellini beans, drained and rinsed
  • 1 c. ditalini pasta, uncooked
  • 1 Shaved Parmesan – optional
  • 2 whole bay leaves
  • salt and pepper to taste

Instructions

Step 1: In a large skillet, heat the olive oil. Once hot, add the ground beef and sausage and cook until no longer pink.

Step 2: In a slow cooker, transfer the meat mixture and add the remaining ingredients except for the pasta, Parmesan, and beans. Set to cook for 7 to 8 hours on low or 3 to 4 hours on high.

Step 3: Stir in the beans and ditalini thirty minutes before serving. To taste, season with salt and pepper.

Step 4: Remove the bay leaves and discard them.

Step 5: Serve the Pasta Fagioli right away. If desired, sprinkle Parmesan on top and enjoy with a crusty baguette or breadsticks.

Notes

You can store the soup for up to 4 days in the fridge. Simply keep the soup in an airtight container. To reheat, place the soup in a medium pot and heat for about 5 to 10 minutes over medium-high heat until completely heated. You can swap ditalini pasta with Tubettini, macaroni, orzo, conchigliette, and others. Make sure to choose a small-sized pasta. You can also substitute the beef broth with chicken broth. For a more authentic flavor and texture, use a combination of beef and sausage. If desired, you can leave out the sausage and just use beef. Or use turkey sausage instead.

October 6, 2022 0 comment
0 FacebookTwitterPinterestEmail
General Recipes

GRAMA’S CORNFLAKE PEANUT BUTTER COOKIES

by Rebecca October 6, 2022
written by Rebecca

Prep time: 10 mins | Cook time: 5 mins | Total time: 45 mins | Yield: 25 cookies

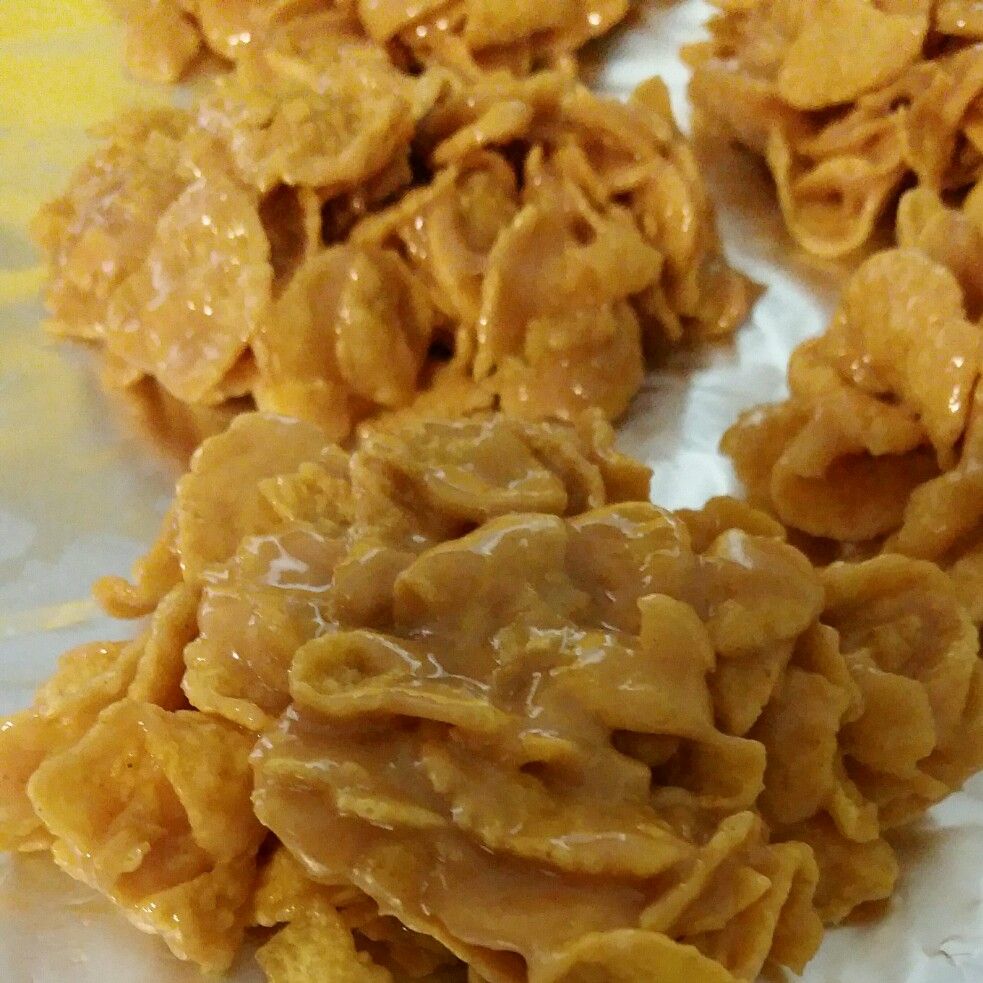
Simple, yet very addictive! These Grama’s Corn Flake Peanut Butter Cookies are a sweet treat that you can easily make without even turning the oven on. These are soft, chewy, and salty cookies that you’ll never stop eating! This recipe makes a decent batch, but I am pretty sure you’ll be tempted to make a huge batch because these cookies fly super fast!

To make these Corn Flake Peanut Butter Cookies, all you need are just a couple of basic ingredients; sugar, corn syrup, butter, peanut butter, and cornflakes cereal. For the sugar, you can try swapping it with honey or corn syrup. I have tried it a few times, and the cookies turned out sweet, shiny, and amazing! I like to make a huge batch of these cookies for a quick treat. I simply store them in an airtight container in a single layer with parchment paper in between the layers. These cookies will last up to a week at room temperature.

These no-bake cookies do not need you to be a professional baker to pull off. There is no special ingredient or equipment needed to make this wonderful treat. These cookies are the perfect treat to satisfy your sweet tooth. These cookies are only delicious, but they are super easy and fun to make! Give these kid-friendly cookies a try soon. I am certain that you’ll love these cookies just like we do!

Ingredients

½ c. peanut butter

½ c. light corn syrup

½ c. white sugar

3 c. cornflakes cereal

2 tbsp butter

HOW TO MAKE GRAMA’S CORNFLAKE PEANUT BUTTER COOKIES

Step 1: Using waxed paper, line a baking sheet.

Step 2: In a saucepan, place the sugar and corn syrup and bring to a boil on medium heat. Once boiling, add the butter along with the peanut butter. Stir well until everything is blended, then take the pan off the heat.

Step 3: Into a large bowl, place the cornflakes and pour the mixture over. Gently stir until the cornflakes are completely coated.

Step 4: Onto the prepared baking sheet, drop the coated cornflakes (shape them like cookies). Let them cool.

Step 5: Serve and enjoy!

Tip:

For this recipe, you are welcome to use varieties of cereal such as Rice Krispies.

Nutrition Facts:

Per Serving: Energy: 85 cal; Protein: 1.5g; Carbohydrates: 13g; Fat: 3.5g; Cholesterol: 2.4mg; Sodium: 58.6mg.

GRAMA’S CORNFLAKE PEANUT BUTTER COOKIES

Rebecca Prep time: 10 mins | Cook time: 5 mins | Total time: 45 mins | Yield: 25 cookies Simple, yet very addictive! These Grama’s Corn Flake Peanut Butter Cookies are… General Recipes GRAMA’S CORNFLAKE PEANUT BUTTER COOKIES European Print This
Serves: 25 Prep Time: 10 mins Cooking Time: 5 mins 5 mins
Nutrition facts: 85 calories 3.5 fat
Rating: 5.0/5
( 1 voted )

Ingredients

  • ½ c. peanut butter
  • ½ c. light corn syrup
  • ½ c. white sugar
  • 3 c. cornflakes cereal
  • 2 tbsp butter

Instructions

Step 1: Using waxed paper, line a baking sheet.

Step 2: In a saucepan, place the sugar and corn syrup and bring to a boil on medium heat. Once boiling, add the butter along with the peanut butter. Stir well until everything is blended, then take the pan off the heat.

Step 3: Into a large bowl, place the cornflakes and pour the mixture over. Gently stir until the cornflakes are completely coated.

Step 4: Onto the prepared baking sheet, drop the coated cornflakes (shape them like cookies). Let them cool.

Step 5: Serve and enjoy!

Notes

For this recipe, you are welcome to use varieties of cereal such as Rice Krispies.

October 6, 2022 0 comment
0 FacebookTwitterPinterestEmail
General Recipes

Salted Caramel Chocolate Ganache Tart

by Rebecca October 5, 2022
written by Rebecca

PREP TIME: 30 mins | COOK TIME: 45 mins | CHILLING TIME: 3 hrs 10 mins | TOTAL TIME: 4 hrs 25 mins | SERVINGS: 12 (makes one 11-inch tart)

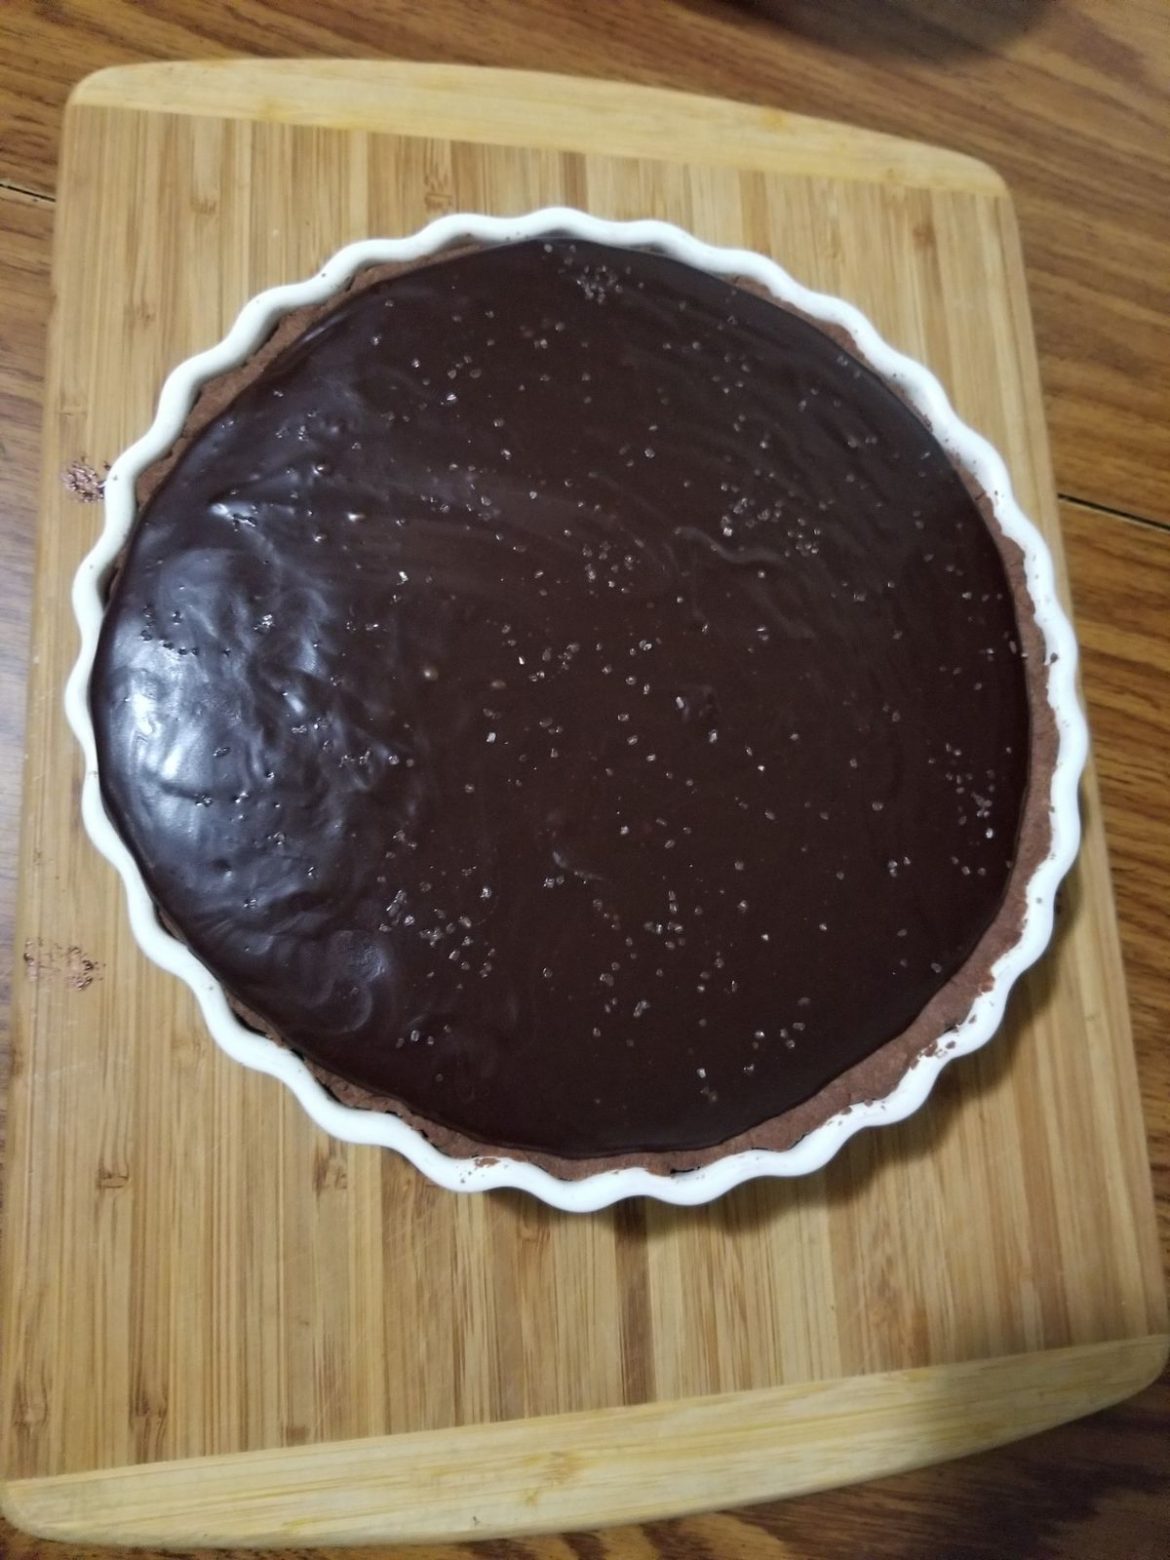
This dessert is the ultimate treat with cocoa crust, salted caramel layer, and topped with chocolate ganache. For another layer of flavor, sprinkle the tart with sea salt before serving.

Ingredients

COOKIE CRUST:

2 egg yolks

1-ounce cocoa powder, by weight (1/2 c., measured)

7.5 ounces all-purpose flour, by weight (1.5 c., measured)

2.5 ounces confectioner’s sugar, by weight (1/2 c., measured)

1/2 c. + 2 tablespoons butter at room temperature

1/2 teaspoon vanilla extract

1/4 teaspoon salt

SALTED CARAMEL:

6 tablespoons butter at room temperature

2.25 c. sugar

3/4 c. light corn syrup

1.5 c. heavy cream

1/2 teaspoon salt

1.5 teaspoon vanilla extract

1/4 c. water

CHOCOLATE GANACHE:

1/2 c. heavy cream

coarse sea salt for garnish

4 ounces bittersweet chocolate, chopped

How to make Salted Caramel Chocolate Ganache Tart

Step 1: Prepare the oven. Preheat it to 350 degrees F.

Step 2: To make the crust, combine the flour with cocoa powder, and salt. Set aside. Cream the butter and sugar in a different bowl. Then, add the egg yolks along with the vanilla. Mix well until blended. Next, slowly add the dry ingredients, mixing until combined, and you have a crumbly dough, but should easily pinch between two fingers.

Step 3: Into the tart pan, press the dough and prick with a fork. Place in the freezer for about 10 minutes. After 10 minutes, place in the preheated oven and bake for about 15 minutes. Remove from the oven when done and transfer on a wire rack. Allow the dough to cool completely.

Step 4: To make the caramel, add the sugar to a heavy-bottomed saucepan. To flatten out the sugar pile, shake the pan. Pour in the water and add the corn syrup and salt. DO NOT STIR. Cook for about 20 minutes over medium-high heat or until the sugar is clear and dissolved. The sugar will bubble more vigorously and will begin to take on an amber color after it has dissolved. Stir in the butter once the sugar looks caramel colored. Then, take the pan off the heat and add the heavy cream, along with vanilla. Return to the stove and continue to cook over medium-high heat for another 10 minutes, stirring using a spatula until thickened and smooth.

Step 5: Into the cooled crust, pour the caramel. Place in the fridge for at least 3 hours or until set.

Step 6: For the chocolate ganache, heat the heavy cream until simmering. Then, pour it on top of the chocolate. Allow sitting for about 60 seconds before stirring until smooth. Over the caramel tart, pour the chocolate ganache, then place in the fridge for a couple of hours until set.

Step 7: Before serving, slice the tart and sprinkle with sea salt. Enjoy!

Nutrition Facts:

calories: 591 kcal, carbohydrates: 73g, protein: 3g, fat: 32g, saturated fat: 20g, cholesterol: 123mg, sodium: 295mg, potassium: 105mg, fiber: 1g, sugar: 57g, vitamin a: 1045IU, vitamin c: 0.2mg, calcium: 45mg, iron: 1.5mg

Salted Caramel Chocolate Ganache Tart

Rebecca PREP TIME: 30 mins | COOK TIME: 45 mins | CHILLING TIME: 3 hrs 10 mins | TOTAL TIME: 4 hrs 25 mins | SERVINGS: 12 (makes one 11-inch tart)… General Recipes Salted Caramel Chocolate Ganache Tart European Print This
Serves: 12 Prep Time: 30 mins Cooking Time: 45 mins 45 mins
Nutrition facts: 591 calories 32 fat
Rating: 5.0/5
( 1 voted )

Ingredients

  • COOKIE CRUST:
  • 2 egg yolks
  • 1-ounce cocoa powder, by weight (1/2 c., measured)
  • 7.5 ounces all-purpose flour, by weight (1.5 c., measured)
  • 2.5 ounces confectioner's sugar, by weight (1/2 c., measured)
  • 1/2 c. + 2 tablespoons butter at room temperature
  • 1/2 teaspoon vanilla extract
  • 1/4 teaspoon salt
  • SALTED CARAMEL:
  • 6 tablespoons butter at room temperature
  • 2.25 c. sugar
  • 3/4 c. light corn syrup
  • 1.5 c. heavy cream
  • 1/2 teaspoon salt
  • 1.5 teaspoon vanilla extract
  • 1/4 c. water
  • CHOCOLATE GANACHE:
  • 1/2 c. heavy cream
  • coarse sea salt for garnish
  • 4 ounces bittersweet chocolate, chopped

Instructions

Step 1: Prepare the oven. Preheat it to 350 degrees F.

Step 2: To make the crust, combine the flour with cocoa powder, and salt. Set aside. Cream the butter and sugar in a different bowl. Then, add the egg yolks along with the vanilla. Mix well until blended. Next, slowly add the dry ingredients, mixing until combined, and you have a crumbly dough, but should easily pinch between two fingers.

Step 3: Into the tart pan, press the dough and prick with a fork. Place in the freezer for about 10 minutes. After 10 minutes, place in the preheated oven and bake for about 15 minutes. Remove from the oven when done and transfer on a wire rack. Allow the dough to cool completely.

Step 4: To make the caramel, add the sugar to a heavy-bottomed saucepan. To flatten out the sugar pile, shake the pan. Pour in the water and add the corn syrup and salt. DO NOT STIR. Cook for about 20 minutes over medium-high heat or until the sugar is clear and dissolved. The sugar will bubble more vigorously and will begin to take on an amber color after it has dissolved. Stir in the butter once the sugar looks caramel colored. Then, take the pan off the heat and add the heavy cream, along with vanilla. Return to the stove and continue to cook over medium-high heat for another 10 minutes, stirring using a spatula until thickened and smooth.

Step 5: Into the cooled crust, pour the caramel. Place in the fridge for at least 3 hours or until set.

Step 6: For the chocolate ganache, heat the heavy cream until simmering. Then, pour it on top of the chocolate. Allow sitting for about 60 seconds before stirring until smooth. Over the caramel tart, pour the chocolate ganache, then place in the fridge for a couple of hours until set.

Step 7: Before serving, slice the tart and sprinkle with sea salt. Enjoy!

October 5, 2022 0 comment
0 FacebookTwitterPinterestEmail
General Recipes

A Cheesy Crack Chicken Spaghetti Bake Worth Drooling Over

by Rebecca October 5, 2022
written by Rebecca

Total time: 45 mins | Serves: 8

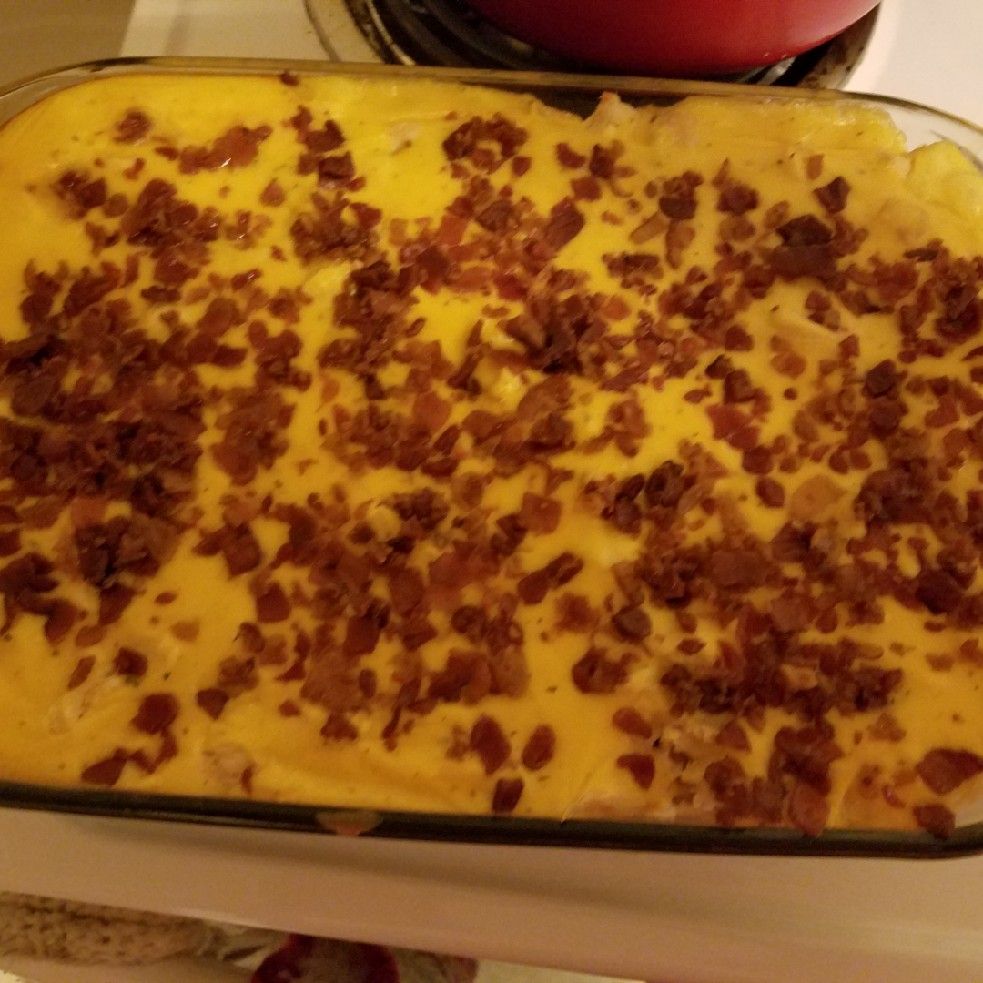
You’ll be drooling over this Cheesy Crack Chicken Spaghetti Bake! It’s a hearty casserole made with a few basic ingredients and ready in a breeze. This super delightful Cheesy Crack Chicken Spaghetti Bake is a very comforting dish that surely fills a hungry stomach! Enjoy a filling dinner with this easy dish, or bring this to a potluck to impress your family and friends. Crazy good, even your fussiest eaters will love and ask for this dish over and over again!

INGREDIENTS

3 c. cooked chicken, shredded or cubed

1 (16 ounces) package of spaghetti

2 cans (10.75 ounces) cream of chicken soup

2 c. sharp cheddar cheese, grated

2 (8 ounces) packages of Velveeta cheese, cubed

1 (1.5 ounces) package of dry ranch mix

1/3 c. bacon bits

kosher salt and freshly ground pepper, to taste

1 c. low-sodium chicken broth

How to make Cheesy Crack Chicken Spaghetti Bake

Step 1: Following the package directions, cook the pasta in a large pot of salted boiling water. Drain when done and set aside.

Step 2: Prepare the oven. Preheat it to 350 degrees F. Using a non-stick spray, lightly grease a 9 x 13-inch baking dish.

Step 3: In a medium saucepan, mix the chicken soup, Velveeta, and chicken broth. Cook over medium heat while stirring until the Velveeta is melted and the mixture is smooth. Then, stir in the ranch dry mix and season with salt and pepper.

Step 4: In the prepared baking dish, place the drained pasta and shredded chicken. On top, pour the cheese sauce. Mix well and sprinkle the cheddar cheese and bacon bits on top.

Step 5: Bake in the preheated oven and bake for about 30 to 35 minutes or until the cheese has melted and bubbly and the dish is completely heated.

Step 6: Remove from the oven when done and serve the cheesy crack chicken spaghetti bake immediately. Enjoy!

A Cheesy Crack Chicken Spaghetti Bake Worth Drooling Over

Rebecca Total time: 45 mins | Serves: 8 You’ll be drooling over this Cheesy Crack Chicken Spaghetti Bake! It’s a hearty casserole made with a few basic ingredients and ready in… General Recipes A Cheesy Crack Chicken Spaghetti Bake Worth Drooling Over European Print This
Serves: 8
Nutrition facts: 200 calories 20 grams fat
Rating: 5.0/5
( 1 voted )

Ingredients

  • 3 c. cooked chicken, shredded or cubed
  • 1 (16 ounces) package of spaghetti
  • 2 cans (10.75 ounces) cream of chicken soup
  • 2 c. sharp cheddar cheese, grated
  • 2 (8 ounces) packages of Velveeta cheese, cubed
  • 1 (1.5 ounces) package of dry ranch mix
  • 1/3 c. bacon bits
  • kosher salt and freshly ground pepper, to taste
  • 1 c. low-sodium chicken broth

Instructions

Step 1: Following the package directions, cook the pasta in a large pot of salted boiling water. Drain when done and set aside.

Step 2: Prepare the oven. Preheat it to 350 degrees F. Using a non-stick spray, lightly grease a 9 x 13-inch baking dish.

Step 3: In a medium saucepan, mix the chicken soup, Velveeta, and chicken broth. Cook over medium heat while stirring until the Velveeta is melted and the mixture is smooth. Then, stir in the ranch dry mix and season with salt and pepper.

Step 4: In the prepared baking dish, place the drained pasta and shredded chicken. On top, pour the cheese sauce. Mix well and sprinkle the cheddar cheese and bacon bits on top.

Step 5: Bake in the preheated oven and bake for about 30 to 35 minutes or until the cheese has melted and bubbly and the dish is completely heated.

Step 6: Remove from the oven when done and serve the cheesy crack chicken spaghetti bake immediately. Enjoy!

October 5, 2022 0 comment
0 FacebookTwitterPinterestEmail
General Recipes

MARYLAND CRAB DIP RECIPE

by Rebecca October 5, 2022
written by Rebecca

Prep Time: 5 mins | Cook Time: 30 mins | Total Time: 35 mins | Servings: 14

I am obsessed with this Maryland Hot Crab Dip! I have been enjoying this dip for as long as I can remember! The first time I made this dip, my family instantly love this! It is an irresistible dip that you can easily make using just a few simple ingredients. For the best taste and texture, just make sure to use fresh lump crab meat. I like to serve this hot and cheesy dip with tortilla chips, crackers, or a sliced/toasted baguette. This dip also goes great with soft pretzels, celery, or pita wedges.

I have friends from Maryland that already gave this recipe a stamp of approval. According to them, they eat this dip on chicken or quesadillas. I have yet to try it, but I know it’ll be amazing! If you like a little kick, a dash of hot sauce is delicious, too!

Ingredients

8 ounces crab meat lump

1 tsp Old Bay plus more for topping

1 tbsp cheddar cheese, shredded

¼ tsp dry mustard

1 tbsp Gouda cheese, shredded

4 oz. Cream Cheese ½ package softened – I used Neufchatel light cream cheese

½ c. Mayonnaise I used Kraft light version

HOW TO MAKE MARYLAND CRAB DIP

Step 1: Prepare the oven. Preheat it to 350 degrees.

Step 2: In a large bowl with an electric mixer, beat the softened cream cheese with mayonnaise, Old Bay Seasoning, and dry mustard until smooth. Then, gently fold in the lump of crab meat.

Step 3: Into an oven-safe dish, spoon the dip and top with the cheddar and Gouda cheese. On top, sprinkle the extra Old Bay Seasoning.

Step 4: Place in the preheated oven and bake for about 30 minutes. Then, broil on low until slightly browned.

Step 5: Topping the dip with some sliced green onions is optional but recommended.

Step 6: Once done baking, serve the Maryland Crab Dip with tortilla chips, crackers, or a sliced/toasted baguette. Enjoy!

MARYLAND CRAB DIP RECIPE

Rebecca Prep Time: 5 mins | Cook Time: 30 mins | Total Time: 35 mins | Servings: 14 I am obsessed with this Maryland Hot Crab Dip! I have been enjoying… General Recipes MARYLAND CRAB DIP RECIPE European Print This
Serves: 14 Prep Time: 5 mins Cooking Time: 30 mins 30 mins
Nutrition facts: 200 calories 20 grams fat
Rating: 4.0/5
( 2 voted )

Ingredients

  • 8 ounces crab meat lump
  • 1 tsp Old Bay plus more for topping
  • 1 tbsp cheddar cheese, shredded
  • ¼ tsp dry mustard
  • 1 tbsp Gouda cheese, shredded
  • 4 oz. Cream Cheese ½ package softened - I used Neufchatel light cream cheese
  • ½ c. Mayonnaise I used Kraft light version

Instructions

Step 1: Prepare the oven. Preheat it to 350 degrees.

Step 2: In a large bowl with an electric mixer, beat the softened cream cheese with mayonnaise, Old Bay Seasoning, and dry mustard until smooth. Then, gently fold in the lump of crab meat.

Step 3: Into an oven-safe dish, spoon the dip and top with the cheddar and Gouda cheese. On top, sprinkle the extra Old Bay Seasoning.

Step 4: Place in the preheated oven and bake for about 30 minutes. Then, broil on low until slightly browned.

Step 5: Topping the dip with some sliced green onions is optional but recommended.

Step 6: Once done baking, serve the Maryland Crab Dip with tortilla chips, crackers, or a sliced/toasted baguette. Enjoy!

October 5, 2022 0 comment
0 FacebookTwitterPinterestEmail
General Recipes

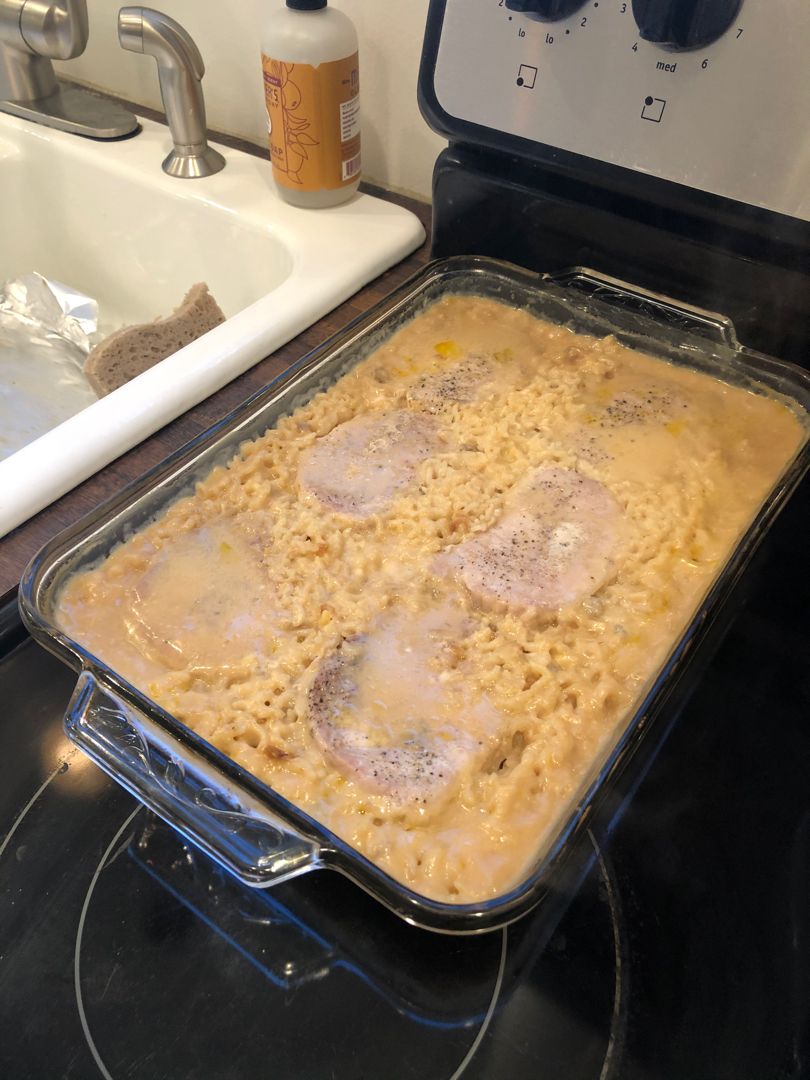
NO PEEK PORK CHOPS & RICE

by Rebecca October 5, 2022
written by Rebecca

Prep Time: 10 mins | Cook Time: 1 hr 15 mins | Total Time: 1 hr 25 mins | Yield: 8 people

Are you looking for another easy dinner? You are in the right place! This No Peek Pork Chops and Rice is a must-try! Complete with tender and juicy pork chops and rice, this dish is one heck of a complete meal! It is incredibly easy and quick to throw together. All you need is to mix everything and bake.

This No Peek Pork Chops and Rice is an excellent dinner option. This dish tastes superb without breaking the bank or you sweating out in the kitchen. The chops turned out delicious and tender! Serve this no peek pork chops and rice with some asparagus or green beans for a no-fuss meal that even your picky eaters will enjoy!

Ingredients

1 packet dry onion soup mix

8 boneless pork chops

1 (10.5 ounces) can of cream of mushroom soup

1 (10.5 ounces) can cream of chicken soup

1½ c. long grain rice uncooked

2 c. chicken broth

1 tablespoon seasoned pepper

HOW TO MAKE NO PEEK PORK CHOPS & RICE

Step 1: Prepare the oven. Preheat it to 350 degrees F. Using cooking spray, grease a 9 x 13 x 2-inch baking tray.

Step 2: In the bottom of the baking dish, place the cream of chicken soup, cream of mushroom soup, chicken broth, rice, and onion soup mix. Mix well. You can also do this in a bowl, then simply transfer the mixture into a baking dish.

Step 3: Season the pork chops on both sides with seasoned pepper. Lay the chops over the rice mixture.

Step 4: Cover the dish with foil and place it in the preheated oven. Then, bake for about 1 hour 15 minutes to 1 hour 30 minutes.

Step 5: Remove from the oven when done and serve these chops and rice right away. Enjoy!

Note:

You can also season the pork chops with salt and pepper in place of the seasoned pepper.

NO PEEK PORK CHOPS & RICE

Rebecca Prep Time: 10 mins | Cook Time: 1 hr 15 mins | Total Time: 1 hr 25 mins | Yield: 8 people Are you looking for another easy dinner? You… General Recipes NO PEEK PORK CHOPS & RICE European Print This
Serves: 8 Prep Time: 10 mins Cooking Time: 1 hr 15 mins 1 hr 15 mins
Nutrition facts: 200 calories 20 grams fat
Rating: 5.0/5
( 1 voted )

Ingredients

  • 1 packet dry onion soup mix
  • 8 boneless pork chops
  • 1 (10.5 ounces) can of cream of mushroom soup
  • 1 (10.5 ounces) can cream of chicken soup
  • 1½ c. long grain rice uncooked
  • 2 c. chicken broth
  • 1 tablespoon seasoned pepper

Instructions

Step 1: Prepare the oven. Preheat it to 350 degrees F. Using cooking spray, grease a 9 x 13 x 2-inch baking tray.

Step 2: In the bottom of the baking dish, place the cream of chicken soup, cream of mushroom soup, chicken broth, rice, and onion soup mix. Mix well. You can also do this in a bowl, then simply transfer the mixture into a baking dish.

Step 3: Season the pork chops on both sides with seasoned pepper. Lay the chops over the rice mixture.

Step 4: Cover the dish with foil and place it in the preheated oven. Then, bake for about 1 hour 15 minutes to 1 hour 30 minutes.

Step 5: Remove from the oven when done and serve these chops and rice right away. Enjoy!

Notes

You can also season the pork chops with salt and pepper in place of the seasoned pepper.

October 5, 2022 0 comment
0 FacebookTwitterPinterestEmail
General Recipes

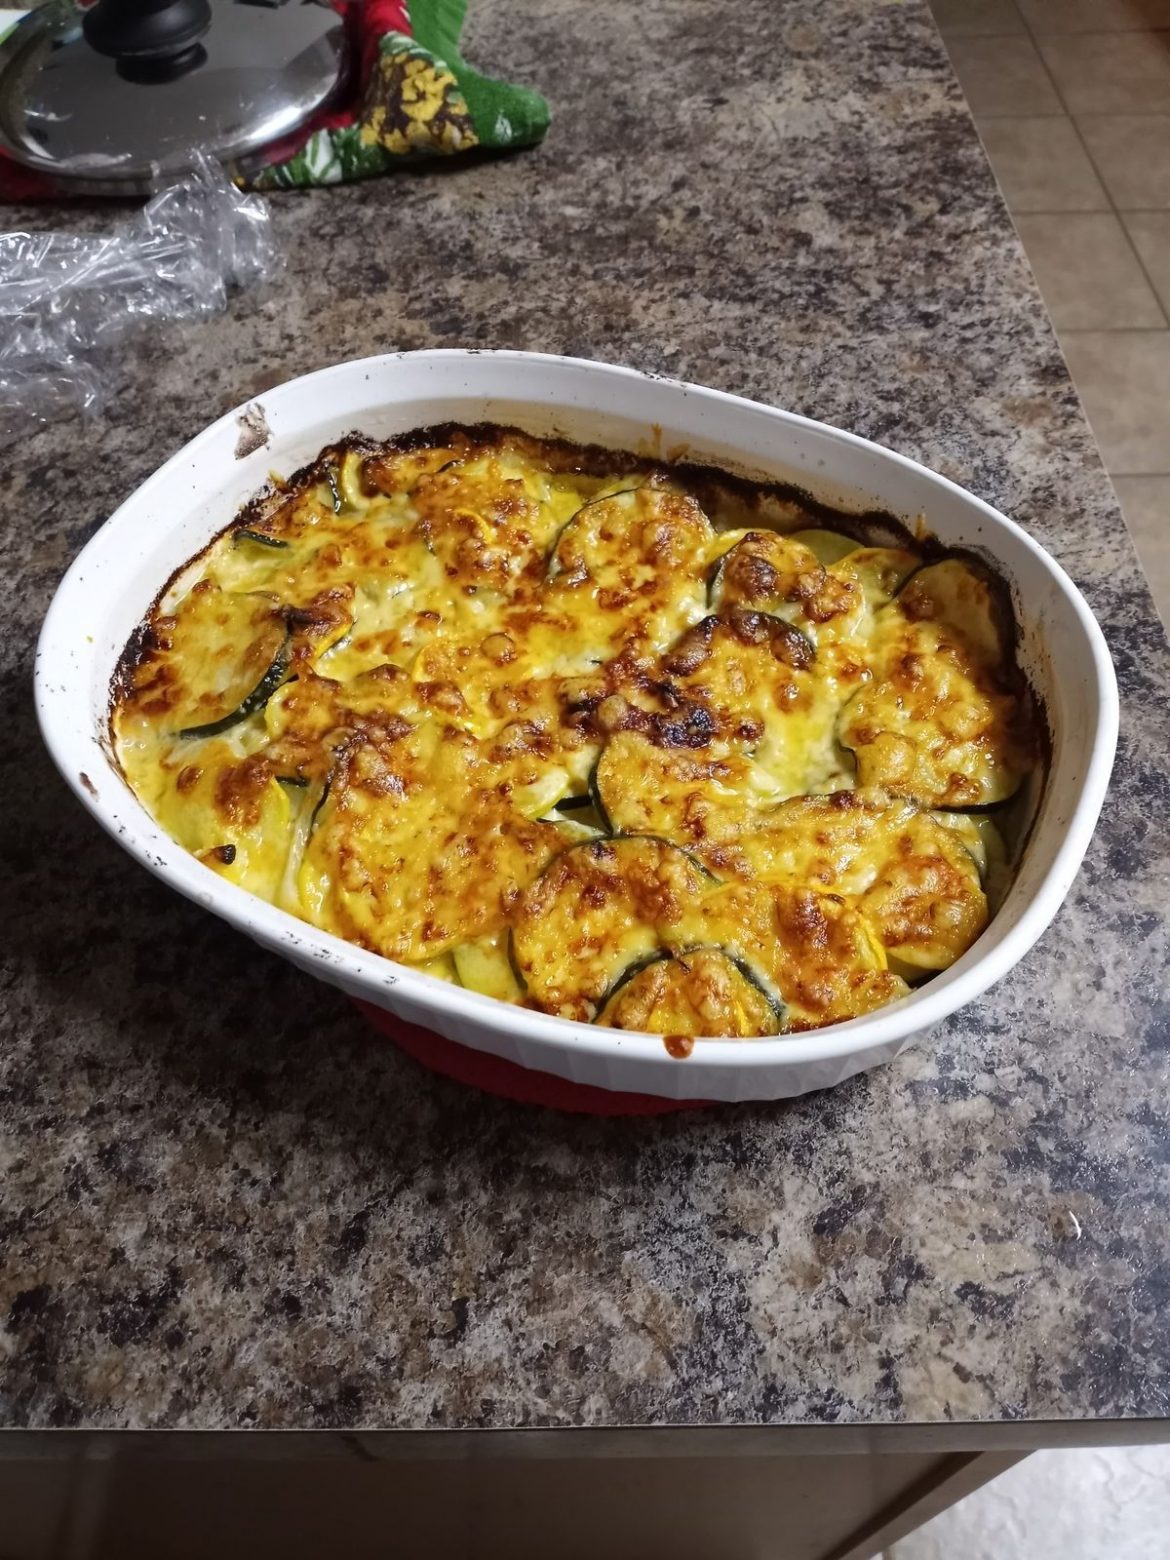
ZUCCHINI AND SQUASH AU GRATIN

by Rebecca October 5, 2022
written by Rebecca

Prep time: 30 mins | Yield: 4-6 servings

Lusciously creamy and cheesy, this Zucchini Gratin with Yellow Squash is a great meal option. It is incredibly easy and quick to make using just a few basic ingredients (zucchini, yellow squash, and onions along with a few pantry staples).

This recipe is great to use all your extra zucchini and squash. All it takes is a few minutes to make this Zucchini Gratin with Yellow Squash, making this an excellent dinner option during busy days. Pair this delicious Zucchini Gratin with Yellow Squash with grilled salmon or roasted chicken for a pleasing dinner that even your picky eaters will love!

Enjoy tender pieces of zucchini, and yellow squash smothered in a mouthwatering creamy cheese sauce all year round with this easy recipe. It is no doubt that this delicious, easy skillet meal will surely become your new family’s favorite!

Ingredients

1 large zucchini, sliced

2 tablespoons butter

1 large yellow squash, sliced

1 teaspoon garlic (fresh or jar)

Shredded cheese, just a handful to sprinkle

1/2 can of heavy cream

Sprinkle of oregano

Parmesan cheese, to taste

2 medium shallots, minced

Salt and pepper, to taste

HOW TO MAKE ZUCCHINI AND SQUASH AU GRATIN

Step 1: Prepare the oven. Preheat it to 450 degrees F.

Step 2: In butter, saute the shallots and garlic until the shallots are transparent.

Step 3: To the shallots and garlic, add the zucchini along with the squash, heavy cream, salt, pepper, and Parmesan cheese. Continue to cook for another 8 to 10 minutes or until the mixture is bubbly.

Step 4: Into a baking dish, transfer the mixture and lightly sprinkle the Parmesan and shredded cheese on top. Place in the preheated oven and bake for about 10 to 14 minutes or until the top is golden brown.

Step 5: Remove from the oven when done, and serve the Zucchini and Squash Au Gratin immediately. Enjoy!

ZUCCHINI AND SQUASH AU GRATIN

Rebecca Prep time: 30 mins | Yield: 4-6 servings Lusciously creamy and cheesy, this Zucchini Gratin with Yellow Squash is a great meal option. It is incredibly easy and quick to… General Recipes ZUCCHINI AND SQUASH AU GRATIN European Print This
Serves: 4-6 Prep Time: 30 mins
Nutrition facts: 200 calories 20 grams fat
Rating: 5.0/5
( 1 voted )

Ingredients

  • 1 large zucchini, sliced
  • 2 tablespoons butter
  • 1 large yellow squash, sliced
  • 1 teaspoon garlic (fresh or jar)
  • Shredded cheese, just a handful to sprinkle
  • 1/2 can of heavy cream
  • Sprinkle of oregano
  • Parmesan cheese, to taste
  • 2 medium shallots, minced
  • Salt and pepper, to taste

Instructions

Step 1: Prepare the oven. Preheat it to 450 degrees F.

Step 2: In butter, saute the shallots and garlic until the shallots are transparent.

Step 3: To the shallots and garlic, add the zucchini along with the squash, heavy cream, salt, pepper, and Parmesan cheese. Continue to cook for another 8 to 10 minutes or until the mixture is bubbly.

Step 4: Into a baking dish, transfer the mixture and lightly sprinkle the Parmesan and shredded cheese on top. Place in the preheated oven and bake for about 10 to 14 minutes or until the top is golden brown.

Step 5: Remove from the oven when done, and serve the Zucchini and Squash Au Gratin immediately. Enjoy!

October 5, 2022 0 comment
0 FacebookTwitterPinterestEmail
General Recipes

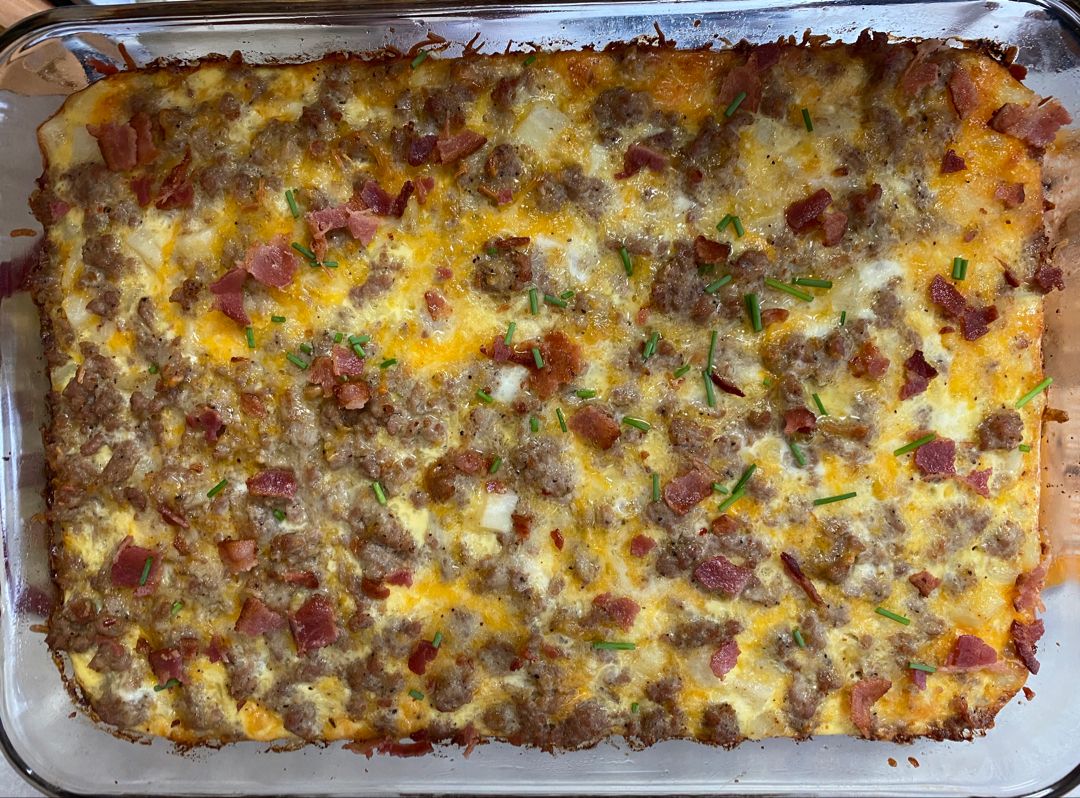
CHRISTMAS BREAKFAST SAUSAGE CASSEROLE

by Rebecca October 5, 2022
written by Rebecca

This Breakfast Sausage Casserole is a staple at home not only during Christmas but all year round! This casserole makes our breakfast extra special!

I love that I can assemble this casserole the night before as it makes life so much easier. In the morning, just pop this in the oven and viola! You have a merry meal just in time for breakfast. Pair this Breakfast Sausage Casserole with a light side such as yoghurt or some fresh fruits. But this casserole is super filling on its own, so you can just serve this by itself. If you have any leftovers, keep them in the fridge for up to 5 days and just reheat in the oven or microwave until warm. Also, if you are looking for a freezer-friendly meal, this casserole is a perfect option! After baking the casserole, let it cool completely, and freezer for up to 3 months.

Ingredients

1 lb ground pork sausage

1 tsp mustard powder

3 large eggs, beaten

2 c. of milk

8 oz. shredded mild cheddar cheese

6 c. white bread, toasted and cut into dice

½ tsp salt

HOW TO MAKE CHRISTMAS BREAKFAST SAUSAGE CASSEROLE

Step 1: Into a medium skillet, place the sausage and cook over medium heat until evenly browned.

Step 2: In a medium-sized bowl, combine the mustard powder, salt, eggs, and milk. Next, add the sausage along with the diced bread and cheese. Mix well.

Step 3: Into a greased baking dish, transfer the mixture, spreading it out. Place in the fridge for at least 8 hours or overnight.

Step 4: When ready to bake, remove it from the fridge and let it come to room temperature. Then, place in the preheated oven and bake for about 45 minutes to 1 hour at 350 degrees, covered. Remove the cover and adjust the oven temperature to 325 degrees F. Continue baking for additional 35 minutes until the casserole is done.

CHRISTMAS BREAKFAST SAUSAGE CASSEROLE

Rebecca This Breakfast Sausage Casserole is a staple at home not only during Christmas but all year round! This casserole makes our breakfast extra special! I love that I can assemble… General Recipes CHRISTMAS BREAKFAST SAUSAGE CASSEROLE European Print This
Nutrition facts: 200 calories 20 grams fat
Rating: 4.7/5
( 3 voted )

Ingredients

  • 1 lb ground pork sausage
  • 1 tsp mustard powder
  • 3 large eggs, beaten
  • 2 c. of milk
  • 8 oz. shredded mild cheddar cheese
  • 6 c. white bread, toasted and cut into dice
  • ½ tsp salt

Instructions

Step 1: Into a medium skillet, place the sausage and cook over medium heat until evenly browned.

Step 2: In a medium-sized bowl, combine the mustard powder, salt, eggs, and milk. Next, add the sausage along with the diced bread and cheese. Mix well.

Step 3: Into a greased baking dish, transfer the mixture, spreading it out. Place in the fridge for at least 8 hours or overnight.

Step 4: When ready to bake, remove it from the fridge and let it come to room temperature. Then, place in the preheated oven and bake for about 45 minutes to 1 hour at 350 degrees, covered. Remove the cover and adjust the oven temperature to 325 degrees F. Continue baking for additional 35 minutes until the casserole is done.

October 5, 2022 0 comment
0 FacebookTwitterPinterestEmail
General Recipes

Snowball Cookies

by Rebecca October 5, 2022
written by Rebecca

Christmas is fast approaching, and these snowball cookies are just in time. These cookies are a classic holiday staple. They are buttery and nutty with an amazing airy and melt-in-your-mouth texture that reminds me of cotton candy.

Ingredients

1 1/2 c. confectioners’ sugar, divided

1 c. unsalted butter, room temperature (use real butter)

2 1/4 c. all-purpose flour

2 teaspoons vanilla extract

3/4 c. finely chopped nuts (I always use pecans) – toasted is optional

1/2 teaspoon salt

How to make Snowball Cookies

Step 1: Prepare the oven. Preheat it to 375 degrees F. Using parchment paper or a silicone baking mat, line a cookie sheet. Or you can grease the pan with butter.

Step 2: Place the butter and half c of the confectioners’ sugar in a large mixing bowl. Beat well until smooth. Then, add the vanilla extract and mix until well blended and smooth.

Step 3: Next, add the flour, mixing it on low speed until just combined and you have a thick and crumbly dough. Then, fold in the chopped nuts.

Step 4: Form a tbsp-sized ball of dough into a ball. Repeat with all the dough.

Step 5: In a container, place the dough balls and keep them in the fridge for about 1 hour. After an hour, transfer the dough balls to the prepared cookie sheet 1 to 2-inches apart. Chilling the dough is optional but recommended to help the cookies hold their form.

Step 6: Place in the preheated oven and bake for about 7 to 10 minutes or until the bottom of the cookies is just lightly browned and the cookies are set. Take the cookies out of the oven when done and let them cool for a couple of minutes.

Step 7: Into a small bowl, place the rest of the confectioners’ sugar. To the confectioners’ sugar, roll the warm cookie one by one until well coated. On the cooling rack, place the cookies and let them cool completely before rolling them again in the confectioners’ sugar.

Step 8: Serve or keep the cookies in an airtight container for up to 1 week.

Notes:

To prevent the cookies from getting dry and crumbling, carefully measure the flour and confectioners’ sugar.

So the cookies will bind better, ensure to chop the nuts small.

To keep the cookies uniform in size, use a cookie scoop.

For people who are allergic to nuts, you can completely omit them or swap them with mini chocolate chips or toffee bits.

These cookies are freezer-friendly. You can make them up to four days ahead.

Snowball Cookies

Rebecca Christmas is fast approaching, and these snowball cookies are just in time. These cookies are a classic holiday staple. They are buttery and nutty with an amazing airy and melt-in-your-mouth… General Recipes Snowball Cookies European Print This
Nutrition facts: 200 calories 20 grams fat
Rating: 5.0/5
( 1 voted )

Ingredients

  • 1 1/2 c. confectioners’ sugar, divided
  • 1 c. unsalted butter, room temperature (use real butter)
  • 2 1/4 c. all-purpose flour
  • 2 teaspoons vanilla extract
  • 3/4 c. finely chopped nuts (I always use pecans) – toasted is optional
  • 1/2 teaspoon salt

Instructions

Step 1: Prepare the oven. Preheat it to 375 degrees F. Using parchment paper or a silicone baking mat, line a cookie sheet. Or you can grease the pan with butter.

Step 2: Place the butter and half c of the confectioners’ sugar in a large mixing bowl. Beat well until smooth. Then, add the vanilla extract and mix until well blended and smooth.

Step 3: Next, add the flour, mixing it on low speed until just combined and you have a thick and crumbly dough. Then, fold in the chopped nuts.

Step 4: Form a tbsp-sized ball of dough into a ball. Repeat with all the dough.

Step 5: In a container, place the dough balls and keep them in the fridge for about 1 hour. After an hour, transfer the dough balls to the prepared cookie sheet 1 to 2-inches apart. Chilling the dough is optional but recommended to help the cookies hold their form.

Step 6: Place in the preheated oven and bake for about 7 to 10 minutes or until the bottom of the cookies is just lightly browned and the cookies are set. Take the cookies out of the oven when done and let them cool for a couple of minutes.

Step 7: Into a small bowl, place the rest of the confectioners’ sugar. To the confectioners’ sugar, roll the warm cookie one by one until well coated. On the cooling rack, place the cookies and let them cool completely before rolling them again in the confectioners’ sugar.

Step 8: Serve or keep the cookies in an airtight container for up to 1 week.

Notes

To prevent the cookies from getting dry and crumbling, carefully measure the flour and confectioners’ sugar. So the cookies will bind better, ensure to chop the nuts small. To keep the cookies uniform in size, use a cookie scoop. For people who are allergic to nuts, you can completely omit them or swap them with mini chocolate chips or toffee bits. These cookies are freezer-friendly. You can make them up to four days ahead.

October 5, 2022 0 comment
0 FacebookTwitterPinterestEmail
Newer Posts
Older Posts

Popular Posts

  • 1

    Crispy Crunchy Parmesan Potatoes

    March 21, 2020
  • 2

    CROCK POT SMOTHERED PORK CHOPS

    March 21, 2020
  • Facebook
  • Twitter

@2019 - All Right Reserved.


Back To Top