Cook it once
  • Home
  • Privacy Policy
  • Recipes
    • KETO
    • LC
    • WW
  • Tips
  • Contact
Cook it once
  • Home
  • Privacy Policy
  • Recipes
    • KETO
    • LC
    • WW
  • Tips
  • Contact
Category:

General Recipes

General Recipes

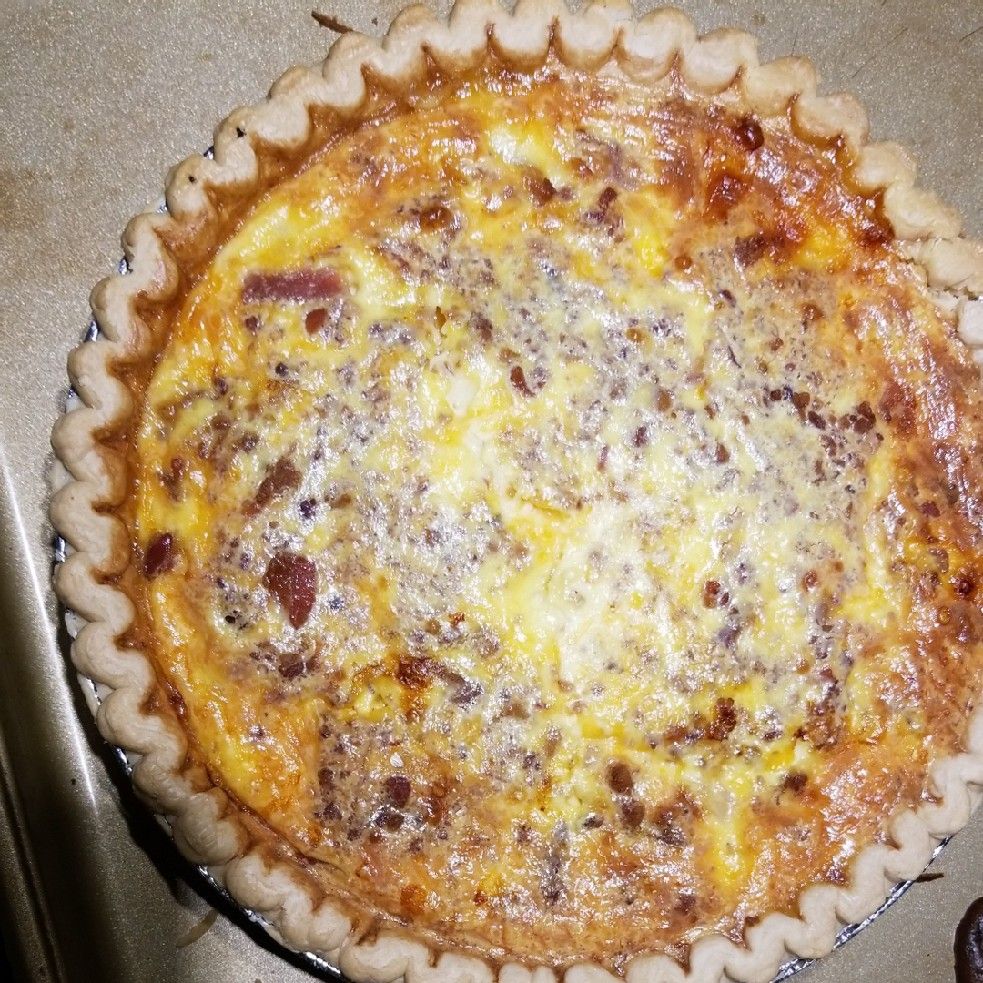
Easy Ham and Cheese Quiche

by Rebecca May 5, 2022
written by Rebecca

PREP TIME: 10 MINS | COOK TIME: 40 MINS | TOTAL TIME: 50 MINS | SERVINGS: 8

This easy ham and cheese quiche is incredibly easy to make using only a few readily available ingredients. The perfect recipe to use your leftover ham. This wonderful quiche is rich and cheesy. You can serve this for breakfast, brunch, lunch, or even dinner.

Quiches are amazing. They are very versatile, super easy and quick to whip up and perfect for using up leftovers. Whenever I find myself with leftover ham this easy ham and cheese quiche is the first recipe I think of. If desired, you can swap ham with bacon. Either way, this quiche is perfect! This quiche tastes great either warm or chilled.

Ingredients

4 eggs, lightly beaten

1/2 medium yellow onion, chopped

1 tbsp butter

1 c. half-and-half

1 1/2 c. diced ham

1 c. shredded cheddar cheese

1 c. shredded Swiss cheese

1 deep dish frozen pie crust

1/4 tsp salt

1/4 tsp black pepper

How to make Easy Ham and Cheese Quiche

Step 1: Prepare the oven. Preheat it to 375 degrees.

Step 2: In a small nonstick pan, melt the butter. Once the butter has melted, add the onion and cook until soft. Set aside the softened onion when done and let it cool a little.

Step 3: Place the eggs, half-and-half, salt, and pepper in a large bowl. Mix well until combined. Then, add the ham, cheddar cheese, and Swiss cheese. Mix well until blended. You can reserve a handful of cheese to sprinkle on top of the quiche.

Step 4: To the mixture in the large bowl, mix in the cooked onion.

Step 5: Into the pie crust, pour the filling. Set the pie crust on a baking sheet and place it in the preheated oven. Bake for about 40 to 45 minutes until the quiche is set.

Step 6: Remove from the oven when done and serve the quiche either warm or chilled. Enjoy!

Nutrition Info.

Calories: 356 kcal
May 5, 2022 0 comment
0 FacebookTwitterPinterestEmail
General Recipes

Magnolia Lemon Pie

by Rebecca May 5, 2022
written by Rebecca

Prep Time: 20 mins | Cook Time: 18 mins | Total Time: 38 mins | Servings: 6-8

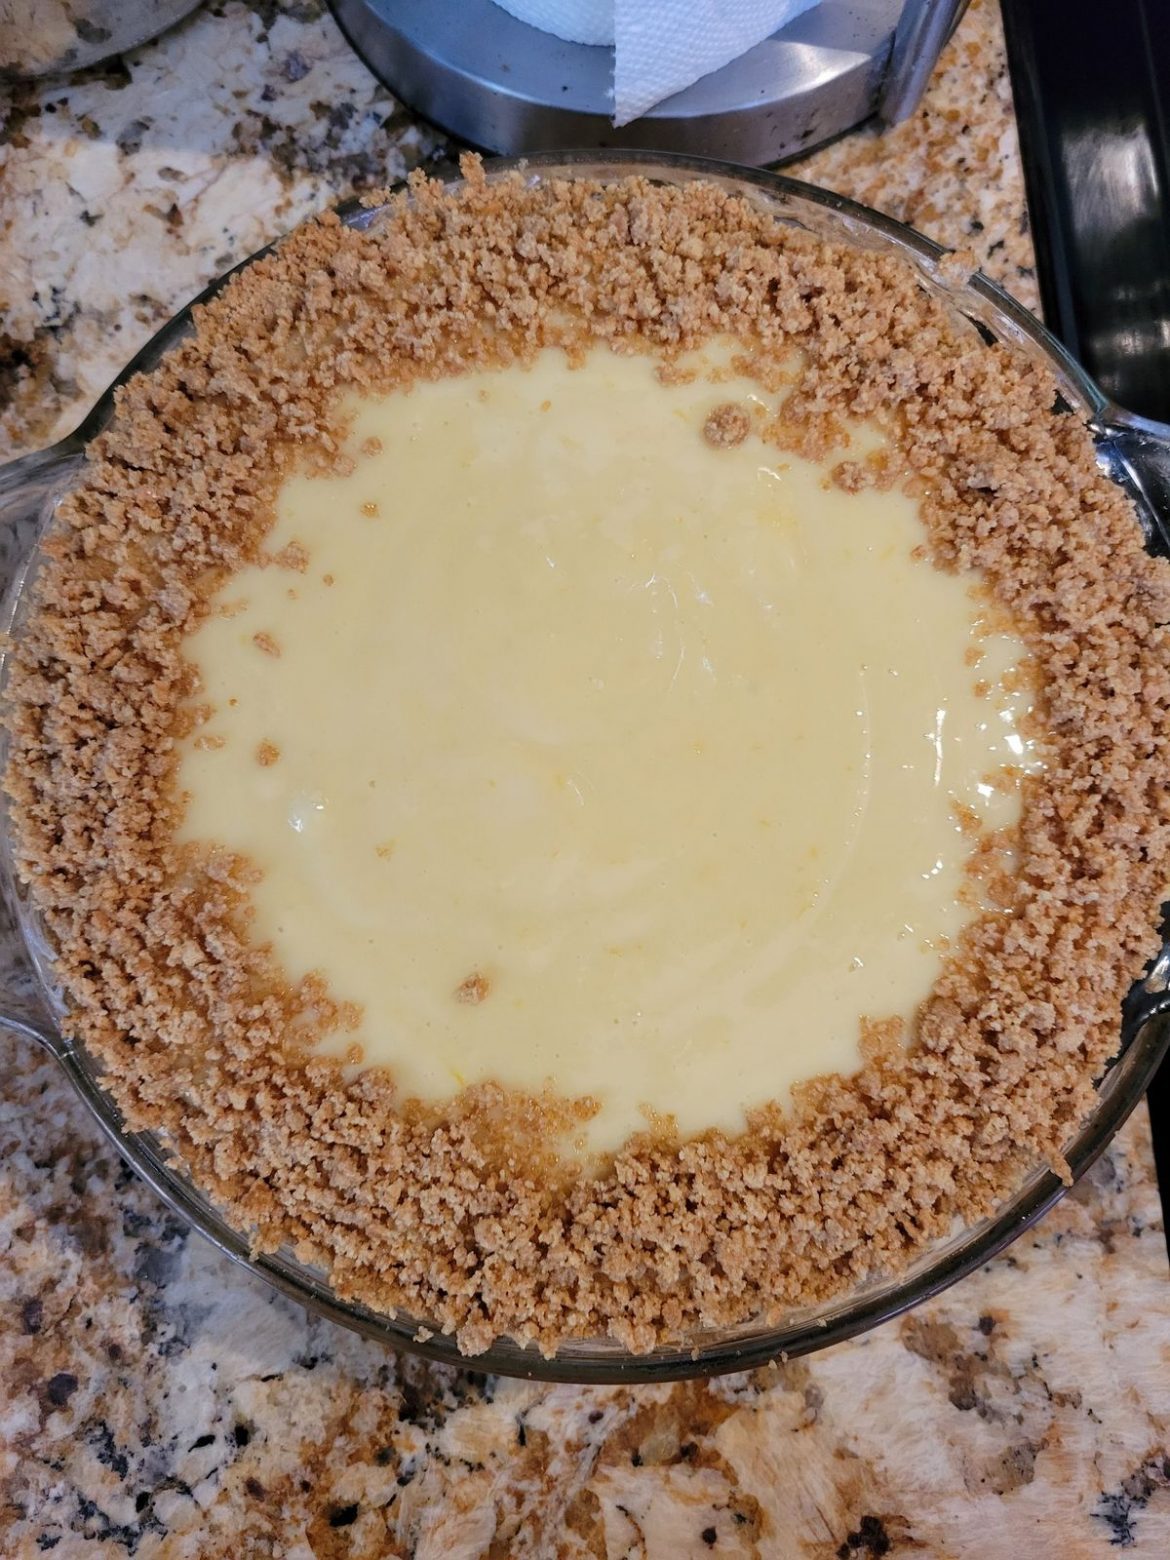
Very refreshing, creamy, lemony, and decadent – this Magnolia Lemon Pie is pure heaven! Impress everyone with this amazing pie from the simple Graham crust to a creamy and perfectly sweet and lemony filling topped with homemade whipped cream.

Ingredients

Crust:

2 tablespoons light brown sugar

6 tablespoons salted butter, melted

1 1/2 c Graham cracker crumbs 1 sleeve Graham crackers, crushed in a food processor

Filling:

3 egg yolks

2 14-ounces cans of sweetened condensed milk

Pinch salt

2/3 c. freshly squeezed lemon juice around 4-5 lemons

Topping:

2 tablespoons powdered sugar

1 c. heavy whipping cream

1/4 teaspoon pure vanilla extract

How to make Magnolia Lemon Pie

Step 1: Prepare the oven. Preheat it to 350 degrees.

Crust:

Step 2: In a small bowl, place the Graham cracker crumbs, brown sugar, and melted butter. Mix well until combined. Into the bottom and sides of a 9-inch deep-dish pie plate, evenly press the mixture. Place in the preheated oven and bake for about 8 minutes or until lightly golden brown. Remove from the oven when done and let the crust cool.

Filling:

Step 3: Add the sweetened condensed milk to a medium bowl along with the egg yolks, lemon juice, and salt. Beat for about 2 to 3 minutes using an electric mixer on medium speed.

Step 4: Into the prepared crust, pour the mixture. Return to the oven and bake for about 10 minutes.

Step 5: Take the pie out of the oven when done and let it cool. Tent the pie once cooled and keep in the fridge for at least 2 hours until set.

Topping:

Step 6: Place the heavy cream, powdered sugar, and vanilla in a medium bowl. Beat well using an electric mixer on medium-high speed until fluffy soft peaks form.

Step 7: Take the pie out of the fridge and cover with the whipped topping.

Step 8: Slice and serve. Enjoy!

Magnolia Lemon Pie

Rebecca Prep Time: 20 mins | Cook Time: 18 mins | Total Time: 38 mins | Servings: 6-8 Very refreshing, creamy, lemony, and decadent – this Magnolia Lemon Pie is pure… General Recipes Magnolia Lemon Pie European Print This
Serves: 6-8 Prep Time: 20 mins Cooking Time: 18 mins 18 mins
Nutrition facts: 200 calories 20 grams fat
Rating: 5.0/5
( 1 voted )

Ingredients

  • Crust:
  • 2 tablespoons light brown sugar
  • 6 tablespoons salted butter, melted
  • 1 1/2 c Graham cracker crumbs 1 sleeve Graham crackers, crushed in a food processor
  • Filling:
  • 3 egg yolks
  • 2 14-ounces cans of sweetened condensed milk
  • Pinch salt
  • 2/3 c. freshly squeezed lemon juice around 4-5 lemons
  • Topping:
  • 2 tablespoons powdered sugar
  • 1 c. heavy whipping cream
  • 1/4 teaspoon pure vanilla extract

Instructions

Step 1: Prepare the oven. Preheat it to 350 degrees.

Crust:

Step 2: In a small bowl, place the Graham cracker crumbs, brown sugar, and melted butter. Mix well until combined. Into the bottom and sides of a 9-inch deep-dish pie plate, evenly press the mixture. Place in the preheated oven and bake for about 8 minutes or until lightly golden brown. Remove from the oven when done and let the crust cool.

Filling:

Step 3: Add the sweetened condensed milk to a medium bowl along with the egg yolks, lemon juice, and salt. Beat for about 2 to 3 minutes using an electric mixer on medium speed.

Step 4: Into the prepared crust, pour the mixture. Return to the oven and bake for about 10 minutes.

Step 5: Take the pie out of the oven when done and let it cool. Tent the pie once cooled and keep in the fridge for at least 2 hours until set.

Topping:

Step 6: Place the heavy cream, powdered sugar, and vanilla in a medium bowl. Beat well using an electric mixer on medium-high speed until fluffy soft peaks form.

Step 7: Take the pie out of the fridge and cover with the whipped topping.

Step 8: Slice and serve. Enjoy!

May 5, 2022 0 comment
0 FacebookTwitterPinterestEmail
General Recipes

Easy 20 Minute Tortellini Pasta Carbonara

by Rebecca May 5, 2022
written by Rebecca

Prep Time: 5 mins | Cook Time: 15 mins | Total Time: 20 mins | Servings: 6

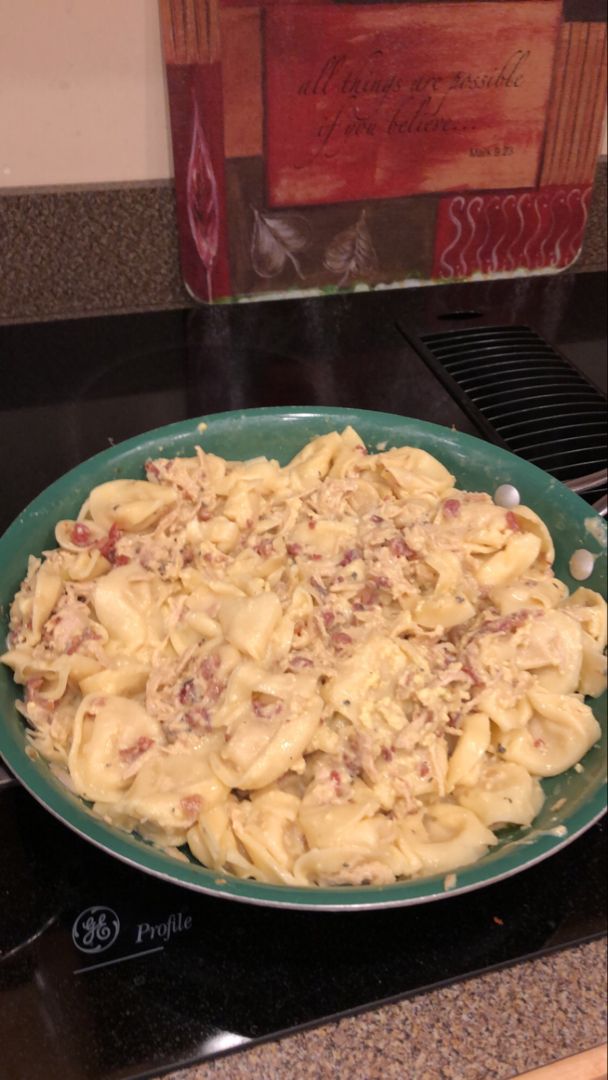
This easy tortellini pasta carbonara is a great, easy, and quick weeknight dinner. A family-approved meal that you can throw together in less than twenty minutes. Very simple, delicious, yet elegant enough to serve for entertaining.

Ingredients

8 slices bacon, diced

20 ounces family style package of Buitoni Three Cheese Tortellini fresh

1 shallot, minced

4 large eggs, room temperature use pasteurized if concerned

8 cloves garlic, finely minced

1 c. freshly grated Parmesan cheese

salt and black pepper to taste

2 tablespoons fresh parsley, chopped, optional garnish

2 tablespoons fresh basil, chopped, optional garnish

How to make Easy 20 Minute Tortellini Pasta Carbonara

Step 1: In a small bowl, place the eggs and Parmesan cheese. Mix well until blended and set aside.

Step 2: In a large skillet, add the diced bacon and cook for about 5 to 6 minutes over medium to medium-high heat until crispy. With a paper towel-lined plate, transfer the cooked bacon, leaving the grease in the pan.

Step 3: In a large pot of salted boiling water, cook the tortellini pasta following the package directions until al dente. Before draining the pasta, reserve about 1 c of the pasta water.

Step 4: In the skillet with the bacon drippings, add the shallot and saute for about 1 to 2 minutes.

Step 5: Into the egg mixture, pour about 2 tbsp of the hot pasta water, whisking quickly as you pour the water.

Step 6: Turn the heat off and toss the drained pasta into the skillet. Working quickly, add the tempered eggs, then the cheese mixture a little at a time, stirring as you add in a bit more. As you toss, add the reserved pasta water a tbsp or so at a time until you get your desired consistency.

Step 7: To taste, season with salt and pepper. Then, sprinkle the cooked bacon. Serve the carbonara right away with more Parmesan cheese, parsley, and basil. Enjoy!

Easy 20 Minute Tortellini Pasta Carbonara

Rebecca Prep Time: 5 mins | Cook Time: 15 mins | Total Time: 20 mins | Servings: 6 This easy tortellini pasta carbonara is a great, easy, and quick weeknight dinner.… General Recipes Easy 20 Minute Tortellini Pasta Carbonara European Print This
Serves: 6 Prep Time: 5 mins Cooking Time: 15 mins1 15 mins1
Nutrition facts: 200 calories 20 grams fat
Rating: 5.0/5
( 1 voted )

Ingredients

  • 8 slices bacon, diced
  • 20 ounces family style package of Buitoni Three Cheese Tortellini fresh
  • 1 shallot, minced
  • 4 large eggs, room temperature use pasteurized if concerned
  • 8 cloves garlic, finely minced
  • 1 c. freshly grated Parmesan cheese
  • salt and black pepper to taste
  • 2 tablespoons fresh parsley, chopped, optional garnish
  • 2 tablespoons fresh basil, chopped, optional garnish

Instructions

Step 1: In a small bowl, place the eggs and Parmesan cheese. Mix well until blended and set aside.

Step 2: In a large skillet, add the diced bacon and cook for about 5 to 6 minutes over medium to medium-high heat until crispy. With a paper towel-lined plate, transfer the cooked bacon, leaving the grease in the pan.

Step 3: In a large pot of salted boiling water, cook the tortellini pasta following the package directions until al dente. Before draining the pasta, reserve about 1 c of the pasta water.

Step 4: In the skillet with the bacon drippings, add the shallot and saute for about 1 to 2 minutes.

Step 5: Into the egg mixture, pour about 2 tbsp of the hot pasta water, whisking quickly as you pour the water.

Step 6: Turn the heat off and toss the drained pasta into the skillet. Working quickly, add the tempered eggs, then the cheese mixture a little at a time, stirring as you add in a bit more. As you toss, add the reserved pasta water a tbsp or so at a time until you get your desired consistency.

Step 7: To taste, season with salt and pepper. Then, sprinkle the cooked bacon. Serve the carbonara right away with more Parmesan cheese, parsley, and basil. Enjoy!

May 5, 2022 0 comment
0 FacebookTwitterPinterestEmail
General Recipes

Italian Zucchini Bake

by Rebecca May 5, 2022
written by Rebecca

Prep Time: 25 mins | Cook Time: 1 hr | Total Time: 1 hr 25 mins | Servings: 12 (Makes a 9×13 pan)

This is a wonderful Italian Zucchini Bake that you can easily make from scratch without a baking mix. The perfect dish for brunch and parties. This tasty Italian zucchini bake has been my favorite side dish to pair with just anything!

Ingredients

4 eggs (I use extra-large)

1 ½ lbs zucchini (3 medium)

2 medium garlic cloves (pressed or finely chopped)

1 small white onion

½ c. olive oil (or vegetable or canola)

1 c. all-purpose flour

½ c. freshly grated Parmesan cheese

4 tsp baking powder

½ c. freshly grated Pecorino Romano cheese

¼ tsp dried basil

½ tsp salt

½ tsp pepper

fresh parsley for garnish (optional)

butter to grease your pan

How to make Italian Zucchini Bake

Step 1: Prepare the oven. Preheat it to 375 degrees F. Using butter, grease a 9 x 13-inch glass pan.

Step 2: After rinsing the zucchini, slice the tip and root ends off. Using a paper towel, pat dries the zucchini. Make sure to leave the skin on.

Step 3: Into 1/8-inch rounds, slice the zucchini with a mandoline, paring knife, or food processor. Into a large mixing bowl, place the slices of zucchini.

Step 4: Pat the slices of zucchini using paper towels, then squeeze gently to let the paper towels absorb the excess moisture.

Step 5: Add the peeled and finely chopped onion to the bowl. Then, the pressed garlic.

Step 6: Add the oil to a liquid measuring cup and beat in the eggs using a fork. Pour this into the bowl with the zucchini. Next, add the flour along with the baking powder, Parmesan, Romano, salt, pepper, and basil.

Step 7: Carefully mix everything using a wooden spoon while trying to separate the slices of the zucchini that are stuck together.

Step 8: Into the prepared pan, pour the zucchini mixture, then evenly smooth it out. Place in the preheated oven and bake for about 55 to 60 minutes, uncovered, or until the top is browned.

Step 9: Remove the casserole from the oven when done and allow it to rest for about 5 minutes. Slice and serve garnished with some parsley. You can keep any leftovers in the fridge for up to five days.

Notes:

For accurate results, I recommend weighing the zucchini or picking three medium zucchini if you do not have a scale.

I do not suggest using a large zucchini with more seeds as they are bitter.

If using an 8 x 8-inch pan, just halve the ingredients and bake as directed.

Nutrition Facts:

Calories: 188 kcal | Carbohydrates: 11g | Protein: 6g | Fat: 13g | Saturated Fat: 3g | Cholesterol: 62mg | Sodium: 238mg | Potassium: 336mg | Fiber: 1g | Sugar: 1g | Vitamin A: 245IU | Vitamin C: 11mg | Calcium: 170mg | Iron: 1.2mg

Italian Zucchini Bake

Rebecca Prep Time: 25 mins | Cook Time: 1 hr | Total Time: 1 hr 25 mins | Servings: 12 (Makes a 9×13 pan) This is a wonderful Italian Zucchini Bake… General Recipes Italian Zucchini Bake European Print This
Serves: 12 Prep Time: 25 mins Cooking Time: 1 hr 1 hr
Nutrition facts: 188 calories 13 fat
Rating: 5.0/5
( 1 voted )

Ingredients

  • 4 eggs (I use extra-large)
  • 1 ½ lbs zucchini (3 medium)
  • 2 medium garlic cloves (pressed or finely chopped)
  • 1 small white onion
  • ½ c. olive oil (or vegetable or canola)
  • 1 c. all-purpose flour
  • ½ c. freshly grated Parmesan cheese
  • 4 tsp baking powder
  • ½ c. freshly grated Pecorino Romano cheese
  • ¼ tsp dried basil
  • ½ tsp salt
  • ½ tsp pepper
  • fresh parsley for garnish (optional)
  • butter to grease your pan

Instructions

Step 1: Prepare the oven. Preheat it to 375 degrees F. Using butter, grease a 9 x 13-inch glass pan.

Step 2: After rinsing the zucchini, slice the tip and root ends off. Using a paper towel, pat dries the zucchini. Make sure to leave the skin on.

Step 3: Into 1/8-inch rounds, slice the zucchini with a mandoline, paring knife, or food processor. Into a large mixing bowl, place the slices of zucchini.

Step 4: Pat the slices of zucchini using paper towels, then squeeze gently to let the paper towels absorb the excess moisture.

Step 5: Add the peeled and finely chopped onion to the bowl. Then, the pressed garlic.

Step 6: Add the oil to a liquid measuring cup and beat in the eggs using a fork. Pour this into the bowl with the zucchini. Next, add the flour along with the baking powder, Parmesan, Romano, salt, pepper, and basil.

Step 7: Carefully mix everything using a wooden spoon while trying to separate the slices of the zucchini that are stuck together.

Step 8: Into the prepared pan, pour the zucchini mixture, then evenly smooth it out. Place in the preheated oven and bake for about 55 to 60 minutes, uncovered, or until the top is browned.

Step 9: Remove the casserole from the oven when done and allow it to rest for about 5 minutes. Slice and serve garnished with some parsley. You can keep any leftovers in the fridge for up to five days.

Notes

For accurate results, I recommend weighing the zucchini or picking three medium zucchini if you do not have a scale. I do not suggest using a large zucchini with more seeds as they are bitter. If using an 8 x 8-inch pan, just halve the ingredients and bake as directed.

May 5, 2022 0 comment
0 FacebookTwitterPinterestEmail
General Recipes

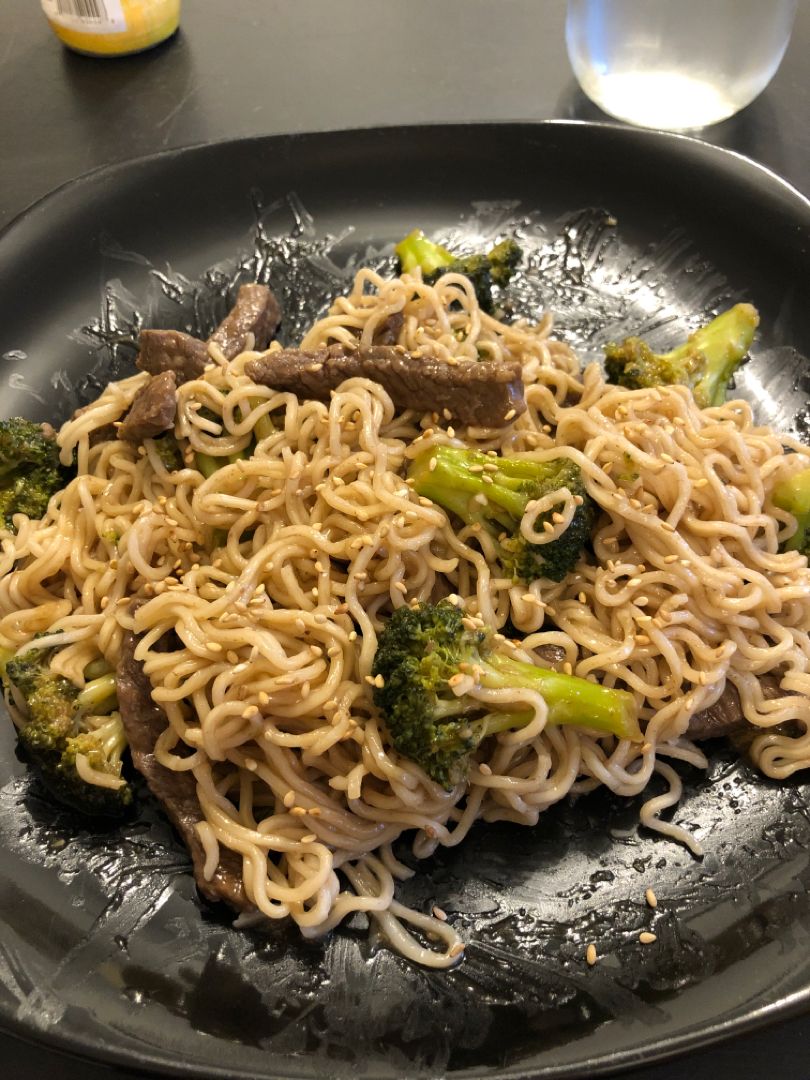
BEEF AND BROCCOLI RAMEN

by Rebecca May 5, 2022
written by Rebecca

PREP TIME: 15 MINS | COOK TIME: 10 MINS | MARINATING: 1 HR | TOTAL TIME: 25 MINS | SERVINGS: 4

This savory beef and broccoli ramen is another mouthwatering dish that you can whip up easily. The perfect weeknight dinner with flank steak and tender but crisp broccoli in a sweet and tangy Asian sauce.

INGREDIENTS

1 lb flank steak or skirt steak thinly sliced against the grain

4 cloves garlic, minced

2 tbsp oil, divided

3 c. broccoli

3 packets of ramen noodles, seasoning packet discarded (3 oz. each)

1 tbsp low sodium soy sauce

1 tbsp rice wine vinegar

Sauce:

1 tbsp ginger, minced

3/4 c. low sodium beef broth

2 tbsp cornstarch

6 tbsp low sodium soy sauce

6 tbsp oyster sauce

2 tbsp rice wine vinegar

2 tsp sesame oil

1 tbsp brown sugar

1/4 c. water

sesame seeds for garnish if desired

1/2-1 tsp Sriracha (adjust depending on your preference)

HOW TO MAKE BEEF AND BROCCOLI RAMEN

Step 1: In a medium bowl, toss the steak, 1 tbsp soy sauce, and 1 tbsp rice wine vinegar. Place in the fridge for at least an hour or overnight to marinate the steak.

Step 2: In a medium bowl, place the sauce ingredients and mix well until combined.

Step 3: Following the package directions, cook the ramen noodles. Drain and set aside when done.

Step 4: To a large skillet, heat 1 tbsp oil. Then, add the broccoli and saute for a few minutes over medium heat until tender but still crisp. Set the broccoli aside when done.

Step 5: In the same pan, add the rest of the oil. Add the beef when the pan is almost smoking and saute for about 1 to 2 minutes. Then, toss in the garlic and continue to cook for a minute more.

Step 6: Return the broccoli to the pan. Pour in the sauce, stir, and simmer for about 1 to 2 minutes or until the sauce has thickened.

Step 7: Add the noodles and toss to coat.

Step 8: Remove from the heat when done and serve the beef and broccoli ramen right away with sprinkles of sesame seeds. Enjoy!

Nutrition Facts:

Amount Per Serving: Calories 328, Calories from Fat 135, Fat 15g23%, Saturated Fat 3g19%, Cholesterol 68mg23%, Sodium 1868mg81%, Potassium 762mg22%, Carbohydrates 18g6%, Fiber 2g8%, Sugar 5g6%, Protein 29g58%, Vitamin A 425IU9%, Vitamin C 62mg75%, Calcium 74mg7%, Iron 3mg17%

BEEF AND BROCCOLI RAMEN

Rebecca PREP TIME: 15 MINS | COOK TIME: 10 MINS | MARINATING: 1 HR | TOTAL TIME: 25 MINS | SERVINGS: 4 This savory beef and broccoli ramen is another mouthwatering… General Recipes BEEF AND BROCCOLI RAMEN European Print This
Serves: 4 Prep Time: 15 mins Cooking Time: 10 mins 10 mins
Nutrition facts: 328 calories 15 fat
Rating: 5.0/5
( 1 voted )

Ingredients

  • 1 lb flank steak or skirt steak thinly sliced against the grain
  • 4 cloves garlic, minced
  • 2 tbsp oil, divided
  • 3 c. broccoli
  • 3 packets of ramen noodles, seasoning packet discarded (3 oz. each)
  • 1 tbsp low sodium soy sauce
  • 1 tbsp rice wine vinegar
  • Sauce:
  • 1 tbsp ginger, minced
  • 3/4 c. low sodium beef broth
  • 2 tbsp cornstarch
  • 6 tbsp low sodium soy sauce
  • 6 tbsp oyster sauce
  • 2 tbsp rice wine vinegar
  • 2 tsp sesame oil
  • 1 tbsp brown sugar
  • 1/4 c. water
  • sesame seeds for garnish if desired
  • 1/2-1 tsp Sriracha (adjust depending on your preference)

Instructions

Step 1: In a medium bowl, toss the steak, 1 tbsp soy sauce, and 1 tbsp rice wine vinegar. Place in the fridge for at least an hour or overnight to marinate the steak.

Step 2: In a medium bowl, place the sauce ingredients and mix well until combined.

Step 3: Following the package directions, cook the ramen noodles. Drain and set aside when done.

Step 4: To a large skillet, heat 1 tbsp oil. Then, add the broccoli and saute for a few minutes over medium heat until tender but still crisp. Set the broccoli aside when done.

Step 5: In the same pan, add the rest of the oil. Add the beef when the pan is almost smoking and saute for about 1 to 2 minutes. Then, toss in the garlic and continue to cook for a minute more.

Step 6: Return the broccoli to the pan. Pour in the sauce, stir, and simmer for about 1 to 2 minutes or until the sauce has thickened.

Step 7: Add the noodles and toss to coat.

Step 8: Remove from the heat when done and serve the beef and broccoli ramen right away with sprinkles of sesame seeds. Enjoy!

May 5, 2022 0 comment
0 FacebookTwitterPinterestEmail
General Recipes

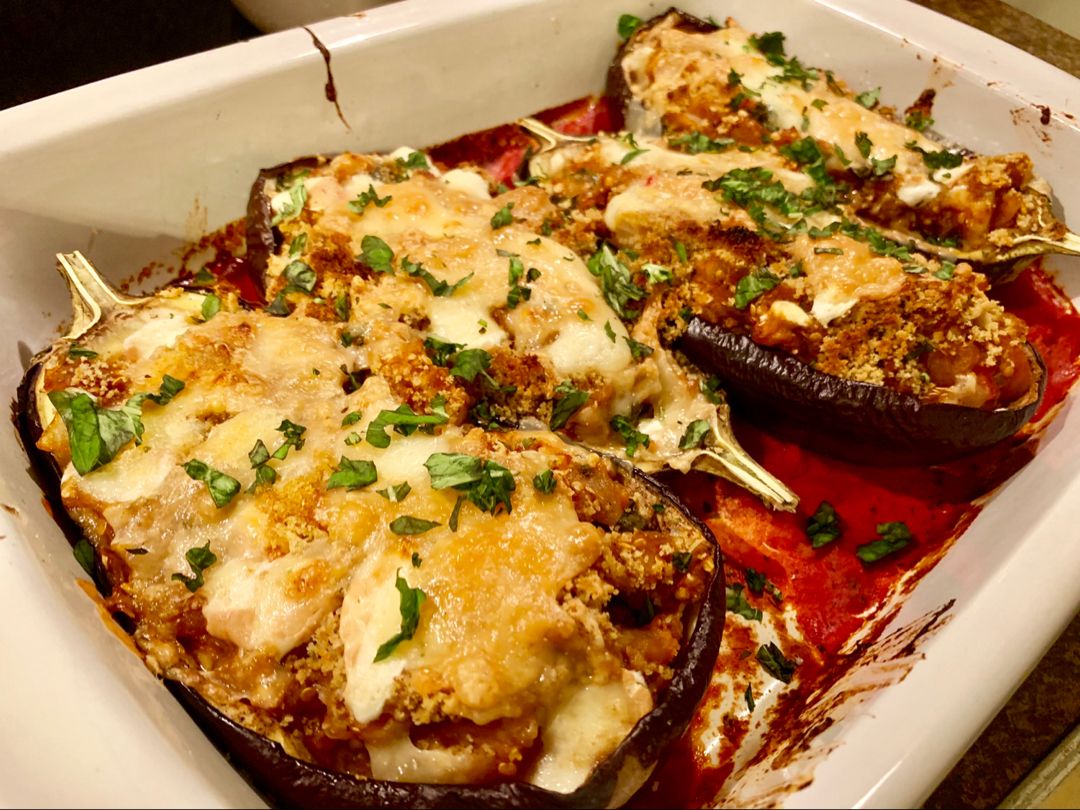
Stuffed Eggplant Parm

by Rebecca May 5, 2022
written by Rebecca

YIELD: 4 servings

This stuffed eggplant parm is pure love! Eggplant shells filled with classic eggplant Parmesan and topped with loads of melty mozzarella and crispy breadcrumbs. Crazy good, seriously cheesy, and flavorful – I’m pretty sure everyone will be drooling!

INGREDIENTS

3 tbsp plus 1 teaspoon olive oil, divided

3 cloves garlic, minced

2 medium eggplants (about 2 1/2 lbs total)

1/4 c. Panko breadcrumbs

1/4 c. torn fresh basil leaves, plus more for topping

1 medium yellow onion, finely chopped

2 c. marinara sauce, divided

1/2 c. finely grated Parmesan cheese (about 2 oz), divided

1 1/2 c. whole-milk, low-moisture shredded mozzarella, divided

3/4 tsp kosher salt, divided

1/2 tsp freshly ground black pepper, divided

How to make Stuffed Eggplant Parm

Step 1: In the middle, arrange the oven rack. Preheat the oven to 400 degrees F.

Step 2: In half lengthwise, cut the eggplants. Cut around the insides of each half using a paring knife, making sure to leave about half an inch border. Using a spoon, scoop out the flesh, making boats out of the eggplant shells. Then, coarsely chop the flesh. Set aside.

Step 3: Rub with 1 tbsp oil the insides of the hollowed eggplant shells and sprinkle with 1/4 tsp salt and pepper. In a 13 x 9-inch baking dish, place the shells, cut-side-up. Place in the preheated oven and roast for about 20 to 30 minutes until tender. Note that the cooking time varies depending on the size of the eggplant. Set the roasted eggplant aside when done.

Step 4: In a small bowl, place the breadcrumbs, 1 teaspoon of the oil, and a pinch of salt. Mix well and set aside.

Step 5: In a large skillet, heat the rest of the 2 tbsp oil over medium heat. Once the oil is shimmering, add the onion and cook for about 4 to 5 minutes, stirring often, until soft. Next, add the chopped eggplant flesh along with the rest of the half tsp salt and 1/4 tsp pepper. Continue to cook for another 2 minutes until the eggplant is tender, stirring occasionally. Then, whisk in 1 c marinara and cook for 2 minutes more until heated through. Take the skillet off the heat and add the basil, 1 c. mozzarella, and 1/4 c. Parmesan. Stir well.

Step 6: Set the broiler to high, then take the baking dish out of the oven. On a work surface, transfer the eggplant shells. Into the baking dish, pour the rest of the 1 c marinara sauce, spreading it into an even layer. Place the eggplant shells back into the baking dish and evenly spoon the filling into the shells. On top, sprinkle the rest of the half c. mozzarella, 1/4 c. Parmesan, and the reserved breadcrumb mixture.

Step 7: Return the baking dish to the oven and broil for about 2 to 4 minutes until the cheese has melted and bubbled and the breadcrumbs are browned.

Step 8: Serve the stuffed eggplant right away with marinara sauce from the baking dish and more basil. Enjoy!

NOTE:

Keep any leftovers in an airtight container and store them in the fridge for up to 4 days.

Nutrition Facts:
Calories 443, Fat 26.9 g (41.4%), Saturated 9.7 g (48.7%), Carbs 33.6 g (11.2%), Fiber 11.3 g (45.3%), Sugars 18.8 g, Protein 19.8 g (39.6%), Sodium 1183.0 mg (49.3%)

Stuffed Eggplant Parm

Rebecca YIELD: 4 servings This stuffed eggplant parm is pure love! Eggplant shells filled with classic eggplant Parmesan and topped with loads of melty mozzarella and crispy breadcrumbs. Crazy good, seriously… General Recipes Stuffed Eggplant Parm 26.9 Print This
Serves: 4
Nutrition facts: 200 calories 443 fat
Rating: 5.0/5
( 1 voted )

Ingredients

  • 3 tbsp plus 1 teaspoon olive oil, divided
  • 3 cloves garlic, minced
  • 2 medium eggplants (about 2 1/2 lbs total)
  • 1/4 c. Panko breadcrumbs
  • 1/4 c. torn fresh basil leaves, plus more for topping
  • 1 medium yellow onion, finely chopped
  • 2 c. marinara sauce, divided
  • 1/2 c. finely grated Parmesan cheese (about 2 oz), divided
  • 1 1/2 c. whole-milk, low-moisture shredded mozzarella, divided
  • 3/4 tsp kosher salt, divided
  • 1/2 tsp freshly ground black pepper, divided

Instructions

Step 1: In the middle, arrange the oven rack. Preheat the oven to 400 degrees F.

Step 2: In half lengthwise, cut the eggplants. Cut around the insides of each half using a paring knife, making sure to leave about half an inch border. Using a spoon, scoop out the flesh, making boats out of the eggplant shells. Then, coarsely chop the flesh. Set aside.

Step 3: Rub with 1 tbsp oil the insides of the hollowed eggplant shells and sprinkle with 1/4 tsp salt and pepper. In a 13 x 9-inch baking dish, place the shells, cut-side-up. Place in the preheated oven and roast for about 20 to 30 minutes until tender. Note that the cooking time varies depending on the size of the eggplant. Set the roasted eggplant aside when done.

Step 4: In a small bowl, place the breadcrumbs, 1 teaspoon of the oil, and a pinch of salt. Mix well and set aside.

Step 5: In a large skillet, heat the rest of the 2 tbsp oil over medium heat. Once the oil is shimmering, add the onion and cook for about 4 to 5 minutes, stirring often, until soft. Next, add the chopped eggplant flesh along with the rest of the half tsp salt and 1/4 tsp pepper. Continue to cook for another 2 minutes until the eggplant is tender, stirring occasionally. Then, whisk in 1 c marinara and cook for 2 minutes more until heated through. Take the skillet off the heat and add the basil, 1 c. mozzarella, and 1/4 c. Parmesan. Stir well.

Step 6: Set the broiler to high, then take the baking dish out of the oven. On a work surface, transfer the eggplant shells. Into the baking dish, pour the rest of the 1 c marinara sauce, spreading it into an even layer. Place the eggplant shells back into the baking dish and evenly spoon the filling into the shells. On top, sprinkle the rest of the half c. mozzarella, 1/4 c. Parmesan, and the reserved breadcrumb mixture.

Step 7: Return the baking dish to the oven and broil for about 2 to 4 minutes until the cheese has melted and bubbled and the breadcrumbs are browned.

Step 8: Serve the stuffed eggplant right away with marinara sauce from the baking dish and more basil. Enjoy!

Notes

Keep any leftovers in an airtight container and store them in the fridge for up to 4 days.

May 5, 2022 0 comment
0 FacebookTwitterPinterestEmail
General Recipes

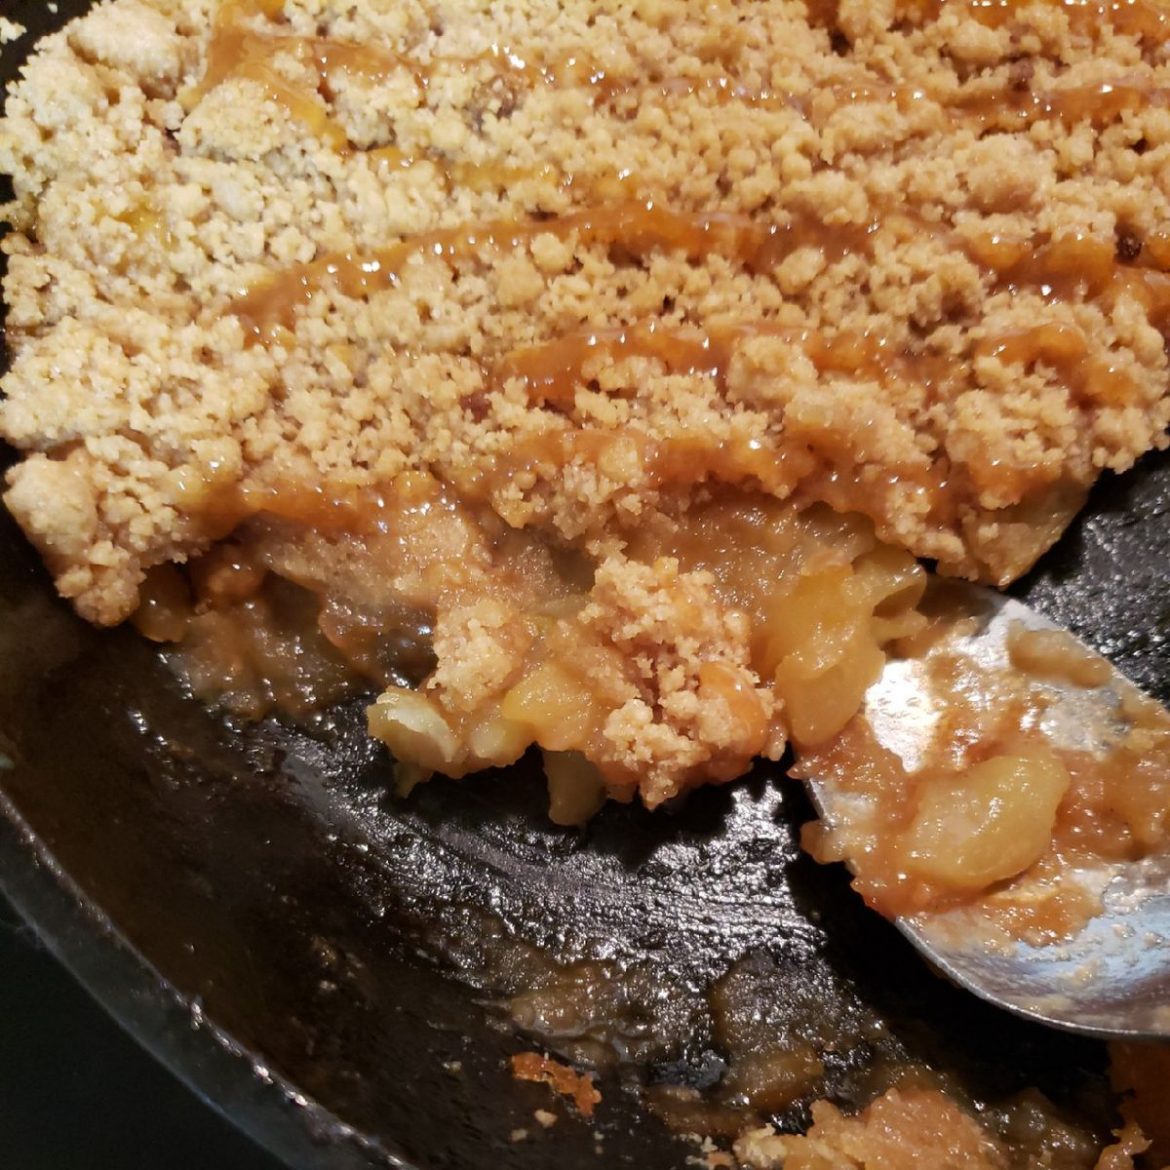
Salted Caramel Apple Crumble

by Rebecca May 4, 2022
written by Rebecca

PREP TIME: 15 MINS | COOK TIME: 30 MINS | TOTAL TIME: 45 MINS | SERVINGS: 8

This salted caramel apple crumble is pure heaven! Enjoy a plate of soft apples topped with buttery crumble in a tasty homemade salted caramel sauce. Make sure to serve it with a big scoop of vanilla ice cream on top. Crazy good you’ll be licking your plate clean!

Ingredients

Caramel sauce:

3 tbsp butter

1 c. sugar

1 tsp sea salt

1 tsp vanilla

3/4 c. heavy cream

1/4 c. water

Crumble:

1/3 c. granulated sugar

1/3 c. packed brown sugar

1/2 tsp salt

6 tbsp butter, softened

1 c. all-purpose flour

Apples:

2 tbsp butter

4 granny smith apples, peeled, cored, and sliced

1/4 tsp salt

2 tbsp lemon juice

How to make Salted Caramel Apple Crumble

Step 1: To make the caramel sauce, start by heating the sugar and water in a small saucepan over medium heat. Melt the sugar and cook while swirling amber in color. Then, stir in the sea salt and heavy cream. Keep on stirring until the sauce is smooth. Lastly, whisk in the butter and vanilla. Set aside when done.

Step 2: To make the crumble, place the crumble ingredients in a stand mixer and blend well until you have a crumbly mixture. Set aside.

Step 3: Toss the peeled, cored, and sliced apples in the lemon juice.

Step 4: In a large cast-iron skillet, cook the apples in butter over medium-low heat for about 5 to 7 minutes. This will draw out the moisture. Then, sprinkle with salt. When done, drain the apples and return them to the skillet.

Step 5: Into the apples, pour 3/4 of the prepared caramel sauce and gently toss. Lastly, top everything with the crumble topping.

Step 6: Place in the oven and bake for about 20 minutes at 350 degrees. Remove from the oven when done, and serve the salted caramel apple crumble with the rest of the caramel sauce. Enjoy!

Nutrition Facts:

Calories: 485 kcal | Carbohydrates: 67g | Protein: 2g | Fat: 24g | Saturated Fat: 15g | Cholesterol: 71mg | Sodium: 659mg | Potassium: 143mg | Fiber: 2g | Sugar: 51g | Vitamin A: 860IU | Vitamin C: 5.8mg | Calcium: 34mg | Iron: 0.9mg

Salted Caramel Apple Crumble

Rebecca PREP TIME: 15 MINS | COOK TIME: 30 MINS | TOTAL TIME: 45 MINS | SERVINGS: 8 This salted caramel apple crumble is pure heaven! Enjoy a plate of soft… General Recipes Salted Caramel Apple Crumble European Print This
Serves: 8 Prep Time: 15 mins Cooking Time: 30 mins 30 mins
Nutrition facts: 485 calories 24 fat
Rating: 5.0/5
( 1 voted )

Ingredients

  • Caramel sauce:
  • 3 tbsp butter
  • 1 c. sugar
  • 1 tsp sea salt
  • 1 tsp vanilla
  • 3/4 c. heavy cream
  • 1/4 c. water
  • Crumble:
  • 1/3 c. granulated sugar
  • 1/3 c. packed brown sugar
  • 1/2 tsp salt
  • 6 tbsp butter, softened
  • 1 c. all-purpose flour
  • Apples:
  • 2 tbsp butter
  • 4 granny smith apples, peeled, cored, and sliced
  • 1/4 tsp salt
  • 2 tbsp lemon juice

Instructions

Step 1: To make the caramel sauce, start by heating the sugar and water in a small saucepan over medium heat. Melt the sugar and cook while swirling amber in color. Then, stir in the sea salt and heavy cream. Keep on stirring until the sauce is smooth. Lastly, whisk in the butter and vanilla. Set aside when done.

Step 2: To make the crumble, place the crumble ingredients in a stand mixer and blend well until you have a crumbly mixture. Set aside.

Step 3: Toss the peeled, cored, and sliced apples in the lemon juice.

Step 4: In a large cast-iron skillet, cook the apples in butter over medium-low heat for about 5 to 7 minutes. This will draw out the moisture. Then, sprinkle with salt. When done, drain the apples and return them to the skillet.

Step 5: Into the apples, pour 3/4 of the prepared caramel sauce and gently toss. Lastly, top everything with the crumble topping.

Step 6: Place in the oven and bake for about 20 minutes at 350 degrees. Remove from the oven when done, and serve the salted caramel apple crumble with the rest of the caramel sauce. Enjoy!

May 4, 2022 0 comment
0 FacebookTwitterPinterestEmail
General Recipes

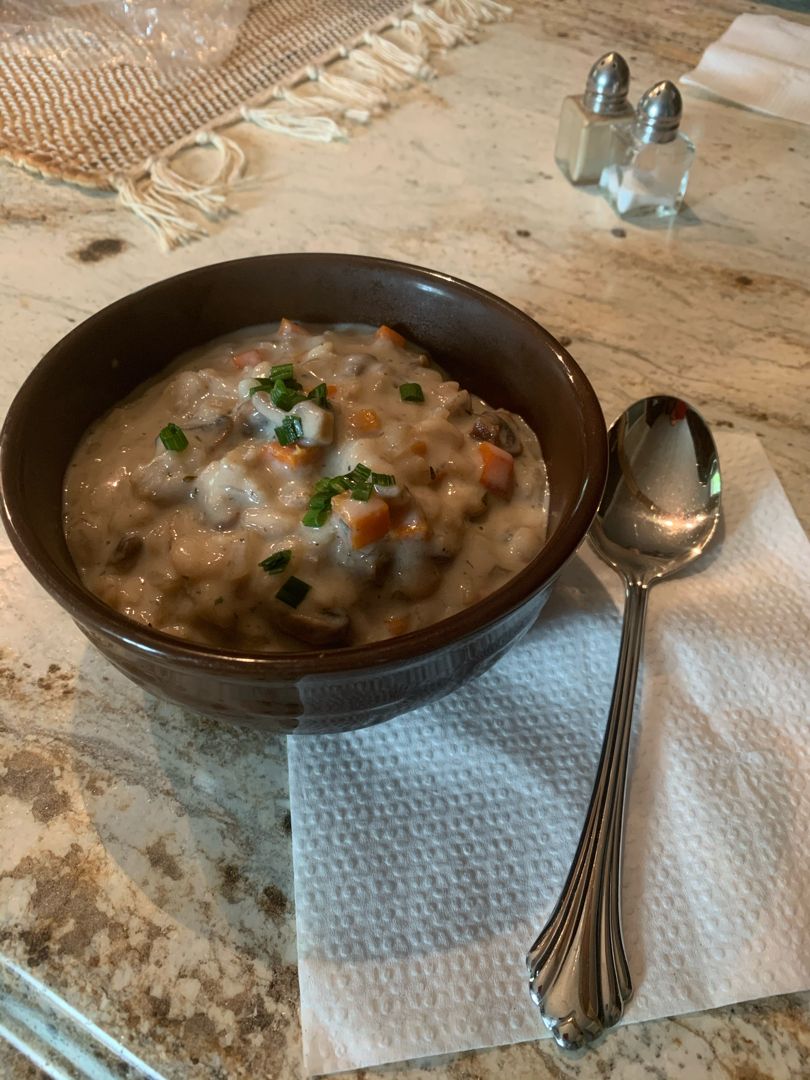
Mushroom Barley Soup

by Rebecca May 4, 2022
written by Rebecca

Prep Time: 5 mins | Cook Time: 25 mins | Total Time: 30 mins | Servings: 6

This mushroom barley soup is super easy to whip up and ready in less than thirty minutes. It is perfect for busy weeknights and all year round. This delicious soup is packed with tender mushrooms and barley in a rich and creamy broth. Ladle this soup into serving bowls and serve hot with some crusty bread.

My grandma makes the best soup from scratch. I tried adapting some of her most loved recipes, but I’ll never be quite as great. I miss my grandma’s cooking, and I always have this nostalgic feeling whenever I make soup.

This very flavorful, rich, and creamy soup is one of my grandma’s favorites. I adapted the recipe, made a few changes, and it turned out incredibly amazing!

Ingredients

½ white onion, diced

¼ c. diced carrots

1 tbsp unsalted butter

2 c. beef broth

¼ tsp dried thyme

¾ c. quick-cooking barley

3 c. 2% milk

2 tbsp all-purpose flour

1 tsp salt

¼ tsp pepper

1 lb fresh baby Bella mushrooms, sliced

How to make Mushroom Barley Soup

Step 1: Melt the butter in a medium soup pot or saucepan over medium heat. Once the butter has melted, add the carrots to the pot along with the onions and mushrooms. Saute for about 5 minutes until tender.

Step 2: To the pot with the veggies, add the dried thyme, beef broth, and barley. Bring everything to a boil, then decrease the heat. Simmer for about 15 minutes, uncovered, until the barley is tender.

Step 3: In the meantime, combine the flour with milk, salt, and pepper in a small bowl until smooth. Stir this into the soup and return the soup to a boil. Continue to cook while stirring constantly for about 3 to 4 minutes or until the soup has thickened.

Step 4: Take the pot off the heat and serve the mushroom barley soup right away. Enjoy!

Nutrition Facts:

Serving: 1serving | Calories: 201 kcal | Carbohydrates: 31g | Protein: 10g | Fat: 5g | Saturated Fat: 3g | Cholesterol: 14mg | Sodium: 751mg | Potassium: 549mg | Fiber: 5g | Sugar: 8g | Vitamin A: 1070IU | Vitamin C: 3mg | Calcium: 160mg | Iron: 1mg

Mushroom Barley Soup

Rebecca Prep Time: 5 mins | Cook Time: 25 mins | Total Time: 30 mins | Servings: 6 This mushroom barley soup is super easy to whip up and ready in… General Recipes Mushroom Barley Soup European Print This
Serves: 6 Prep Time: 5 mins Cooking Time: 25 mins 25 mins
Nutrition facts: 201 calories 5 fat
Rating: 5.0/5
( 1 voted )

Ingredients

  • ½ white onion, diced
  • ¼ c. diced carrots
  • 1 tbsp unsalted butter
  • 2 c. beef broth
  • ¼ tsp dried thyme
  • ¾ c. quick-cooking barley
  • 3 c. 2% milk
  • 2 tbsp all-purpose flour
  • 1 tsp salt
  • ¼ tsp pepper
  • 1 lb fresh baby Bella mushrooms, sliced

Instructions

Step 1: Melt the butter in a medium soup pot or saucepan over medium heat. Once the butter has melted, add the carrots to the pot along with the onions and mushrooms. Saute for about 5 minutes until tender.

Step 2: To the pot with the veggies, add the dried thyme, beef broth, and barley. Bring everything to a boil, then decrease the heat. Simmer for about 15 minutes, uncovered, until the barley is tender.

Step 3: In the meantime, combine the flour with milk, salt, and pepper in a small bowl until smooth. Stir this into the soup and return the soup to a boil. Continue to cook while stirring constantly for about 3 to 4 minutes or until the soup has thickened.

Step 4: Take the pot off the heat and serve the mushroom barley soup right away. Enjoy!

May 4, 2022 0 comment
0 FacebookTwitterPinterestEmail
General Recipes

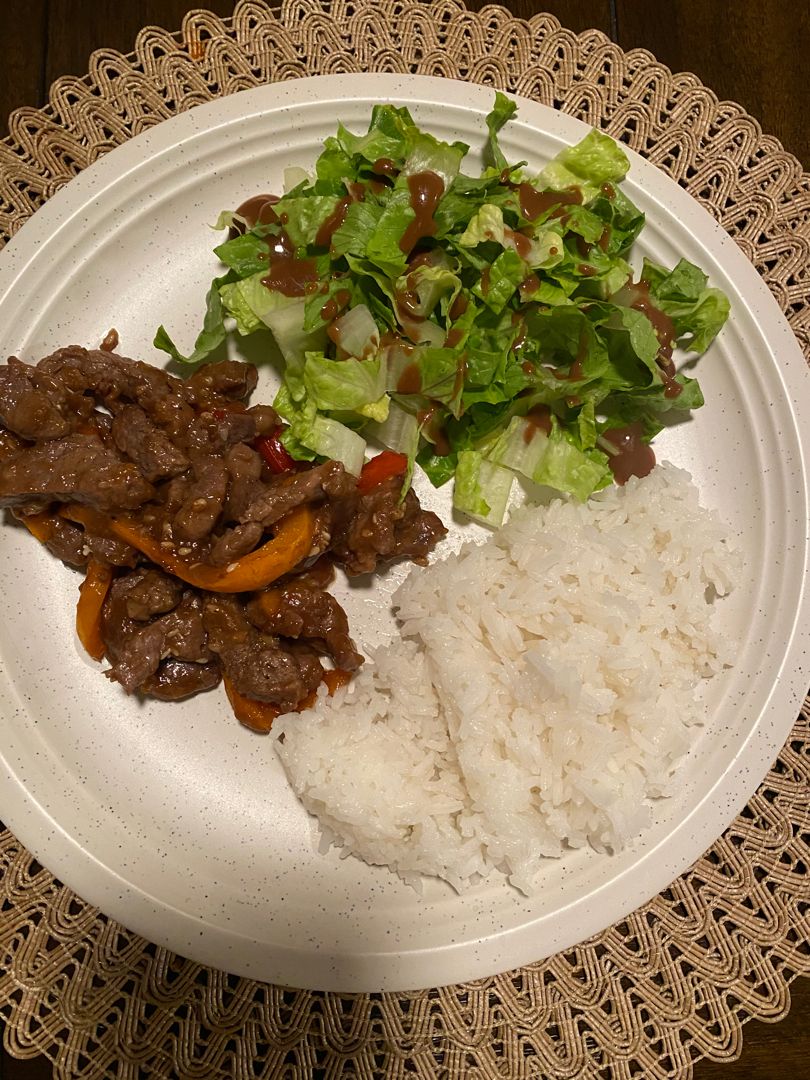
Pepper Steak Stir Fry

by Rebecca May 4, 2022
written by Rebecca

Prep Time: 10 mins | Cook Time: 20 mins | Total Time: 30 mins | Servings: 4

This mouthwatering Pepper Steak Stir Fry has been one of my favorite Chinese dishes with thinly sliced flank steak with red and green bell peppers in a savory sauce. I love to serve this over rice for an easy and quick weeknight meal perfect for everyone. This stir fry is an amazing homemade version of our favorite Chinese takeout dish but better! Incredibly easy to make and ready in no time. Make sure to give this simple recipe a try very soon and enjoy a restaurant-quality at home whenever!

INGREDIENTS

1 1/4 lbs flank steak thinly sliced

1 tbsp vegetable oil, divided use

1 green bell pepper, cored, seeded, and cut into strips

1 red bell pepper, cored, seeded, and cut into strips

1 tsp minced ginger

2 tsp minced garlic

1 1/2 tbsp sugar

1/4 c. soy sauce

1 1/2 tbsp cornstarch

salt and pepper to taste

How to make Pepper Steak Stir Fry

Step 1: In a large pan, heat 1 tsp vegetable oil over medium-high heat. Once the oil is hot, add the peppers to the pan and saute for about 3 to 4 minutes until just tender. To a plate, transfer the peppers when done.

Step 2: In the same pan, add the rest of the oil. To taste, season the flank steak with salt and pepper. Now, adjust the heat to high and add the steak to the pan. Sear the steak for about 5 to 6 minutes or until lightly browned. Then, add the garlic and ginger. Continue to cook for another 30 seconds.

Step 3: Return the cooked peppers to the pan.

Step 4: Place the soy sauce, sugar, 1/4 c water, and cornstarch in a small bowl. Stir well and pour this over the steak mixture. Let everything simmer for about 2 to 3 minutes or until the sauce has just thickened.

Step 5: Remove from the heat when done and serve the Pepper Steak Stir Fry right away. Enjoy!

NUTRITION FACTS:

Calories: 277 kcal | Carbohydrates: 11g | Protein: 32g | Fat: 10g | Saturated Fat: 5g | Cholesterol: 85mg | Sodium: 687mg | Potassium: 628mg | Fiber: 1g | Sugar: 6g | Vitamin A: 1040IU | Vitamin C: 61.9mg | Calcium: 36mg | Iron: 2.8mg

Pepper Steak Stir Fry

Rebecca Prep Time: 10 mins | Cook Time: 20 mins | Total Time: 30 mins | Servings: 4 This mouthwatering Pepper Steak Stir Fry has been one of my favorite Chinese… General Recipes Pepper Steak Stir Fry European Print This
Serves: 4 Prep Time: 10 mins Cooking Time: 20 mins 20 mins
Nutrition facts: 277 calories 10 fat
Rating: 5.0/5
( 1 voted )

Ingredients

  • 1 1/4 lbs flank steak thinly sliced
  • 1 tbsp vegetable oil, divided use
  • 1 green bell pepper, cored, seeded, and cut into strips
  • 1 red bell pepper, cored, seeded, and cut into strips
  • 1 tsp minced ginger
  • 2 tsp minced garlic
  • 1 1/2 tbsp sugar
  • 1/4 c. soy sauce
  • 1 1/2 tbsp cornstarch
  • salt and pepper to taste

Instructions

Step 1: In a large pan, heat 1 tsp vegetable oil over medium-high heat. Once the oil is hot, add the peppers to the pan and saute for about 3 to 4 minutes until just tender. To a plate, transfer the peppers when done.

Step 2: In the same pan, add the rest of the oil. To taste, season the flank steak with salt and pepper. Now, adjust the heat to high and add the steak to the pan. Sear the steak for about 5 to 6 minutes or until lightly browned. Then, add the garlic and ginger. Continue to cook for another 30 seconds.

Step 3: Return the cooked peppers to the pan.

Step 4: Place the soy sauce, sugar, 1/4 c water, and cornstarch in a small bowl. Stir well and pour this over the steak mixture. Let everything simmer for about 2 to 3 minutes or until the sauce has just thickened.

Step 5: Remove from the heat when done and serve the Pepper Steak Stir Fry right away. Enjoy!

May 4, 2022 0 comment
0 FacebookTwitterPinterestEmail
General Recipes

Simple Cinnamon Cake

by Rebecca May 4, 2022
written by Rebecca

Prep Time: 20 mins | Cook Time: 40 mins | Total Time: 1 hr | Servings: 12

Make this simple cinnamon cake from scratch and impress everyone with a light and wonderful cake. This cake is perfect for all the cinnamon lovers out there. Enjoy this beautiful and delicious cake on a Sunday brunch all year round!

Ingredients

3 large eggs

2 c. all-purpose flour

1 tbsp cinnamon

2/3 c. unsalted butter, softened

1 1/3 c. granulated sugar

2 tsp vanilla

1 tbsp baking powder

2/3 c. whole milk

3/4 tsp salt

Cinnamon Syrup Glaze:

6 tbsp unsalted butter

1 tsp vanilla

1/2 c. granulated sugar

3/4 tsp cinnamon

1/3 c. water

How to make Simple Cinnamon Cake

Step 1: Prepare the oven. Preheat it to 350 degrees F. Ready a 10-inch bundt pan. Generously grease, lightly flour, and set aside.

Step 2: Place the flour, baking powder, cinnamon, and salt in a medium bowl. Mix well until combined.

Step 3: Place the sugar, butter, and vanilla in a large bowl and beat using an electric mixer until smooth and creamy. Then, add the eggs, one at a time, beating every after each addition until blended. Next, stir in the flour mixture, alternating with the milk.

Step 4: Into the prepared pan, pour the batter. Place in the preheated oven and bake for about 40 to 45 minutes or until a toothpick inserted in the middle of the cake comes out clean. Take the cake out of the oven when done and allow it to cool for about 20 minutes in the pan.

Step 5: In the meantime, place the sugar, water, butter, vanilla, and cinnamon in a small saucepan, stirring over medium heat until the sugar has dissolved and you have a slightly thickened mixture.

Step 6: Onto a wire rack set over a plate, invert the cake. Poke holes all over the cake using a fork. Then, drizzle the warm cake with the cinnamon syrup glaze.

Step 7: Slice the cinnamon cake and serve. Enjoy!

Nutrition Facts:

Calories: 369 kcal | Carbohydrates: 48g | Protein: 5g | Fat: 18g | Saturated Fat: 11g | Cholesterol: 96mg | Sodium: 176mg | Potassium: 164mg | Fiber: 1g | Sugar: 31g | Vitamin A: 589IU | Calcium: 82mg | Iron: 1mg

Simple Cinnamon Cake

Rebecca Prep Time: 20 mins | Cook Time: 40 mins | Total Time: 1 hr | Servings: 12 Make this simple cinnamon cake from scratch and impress everyone with a light… General Recipes Simple Cinnamon Cake European Print This
Serves: 12 Prep Time: 20 mins Cooking Time: 40 mins 40 mins
Nutrition facts: 369 calories 18 fat
Rating: 5.0/5
( 1 voted )

Ingredients

  • 3 large eggs
  • 2 c. all-purpose flour
  • 1 tbsp cinnamon
  • 2/3 c. unsalted butter, softened
  • 1 1/3 c. granulated sugar
  • 2 tsp vanilla
  • 1 tbsp baking powder
  • 2/3 c. whole milk
  • 3/4 tsp salt
  • Cinnamon Syrup Glaze:
  • 6 tbsp unsalted butter
  • 1 tsp vanilla
  • 1/2 c. granulated sugar
  • 3/4 tsp cinnamon
  • 1/3 c. water

Instructions

Step 1: Prepare the oven. Preheat it to 350 degrees F. Ready a 10-inch bundt pan. Generously grease, lightly flour, and set aside.

Step 2: Place the flour, baking powder, cinnamon, and salt in a medium bowl. Mix well until combined.

Step 3: Place the sugar, butter, and vanilla in a large bowl and beat using an electric mixer until smooth and creamy. Then, add the eggs, one at a time, beating every after each addition until blended. Next, stir in the flour mixture, alternating with the milk.

Step 4: Into the prepared pan, pour the batter. Place in the preheated oven and bake for about 40 to 45 minutes or until a toothpick inserted in the middle of the cake comes out clean. Take the cake out of the oven when done and allow it to cool for about 20 minutes in the pan.

Step 5: In the meantime, place the sugar, water, butter, vanilla, and cinnamon in a small saucepan, stirring over medium heat until the sugar has dissolved and you have a slightly thickened mixture.

Step 6: Onto a wire rack set over a plate, invert the cake. Poke holes all over the cake using a fork. Then, drizzle the warm cake with the cinnamon syrup glaze.

Step 7: Slice the cinnamon cake and serve. Enjoy!

May 4, 2022 0 comment
0 FacebookTwitterPinterestEmail
Newer Posts
Older Posts

Popular Posts

  • 1

    Crispy Crunchy Parmesan Potatoes

    March 21, 2020
  • 2

    CROCK POT SMOTHERED PORK CHOPS

    March 21, 2020
  • Facebook
  • Twitter

@2019 - All Right Reserved.


Back To Top