Cook it once
  • Home
  • Privacy Policy
  • Recipes
    • KETO
    • LC
    • WW
  • Tips
  • Contact
Cook it once
  • Home
  • Privacy Policy
  • Recipes
    • KETO
    • LC
    • WW
  • Tips
  • Contact
Category:

Main Dish Recipes

Main Dish Recipes

Best Rice Pudding EVER

by Rebecca June 19, 2020
written by Rebecca

I just realized how amazing this pudding is! The first time I tasted it, I did not appreciate it because I was craving for something but now, oh boy, I wish I had! It’s a very satisfying meal to eat. It’s not only delicious but it is also very easy to make. You only need to follow 6 steps to guide you to perfection. I remember uttering the words; “This is freaking awesome!”. Give it a try and you may just say the same words. This is perfect when you are taking a break from greasy meals. This is perfect as well if you want something heavy yet healthy food to eat. Are you convinced yet? Okay, here’s another reason why you should give this a try. It is cheap to make! You only need basic ingredients for this recipe and you can buy them pretty much anywhere and it won’t cost you a lot. I am on a tight budget that’s why I only buy the things that are essential to me and my family. We can afford the occasional steak but this helped us a lot. Aside from being delicious, it’s not expensive at all. We can still enjoy good food even on a tight budget. It’s just a matter of picking the right meals and enjoying it at the same time.

INGREDIENTS

2/3 cup Minute Rice

2 3/4 cups milk

1/3 cup sugar

1 tablespoon butter

1/2 teaspoon salt

1/2 teaspoon vanilla

1/4 teaspoon nutmeg

Cinnamon

1/2 cup raisins

HOW TO MAKE RICE PUDDING

Step 1: Grease a 1-quart baking dish.

Step 2: Add the butter, vanilla, nutmeg, salt, sugar, raisins, milk, and Minute Rice. Stir until well-mixed.

Step 3: Place the baking dish inside the oven and bake for 1 hour at 350 degrees.

Step 4: When the pudding is cooked, Stir after 15 minutes.

Step 5: Sprinkle cinnamon on top of the pudding.

Step 6: Serve and enjoy!

Note: You can serve it warm or chilled.

Best Rice Pudding EVER

Rebecca I just realized how amazing this pudding is! The first time I tasted it, I did not appreciate it because I was craving for something but now, oh boy, I… Main Dish Recipes Best Rice Pudding EVER European Print This
Nutrition facts: 200 calories 20 grams fat
Rating: 4.7/5
( 6 voted )

Ingredients

  • 2/3 cup Minute Rice
  • 2 3/4 cups milk
  • 1/3 cup sugar
  • 1 tablespoon butter
  • 1/2 teaspoon salt
  • 1/2 teaspoon vanilla
  • 1/4 teaspoon nutmeg
  • Cinnamon
  • 1/2 cup raisins

Instructions

Step 1: Grease a 1-quart baking dish.

Step 2: Add the butter, vanilla, nutmeg, salt, sugar, raisins, milk, and Minute Rice. Stir until well-mixed.

Step 3: Place the baking dish inside the oven and bake for 1 hour at 350 degrees.

Step 4: When the pudding is cooked, Stir after 15 minutes.

Step 5: Sprinkle cinnamon on top of the pudding.

Step 6: Serve and enjoy!

Note: You can serve it warm or chilled.

June 19, 2020 0 comment
0 FacebookTwitterPinterestEmail
Main Dish Recipes

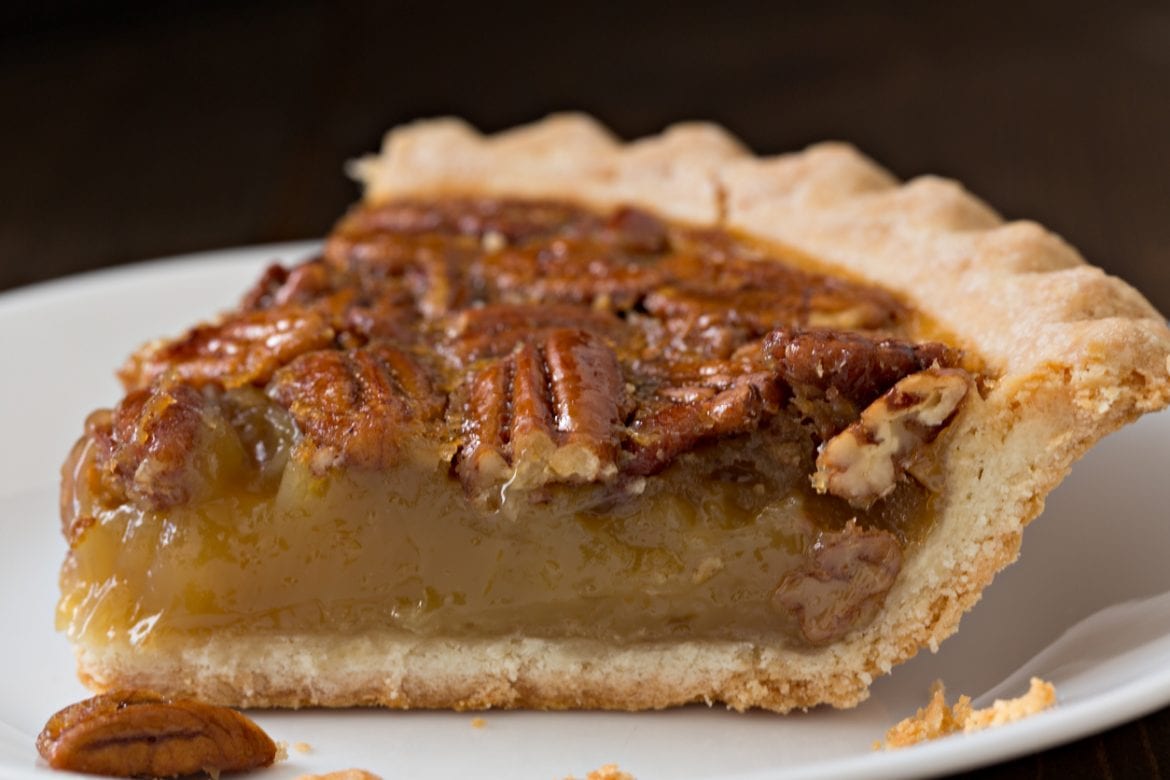
Grandma’s Tried And True Pecan Pie

by Rebecca June 19, 2020
written by Rebecca

Old but gold! This recipe has been a part of my life ever since I was a kid. It’s what I always crave every time I miss home. It’s more than just food, it’s tradition, it’s family. Today, I miss home that’s why I somehow found a way to make something that would make me feel like I’m home! This is my take on his amazing pecan pie. I hope you all like it. By the way, you can add whatever flavor of ice cream you prefer. You are in for a treat! Enjoy!

INGREDIENTS

1 pie crust, store-bought or homemade

1/2 cup sugar

1/4 cup brown sugar

1/2 teaspoon salt

1/4 teaspoon ground cinnamon

1 cup light corn syrup

3 eggs, beaten

4 tablespoons salted butter, melted

1 1/2 teaspoons vanilla extract

1 1/2 cups whole pecans

How to make Grandma’s Tried And True Pecan Pie

Step 1: Ready the oven and preheat to 350 degrees.

Step 2: In a 9-inch pie pan, roll out the pie crust.

Step 3: Fold and crimp the outer edges and cut the excess crust.

Step 4: Combine brown and white sugars, eggs, vanilla, melted butter, corn syrup, cinnamon, and salt in a large bowl. Whisk until all the ingredients are well-blended.

Step 5: Spread the pecans into the pie in an even layer.

Step 6: Pour the corn syrup mixture on top of the nuts. Apply light pressure to press the nuts into the syrup.

Step 7: Cover the pan with aluminum foil.

Step 8: Place the pan inside the preheated oven and bake for 30 minutes.

Step 9: Remove from the oven and remove the aluminum foil cover. Put back inside the oven and bake for another 30 minutes or until the middle part is cooked.

Step 10: Remove the pan from the oven and let it sit on a wire rack to cool at room temperature.

Step 11: Slice into pieces and top with vanilla ice cream. Serve and enjoy!

Grandma’s Tried And True Pecan Pie

Rebecca Old but gold! This recipe has been a part of my life ever since I was a kid. It’s what I always crave every time I miss home. It’s more… Main Dish Recipes Grandma’s Tried And True Pecan Pie European Print This
Nutrition facts: 200 calories 20 grams fat
Rating: 5.0/5
( 1 voted )

Ingredients

  • 1 pie crust, store-bought or homemade
  • 1/2 cup sugar
  • 1/4 cup brown sugar
  • 1/2 teaspoon salt
  • 1/4 teaspoon ground cinnamon
  • 1 cup light corn syrup
  • 3 eggs, beaten
  • 4 tablespoons salted butter, melted
  • 1 1/2 teaspoons vanilla extract
  • 1 1/2 cups whole pecans

Instructions

Step 1: Ready the oven and preheat to 350 degrees.

Step 2: In a 9-inch pie pan, roll out the pie crust.

Step 3: Fold and crimp the outer edges and cut the excess crust.

Step 4: Combine brown and white sugars, eggs, vanilla, melted butter, corn syrup, cinnamon, and salt in a large bowl. Whisk until all the ingredients are well-blended.

Step 5: Spread the pecans into the pie in an even layer.

Step 6: Pour the corn syrup mixture on top of the nuts. Apply light pressure to press the nuts into the syrup.

Step 7: Cover the pan with aluminum foil.

Step 8: Place the pan inside the preheated oven and bake for 30 minutes.

Step 9: Remove from the oven and remove the aluminum foil cover. Put back inside the oven and bake for another 30 minutes or until the middle part is cooked.

Step 10: Remove the pan from the oven and let it sit on a wire rack to cool at room temperature.

Step 11: Slice into pieces and top with vanilla ice cream. Serve and enjoy!

June 19, 2020 0 comment
0 FacebookTwitterPinterestEmail
Main Dish Recipes

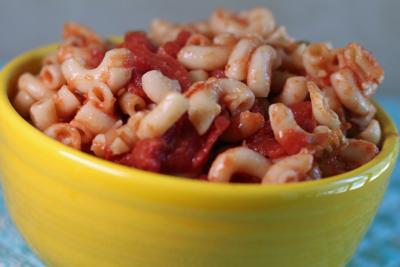
Macaroni and Tomatoes Old Fashioned Recipe

by Rebecca June 19, 2020
written by Rebecca

This recipe that I am sharing with you today is one of my favorite food to cook on a Sunday night. Eat this with some wine and a good company. I learned how to cook this with the help of my sister. She’s the head chef in a restaurant so pretty much all the dishes I know came from her. I am not a very good cook but I make sure that the meals I prepare are awesome, for me! But hey, who would appreciate our work, isn’t it us? Anyway, going back to this amazing recipe. This has a very fresh feeling to it every time you take a bite. I don’t know, but it is just a very satisfying meal. The taste of bacon and cheese, oh my god! It’s the best! Next time you have guests, cook this recipe. I am 100 percent sure that they’re gonna love it! I guess you need to go to the department store now and buy all these ingredients. Have fun!

INGREDIENTS

1 cup uncooked elbow macaroni

2 cups of water

1 teaspoon salt or to taste

1 (15 oz.) can diced tomatoes, undrained

2 cups tomatoes juice

1 teaspoon bacon drippings

1 tablespoons butter

2 teaspoons sugar

black pepper to taste

How to make Old Fashioned Macaroni and Tomatoes

Step 1: Place a medium casserole on the stove and pour enough water to soak the pasta then bring it to a boil. Add salt to season the water.

Step 2: Add the macaroni in the boiling water and cook until half-cooked.

Step 3: Toss in the tomatoes, bacon drippings, sugar, butter, black pepper, and tomato juice.

Step 4: Stir the ingredients and cook until the pasta has incorporated all the juices. (Note: Make sure not to forget about the bacon drippings as they take the major role to the flavor.)

Step 5: Sprinkle the parmesan cheese on top or any cheese you prefer.

Step 6: Serve hot and enjoy!

Macaroni and Tomatoes Old Fashioned Recipe

Rebecca This recipe that I am sharing with you today is one of my favorite food to cook on a Sunday night. Eat this with some wine and a good company.… Main Dish Recipes Macaroni and Tomatoes Old Fashioned Recipe European Print This
Nutrition facts: 200 calories 20 grams fat
Rating: 5.0/5
( 1 voted )

Ingredients

  • 1 cup uncooked elbow macaroni
  • 2 cups of water
  • 1 teaspoon salt or to taste
  • 1 (15 oz.) can diced tomatoes, undrained
  • 2 cups tomatoes juice
  • 1 teaspoon bacon drippings
  • 1 tablespoons butter
  • 2 teaspoons sugar
  • black pepper to taste

Instructions

Step 1: Place a medium casserole on the stove and pour enough water to soak the pasta then bring it to a boil. Add salt to season the water.

Step 2: Add the macaroni in the boiling water and cook until half-cooked.

Step 3: Toss in the tomatoes, bacon drippings, sugar, butter, black pepper, and tomato juice.

Step 4: Stir the ingredients and cook until the pasta has incorporated all the juices. (Note: Make sure not to forget about the bacon drippings as they take the major role to the flavor.)

Step 5: Sprinkle the parmesan cheese on top or any cheese you prefer.

Step 6: Serve hot and enjoy!

June 19, 2020 0 comment
0 FacebookTwitterPinterestEmail
Main Dish Recipes

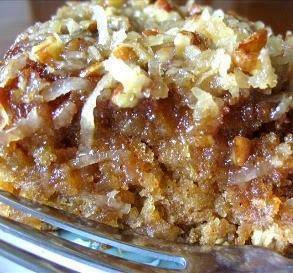
Lazy Day Oatmeal Cake

by Rebecca June 19, 2020
written by Rebecca

What a nice day to eat something light for the stomach. This recipe is called Lazy Day Oatmeal Cake. You heard it right! It is my way of detoxing from all the greasy food I have eaten for the past week. This may sound boring to some of you but I assure you this is gonna change everything. I was kind of hesitant at first to try it but I am so glad that I did because I never would have tasted how amazing and simple this is. So, if you need to take a rest from all the heavy meals, this is a must-try.

INGREDIENTS

1 cup uncooked rolled oats ( instant or regular, I used rolled oats)

1 1/4 cups boiling water

1/2 cup butter or 1/2 cup margarine

1 cup granulated sugar

1 teaspoon vanilla

2 eggs

1 1/2 cups flour

1 teaspoon baking soda

1/2 teaspoon salt

3/4 teaspoon cinnamon

1/4 teaspoon nutmeg

FOR THE TOPPING

1/4 cup butter or 1/4 cup margarine, melted

1/2 cup brown sugar

3 tablespoons cream or 3 tablespoons milk

3/4 cup flaked coconut

1/3 cup chopped nuts (optional)

How to make Lazy Day Oatmeal Cake

Step 1: Pour boiling water in a shallow bowl and add the oats. Submerge the oats for 20 minutes.

Step 2: Add sugar and butter in a large bowl and whisk until creamy.

Step 3: Add the vanilla and eggs. Beat until well-blended.

Step 4: Sift the flour then add spices and soda.

Step 5: Fold in the cooked oats into the creamed mixture.

Step 6: Add in the sifted flour and fold.

Step 7: Transfer the mixture into a 9×9 pan.

Step 8: Place the pan inside the oven and bake for 40 to 50 minutes at 350 degrees F.

Step 9: In a large bowl, combine all the topping ingredients.

Step 10: Remove the pan from the oven. Spread the topping mixture on top of the cake.

Step 11: Place pan in the broiler and bake until bubbly and the color turns brown.

Step 12: Serve and enjoy!

Lazy Day Oatmeal Cake

Rebecca What a nice day to eat something light for the stomach. This recipe is called Lazy Day Oatmeal Cake. You heard it right! It is my way of detoxing from… Main Dish Recipes Lazy Day Oatmeal Cake European Print This
Nutrition facts: 200 calories 20 grams fat
Rating: 5.0/5
( 1 voted )

Ingredients

  • 1 cup uncooked rolled oats ( instant or regular, I used rolled oats)
  • 1 1/4 cups boiling water
  • 1/2 cup butter or 1/2 cup margarine
  • 1 cup granulated sugar
  • 1 teaspoon vanilla
  • 2 eggs
  • 1 1/2 cups flour
  • 1 teaspoon baking soda
  • 1/2 teaspoon salt
  • 3/4 teaspoon cinnamon
  • 1/4 teaspoon nutmeg
  • FOR THE TOPPING
  • 1/4 cup butter or 1/4 cup margarine, melted
  • 1/2 cup brown sugar
  • 3 tablespoons cream or 3 tablespoons milk
  • 3/4 cup flaked coconut
  • 1/3 cup chopped nuts (optional)

Instructions

Step 1: Pour boiling water in a shallow bowl and add the oats. Submerge the oats for 20 minutes.

Step 2: Add sugar and butter in a large bowl and whisk until creamy.

Step 3: Add the vanilla and eggs. Beat until well-blended.

Step 4: Sift the flour then add spices and soda.

Step 5: Fold in the cooked oats into the creamed mixture.

Step 6: Add in the sifted flour and fold.

Step 7: Transfer the mixture into a 9x9 pan.

Step 8: Place the pan inside the oven and bake for 40 to 50 minutes at 350 degrees F.

Step 9: In a large bowl, combine all the topping ingredients.

Step 10: Remove the pan from the oven. Spread the topping mixture on top of the cake.

Step 11: Place pan in the broiler and bake until bubbly and the color turns brown.

Step 12: Serve and enjoy!

June 19, 2020 0 comment
0 FacebookTwitterPinterestEmail
Main Dish Recipes

Oooey Gooey Cinnamon Swirl Cake

by Rebecca June 19, 2020
written by Rebecca

Cinnamon and coffee are a match made in heaven! I love to have a slice of this Oooey Gooey Cinnamon Swirl Cake paired with a freshly brewed coffee for breakfast. A sweet and bitter taste to pump me up in the morning. It is also the perfect dessert when you’re craving a cinnamon roll without all the work. This cake form of a cinnamon roll is an easy peasy cake recipe. The ingredients are pretty simple and easily find. This cake you can make in a snap, it is a moist, flavorful, and to die for.

INGREDIENTS

For the Batter

3 cup all-purpose flour

1/4 teaspoon salt

1 cup of sugar

4 teaspoon baking powder

1 1/2 cup milk

2 eggs

2 teaspoons vanilla extract

1/2 cup butter, melted

For the Topping

1 cup butter, very softened

1 cup brown sugar

2 tablespoons all-purpose flour

2 tablespoons cinnamon

For the Glaze

2 cups powdered sugar

5 tablespoons milk

1 teaspoon vanilla extract

How to make Cinnamon Swirl Cake

Step 1: Mix the flour, salt, sugar, baking powder, milk, eggs, and vanilla extract in a large bowl. Mix until well combined.

Step 2: Gradually add in the melted butter and mix until incorporated.

Step 3: Pour the batter into a well-greased 9 x 13-inch pan. Or you can use a 9 x 9-inch pan if you prefer a thicker cake.

Step 4: Mix the softened butter, brown sugar, flour, and cinnamon in another bowl. Combine well.

Step 5: Pour on top of the batter and use a butter knife to swirl the topping.

Step 6: Place inside the oven and bake at 350 degrees for 40 minutes. But if you are using a 9 x 9-inch pan, you should bake for about 50 minutes.

Step 7: Once done, remove the cake from the oven. Set aside.

Step 8: For the glaze, mix the powdered sugar, milk, and vanilla extract until well combined.

Step 9: Drizzle the glaze over while the cake is still warm and let it sit for 15 minutes before cutting. Serve and enjoy!

Rebecca Cinnamon and coffee are a match made in heaven! I love to have a slice of this Oooey Gooey Cinnamon Swirl Cake paired with a freshly brewed coffee for breakfast.… Main Dish Recipes Oooey Gooey Cinnamon Swirl Cake European Print This
Nutrition facts: 200 calories 20 grams fat
Rating: 5.0/5
( 1 voted )

Ingredients

  • For the Batter
  • 3 cup all-purpose flour
  • 1/4 teaspoon salt
  • 1 cup of sugar
  • 4 teaspoon baking powder
  • 1 1/2 cup milk
  • 2 eggs
  • 2 teaspoons vanilla extract
  • 1/2 cup butter, melted
  • For the Topping
  • 1 cup butter, very softened
  • 1 cup brown sugar
  • 2 tablespoons all-purpose flour
  • 2 tablespoons cinnamon
  • For the Glaze
  • 2 cups powdered sugar
  • 5 tablespoons milk
  • 1 teaspoon vanilla extract

Instructions

Step 1: Mix the flour, salt, sugar, baking powder, milk, eggs, and vanilla extract in a large bowl. Mix until well combined.

Step 2: Gradually add in the melted butter and mix until incorporated.

Step 3: Pour the batter into a well-greased 9 x 13-inch pan. Or you can use a 9 x 9-inch pan if you prefer a thicker cake.

Step 4: Mix the softened butter, brown sugar, flour, and cinnamon in another bowl. Combine well.

Step 5: Pour on top of the batter and use a butter knife to swirl the topping.

Step 6: Place inside the oven and bake at 350 degrees for 40 minutes. But if you are using a 9 x 9-inch pan, you should bake for about 50 minutes.

Step 7: Once done, remove the cake from the oven. Set aside.

Step 8: For the glaze, mix the powdered sugar, milk, and vanilla extract until well combined.

Step 9: Drizzle the glaze over while the cake is still warm and let it sit for 15 minutes before cutting. Serve and enjoy!

June 19, 2020 0 comment
0 FacebookTwitterPinterestEmail
Main Dish Recipes

8-Can Chicken Taco Soup

by Rebecca June 19, 2020
written by Rebecca

For a quick and easy dinner idea follow this recipe for an 8-Can Chicken Taco Soup. This will only take you about 20 to 30 minutes to cook. A perfect chicken taco soup that is heartwarming, loaded, and super flavorful.

I think yeah all will agree that nothing is better than having a recipe that cooks itself. If you are still wondering, this soup comprised of eight different cans of assorted ingredients, thus, the name 8-cans. I love how this soup is so filling. It has beans, corn, tomatoes, chicken, and green chiles among the many things this soup consists of. Drop everything in the pot and bring to a boil, and dinner is ready in under 20 minutes!

INGREDIENTS

1 (15 oz.) can pinto beans, rinsed and drained

1 (15 oz.) can black beans, rinsed and drained

1 (15 oz.) can sweet corn kernels, drained

1 (14.5 oz.) can diced tomatoes

1 (12.5 oz.) can chicken breast, drained and shredded

1/2 (15 oz.) can green enchilada sauce (or 1, 10 oz. can)

1 (4 oz.) can dice green chiles

1 (14 oz.) can low-sodium chicken broth

1 (1 oz.) packet taco seasoning

1/2 teaspoon cumin, optional

1/2 teaspoon chili powder, optional

1/2 teaspoon garlic powder, optional

1/2 teaspoon onion powder, optional

Kosher salt and freshly ground pepper, to taste

Garnish options: sour cream, tortilla chips, avocado

How to make 8-Can Chicken Taco Soup

Step 1: In a large stockpot, cook the pinto beans, black beans, corn, tomatoes, enchilada sauce, green chiles, and chicken broth over medium-high heat.

Step 2: And stir in the taco seasoning, followed with the cumin, chili powder, garlic powder, and onion powder. Sprinkle some salt and pepper to taste. Adjust the seasoning if necessary.

Step 3: Bring to a boil. Once boiling, reduce the heat to low and let the mixture simmer for about 20 to 30 minutes or until you reached the desired thickness.

Step 4: Remove from the oven and serve immediately. Garnish with sour cream, tortilla strips, and avocado. Enjoy!

8-Can Chicken Taco Soup

Rebecca For a quick and easy dinner idea follow this recipe for an 8-Can Chicken Taco Soup. This will only take you about 20 to 30 minutes to cook. A perfect… Main Dish Recipes 8-Can Chicken Taco Soup European Print This
Nutrition facts: 200 calories 20 grams fat
Rating: 5.0/5
( 1 voted )

Ingredients

  • 1 (15 oz.) can pinto beans, rinsed and drained
  • 1 (15 oz.) can black beans, rinsed and drained
  • 1 (15 oz.) can sweet corn kernels, drained
  • 1 (14.5 oz.) can diced tomatoes
  • 1 (12.5 oz.) can chicken breast, drained and shredded
  • 1/2 (15 oz.) can green enchilada sauce (or 1, 10 oz. can)
  • 1 (4 oz.) can dice green chiles
  • 1 (14 oz.) can low-sodium chicken broth
  • 1 (1 oz.) packet taco seasoning
  • 1/2 teaspoon cumin, optional
  • 1/2 teaspoon chili powder, optional
  • 1/2 teaspoon garlic powder, optional
  • 1/2 teaspoon onion powder, optional
  • Kosher salt and freshly ground pepper, to taste
  • Garnish options: sour cream, tortilla chips, avocado

Instructions

Step 1: In a large stockpot, cook the pinto beans, black beans, corn, tomatoes, enchilada sauce, green chiles, and chicken broth over medium-high heat.

Step 2: And stir in the taco seasoning, followed with the cumin, chili powder, garlic powder, and onion powder. Sprinkle some salt and pepper to taste. Adjust the seasoning if necessary.

Step 3: Bring to a boil. Once boiling, reduce the heat to low and let the mixture simmer for about 20 to 30 minutes or until you reached the desired thickness.

Step 4: Remove from the oven and serve immediately. Garnish with sour cream, tortilla strips, and avocado. Enjoy!

June 19, 2020 0 comment
0 FacebookTwitterPinterestEmail
Main Dish Recipes

Caramel Apple Cobbler

by Rebecca June 18, 2020
written by Rebecca

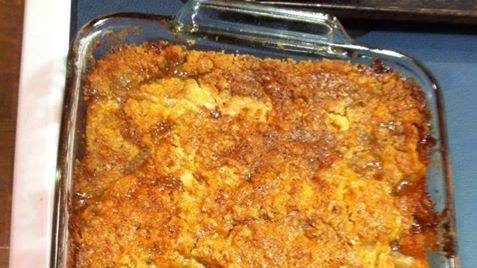
Whenever I make Caramel Apple Cobbler I feel happy. It’s like Christmas, winter, with snow falling, gift-giving, and the children laughing and chasing each other in the living room while the grown-ups are either in the kitchen cooking or catching up over wine or ice-cooled beer. Just the thought of all these makes me feel nostalgic. This cobbler is a staple in my family. It is a year-round dessert that is most-loved and enjoyed by the kids. It is most awesome when top with a scoop of ice cream or whipped cream for an after school or work snack. When making this cobbler I am very particular with the apples I use. The variety of apples you use is important, I prefer a sweet, tart flavored, and apple that doesn’t turn into mush. Picking the right apple is a must so you will not end up with Apple Sauce Cobbler. I would highly recommend you use Honeycrisp apples, they are especially great for this recipe. Other options are Granny Smith, Gala, and Mutsu (Crispin) that are equally good to use in baked recipes like this Caramel Apple Cobbler.

Have yourself a piece of this sweet and comforting tart apples, combined with sweet caramel, and warm cinnamon in an amazing buttery crust. This cobbler is winter straight from the oven. Simply delicious!

INGREDIENTS

1 box yellow cake mix

2 cans apple pie filling

1 jar caramel

1 stick butter

How to make Caramel Apple Cobbler

Step 1: Grease a 9 x 13-inch pan with butter.

Step 2: Pour the apple pie filling in the bottom of the prepared pan.

Step 3: Then, place the dry cake mix on top.

Step 4: And drizzle the caramel over the cake mix.

Step 5: Finally, sprinkle the melted butter throughout the top.

Step 6: Place inside the oven and bake at 350 degrees for about 45 minutes.

Caramel Apple Cobbler

Rebecca Whenever I make Caramel Apple Cobbler I feel happy. It’s like Christmas, winter, with snow falling, gift-giving, and the children laughing and chasing each other in the living room while… Main Dish Recipes Caramel Apple Cobbler European Print This
Nutrition facts: 200 calories 20 grams fat
Rating: 5.0/5
( 1 voted )

Ingredients

  • 1 box yellow cake mix
  • 2 cans apple pie filling
  • 1 jar caramel
  • 1 stick butter

Instructions

Step 1: Grease a 9 x 13-inch pan with butter.

Step 2: Pour the apple pie filling in the bottom of the prepared pan.

Step 3: Then, place the dry cake mix on top.

Step 4: And drizzle the caramel over the cake mix.

Step 5: Finally, sprinkle the melted butter throughout the top.

Step 6: Place inside the oven and bake at 350 degrees for about 45 minutes.

June 18, 2020 0 comment
0 FacebookTwitterPinterestEmail
Main Dish Recipes

Apple Pie Bread Pudding

by Rebecca June 18, 2020
written by Rebecca

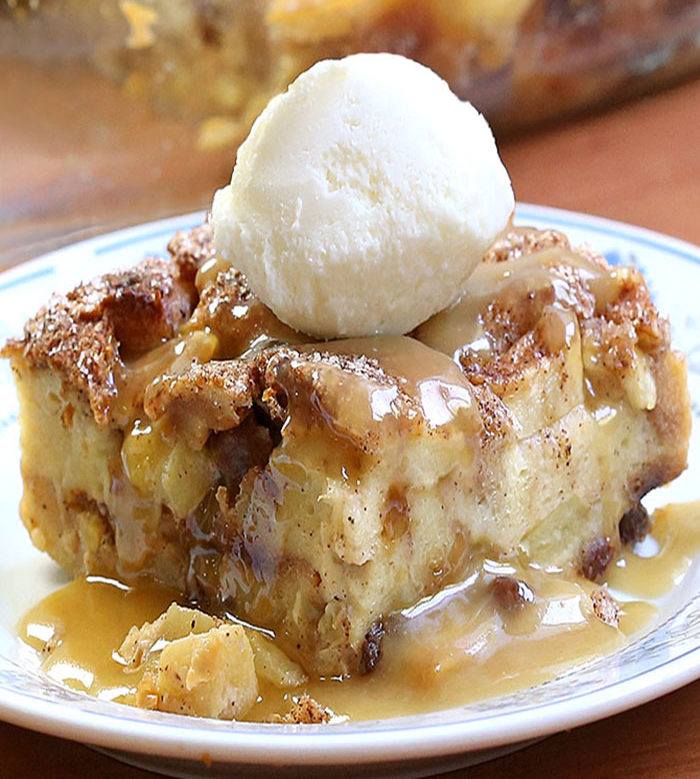
The perfect combination of apple pie and bread pudding. This recipe is a must! Great for breakfast or dessert, either way, you’ll have a blast with this delish Apple Pie Bread Pudding. Don’t forget to top it with a scoop of vanilla ice cream. I promise it’s gonna change everything! Up your game and put this on your dessert menu, I’m pretty sure your whole family will this mouth-watering and heavenly pudding. And so you know this gets way better if sited overnight. Prepare this a night before and pop it in the oven the morning after.

INGREDIENTS

8 cups bread, cubed

3 medium apples, peeled, cored and chopped

4 eggs

1 cup vanilla yogurt

1 cup milk

2 teaspoons cinnamon, divided

½ teaspoon nutmeg

½ cup sugar + 2 tbsp.

½ cup raisins

For the Sauce

1 cup unsalted butter

1 cup heavy cream

1 cup brown sugar

How to make Apple Pie Bread Pudding

Step 1: Prepare the oven. Preheat it to 350 degrees. Grease a 9 x 13-inch baking dish with cooking spray.

Step 2: Whisk the yogurt, milk, eggs, 1 teaspoon of cinnamon, nutmeg, and a half cup of sugar in a large bowl.

Step 3: Mix in the sliced apples and raisins. Smoothly fold in the bread cubes and pour the mixture in the prepared baking dish.

Step 4: Mix 2 tablespoons of sugar and 1 teaspoon of cinnamon in a small bowl.

Step 5: Drizzle the sugar and cinnamon mixture on top of the bread pudding.

Step 6: Place inside the preheated oven and bake for 30 to 40 minutes or until puffed and golden brown.

Step 7: Meanwhile, to make the caramel sauce. Stir the butter, heavy cream, and brown sugar in a heavy saucepan over medium-low heat. Bring to a boil. Once boiling, reduce the heat to low and continue to simmer for 5 minutes or until the sauce is thick.

Step 8: Once the pudding is done, remove from the oven and pour the sauce over.

Step 9: Slice and top with vanilla ice cream. Serve and enjoy!

Apple Pie Bread Pudding

Rebecca The perfect combination of apple pie and bread pudding. This recipe is a must! Great for breakfast or dessert, either way, you’ll have a blast with this delish Apple Pie… Main Dish Recipes Apple Pie Bread Pudding European Print This
Nutrition facts: 200 calories 20 grams fat
Rating: 4.5/5
( 2 voted )

Ingredients

  • 8 cups bread, cubed
  • 3 medium apples, peeled, cored and chopped
  • 4 eggs
  • 1 cup vanilla yogurt
  • 1 cup milk
  • 2 teaspoons cinnamon, divided
  • ½ teaspoon nutmeg
  • ½ cup sugar + 2 tbsp.
  • ½ cup raisins
  • For the Sauce
  • 1 cup unsalted butter
  • 1 cup heavy cream
  • 1 cup brown sugar

Instructions

Step 1: Prepare the oven. Preheat it to 350 degrees. Grease a 9 x 13-inch baking dish with cooking spray.

Step 2: Whisk the yogurt, milk, eggs, 1 teaspoon of cinnamon, nutmeg, and a half cup of sugar in a large bowl.

Step 3: Mix in the sliced apples and raisins. Smoothly fold in the bread cubes and pour the mixture in the prepared baking dish.

Step 4: Mix 2 tablespoons of sugar and 1 teaspoon of cinnamon in a small bowl.

Step 5: Drizzle the sugar and cinnamon mixture on top of the bread pudding.

Step 6: Place inside the preheated oven and bake for 30 to 40 minutes or until puffed and golden brown.

Step 7: Meanwhile, to make the caramel sauce. Stir the butter, heavy cream, and brown sugar in a heavy saucepan over medium-low heat. Bring to a boil. Once boiling, reduce the heat to low and continue to simmer for 5 minutes or until the sauce is thick.

Step 8: Once the pudding is done, remove from the oven and pour the sauce over.

Step 9: Slice and top with vanilla ice cream. Serve and enjoy!

June 18, 2020 0 comment
0 FacebookTwitterPinterestEmail
Main Dish Recipes

No-Bake Woolworth Icebox Cheesecake

by Rebecca June 18, 2020
written by Rebecca

No-bake desserts are extremely impressive. They are like the 2.0 version of the baked goods we enjoy and love. It is like magic! When I moved out of my parent’s house I only have the basics and it took me months to even afford a decent oven. It’s darn hard and I needed to adjust. That’s when I fell in love with no-bake recipes. Don’t underestimate no-bake goodies because they are as great and sometimes even better. Like this No-Bake Woolworth Icebox Cheesecake. It’s one of the many no-bake recipes I kept and fell crazy in love with. A no-fuss, cold, lemony, and light Icebox Cheesecake. This is best served when chilled and reminds me of summer.

INGREDIENTS

1 (3 oz.) package lemon jello

1 cup boiling water

3 cups graham cracker crumbs

1/2 cup (1 stick) butter, melted

1 (8 oz.) package cream cheese

1 cup granulated sugar

4 tablespoons lemon juice

1 (12 oz.) can evaporate milk, chilled

How to make No-Bake Woolworth Icebox Cheesecake

Step 1: Place the jello in a medium bowl and dissolve in boiling water. Let it cool for about 5 to 10 minutes or until the jello is a little thick.

Step 2: Meanwhile, in a medium bowl, mix 3/4 of the graham crumbs with melted butter. Pour into the bottom of a 9 x 13-inch pan and press. Set aside. Don’t forget to reserve the remaining crumbs for topping.

Step 3: Beat the evaporated milk in a medium bowl for 2 to 4 minutes until whipped and fluffy.

Step 4: In a large bowl, combine the cream cheese, sugar, and lemon juice. Mix until smooth.

Step 5: Pour in the thickened jello and fold in the whipped evaporated milk.

Step 6: Evenly spread the filling on the crust. Then, top it with the reserved graham cracker crumbs.

Step 7: Place inside the fridge to chill for at least 2 hours or preferably overnight, covered. Once ready, slice, and serve. Enjoy!

No-Bake Woolworth Icebox Cheesecake

Rebecca No-bake desserts are extremely impressive. They are like the 2.0 version of the baked goods we enjoy and love. It is like magic! When I moved out of my parent’s… Main Dish Recipes No-Bake Woolworth Icebox Cheesecake European Print This
Nutrition facts: 200 calories 20 grams fat
Rating: 5.0/5
( 1 voted )

Ingredients

  • 1 (3 oz.) package lemon jello
  • 1 cup boiling water
  • 3 cups graham cracker crumbs
  • 1/2 cup (1 stick) butter, melted
  • 1 (8 oz.) package cream cheese
  • 1 cup granulated sugar
  • 4 tablespoons lemon juice
  • 1 (12 oz.) can evaporate milk, chilled

Instructions

Step 1: Place the jello in a medium bowl and dissolve in boiling water. Let it cool for about 5 to 10 minutes or until the jello is a little thick.

Step 2: Meanwhile, in a medium bowl, mix 3/4 of the graham crumbs with melted butter. Pour into the bottom of a 9 x 13-inch pan and press. Set aside. Don't forget to reserve the remaining crumbs for topping.

Step 3: Beat the evaporated milk in a medium bowl for 2 to 4 minutes until whipped and fluffy.

Step 4: In a large bowl, combine the cream cheese, sugar, and lemon juice. Mix until smooth.

Step 5: Pour in the thickened jello and fold in the whipped evaporated milk.

Step 6: Evenly spread the filling on the crust. Then, top it with the reserved graham cracker crumbs.

Step 7: Place inside the fridge to chill for at least 2 hours or preferably overnight, covered. Once ready, slice, and serve. Enjoy!


June 18, 2020 0 comment
0 FacebookTwitterPinterestEmail
Main Dish Recipes

Roasted Garlic Mushrooms

by Rebecca June 18, 2020
written by Rebecca

A very simple and easy recipe to make for a “healthy” treat that you will surely enjoy! I make this every time I eat something fatty the night after. It kind of cleans my body. I don’t know but it feels good after eating this Roasted Garlic Mushrooms. My grandma used to force me to eat vegetables but I was so hesitant because I did not want to eat something that is not appealing to me. Now that I am an adult, I have found the best healthy food that has an appeal to me. Hats off to my grandma still for being the best cook that I know but this recipe is all me. She was so proud that I am eating vegetables now. Yeah, I’m still her little grandchild. I cooked this yesterday and she tasted it. You know what happens next, she loved it! I know that you’re gonna love it too!

INGREDIENTS

1 pound fresh mushroom, halved

1 spray olive oil cooking spray

1/8 teaspoon table salt, or to taste

1/8 teaspoon black pepper, or to taste

1 clove, medium garlic clove, minced or pressed

1 tablespoon fresh thyme, minced

1 tablespoon balsamic vinegar

How to make Roasted Garlic Mushrooms

Step 1: Ready the oven and preheat to 450 degrees F.

Step 2: Add the mushrooms in a large jelly roll and arrange them in a single layer. Apply cooking spray and coat the mushrooms. Sprinkle salt and pepper.

Step 3: Roast the other side of the mushrooms for 15 minutes and flip it over to roast the other side for 5 to 10 minutes more.

Step 4: In a large bowl, add thyme and garlic.

Step 5: Transfer the mushrooms into the large bowl with the garlic and thyme. Toss the bowl to coat the mushrooms completely with garlic and thyme.

Step 6: Pour vinegar and toss it again until all ingredients are incorporated.

Step 7: Serve and enjoy! (Make 1 cup per serving.)

Roasted Garlic Mushrooms

Rebecca A very simple and easy recipe to make for a “healthy” treat that you will surely enjoy! I make this every time I eat something fatty the night after. It… Main Dish Recipes Roasted Garlic Mushrooms European Print This
Nutrition facts: 200 calories 20 grams fat
Rating: 5.0/5
( 2 voted )

Ingredients

  • 1 pound fresh mushroom, halved
  • 1 spray olive oil cooking spray
  • 1/8 teaspoon table salt, or to taste
  • 1/8 teaspoon black pepper, or to taste
  • 1 clove, medium garlic clove, minced or pressed
  • 1 tablespoon fresh thyme, minced
  • 1 tablespoon balsamic vinegar

Instructions

Step 1: Ready the oven and preheat to 450 degrees F.

Step 2: Add the mushrooms in a large jelly roll and arrange them in a single layer. Apply cooking spray and coat the mushrooms. Sprinkle salt and pepper.

Step 3: Roast the other side of the mushrooms for 15 minutes and flip it over to roast the other side for 5 to 10 minutes more.

Step 4: In a large bowl, add thyme and garlic.

Step 5: Transfer the mushrooms into the large bowl with the garlic and thyme. Toss the bowl to coat the mushrooms completely with garlic and thyme.

Step 6: Pour vinegar and toss it again until all ingredients are incorporated.

Step 7: Serve and enjoy! (Make 1 cup per serving.)


June 18, 2020 0 comment
0 FacebookTwitterPinterestEmail
Newer Posts
Older Posts

Popular Posts

  • 1

    Crispy Crunchy Parmesan Potatoes

    March 21, 2020
  • 2

    CROCK POT SMOTHERED PORK CHOPS

    March 21, 2020
  • Facebook
  • Twitter

@2019 - All Right Reserved.


Back To Top