Cook it once
  • Home
  • Privacy Policy
  • Recipes
    • KETO
    • LC
    • WW
  • Tips
  • Contact
Cook it once
  • Home
  • Privacy Policy
  • Recipes
    • KETO
    • LC
    • WW
  • Tips
  • Contact
Category:

Main Dish Recipes

Main Dish Recipes

SLOW COOKER HAM AND POTATO CASSEROLE

by Rebecca September 16, 2020
written by Rebecca

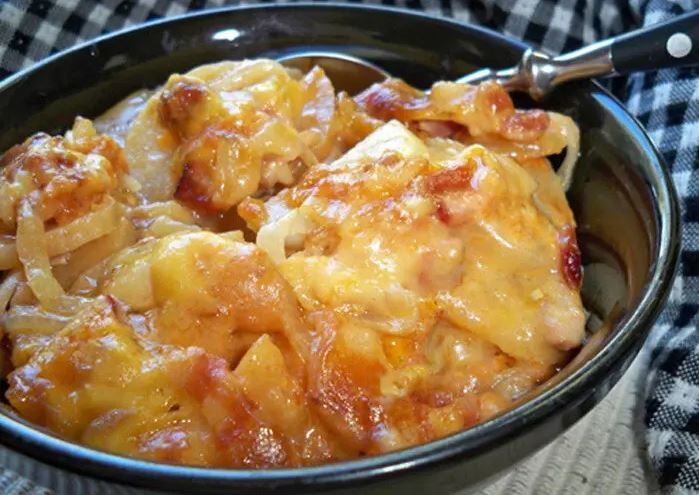
This looks delicious! Savory, appetizing Ham, and Potato Casserole cooked perfectly in a slow cooker. I so love slow cooker recipes, they are a breeze to set-up and you just leave them to cook. Throw everything in the pan and cook. I am a working mom and most of the days I need something easy and quick.  And this dish falls perfectly into the criteria – easy, delicious, and does not take much of my time. On regular days, I don’t have much time to spend eternity in the kitchen so I always resort to slow cooker recipes. And why not? It is convenient and super delicious! Just like this casserole that has a mouthwatering creamy sauce, ham, and stuffing mix. This is the ultimate comfort food! The kids love this super which is great and this has been our go-to always. This slow-cooker dish is yet another of my favorites. Great as is but is excellent alongside anything. And with only a few simple readily available ingredients you can whip this up whenever. Goodness in a plate – one bite and you’ll love this creamy, cheesy, potatoes. Without a doubt a keeper!

INGREDIENTS

1 (30 oz) package frozen hash brown potatoes, cubed or shredded

1 envelope onion soup mix

1 teaspoon salt

1 (8 oz) container sour cream

1 (10.75 oz) can reduced-fat cream of chicken soup

2 cups grated cheddar cheese

1/4 cup butter, melted

1 (6 oz) package, herb-seasoned stuffing mix

2 cups chopped ham

HOW TO MAKE SLOW COOKER HAM AND POTATO CASSEROLE

Step 1: Using a nonstick cooking spray, grease a slow cooker.

Step 2: In the slow cooker, combine the hash browns, dried onion soup mix, salt, sour cream, cream of chicken soup, cheese, and ham.

Step 3: Then, sprinkle stuffing mix on top and drizzle over the melted butter.

Step 4: Cook for about 5 to 6 hours on low, covered, or 2 to 4 hours on high.

SLOW COOKER HAM AND POTATO CASSEROLE

Rebecca This looks delicious! Savory, appetizing Ham, and Potato Casserole cooked perfectly in a slow cooker. I so love slow cooker recipes, they are a breeze to set-up and you just… Main Dish Recipes SLOW COOKER HAM AND POTATO CASSEROLE European Print This
Nutrition facts: 200 calories 20 grams fat
Rating: 3.6/5
( 37 voted )

Ingredients

  • 1 (30 oz) package frozen hash brown potatoes, cubed or shredded
  • 1 envelope onion soup mix
  • 1 teaspoon salt
  • 1 (8 oz) container sour cream
  • 1 (10.75 oz) can reduced-fat cream of chicken soup
  • 2 cups grated cheddar cheese
  • 1/4 cup butter, melted
  • 1 (6 oz) package, herb-seasoned stuffing mix
  • 2 cups chopped ham

Instructions

Step 1: Using a nonstick cooking spray, grease a slow cooker.

Step 2: In the slow cooker, combine the hash browns, dried onion soup mix, salt, sour cream, cream of chicken soup, cheese, and ham.

Step 3: Then, sprinkle stuffing mix on top and drizzle over the melted butter.

Step 4: Cook for about 5 to 6 hours on low, covered, or 2 to 4 hours on high.
September 16, 2020 0 comment
0 FacebookTwitterPinterestEmail
Main Dish Recipes

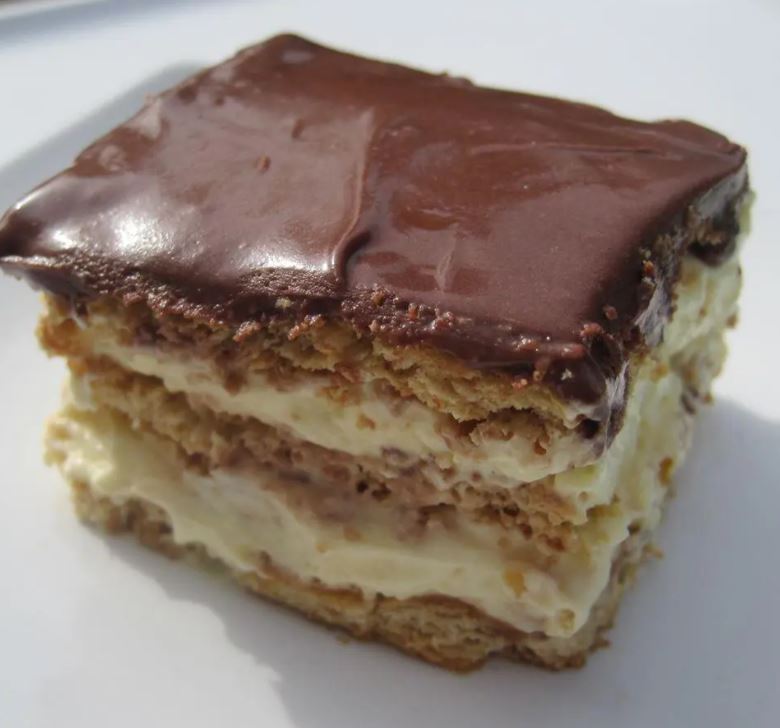
AN ECLAIR CAKE YOU’LL WANNA MAKE AGAIN AND AGAIN

by Rebecca September 16, 2020
written by Rebecca

You all know by now how much I love pastries especially no-bakes. Because they are super easy to make, although need time to set up. So I recommend making them a night before you need to serve them. One of my obsessions is this soft, creamy Eclair Cake. With only simple few ingredients you can make this over and over again. This cake hits the sweet spot every time! A heavenly cake with cream puff crust, vanilla cream cheese layer, whipped cream, and chocolate frosting. I cannot ask for anything more! And if want more chocolate goodness, try using graham chocolate. I promise this is worth everything!

INGREDIENTS

2 (3.5 oz) packages instant vanilla pudding mix

1 (8 oz) container frozen whipped topping, thawed

3 cups of milk

1 (16 oz) package graham cracker squares

1 (16 oz) package prepared chocolate frosting

HOW TO MAKE ECLAIR CAKE

Step 1: Add the pudding, whipped topping, and milk in a medium bowl. Blend well.

Step 2: Arrange a single layer of graham cracker in the bottom of a 13 x 9-inch baking pan. Uniformly spread half of the pudding on top. Place another layer of graham crackers, then, the remaining pudding mix. And the final layer of the graham cracker.

Step 3: Generously spread the frosting until the edges of the pan and on the entire cake.

Step 4: Place in the fridge to chill for about 4 hours, covered, before serving.

NOTES:

For the frosting to be easier to spread, freeze the cake for at least 30 minutes.

Tweak this recipe as much as you want. Use graham chocolate instead and vanilla pudding. Or chocolate or cheesecake pudding instead of vanilla.

This is a pretty easy dessert to make but takes time to set up. I would suggest making this ahead or night before you will serve it.

The smooth and fluffy bite of this amazing eclair cake is like that of a hot burger fresh off the grill.

AN ECLAIR CAKE YOU’LL WANNA MAKE AGAIN AND AGAIN

Rebecca You all know by now how much I love pastries especially no-bakes. Because they are super easy to make, although need time to set up. So I recommend making them… Main Dish Recipes AN ECLAIR CAKE YOU’LL WANNA MAKE AGAIN AND AGAIN European Print This
Nutrition facts: 200 calories 20 grams fat
Rating: 5.0/5
( 1 voted )

Ingredients

  • 2 (3.5 oz) packages instant vanilla pudding mix
  • 1 (8 oz) container frozen whipped topping, thawed
  • 3 cups of milk
  • 1 (16 oz) package graham cracker squares
  • 1 (16 oz) package prepared chocolate frosting

Instructions

Step 1: Add the pudding, whipped topping, and milk in a medium bowl. Blend well.

Step 2: Arrange a single layer of graham cracker in the bottom of a 13 x 9-inch baking pan. Uniformly spread half of the pudding on top. Place another layer of graham crackers, then, the remaining pudding mix. And the final layer of the graham cracker.

Step 3: Generously spread the frosting until the edges of the pan and on the entire cake.

Step 4: Place in the fridge to chill for about 4 hours, covered, before serving.

NOTES:

For the frosting to be easier to spread, freeze the cake for at least 30 minutes.

Tweak this recipe as much as you want. Use graham chocolate instead and vanilla pudding. Or chocolate or cheesecake pudding instead of vanilla.

This is a pretty easy dessert to make but takes time to set up. I would suggest making this ahead or night before you will serve it.

The smooth and fluffy bite of this amazing eclair cake is like that of a hot burger fresh off the grill.

September 16, 2020 0 comment
0 FacebookTwitterPinterestEmail
Main Dish Recipes

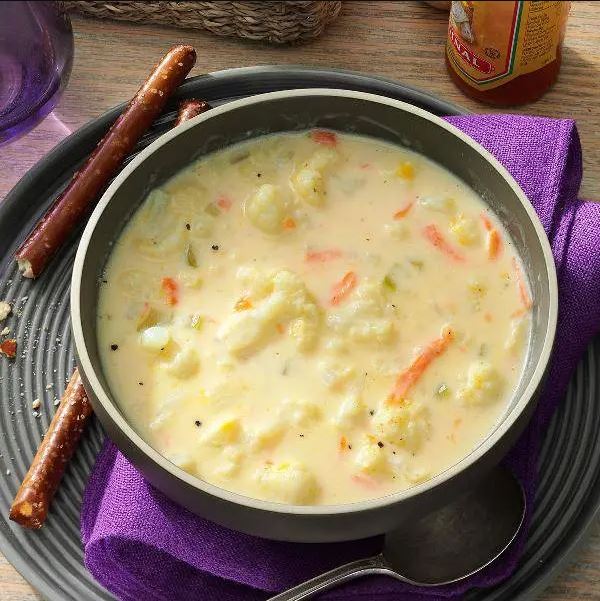
CAULIFLOWER SOUP

by Rebecca September 16, 2020
written by Rebecca

Yield: 8 servings (about 2 quarts)

A nice and tasty way to fill your tummy and heart with warmth in this cold breeze. One sip and everything seems okay despite the freezing weather. I love this soup so much, not only that this is so good but also because this is healthy. It has cauliflower, carrots, celery, cheese, and don’t forget the hot pepper! It is amazing as is but I like mine with a bit of kick, thus, the hot pepper. This creamy cauliflower soup is undeniably a keeper – super easy, quick, and good for the health. And simply delicious!

INGREDIENTS

1 medium head cauliflower, broken into florets

1 medium carrot, shredded

1/4 cup chopped celery

2-1/2 cups water

2 teaspoons chicken or 1 vegetable bouillon cube

3 tablespoons butter

3 tablespoons all-purpose flour

3/4 teaspoon salt

1/8 teaspoon pepper

2 cups 2% milk

1 cup (4 ounces) shredded cheddar cheese

1/2 to 1 teaspoon of hot pepper sauce, optional

HOW TO MAKE CAULIFLOWER SOUP

Step 1: Combine the cauliflower, carrot, celery, water, and bouillon in a large bowl. Bring to a boil.

Step 2: Decrease the heat and simmer for about 12 to 15 minutes or until the veggies are tender. You don’t need to drain. Making sure to lightly stir every 5 minutes or so. Remember, slightly stir and do not crush to remain some of the crunches.

Step 3: Melt the butter in a separate large saucepan. Add in the flour, salt, and pepper. Stir until smooth.

Step 4: Slowly add the milk and continue stirring to prevent the mixture to clomp.

Step 5: Let the mixture boil over medium heat. Continue to cook and stir for another 2 minutes or until the mixture has thickened. Then, reduce the heat.

Step 6: Sprinkle the cheese and stir until melted.

Step 7: If desired, you can add hot pepper. Stir well and continue to simmer over low heat for a couple of minutes.

Step 8: Serve immediately. Enjoy!

CAULIFLOWER SOUP

Rebecca Yield: 8 servings (about 2 quarts) A nice and tasty way to fill your tummy and heart with warmth in this cold breeze. One sip and everything seems okay despite… Main Dish Recipes CAULIFLOWER SOUP European Print This
Serves: 8
Nutrition facts: 200 calories 20 grams fat
Rating: 5.0/5
( 1 voted )

Ingredients

  • 1 medium head cauliflower, broken into florets
  • 1 medium carrot, shredded
  • 1/4 cup chopped celery
  • 2-1/2 cups water
  • 2 teaspoons chicken or 1 vegetable bouillon cube
  • 3 tablespoons butter
  • 3 tablespoons all-purpose flour
  • 3/4 teaspoon salt
  • 1/8 teaspoon pepper
  • 2 cups 2% milk
  • 1 cup (4 ounces) shredded cheddar cheese
  • 1/2 to 1 teaspoon of hot pepper sauce, optional

Instructions

Step 1: Combine the cauliflower, carrot, celery, water, and bouillon in a large bowl. Bring to a boil.

Step 2: Decrease the heat and simmer for about 12 to 15 minutes or until the veggies are tender. You don't need to drain. Making sure to lightly stir every 5 minutes or so. Remember, slightly stir and do not crush to remain some of the crunches.

Step 3: Melt the butter in a separate large saucepan. Add in the flour, salt, and pepper. Stir until smooth.

Step 4: Slowly add the milk and continue stirring to prevent the mixture to clomp.

Step 5: Let the mixture boil over medium heat. Continue to cook and stir for another 2 minutes or until the mixture has thickened. Then, reduce the heat.

Step 6: Sprinkle the cheese and stir until melted.

Step 7: If desired, you can add hot pepper. Stir well and continue to simmer over low heat for a couple of minutes.

Step 8: Serve immediately. Enjoy!

September 16, 2020 0 comment
0 FacebookTwitterPinterestEmail
Main Dish Recipes

French Onion Stuffed Potatoes

by Rebecca September 16, 2020
written by Rebecca

Serves: 4 | Prep: 10 minutes | Cook time: 30 minutes

In my opinion, these stuffed potatoes are way better than the French Onion Soup. So much going on inside and outside these potatoes. A pretty simple, not fussy potato dish that is filled with caramelized onions. Mouthwatering, super savory, and outrageously delicious! Make your ordinary baked potatoes into something extraordinary. Excellent side dish alongside steaks, chops, and many more. All the goodness in a stuffed potato that is baked in perfection and top with gruyere cheese and more caramelized onions. This dish is a must-try and to keep.

INGREDIENTS

4 large baked potatoes

4 tablespoons butter

4 onions, halved and thinly sliced

1/2 teaspoon dried thyme

1/2 cup sherry or dry white wine

1 cup beef stock

2 cups Gruyere cheese, grated

Kosher salt and freshly ground black pepper, to taste

How to make French Onion Stuffed Potatoes

Step 1: Prepare the oven. Preheat it to 375 degrees F.

Step 2: Add butter in a large skillet. Melt over medium-high heat.

Step 3: Sautee the onions and season with salt, pepper, and thyme. Slowly cook while occasionally stirring until the onions are very soft and caramel-colored.

Step 4: Using a sherry and wine, deglaze the pan. Then, pour the stock into the pan and bring to a low boil. Allow the liquid to evaporate, cook for about 5 to 10 minutes.

Step 5: In the meantime, slice the top third of the potatoes and scoop the flesh. Place in a medium bowl and add in half of the onion mixture. Stir to incorporate.

Step 6: Fill the potato shells and transfer them on a baking sheet.

Step 7: Top each shell with the rest of the onions and gruyere cheese.

Step 8: Place inside the preheated oven and bake until the cheese has melted. If you want more color, broil the potatoes on high for at least a minute.

Step 9: Serve and enjoy!

French Onion Stuffed Potatoes

Rebecca Serves: 4 | Prep: 10 minutes | Cook time: 30 minutes In my opinion, these stuffed potatoes are way better than the French Onion Soup. So much going on inside… Main Dish Recipes French Onion Stuffed Potatoes European Print This
Serves: 4 Prep Time: 10 mins Cooking Time: 30 mins 30 mins
Nutrition facts: 200 calories 20 grams fat
Rating: 5.0/5
( 1 voted )

Ingredients

  • 4 large baked potatoes
  • 4 tablespoons butter
  • 4 onions, halved and thinly sliced
  • 1/2 teaspoon dried thyme
  • 1/2 cup sherry or dry white wine
  • 1 cup beef stock
  • 2 cups Gruyere cheese, grated
  • Kosher salt and freshly ground black pepper, to taste

Instructions

Step 1: Prepare the oven. Preheat it to 375 degrees F.

Step 2: Add butter in a large skillet. Melt over medium-high heat.

Step 3: Sautee the onions and season with salt, pepper, and thyme. Slowly cook while occasionally stirring until the onions are very soft and caramel-colored.

Step 4: Using a sherry and wine, deglaze the pan. Then, pour the stock into the pan and bring to a low boil. Allow the liquid to evaporate, cook for about 5 to 10 minutes.

Step 5: In the meantime, slice the top third of the potatoes and scoop the flesh. Place in a medium bowl and add in half of the onion mixture. Stir to incorporate.

Step 6: Fill the potato shells and transfer them on a baking sheet.

Step 7: Top each shell with the rest of the onions and gruyere cheese.

Step 8: Place inside the preheated oven and bake until the cheese has melted. If you want more color, broil the potatoes on high for at least a minute.

Step 9: Serve and enjoy!

September 16, 2020 0 comment
0 FacebookTwitterPinterestEmail
Main Dish Recipes

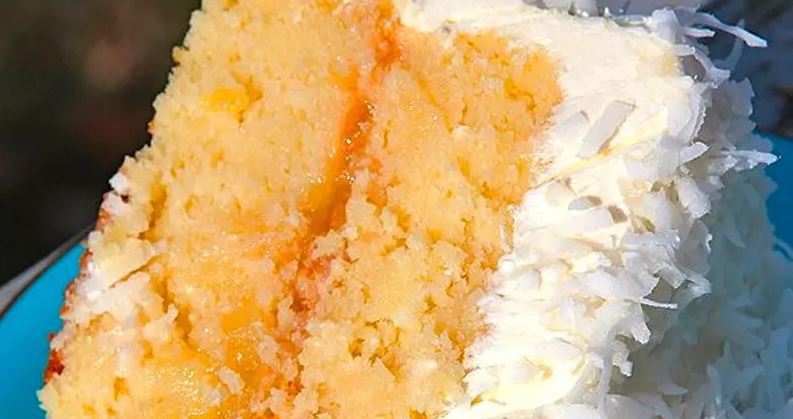
NANNY’S FAMOUS COCONUT-PINEAPPLE CAKE

by Rebecca September 16, 2020
written by Rebecca

A beautiful cake that is excellent for any occasion. Simple, refreshing, and perfectly sweet Coconut and Pineapple flavored cake.

INGREDIENTS

1 (15 1/4-ounce) can crushed pineapple in juice, undrained

1 1/2 cups butter or margarine, softened

3 cups of sugar

5 large eggs

1/2 cup lemon-lime soft drink*

3 cups cake flour, sifted

1 teaspoon lemon extract

1 teaspoon vanilla extract

Pineapple Filling

Cream Cheese Frosting

1 (6-ounce) package frozen flaked coconut, thawed

Garnish: fresh mint sprig

HOW TO MAKE NANNY’S FAMOUS COCONUT-PINEAPPLE CAKE

Step 1: Oil the sides and bottom of three 9-inch round cake pans. Using a wax paper, line the bottoms of each pan. Then, grease and flour the wax papers.

Step 2: Remove the juice from the pineapple, making sure to reserve 3/4 cup of juice. Set aside 1/4 cup of the reserved juice for the Cream Cheese Frosting. And for the Pineapple filling, reserve crushed pineapple.

Step 3: In a bowl, add the butter. Cream using an electric mixer until creamy. Slowly add in the sugar and beat well. Then, add in the eggs one at a time, beating every after each addition until incorporated.

Step 4: Mix the half cup reserved pineapple juice with a soft drink. Add in the flour alternately with the juice mixture into the butter mixture. Start and end with the flour. Beat every after each addition at low speed. Then, stir in the extracts.

Step 5: Transfer the batter into the prepared cake pans.

Step 6: Place inside the oven and bake for about 25 to 30 minutes at 350 degrees F. Check the doneness by inserting a toothpick in the center of the cake. Once the toothpick comes out clean the cake is done.

Step 7: Remove from the oven and take the cakes out of the pan immediately. Transfer into wire racks to cool.

Step 8: Evenly spread the 3/4 pineapple filling between the layers, then, the rest of the filling on top of the cake. On the sides of the cake, spread the Cream Cheese Frosting and pipe border around the top if you prefer. Then, sprinkle over the coconut. For the garnish, it is optional. Only if desired.

NOTE:

I always use 7-up for the lemon-lime soft drink. The layers of the cake rise excellently because of its specific level of carbonation.

NANNY’S FAMOUS COCONUT-PINEAPPLE CAKE

Rebecca A beautiful cake that is excellent for any occasion. Simple, refreshing, and perfectly sweet Coconut and Pineapple flavored cake. INGREDIENTS 1 (15 1/4-ounce) can crushed pineapple in juice, undrained 1… Main Dish Recipes NANNY’S FAMOUS COCONUT-PINEAPPLE CAKE European Print This
Nutrition facts: 200 calories 20 grams fat
Rating: 4.5/5
( 2 voted )

Ingredients

  • 1 (15 1/4-ounce) can crushed pineapple in juice, undrained
  • 1 1/2 cups butter or margarine, softened
  • 3 cups of sugar
  • 5 large eggs
  • 1/2 cup lemon-lime soft drink*
  • 3 cups cake flour, sifted
  • 1 teaspoon lemon extract
  • 1 teaspoon vanilla extract
  • Pineapple Filling
  • Cream Cheese Frosting
  • 1 (6-ounce) package frozen flaked coconut, thawed
  • Garnish: fresh mint sprig

Instructions

Step 1: Oil the sides and bottom of three 9-inch round cake pans. Using a wax paper, line the bottoms of each pan. Then, grease and flour the wax papers.

Step 2: Remove the juice from the pineapple, making sure to reserve 3/4 cup of juice. Set aside 1/4 cup of the reserved juice for the Cream Cheese Frosting. And for the Pineapple filling, reserve crushed pineapple.

Step 3: In a bowl, add the butter. Cream using an electric mixer until creamy. Slowly add in the sugar and beat well. Then, add in the eggs one at a time, beating every after each addition until incorporated.

Step 4: Mix the half cup reserved pineapple juice with a soft drink. Add in the flour alternately with the juice mixture into the butter mixture. Start and end with the flour. Beat every after each addition at low speed. Then, stir in the extracts.

Step 5: Transfer the batter into the prepared cake pans.

Step 6: Place inside the oven and bake for about 25 to 30 minutes at 350 degrees F. Check the doneness by inserting a toothpick in the center of the cake. Once the toothpick comes out clean the cake is done.

Step 7: Remove from the oven and take the cakes out of the pan immediately. Transfer into wire racks to cool.

Step 8: Evenly spread the 3/4 pineapple filling between the layers, then, the rest of the filling on top of the cake. On the sides of the cake, spread the Cream Cheese Frosting and pipe border around the top if you prefer. Then, sprinkle over the coconut. For the garnish, it is optional. Only if desired.

NOTE:

I always use 7-up for the lemon-lime soft drink. The layers of the cake rise excellently because of its specific level of carbonation.

September 16, 2020 0 comment
0 FacebookTwitterPinterestEmail
Main Dish Recipes

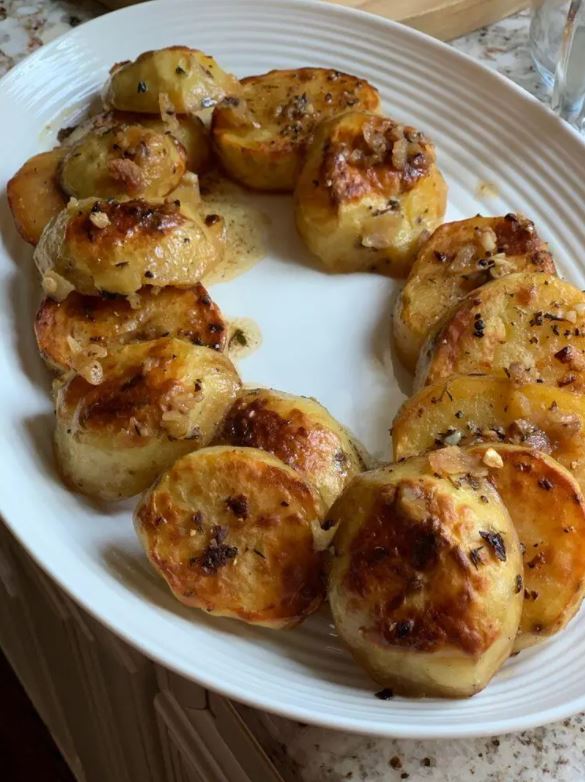
MELT-IN-YOUR-MOUTH MELTING POTATOES

by Rebecca September 16, 2020
written by Rebecca

I adore potatoes. They are the most versatile and you can make or add them in almost everything. And I have never tasted anything like this melting potatoes. They just melt in your mouth and they are outrageously delicious! When I first made these, my kids went crazy! And they have been requesting for these all the time. Super easy, not fussy potatoes with superb taste that just melts in your mouth. Goes alongside anything and are excellent as is. This is a must-try and to keep.

INGREDIENTS

2 lbs of Yukon Gold potatoes, peeled, cut into 1-inch slices

2 tbsp of melted butter

2 tbsp extra-virgin olive oil

2 tsp chopped fresh thyme

1 tsp chopped fresh rosemary

¾ tsp salt

½ tsp ground pepper

1 cup low-sodium vegetable broth or chicken broth

5 cloves garlic, peeled and smashed

HOW TO MAKE MELT-IN-YOUR-MOUTH MELTING POTATOES

Step 1: Before preheating the oven, place the rack first in the upper third layer of the oven.

Step 2: In a large bowl, add the potatoes, butter, oil, thyme, rosemary, salt, and pepper. Toss to coat the potatoes.

Step 3: In a single layer, arrange the potato mixture in a 9 x 13-inch metal baking pan.

Step 4: Place inside the preheated oven and roast for approximately 30 minutes. Flip the potatoes once until they turn brown.

Step 5: Take the pan out of the oven and carefully pour in the broth and add in the garlic.

Step 6: Then, continue roasting for another 15 minutes until most of the broth is absorbed and the potatoes are fork-tender.

Step 7: Remove from the oven and serve hot. Enjoy!

NOTE:

Let the potatoes cook undisturbed. Flip them only once until they turned brown. Take the sheet out of the oven and add the magic ingredient – the chicken broth. Adding some liquid that the tots will absorb will help the potatoes transform into that melt-in-your-mouth bites.

MELT-IN-YOUR-MOUTH MELTING POTATOES

Rebecca I adore potatoes. They are the most versatile and you can make or add them in almost everything. And I have never tasted anything like this melting potatoes. They just… Main Dish Recipes MELT-IN-YOUR-MOUTH MELTING POTATOES European Print This
Nutrition facts: 200 calories 20 grams fat
Rating: 4.3/5
( 3 voted )

Ingredients

  • 2 lbs of Yukon Gold potatoes, peeled, cut into 1-inch slices
  • 2 tbsp of melted butter
  • 2 tbsp extra-virgin olive oil
  • 2 tsp chopped fresh thyme
  • 1 tsp chopped fresh rosemary
  • ¾ tsp salt
  • ½ tsp ground pepper
  • 1 cup low-sodium vegetable broth or chicken broth
  • 5 cloves garlic, peeled and smashed

Instructions

Step 1: Before preheating the oven, place the rack first in the upper third layer of the oven.

Step 2: In a large bowl, add the potatoes, butter, oil, thyme, rosemary, salt, and pepper. Toss to coat the potatoes.

Step 3: In a single layer, arrange the potato mixture in a 9 x 13-inch metal baking pan.

Step 4: Place inside the preheated oven and roast for approximately 30 minutes. Flip the potatoes once until they turn brown.

Step 5: Take the pan out of the oven and carefully pour in the broth and add in the garlic.

Step 6: Then, continue roasting for another 15 minutes until most of the broth is absorbed and the potatoes are fork-tender.

Step 7: Remove from the oven and serve hot. Enjoy!

NOTE:

Let the potatoes cook undisturbed. Flip them only once until they turned brown. Take the sheet out of the oven and add the magic ingredient - the chicken broth. Adding some liquid that the tots will absorb will help the potatoes transform into that melt-in-your-mouth bites.

September 16, 2020 0 comment
0 FacebookTwitterPinterestEmail
Main Dish Recipes

HOMEMADE CHICAGO STYLE DEEP DISH PIZZA

by Rebecca September 16, 2020
written by Rebecca

I love pizza and this thick crust deep dish pizza is everything! It seems a bit of work but trusts me this is worth it. Gooey, oh so cheesy, and a freaking delicious Homemade Chicago Style Deep Dish Pizza.

INGREDIENTS

For the Dough:

3¼ cups all-purpose flour

½ cup yellow cornmeal

1½ teaspoons salt

2 teaspoons sugar

2¼ teaspoons instant yeast

1¼ cups water, room temperature

3 tablespoons unsalted butter, melted

4 tablespoons unsalted butter, softened

1 teaspoon + 4 tablespoons olive oil, divided

For the Sauce:

2 tablespoons unsalted butter

¼ cup grated onion

¼ teaspoon dried oregano

½ teaspoon salt

2 garlic cloves, minced

1 (28-ounce) can crushed tomatoes

¼ teaspoon sugar

2 tablespoons coarsely chopped fresh basil

1 tablespoon olive oil

Freshly ground black pepper

For the Toppings:

1 pound mozzarella cheese, shredded (about 4 cups)

Pepperoni

¼ cup grated Parmesan cheese

HOW TO MAKE HOMEMADE CHICAGO STYLE DEEP DISH PIZZA

To make the dough:

Step 1: In a large bowl, whisk the flour, cornmeal, salt, sugar, and yeast.

Step 2: Add in the water and melted butter. With a dough hook, mix for about 1 to 2 minutes on low speed until completely combined. Occasionally scraping the bottom and sides of the bowl.

Step 3: Adjusting the speed to medium, knead the dough for about 4 to 5 minutes until the dough is smooth, glossy, and the dough is already pulling away from the sides of the bowl. This you can simply do using your hands. First, use a spatula to mix in the water and butter, then, knead using your hands.

Step 4: With a teaspoon of olive oil, coat a large bowl. Transfer the dough to the bowl using a greased spatula. Turn the dough to coat in oil and use a plastic wrap to tightly cover the dough. Allow the dough to rise for about 45 to 60 minutes at room temperature until almost double in size.

To make the sauce:

Step 1: In a medium saucepan, heat the butter over medium heat until melted. Add in the onion, oregano, and salt. Occasionally stir for about 5 minutes until the liquid is disappeared and the onion is golden brown.

Step 2: Then, add in the garlic and cook for about 30 seconds until fragrant.

Step 3: Stir in the tomatoes and adjust the heat to high. Bring to a simmer, then, set the heat to low and continue to simmer for about 25 to 30 minutes until at least 2 1/2 cups is reduced. Turn off the heat and immediately stir in the basil and olive oil. Season with salt and pepper to taste.

To layer the dough:

Step 1: Onto a dry work surface, turn the dough out, and roll into a 15 x 12-inch rectangle. Spread the softened butter with an offset spatula over the surface of the dough. Leave at least half an inch border along the edges. Roll the dough, beginning at the short end into a tight cylinder. Then, flatten the cylinder seam side down on an 18 x 14-inch rectangle.

Step 2: Split the rectangle in half crosswise. Fold the first half into thirds like that of a business letter. Then, form a ball by pinching the seams together. Do this for the other half. Place the balls into the oiled bowl, covering tightly with plastic wrap. Allow rising for about 40 to 50 minutes in the fridge until almost double in size.

Step 3: In the meantime, set the oven rack to the lower area. And preheat the oven to 425 degrees F.

Let’s bake!

Step 1: Grease with 2 tablespoons of olive oil a two 9-inch round cake pans.

Step 2: Place one of the doughs onto a dry work surface, then, roll it out into a 13-inch circle.

Step 3: Loosely roll the dough around a rolling pin and transfer it into the pan by unrolling the dough in the pan. Press lightly and work into corners and an inch upsides. In case the dough holds when stretch, allow it to relax for at least 5 minutes before trying again. Do this with the other dough ball.

Step 4: Evenly sprinkle over 2 cups of mozzarella onto each dough. If you want to add meat or veggie topping, add them after the cheese. Then, pour 1 1/4 cups of tomato sauce on top of the cheese and spread and sprinkle over 2 tablespoons of parmesan.

Step 5: Place inside the preheated oven and bake for about 20 to 30 minutes until the crust is golden brown.

Step 6: Take the pizza out of the oven and allow to rest for at least 10 minutes before slicing.

Step 7: Serve and enjoy!

HOMEMADE CHICAGO STYLE DEEP DISH PIZZA

Rebecca I love pizza and this thick crust deep dish pizza is everything! It seems a bit of work but trusts me this is worth it. Gooey, oh so cheesy, and… Main Dish Recipes HOMEMADE CHICAGO STYLE DEEP DISH PIZZA European Print This
Nutrition facts: 200 calories 20 grams fat
Rating: 4.0/5
( 4 voted )

Ingredients

  • For the Dough:
  • 3¼ cups all-purpose flour
  • ½ cup yellow cornmeal
  • 1½ teaspoons salt
  • 2 teaspoons sugar
  • 2¼ teaspoons instant yeast
  • 1¼ cups water, room temperature
  • 3 tablespoons unsalted butter, melted
  • 4 tablespoons unsalted butter, softened
  • 1 teaspoon + 4 tablespoons olive oil, divided
  • For the Sauce:
  • 2 tablespoons unsalted butter
  • ¼ cup grated onion
  • ¼ teaspoon dried oregano
  • ½ teaspoon salt
  • 2 garlic cloves, minced
  • 1 (28-ounce) can crushed tomatoes
  • ¼ teaspoon sugar
  • 2 tablespoons coarsely chopped fresh basil
  • 1 tablespoon olive oil
  • Freshly ground black pepper
  • For the Toppings:
  • 1 pound mozzarella cheese, shredded (about 4 cups)
  • Pepperoni
  • ¼ cup grated Parmesan cheese

Instructions

To make the dough:

Step 1: In a large bowl, whisk the flour, cornmeal, salt, sugar, and yeast.

Step 2: Add in the water and melted butter. With a dough hook, mix for about 1 to 2 minutes on low speed until completely combined. Occasionally scraping the bottom and sides of the bowl.

Step 3: Adjusting the speed to medium, knead the dough for about 4 to 5 minutes until the dough is smooth, glossy, and the dough is already pulling away from the sides of the bowl. This you can simply do using your hands. First, use a spatula to mix in the water and butter, then, knead using your hands.

Step 4: With a teaspoon of olive oil, coat a large bowl. Transfer the dough to the bowl using a greased spatula. Turn the dough to coat in oil and use a plastic wrap to tightly cover the dough. Allow the dough to rise for about 45 to 60 minutes at room temperature until almost double in size.

To make the sauce:

Step 1: In a medium saucepan, heat the butter over medium heat until melted. Add in the onion, oregano, and salt. Occasionally stir for about 5 minutes until the liquid is disappeared and the onion is golden brown.

Step 2: Then, add in the garlic and cook for about 30 seconds until fragrant.

Step 3: Stir in the tomatoes and adjust the heat to high. Bring to a simmer, then, set the heat to low and continue to simmer for about 25 to 30 minutes until at least 2 1/2 cups is reduced. Turn off the heat and immediately stir in the basil and olive oil. Season with salt and pepper to taste.

To layer the dough:

Step 1: Onto a dry work surface, turn the dough out, and roll into a 15 x 12-inch rectangle. Spread the softened butter with an offset spatula over the surface of the dough. Leave at least half an inch border along the edges. Roll the dough, beginning at the short end into a tight cylinder. Then, flatten the cylinder seam side down on an 18 x 14-inch rectangle.

Step 2: Split the rectangle in half crosswise. Fold the first half into thirds like that of a business letter. Then, form a ball by pinching the seams together. Do this for the other half. Place the balls into the oiled bowl, covering tightly with plastic wrap. Allow rising for about 40 to 50 minutes in the fridge until almost double in size.

Step 3: In the meantime, set the oven rack to the lower area. And preheat the oven to 425 degrees F.

Let's bake!

Step 1: Grease with 2 tablespoons of olive oil a two 9-inch round cake pans.

Step 2: Place one of the doughs onto a dry work surface, then, roll it out into a 13-inch circle.

Step 3: Loosely roll the dough around a rolling pin and transfer it into the pan by unrolling the dough in the pan. Press lightly and work into corners and an inch upsides. In case the dough holds when stretch, allow it to relax for at least 5 minutes before trying again. Do this with the other dough ball.

Step 4: Evenly sprinkle over 2 cups of mozzarella onto each dough. If you want to add meat or veggie topping, add them after the cheese. Then, pour 1 1/4 cups of tomato sauce on top of the cheese and spread and sprinkle over 2 tablespoons of parmesan.

Step 5: Place inside the preheated oven and bake for about 20 to 30 minutes until the crust is golden brown.

Step 6: Take the pizza out of the oven and allow to rest for at least 10 minutes before slicing.

Step 7: Serve and enjoy!

September 16, 2020 0 comment
0 FacebookTwitterPinterestEmail
Main Dish Recipes

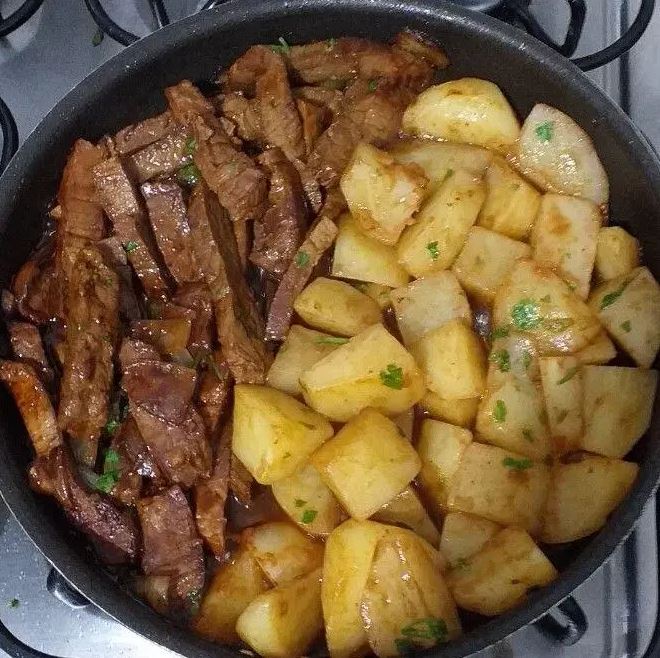
GARLIC BUTTER STEAK AND POTATOES SKILLET

by Rebecca September 16, 2020
written by Rebecca

This is my husband’s masterpiece and my favorite during date night. Mouthwatering steaks cut into strips with fork-tender potatoes in a savory sauce. The flavors bursting in your mouth in every bite. A super easy and quick one-pan meal that your family will love.

INGREDIENTS

2-4 petite steaks

salt and pepper to taste

garlic powder to taste

1 tablespoon olive oil

2-4 pounds baby potatoes, diced

2-6 tablespoons salted butter, soft enough to mash with a fork one tablespoon per steak, plus two tablespoons for the potatoes

2 teaspoons minced garlic

1 teaspoon dried Italian herb blend

1 teaspoon chopped fresh thyme

1 teaspoon chopped fresh parsley

HOW TO MAKE GARLIC BUTTER STEAK AND POTATOES SKILLET

Step 1: Prepare the oven. Preheat it to 400 degrees.

Step 2: Combine the butter, garlic, and dried herbs in a small bowl. Set aside.

Step 3: Generously season the pieces of steak with salt, pepper, and garlic powder on each side.

Step 4: Drizzle oil into a skillet and heat over medium-high heat. Add the steaks and sear for about 2 to 3 minutes on both sides until brown. Then, transfer the cooked steaks onto a plate. Set aside.

Step 5: Add the potatoes into the same skillet. Generously season the potatoes with salt, pepper, and garlic powder. Cook and stir for about 3 to 5 minutes until browned.

Step 6: Shove the potatoes to one side of the pan, then, place the steak back on the other side of the pan.

Step 7: Place the pan into the preheated oven and bake for about 15 to 20 minutes or until the potatoes are fork-tender and the steaks are cooked to your desired doneness.

Step 8: Remove from the oven and immediately put a dollop of the garlic butter on the steak pieces and the potatoes. Allow the butter to melt before mixing the potatoes to coat the steaks and potatoes on butter. Top with chopped thyme and parsley.

Step 9: Serve and enjoy!

GARLIC BUTTER STEAK AND POTATOES SKILLET

Rebecca This is my husband’s masterpiece and my favorite during date night. Mouthwatering steaks cut into strips with fork-tender potatoes in a savory sauce. The flavors bursting in your mouth in… Main Dish Recipes GARLIC BUTTER STEAK AND POTATOES SKILLET European Print This
Nutrition facts: 200 calories 20 grams fat
Rating: 5.0/5
( 1 voted )

Ingredients

  • 2-4 petite steaks
  • salt and pepper to taste
  • garlic powder to taste
  • 1 tablespoon olive oil
  • 2-4 pounds baby potatoes, diced
  • 2-6 tablespoons salted butter, soft enough to mash with a fork one tablespoon per steak, plus two tablespoons for the potatoes
  • 2 teaspoons minced garlic
  • 1 teaspoon dried Italian herb blend
  • 1 teaspoon chopped fresh thyme
  • 1 teaspoon chopped fresh parsley

Instructions

Step 1: Prepare the oven. Preheat it to 400 degrees.

Step 2: Combine the butter, garlic, and dried herbs in a small bowl. Set aside.

Step 3: Generously season the pieces of steak with salt, pepper, and garlic powder on each side.

Step 4: Drizzle oil into a skillet and heat over medium-high heat. Add the steaks and sear for about 2 to 3 minutes on both sides until brown. Then, transfer the cooked steaks onto a plate. Set aside.

Step 5: Add the potatoes into the same skillet. Generously season the potatoes with salt, pepper, and garlic powder. Cook and stir for about 3 to 5 minutes until browned.

Step 6: Shove the potatoes to one side of the pan, then, place the steak back on the other side of the pan.

Step 7: Place the pan into the preheated oven and bake for about 15 to 20 minutes or until the potatoes are fork-tender and the steaks are cooked to your desired doneness.

Step 8: Remove from the oven and immediately put a dollop of the garlic butter on the steak pieces and the potatoes. Allow the butter to melt before mixing the potatoes to coat the steaks and potatoes on butter. Top with chopped thyme and parsley.

Step 9: Serve and enjoy!

September 16, 2020 0 comment
0 FacebookTwitterPinterestEmail
Main Dish Recipes

Best Chocolate Chip Cookies

by Rebecca September 16, 2020
written by Rebecca

Just like what my niece always says – this is the best cookie ever! Although cookies are a bit underrated, still we cannot hide the fact that kids and even adults love cookies. We all have that one cookie recipe that we treasure. And mine is this Chocolate Chip Cookies recipe. Looks like your regular choco-chip cookies but far better. Plus, these cookies are a snap to make. With crisp edges and chewy middles, these are the best choco-chip cookies in the world! A huge hit during cookie exchange, perfect as a homemade giveaway, or store in an airtight container for the kids to enjoy. I have shared this recipe with many of my friends and they all said the same thing – they love it! And these perfectly sweet cookies are the most requested whenever my kid’s friends come over. I make sure to bake as many as I can because they want a take home, too.

Ingredients

1 cup white sugar

1 cup packed brown sugar

2 eggs

2 teaspoons vanilla extract

1 teaspoon baking soda

2 teaspoons hot water

1/2 teaspoon salt

3 cups all-purpose flour

2 cups semisweet chocolate chips

1 cup chopped walnuts

How to make Best Chocolate Chip Cookies

Step 1: Prepare the oven. Preheat it to 350 degrees F or 175 degrees C.

Step 2: In a mixing bowl, add the butter, white sugar, and brown sugar. Cream until smooth. Then, add in the eggs one at a time, beating every after each addition. And stir in the vanilla.

Step 3: Before adding the baking soda into the batter, dissolve it first in hot water. Once dissolved, add it in the batter followed by the salt.

Step 4: Add in the flour, chocolate chips, and nuts. Stir well until incorporated.

Step 5: Drop big spoonfuls of the batter onto ungreased pans.

Step 6: Place inside the preheated oven and bake for about 10 minutes or until the cookie edges are nicely done.

Best Chocolate Chip Cookies

Rebecca Just like what my niece always says – this is the best cookie ever! Although cookies are a bit underrated, still we cannot hide the fact that kids and even… Main Dish Recipes Best Chocolate Chip Cookies European Print This
Nutrition facts: 200 calories 20 grams fat
Rating: 4.5/5
( 2 voted )

Ingredients

  • 1 cup white sugar
  • 1 cup packed brown sugar
  • 2 eggs
  • 2 teaspoons vanilla extract
  • 1 teaspoon baking soda
  • 2 teaspoons hot water
  • 1/2 teaspoon salt
  • 3 cups all-purpose flour
  • 2 cups semisweet chocolate chips
  • 1 cup chopped walnuts

Instructions

Step 1: Prepare the oven. Preheat it to 350 degrees F or 175 degrees C.

Step 2: In a mixing bowl, add the butter, white sugar, and brown sugar. Cream until smooth. Then, add in the eggs one at a time, beating every after each addition. And stir in the vanilla.

Step 3: Before adding the baking soda into the batter, dissolve it first in hot water. Once dissolved, add it in the batter followed by the salt.

Step 4: Add in the flour, chocolate chips, and nuts. Stir well until incorporated.

Step 5: Drop big spoonfuls of the batter onto ungreased pans.

Step 6: Place inside the preheated oven and bake for about 10 minutes or until the cookie edges are nicely done.

September 16, 2020 0 comment
0 FacebookTwitterPinterestEmail
Main Dish Recipes

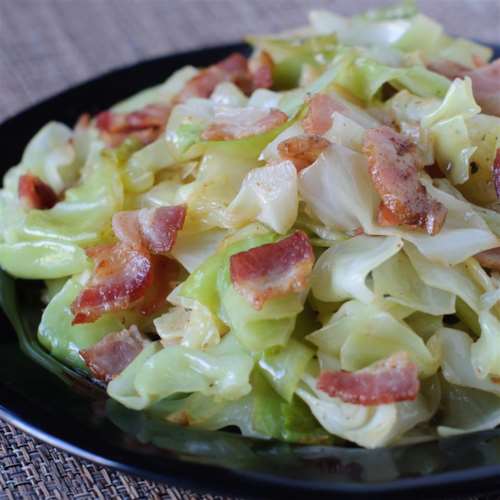
FRIED IRISH CABBAGE WITH BACON

by Rebecca September 15, 2020
written by Rebecca

Prep: 10 mins | Cook: 15mins | Ready In 25 mins

I always love this dish – simple, super easy, and outrageously delicious! Even my picky eaters adore this so much. I bring this always-on potluck and it is always a huge hit. A friend gave me this recipe way back and I never fail to prepare this ever since. Vegetables are a staple at my house and this is one of my family’s favorite. This is highly recommended and a keeper. Try this now and I am sure that your whole family will want it always! Thank me later. Enjoy!

Ingredients

1 (12 oz) package bacon

1/4 cup bacon drippings

1 small head cabbage, cored and finely chopped

ground black pepper to taste

HOW TO MAKE FRIED IRISH CABBAGE WITH BACON

Step 1: In a deep skillet, add the bacon and cook for about 5 to 7 minutes over medium heat until crisp.

Step 2: Remove the bacon from the skillet and transfer onto a paper towel-lined plate to drain. Make sure to not forget to reserve 1/4 cup of drippings in the skillet.

Step 3: In the reserved bacon drippings, add and stir the cabbage for about 5 to 7 minutes over medium heat.

Step 4: Then, crumble the bacon on top of the cabbage.

Step 5: Stir and simmer for about 2 to 3 minutes until the bacon is warm.

Step 6: Season the dish with black pepper.

Step 7: Serve and enjoy!

NOTE:

For the bacon, feel free to use any bacon that you prefer from the regular bacon. turkey, or vegan. Although the turkey and vegan bacon are not very fatty, so you need to add extra oil or butter,

Don’t forget to not overcook the cabbage or they will turn super soft, the texture is going to be smooth, and it’ll be weird.

Nutrition Facts:

Per Serving: 220 calories; 8.5 g protein; 30 mg cholesterol; 468 mg sodium; 17.8 g fat; 7.3 g carbohydrates

FRIED IRISH CABBAGE WITH BACON

Rebecca Prep: 10 mins | Cook: 15mins | Ready In 25 mins I always love this dish – simple, super easy, and outrageously delicious! Even my picky eaters adore this so much. I bring this always-on… Main Dish Recipes FRIED IRISH CABBAGE WITH BACON European Print This
Prep Time: 10 mins Cooking Time: 15 mins 15 mins
Nutrition facts: 220 calories 17.8 fat
Rating: 5.0/5
( 1 voted )

Ingredients

  • 1 (12 oz) package bacon
  • 1/4 cup bacon drippings
  • 1 small head cabbage, cored and finely chopped
  • ground black pepper to taste

Instructions

Step 1: In a deep skillet, add the bacon and cook for about 5 to 7 minutes over medium heat until crisp.

Step 2: Remove the bacon from the skillet and transfer onto a paper towel-lined plate to drain. Make sure to not forget to reserve 1/4 cup of drippings in the skillet.

Step 3: In the reserved bacon drippings, add and stir the cabbage for about 5 to 7 minutes over medium heat.

Step 4: Then, crumble the bacon on top of the cabbage.

Step 5: Stir and simmer for about 2 to 3 minutes until the bacon is warm.

Step 6: Season the dish with black pepper.

Step 7: Serve and enjoy!

NOTE:

For the bacon, feel free to use any bacon that you prefer from the regular bacon. turkey, or vegan. Although the turkey and vegan bacon are not very fatty, so you need to add extra oil or butter,

Don't forget to not overcook the cabbage or they will turn super soft, the texture is going to be smooth, and it'll be weird.

September 15, 2020 0 comment
0 FacebookTwitterPinterestEmail
Newer Posts
Older Posts

Popular Posts

  • 1

    Crispy Crunchy Parmesan Potatoes

    March 21, 2020
  • 2

    CROCK POT SMOTHERED PORK CHOPS

    March 21, 2020
  • Facebook
  • Twitter

@2019 - All Right Reserved.


Back To Top