Cook it once
  • Home
  • Privacy Policy
  • Recipes
    • KETO
    • LC
    • WW
  • Tips
  • Contact
Cook it once
  • Home
  • Privacy Policy
  • Recipes
    • KETO
    • LC
    • WW
  • Tips
  • Contact
Category:

Main Dish Recipes

Main Dish Recipes

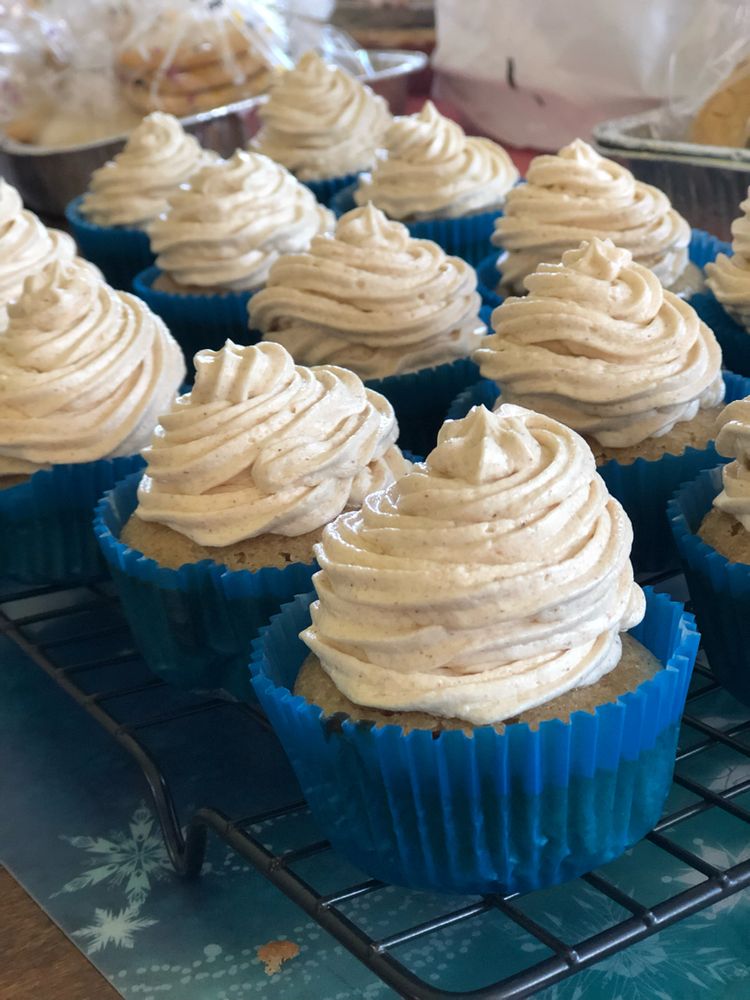
Apple Cider Cupcakes and Brown Sugar Cinnamon Buttercream

by Rebecca September 23, 2020
written by Rebecca

Prep time: 30 mins | Cook time: 17 mins | Total time: 47 mins | Serves: 15-17

These amazing made from scratch apple cider cupcakes with perfectly sweet brown sugar cinnamon buttercream are always a huge hit and a crowd favorite. A mouthwatering fall dessert that is super to make!

Ingredients

Cupcakes:

2 eggs

1⅔ cup all-purpose flour

1 cup apple cider

⅔ cup of sugar

½ cup unsalted butter softened

2 tsp. baking powder

1 tsp. ground cinnamon

½ tsp. salt

1 tsp. vanilla

Frosting:

1 cup softened butter

3 cup powdered sugar

½ cup light brown sugar

1 tsp cinnamon

2 tbsp milk

1 tsp vanilla

How to make Apple Cider Cupcakes and Brown Sugar Cinnamon Buttercream

To make the Cupcakes:

Step 1: In a bowl, cream the butter and sugar. Add in the eggs and vanilla. Mixing until incorporated.

Step 2: In another bowl, add the flour, baking powder, ground cinnamon, and salt. Whisk to combine.

Step 3: Alternately add the apple cider and flour mixture into the butter mixture. Gradually mix until incorporated.

Step 4: Using a paper or foil liners, line a standard muffin or cupcake tin.

Step 5: Spoon the batter about 2/3 full into each cupcake liner.

Step 6: Place inside the oven and bake for about 17 to 19 minutes at 350 degrees. Once the inserted toothpick in the center comes out clean, the cupcakes are done.

Step 7: Remove from the oven and allow the cupcakes to completely cool before frosting.

To make the Frosting:

Step 1: In a mixing bowl, whip the butter, brown sugar, cinnamon, and vanilla with a mixer until light and fluffy.

Step 2: Slowly add in the powdered sugar and mix until combined.

Step 3: Stir in the milk until you reached your preferred consistency. Opt for thinner frosting.

Step 4: Shift the frosting into a piping bag. Once the cupcakes are fully cooled, frost them.

Step 5: If desired, you can garnish the cupcakes with a slice of apple each.

Step 6: Store the frosted cupcakes in an airtight container at room temperature to stay fresh for up to 5 days.

Apple Cider Cupcakes and Brown Sugar Cinnamon Buttercream

Rebecca Prep time: 30 mins | Cook time: 17 mins | Total time: 47 mins | Serves: 15-17 These amazing made from scratch apple cider cupcakes with perfectly sweet brown sugar… Main Dish Recipes Apple Cider Cupcakes and Brown Sugar Cinnamon Buttercream European Print This
Serves: 15-17 Prep Time: 30 mins Cooking Time: 17 mins 17 mins
Nutrition facts: 200 calories 20 grams fat
Rating: 5.0/5
( 1 voted )

Ingredients

  • Cupcakes:
  • 2 eggs
  • 1⅔ cup all-purpose flour
  • 1 cup apple cider
  • ⅔ cup of sugar
  • ½ cup unsalted butter softened
  • 2 tsp. baking powder
  • 1 tsp. ground cinnamon
  • ½ tsp. salt
  • 1 tsp. vanilla
  • Frosting:
  • 1 cup softened butter
  • 3 cup powdered sugar
  • ½ cup light brown sugar
  • 1 tsp cinnamon
  • 2 tbsp milk
  • 1 tsp vanilla

Instructions

To make the Cupcakes:

Step 1: In a bowl, cream the butter and sugar. Add in the eggs and vanilla. Mixing until incorporated.

Step 2: In another bowl, add the flour, baking powder, ground cinnamon, and salt. Whisk to combine.

Step 3: Alternately add the apple cider and flour mixture into the butter mixture. Gradually mix until incorporated.

Step 4: Using a paper or foil liners, line a standard muffin or cupcake tin.

Step 5: Spoon the batter about 2/3 full into each cupcake liner.

Step 6: Place inside the oven and bake for about 17 to 19 minutes at 350 degrees. Once the inserted toothpick in the center comes out clean, the cupcakes are done.

Step 7: Remove from the oven and allow the cupcakes to completely cool before frosting.

To make the Frosting:

Step 1: In a mixing bowl, whip the butter, brown sugar, cinnamon, and vanilla with a mixer until light and fluffy.

Step 2: Slowly add in the powdered sugar and mix until combined.

Step 3: Stir in the milk until you reached your preferred consistency. Opt for thinner frosting.

Step 4: Shift the frosting into a piping bag. Once the cupcakes are fully cooled, frost them.

Step 5: If desired, you can garnish the cupcakes with a slice of apple each.

Step 6: Store the frosted cupcakes in an airtight container at room temperature to stay fresh for up to 5 days.
September 23, 2020 0 comment
0 FacebookTwitterPinterestEmail
Main Dish Recipes

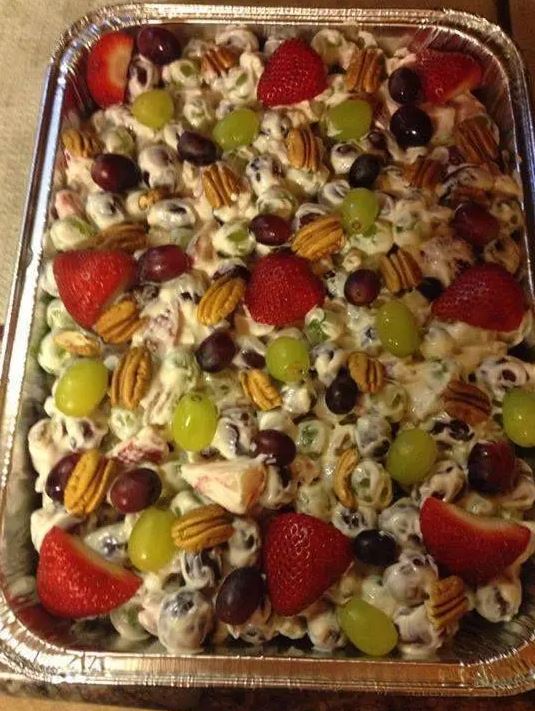
GRAPE SALAD

by Rebecca September 22, 2020
written by Rebecca

Serves: 20

Talk about a healthy meal! This grape salad is very refreshing to eat. I always prepare and serve this all the time. It is my way of cleansing my body with all the greasy meals I eat every day! It kind of balances the fattiness. You would feel less guilty once you get a bite of this amazing salad! I remember last month; my best friend went to my house. We had an amazing talk about life and of course food! This was one of the recipes that she taught me. I am so glad that she gave this incredible recipe because I never would have tasted perfection! Feel free to add more fruits to this salad though. For example, I think apples would be a great addition to this salad. Pineapples and cucumbers are awesome as well! Sometimes I even add strawberries. Give it your take. Make it a full-packed salad. You will never get tired of eating this, I swear! Breakfast, lunch, and dinner! I hope you all love and appreciate this recipe. Enjoy!

Ingredients:

16 oz sour cream

16 oz cream cheese

1 cup of sugar

Couple squirts of pure vanilla

Approx. 4 lbs. green seedless grapes

Approx. 4 lbs. red seedless grapes

Maybe 4 cups pecans

1-quart strawberries

HOW TO MAKE GRAPE SALAD

Step 1: In a medium mixing bowl, add in the sugar, cream cheese, vanilla, and sour cream. Stir
until well blended.

Step 2: Add in the rest of the ingredients and stir until everything is coated with the cream cheese
mixture. Set aside pecans and some fruits for garnish.

Step 3: Garnish with reserved pecans and fruits.

Step 4: Serve and enjoy!

NOTE

I use low-fat cream cheese and sour cream.

You can add your preferred fruits for this recipe.

You can sprinkle brown sugar for extra sweetness.

GRAPE SALAD

Rebecca Serves: 20 Talk about a healthy meal! This grape salad is very refreshing to eat. I always prepare and serve this all the time. It is my way of cleansing… Main Dish Recipes GRAPE SALAD European Print This
Serves: 20
Nutrition facts: 200 calories 20 grams fat
Rating: 5.0/5
( 1 voted )

Ingredients

  • 16 oz sour cream
  • 16 oz cream cheese
  • 1 cup of sugar
  • Couple squirts of pure vanilla
  • Approx. 4 lbs. green seedless grapes
  • Approx. 4 lbs. red seedless grapes
  • Maybe 4 cups pecans
  • 1-quart strawberries

Instructions

Step 1: In a medium mixing bowl, add in the sugar, cream cheese, vanilla, and sour cream. Stir
until well blended.

Step 2: Add in the rest of the ingredients and stir until everything is coated with the cream cheese
mixture. Set aside pecans and some fruits for garnish.

Step 3: Garnish with reserved pecans and fruits.

Step 4: Serve and enjoy!

NOTE

I use low-fat cream cheese and sour cream.

You can add your preferred fruits for this recipe.

You can sprinkle brown sugar for extra sweetness.

September 22, 2020 0 comment
0 FacebookTwitterPinterestEmail
Main Dish Recipes

IMPOSSIBLY EASY CHICKEN POT PIE

by Rebecca September 22, 2020
written by Rebecca

Remarkably easy, this fun chicken pot pie is insanely delicious! A delightful addition to your weekly menu made easy with frozen mixed veggies, cooked chicken, Bisquick mix along with the other simple ingredients you can easily find in your pantry. The ultimate comfort food that freezes well and requires only pantry ingredients. This appealing chicken pot pie is ready in a heartbeat. Not fussy, extremely easy, and the quickest to make.
My grandmother used to make pot pies. I grew up watching her make the most scrumptious meals. And this chicken pot pie recipe is the closest I can get to my grandmother’s. The taste is comparable to her chicken pot pie, both have that distinct and mouthwatering flavor, not to mention the flaky crust that we both love so much. And the filling is thick and full of chicken and vegetables. I was shocked that making a copy cat of my grandmother’s most loved chicken pot pie is easy and incredibly simple. This out-of-this-world savory vegetables, tender chicken with a creamy filling and flaky golden-brown crust is a favorite not only during winter and fall months but year-round!

INGREDIENTS

1 2/3 cups Green Giant(TM) Steamers(TM) frozen mixed vegetables

1 cup cut-up cooked chicken

1 (10.75 ounces) can condense cream of chicken soup

1 cup Original Bisquick(R) mix

1/2 cup milk

1 egg

HOW TO MAKE EASY CHICKEN POT PIE

Step 1: Prepare the oven. Preheat it to 400 degrees F.

Step 2: In an ungreased 9 x 1 1/4-inch glass pie plate, combine the vegetables, chicken, and soup.

Step 3: In a bowl, add the Bisquick, milk, and egg. Whisk with a fork until incorporated.

Step 4: Then, pour this over the vegetables and chicken mixture.

Step 5: Place inside the preheated oven and bake for about 30 minutes or until golden brown.

IMPOSSIBLY EASY CHICKEN POT PIE

Rebecca Remarkably easy, this fun chicken pot pie is insanely delicious! A delightful addition to your weekly menu made easy with frozen mixed veggies, cooked chicken, Bisquick mix along with the… Main Dish Recipes IMPOSSIBLY EASY CHICKEN POT PIE European Print This
Nutrition facts: 200 calories 20 grams fat
Rating: 5.0/5
( 1 voted )

Ingredients

  • 1 2/3 cups Green Giant(TM) Steamers(TM) frozen mixed vegetables
  • 1 cup cut-up cooked chicken
  • 1 (10.75 ounces) can condense cream of chicken soup
  • 1 cup Original Bisquick(R) mix
  • 1/2 cup milk
  • 1 egg

Instructions

Step 1: Prepare the oven. Preheat it to 400 degrees F.

Step 2: In an ungreased 9 x 1 1/4-inch glass pie plate, combine the vegetables, chicken, and soup.

Step 3: In a bowl, add the Bisquick, milk, and egg. Whisk with a fork until incorporated.

Step 4: Then, pour this over the vegetables and chicken mixture.

Step 5: Place inside the preheated oven and bake for about 30 minutes or until golden brown.

September 22, 2020 0 comment
0 FacebookTwitterPinterestEmail
Main Dish Recipes

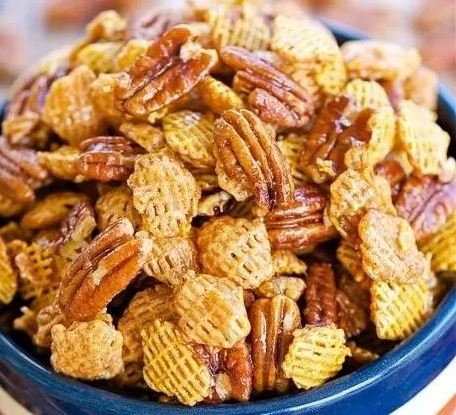
PRALINE CRUNCH

by Rebecca September 22, 2020
written by Rebecca

This has been my go-to snack. Fun to make and the kids most requested. I love how this snack balances the salty, sweet, and crunch! Beware though because this is overly addictive. A single bite will turn into countless nibbles and before you know it you are fighting for the last piece! This simple snack is pretty straightforward. All the ingredients you can easily find in your pantry. If you are like me who store pecans at home, then, it is time for you to try this. And experience the perfect scale of sweet and salty in every bite and that outrageously crisp of this praline crunch. This fun snack is a huge hit not only with kids but with everyone! A snack mix that you can whip up whenever. So good you have to make a lot so everyone can have their fair share.

INGREDIENTS

10 cups

8 cups Crispix cereal

2 cup pecan halves

1/2 cup brown sugar, packed

1/2 cup corn syrup

1/2 cup butter

1 tsp vanilla extract

1/2 tsp baking soda

HOW TO MAKE PRALINE CRUNCH

Step 1: Prepare the oven. Preheat it to 250 degrees F.

Step 2: Combine the cereal and pecans in a large bowl.

Step 3: Add the brown sugar, corn syrup, and butter in a medium saucepan. Combine and bring to a boil over medium-high heat. Occasionally stir.

Step 4: Remove the pan from the heat, then, stir in the vanilla and baking soda.

Step 5: Pour this over the cereal mixture. Toss to evenly coat.

Step 6: Transfer the cereal mixture into a 9 x 13-inch pan.

Step 7: Place inside the oven and bake for an hour. Making sure to stir every 20 minutes.

Step 8: Remove from the oven and pour onto wax or parchment paper to cool.

Step 9: Once cooled, break the praline into pieces.

PRALINE CRUNCH

Rebecca This has been my go-to snack. Fun to make and the kids most requested. I love how this snack balances the salty, sweet, and crunch! Beware though because this is… Main Dish Recipes PRALINE CRUNCH European Print This
Nutrition facts: 200 calories 20 grams fat
Rating: 5.0/5
( 1 voted )

Ingredients

  • 10 cups
  • 8 cups Crispix cereal
  • 2 cup pecan halves
  • 1/2 cup brown sugar, packed
  • 1/2 cup corn syrup
  • 1/2 cup butter
  • 1 tsp vanilla extract
  • 1/2 tsp baking soda

Instructions

Step 1: Prepare the oven. Preheat it to 250 degrees F.

Step 2: Combine the cereal and pecans in a large bowl.

Step 3: Add the brown sugar, corn syrup, and butter in a medium saucepan. Combine and bring to a boil over medium-high heat. Occasionally stir.

Step 4: Remove the pan from the heat, then, stir in the vanilla and baking soda.

Step 5: Pour this over the cereal mixture. Toss to evenly coat.

Step 6: Transfer the cereal mixture into a 9 x 13-inch pan.

Step 7: Place inside the oven and bake for an hour. Making sure to stir every 20 minutes.

Step 8: Remove from the oven and pour onto wax or parchment paper to cool.

Step 9: Once cooled, break the praline into pieces.

September 22, 2020 0 comment
0 FacebookTwitterPinterestEmail
Main Dish Recipes

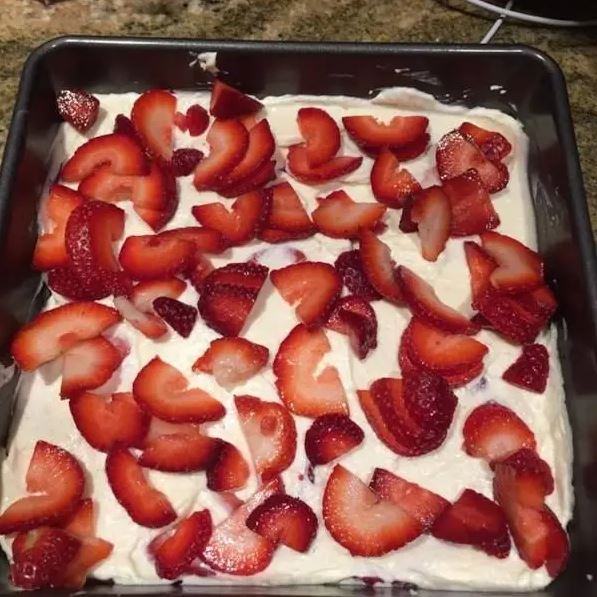
DIABETIC NO BAKE SUGAR FREE STRAWBERRY CHEESECAKE

by Rebecca September 22, 2020
written by Rebecca

Don’t miss out on sweet desserts even if you are a diabetic. This no-bake dessert is sugar-free, packed with fresh strawberries, and has all the same goodness of cheesecake. So you need not worry about your sugar spiking to the highest mountains. Enjoy life and eat what makes you happy. Look for desserts that are health friendy like this amazing Strawberry Cheesecake. No-bake, economic, and guaranteed low-carb. A lovely strawberry filled dessert you can enjoy without guilt and fear.

INGREDIENTS

3/4 cup graham cracker crumbs

3 tablespoons butter, melted

1/4 teaspoon ground cinnamon

1/4 teaspoon ground nutmeg1 (8 ounces) package cream cheese, softened

1 1/2 cups milk

1 (1 ounce) package cheesecake flavor sugar-free instant pudding mix

2 pints fresh strawberries, sliced

HOW TO MAKE NO-BAKE SUGAR FREE STRAWBERRY CHEESECAKE

Step 1: In a bowl, combine the graham cracker crumbs, melted butter, cinnamon, and nutmeg,

Step 2: In an 8-inch pie dish, press the graham cracker crumbs mixture.

Step 3: Meanwhile, add the cream cheese in a mixing bowl to make the filling. Beat using an electric mixer on medium speed until softened. Reducing the speed to low and slowly adding in the milk, a small amount at a time. At this point, the consistency will be watery.

Step 4: To scrape the cream cheese from the sides of the bowl, use a rubber spatula.

Step 5: Add in the pudding mix. Beat until the filling is thick and smooth.

Step 6: Add half of the cream cheese filling over the graham cracker crust. Spread evenly.

Step 7: Spoon and spread the strawberry filling on top of the cream cheese filling.

Step 8: Do the same with the rest of the filling.

Step 9: Place in the fridge to chill for an hour until the pie is set and cold.

DIABETIC NO BAKE SUGAR FREE STRAWBERRY CHEESECAKE

Rebecca Don’t miss out on sweet desserts even if you are a diabetic. This no-bake dessert is sugar-free, packed with fresh strawberries, and has all the same goodness of cheesecake. So… Main Dish Recipes DIABETIC NO BAKE SUGAR FREE STRAWBERRY CHEESECAKE European Print This
Nutrition facts: 200 calories 20 grams fat
Rating: 5.0/5
( 1 voted )

Ingredients

  • 3/4 cup graham cracker crumbs
  • 3 tablespoons butter, melted
  • 1/4 teaspoon ground cinnamon
  • 1/4 teaspoon ground nutmeg1 (8 ounces) package cream cheese, softened
  • 1 1/2 cups milk
  • 1 (1 ounce) package cheesecake flavor sugar-free instant pudding mix
  • 2 pints fresh strawberries, sliced

Instructions

Step 1: In a bowl, combine the graham cracker crumbs, melted butter, cinnamon, and nutmeg,

Step 2: In an 8-inch pie dish, press the graham cracker crumbs mixture.

Step 3: Meanwhile, add the cream cheese in a mixing bowl to make the filling. Beat using an electric mixer on medium speed until softened. Reducing the speed to low and slowly adding in the milk, a small amount at a time. At this point, the consistency will be watery.

Step 4: To scrape the cream cheese from the sides of the bowl, use a rubber spatula.

Step 5: Add in the pudding mix. Beat until the filling is thick and smooth.

Step 6: Add half of the cream cheese filling over the graham cracker crust. Spread evenly.

Step 7: Spoon and spread the strawberry filling on top of the cream cheese filling.

Step 8: Do the same with the rest of the filling.

Step 9: Place in the fridge to chill for an hour until the pie is set and cold.

September 22, 2020 0 comment
0 FacebookTwitterPinterestEmail
Main Dish Recipes

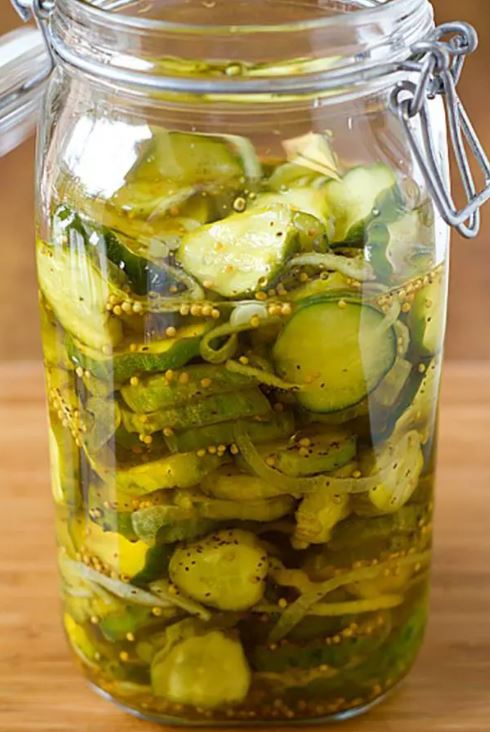
REFRIGERATOR BREAD AND BUTTER PICKLES

by Rebecca September 22, 2020
written by Rebecca

If you have been looking for that perfect bread and butter pickles, your search ends here. This is the best you will ever have! Pretty straightforward, super easy, and the quickest to prepare. Plus, you can store this in the fridge for up to 2 weeks! I save mine in a Bormioli jar and it’s perfect! But you can use an airtight jar available. This sweet bread and butter pickles are made with simple and readily available ingredients. Give this a try and see for yourself. No fuss, delicious, does not require canning, and the best homemade bread and butter pickles!

INGREDIENTS

5½ cups (about 1½ pounds) thinly sliced (about ¼-inch) pickling cucumbers

1½ tablespoons kosher salt1 cup thinly sliced sweet onion

1 cup (198 grams) granulated sugar

1 cup (240 ml) white vinegar

½ cup (120 ml) apple cider vinegar

¼ cup (50 grams) light brown sugar

1½ teaspoons mustard seeds½ teaspoon celery seeds

1/8 teaspoon ground turmeric

HOW TO MAKE REFRIGERATOR BREAD AND BUTTER PICKLES

Step 1: In a large, shallow bowl, combine the cucumbers and salt. Chill for 1 1/2 hours, covered.

Step 2: Once chilled, transfer the cucumbers into a colander. Thoroughly rinse under cold water. Drain the cucumbers well and put them back into the bowl.

Step 3: Add in the onions and toss.

Step 4: In a medium saucepan, combine the granulated sugar, white vinegar, apple cider vinegar, brown sugar, mustard seeds, celery seeds, and ground turmeric. Simmer over medium heat. Stir until the sugar dissolves.

Step 5: Pour the hot vinegar mixture on the cucumber and onion. Allow sitting for an hour at room temperature.

Step 6: Refrigerate for 24 hours, covered.

Step 7: Store in the refrigerator for up to 2 weeks in an airtight container.

NOTE:

If you can find Bormioli jars that would be perfect!

REFRIGERATOR BREAD AND BUTTER PICKLES

Rebecca If you have been looking for that perfect bread and butter pickles, your search ends here. This is the best you will ever have! Pretty straightforward, super easy, and the… Main Dish Recipes REFRIGERATOR BREAD AND BUTTER PICKLES European Print This
Nutrition facts: 200 calories 20 grams fat
Rating: 5.0/5
( 1 voted )

Ingredients

  • 5½ cups (about 1½ pounds) thinly sliced (about ¼-inch) pickling cucumbers
  • 1½ tablespoons kosher salt1 cup thinly sliced sweet onion
  • 1 cup (198 grams) granulated sugar
  • 1 cup (240 ml) white vinegar
  • ½ cup (120 ml) apple cider vinegar
  • ¼ cup (50 grams) light brown sugar
  • 1½ teaspoons mustard seeds½ teaspoon celery seeds
  • 1/8 teaspoon ground turmeric

Instructions

Step 1: In a large, shallow bowl, combine the cucumbers and salt. Chill for 1 1/2 hours, covered.

Step 2: Once chilled, transfer the cucumbers into a colander. Thoroughly rinse under cold water. Drain the cucumbers well and put them back into the bowl.

Step 3: Add in the onions and toss.

Step 4: In a medium saucepan, combine the granulated sugar, white vinegar, apple cider vinegar, brown sugar, mustard seeds, celery seeds, and ground turmeric. Simmer over medium heat. Stir until the sugar dissolves.

Step 5: Pour the hot vinegar mixture on the cucumber and onion. Allow sitting for an hour at room temperature.

Step 6: Refrigerate for 24 hours, covered.

Step 7: Store in the refrigerator for up to 2 weeks in an airtight container.

NOTE:

If you can find Bormioli jars that would be perfect!

September 22, 2020 0 comment
0 FacebookTwitterPinterestEmail
Main Dish Recipes

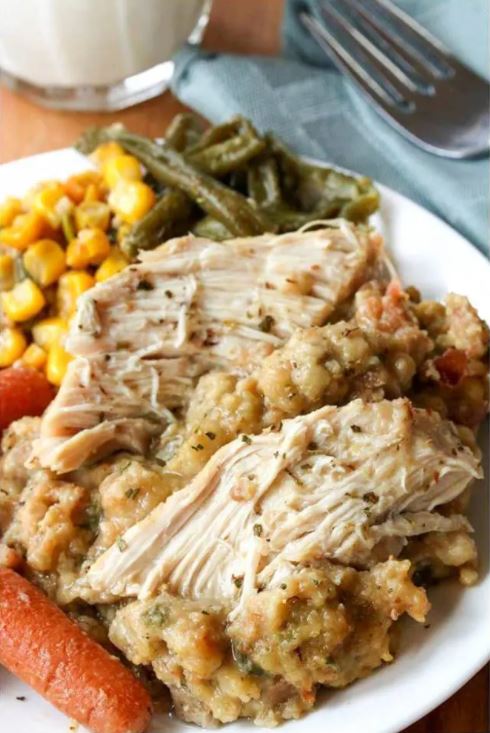
CROCKPOT CHICKEN AND STUFFING

by Rebecca September 22, 2020
written by Rebecca

Servings Per Recipe: 4

A simple, no fussy chicken and stuffing that is amazingly cooked in a crockpot to give you the most delicious dish. Try to add in some diced sausage, onions, celery, even dried cranberries, and the result will surprise you. Serve this alongside whipped potatoes or roasted potatoes like I normally do. If you haven’t tried this, you are missing out. Give this a shot and I promise you won’t regret it. have a blast with this mouthwatering, best of the best Crockpot Chicken and Stuffing.
This comforting dish is filled with all the goodness you can ask for. Outrageously delicious, always a crowd favorite, and guaranteed to give you a game-changer meal. A perfect rotation to your usual dinner menu. Impress your loved ones with this easy peasy dish. A dump and go dish that is slow-cooked in a crockpot that will wow everyone!

INGREDIENTS

1 (10.5 ounces) can of cream of chicken soup

1 (6 oz) box of stuffing mix

¾ cup of water

1 (16 oz) bag of frozen green beans

3-4 large salted and peppered chicken breasts

HOW TO MAKE CROCKPOT CHICKEN AND STUFFING

Step 1: Place the chicken into the crockpot.

Step 2: Add the soup, sour cream, stuffing, and half of the water in a bowl. Mix well, then, pour over the chicken.

Step 3: Add in the string beans and the remaining water.

Step 4: Cook for about 4 hours on high or 6 to 7 hours on low.

NOTE:

If possible, regularly mix the stuffing. But if you prefer that the string beans remain separated, then, add them more to the side.

NUTRITIONAL INFORMATION

Amount Per Serving: Calories: 356, Total Fat: 8.4, Saturated Fat: 2.3, Cholesterol: 69, Sodium: 1466, Total Carbohydrates: 38.1, Sugars: 4.2, Dietary Fiber: 1.4, Protein: 29.6, 9 SP

CROCKPOT CHICKEN AND STUFFING

Rebecca Servings Per Recipe: 4 A simple, no fussy chicken and stuffing that is amazingly cooked in a crockpot to give you the most delicious dish. Try to add in some… Main Dish Recipes CROCKPOT CHICKEN AND STUFFING European Print This
Serves: 4
Nutrition facts: 200 calories 20 grams fat
Rating: 5.0/5
( 1 voted )

Ingredients

  • 1 (10.5 ounces) can of cream of chicken soup
  • 1 (6 oz) box of stuffing mix
  • ¾ cup of water
  • 1 (16 oz) bag of frozen green beans
  • 3-4 large salted and peppered chicken breasts

Instructions

Step 1: Place the chicken into the crockpot.

Step 2: Add the soup, sour cream, stuffing, and half of the water in a bowl. Mix well, then, pour over the chicken.

Step 3: Add in the string beans and the remaining water.

Step 4: Cook for about 4 hours on high or 6 to 7 hours on low.

NOTE:

If possible, regularly mix the stuffing. But if you prefer that the string beans remain separated, then, add them more to the side.

September 22, 2020 0 comment
0 FacebookTwitterPinterestEmail
Main Dish Recipes

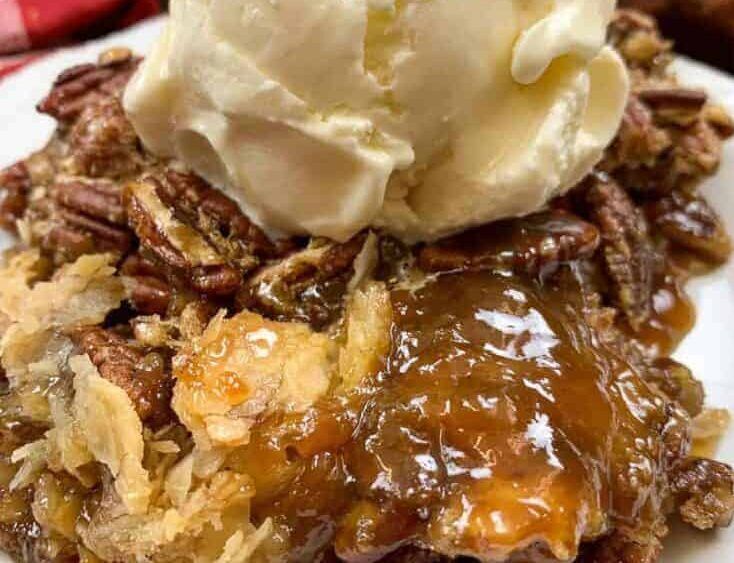
PECAN PIE COBBLER

by Rebecca September 22, 2020
written by Rebecca

This sweet, buttery dessert is packed with toasted pecans with gooey caramel. A simple dessert that is best served with vanilla ice cream. This hits all the sweet spots and a huge hit always. With a perfectly fluffy texture with rich caramel sauce, this cobbler no doubt made it my top list of desserts.

INGREDIENTS

1 Box refrigerated pie crusts, softened as directed on box

2 1/2 cups light corn syrup

2 1/2 cups packed brown sugar

1/2 cup butter, melted

4 1/2 teaspoons vanilla

6 eggs, slightly beaten

2 cups coarsely chopped pecans

Butter-flavor cooking spray

2 cups pecan halves

Vanilla ice cream, if desired

HOW TO MAKE PECAN PIE COBBLER

Step 1: Prepare the oven. Preheat it to 425 degrees F.

Step 2: Using a shortening or cooking spray, grease a 13 x 9-inch or 3-quart glass baking dish.

Step 3: On your work surface, unroll a pouch pie crust. Roll it into a 13 x 9-inch triangle.

Step 4: Transfer the crust in the prepared dish. Trim the edges if needed.

Step 5: Add the corn syrup, brown sugar, butter, vanilla, and eggs. Whisk using a wire whisk before stirring in the chopped pecans.

Step 6:Into the crust-lined dish, spoon half of the filling.

Step 7: Unroll the other pie crust on your work surface. Rolling it into a 13 x 9-inch triangle, then, placing it on top of the filling. Again, you may need to trim the edges to fit.

Step 8: Before baking, spray the crust with a butter-flavored cooking spray.

Step 9: Place inside the preheated oven and bake for about 14 to 16 minutes or until browned. Adjust the temperature to 350 degrees F. Then, spoon carefully the rest of the filling over the baked pastry. Garnish with halves pecan.

Step 10: Continue baking for another 30 minutes or longer until set.

Step 11: Remove from the oven and allow to cool for at least 20 minutes on a cooling rack.

Step 12: Serve the cobbler warm with vanilla ice cream. Enjoy!

PECAN PIE COBBLER

Rebecca This sweet, buttery dessert is packed with toasted pecans with gooey caramel. A simple dessert that is best served with vanilla ice cream. This hits all the sweet spots and… Main Dish Recipes PECAN PIE COBBLER European Print This
Nutrition facts: 200 calories 20 grams fat
Rating: 5.0/5
( 1 voted )

Ingredients

  • 1 Box refrigerated pie crusts, softened as directed on box
  • 2 1/2 cups light corn syrup
  • 2 1/2 cups packed brown sugar
  • 1/2 cup butter, melted
  • 4 1/2 teaspoons vanilla
  • 6 eggs, slightly beaten
  • 2 cups coarsely chopped pecans
  • Butter-flavor cooking spray
  • 2 cups pecan halves
  • Vanilla ice cream, if desired

Instructions

Step 1: Prepare the oven. Preheat it to 425 degrees F.

Step 2: Using a shortening or cooking spray, grease a 13 x 9-inch or 3-quart glass baking dish.

Step 3: On your work surface, unroll a pouch pie crust. Roll it into a 13 x 9-inch triangle.

Step 4: Transfer the crust in the prepared dish. Trim the edges if needed.

Step 5: Add the corn syrup, brown sugar, butter, vanilla, and eggs. Whisk using a wire whisk before stirring in the chopped pecans.

Step 6:Into the crust-lined dish, spoon half of the filling.

Step 7: Unroll the other pie crust on your work surface. Rolling it into a 13 x 9-inch triangle, then, placing it on top of the filling. Again, you may need to trim the edges to fit.

Step 8: Before baking, spray the crust with a butter-flavored cooking spray.

Step 9: Place inside the preheated oven and bake for about 14 to 16 minutes or until browned. Adjust the temperature to 350 degrees F. Then, spoon carefully the rest of the filling over the baked pastry. Garnish with halves pecan.

Step 10: Continue baking for another 30 minutes or longer until set.

Step 11: Remove from the oven and allow to cool for at least 20 minutes on a cooling rack.

Step 12: Serve the cobbler warm with vanilla ice cream. Enjoy!

September 22, 2020 0 comment
0 FacebookTwitterPinterestEmail
Main Dish Recipes

BEEF AND CHEESE CHIMICHANGA

by Rebecca September 22, 2020
written by Rebecca

These chimichangas are filled with savory ground beef, beans, gooey cheese, jalapenos, and spices & seasonings. All the goodness in a crispy pan-fried tortilla packed with gooey, mouthwatering, and freakishly delicious beef mixture. Guaranteed taste better than those in the restaurants. My family’s most requested and go-to whenever we are craving something Mexican but too lazy to go out. Enjoy this easy and quick beef and cheese chimichanga in the comfort of your home.

INGREDIENTS

1 pound ground beef

1 can (16 ounces) refried beans

1/2 cup finely chopped onion

3 cans (8 ounces each) tomato sauce, divided

2 teaspoons chili powder

1 teaspoon minced garlic

1/2 teaspoon ground cumin

12 flour tortillas (10 inches), warmed

1 can (4 ounces) chopped green chilies

1 can (4 ounces) chopped jalapeno peppers

Oil for deep-fat frying

1-1/2 cups shredded cheddar cheese

HOW TO MAKE BEEF AND CHEESE CHIMICHANGA

Step 1: Place the beef in a large skillet. Cook over medium heat until no longer pink. When cooked, drain excess fat before stirring the beans, half a cup tomato sauce, chili powder, garlic, and cumin.

Step 2: On each tortilla, spoon about 1/3 cup of the beef mixture off-center. Folding up the edge closest to the filling and over to cover the beef mixture. Then, fold each side and roll-up. Secure using toothpicks.

Step 3: Add the chilies, peppers, and the rest of the tomato sauce in a large saucepan. Combine and heat through.

Step 4: Add oil in an electric skillet or deep-fat fryer. Heat the oil to about 375 degrees.

Step 5: When the oil is heated, place the chimichangas in the skillet and fry for about 1 1/2 to 2 minutes per side or until browned.

Step 6: Transfer on paper towels to drain.

Step 7: Before serving, sprinkle with cheese. Serve with sauce. Enjoy!

BEEF AND CHEESE CHIMICHANGA

Rebecca These chimichangas are filled with savory ground beef, beans, gooey cheese, jalapenos, and spices & seasonings. All the goodness in a crispy pan-fried tortilla packed with gooey, mouthwatering, and freakishly… Main Dish Recipes BEEF AND CHEESE CHIMICHANGA European Print This
Nutrition facts: 200 calories 20 grams fat
Rating: 5.0/5
( 1 voted )

Ingredients

  • 1 pound ground beef
  • 1 can (16 ounces) refried beans
  • 1/2 cup finely chopped onion
  • 3 cans (8 ounces each) tomato sauce, divided
  • 2 teaspoons chili powder
  • 1 teaspoon minced garlic
  • 1/2 teaspoon ground cumin
  • 12 flour tortillas (10 inches), warmed
  • 1 can (4 ounces) chopped green chilies
  • 1 can (4 ounces) chopped jalapeno peppers
  • Oil for deep-fat frying
  • 1-1/2 cups shredded cheddar cheese

Instructions

Step 1: Place the beef in a large skillet. Cook over medium heat until no longer pink. When cooked, drain excess fat before stirring the beans, half a cup tomato sauce, chili powder, garlic, and cumin.

Step 2: On each tortilla, spoon about 1/3 cup of the beef mixture off-center. Folding up the edge closest to the filling and over to cover the beef mixture. Then, fold each side and roll-up. Secure using toothpicks.

Step 3: Add the chilies, peppers, and the rest of the tomato sauce in a large saucepan. Combine and heat through.

Step 4: Add oil in an electric skillet or deep-fat fryer. Heat the oil to about 375 degrees.

Step 5: When the oil is heated, place the chimichangas in the skillet and fry for about 1 1/2 to 2 minutes per side or until browned.

Step 6: Transfer on paper towels to drain.

Step 7: Before serving, sprinkle with cheese. Serve with sauce. Enjoy!

September 22, 2020 0 comment
0 FacebookTwitterPinterestEmail
Main Dish Recipes

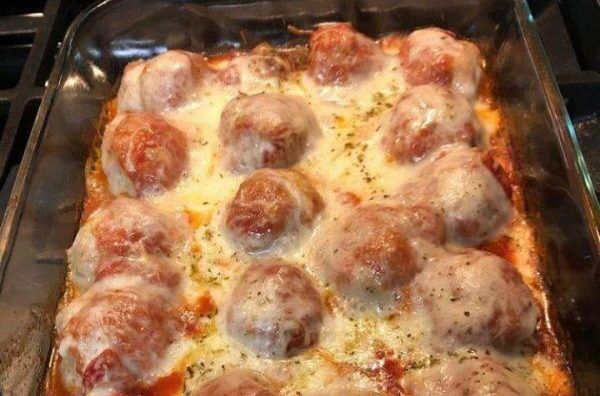
DUMP AND BAKE YOUR WAY TO A FANTASTIC MEATBALL CASSEROLE!

by Rebecca September 22, 2020
written by Rebecca

Enjoy meatballs any day, any time with this super easy and quick meatball casserole. My go-to during busy days and whenever the kids are craving for meatballs. Nothing gets better than this, all you have to do is dump everything in a baking dish, pop in the oven, and wait for a bit for the ingredients to come together. No pre-cooking needed, nothing fancy, not fussy dump and bake meatball casserole that your whole family will love. This will be a perfect addition to your weeknight menu – simple, easy, quick, and mouthwatering! Rotini pasta, marinara sauce, fully cooked meatballs, and mozzarella are all you need to make this excellent casserole. This is a wonderful recipe that you must-have, this is a keeper, and worth everything. I have shared this with friends and everyone loves it. So if you love meatballs or looking for a no fussy dish, then this is for you.

INGREDIENTS

1 (16 ounces) package Barilla uncooked rotini pasta

1 (25 ounces) jar marinara sauce

3 cups of water

1 (14 ounces) package fully-cooked miniature (cocktail-size) meatballs (if using frozen meatballs, make sure that they are completely thawed before using)

2 cups Kraft shredded mozzarella (or Italian blend) cheese

Optional: Parmesan cheese and fresh chopped herbs (such as basil, oregano, and parsley) for garnish

HOW TO MAKE MEATBALL CASSEROLE

Step 1: Prepare the oven. Preheat it to 425 degrees F.

Step 2: Add the uncooked pasta, marinara sauce, water, and meatballs in a large baking dish. Stir well.

Step 3: Tightly cover the dish with aluminum foil.

Step 4: Place inside the preheated oven and bake for about 30 minutes.

Step 5: After 30 minutes, remove the cover and stir.

Step 6: Then, sprinkle over the mozzarella and put the dish back in the oven and bake for another 10 minutes, uncovered, or until the cheese has melted and the pasta is tender.

DUMP AND BAKE YOUR WAY TO A FANTASTIC MEATBALL CASSEROLE!

Rebecca Enjoy meatballs any day, any time with this super easy and quick meatball casserole. My go-to during busy days and whenever the kids are craving for meatballs. Nothing gets better… Main Dish Recipes DUMP AND BAKE YOUR WAY TO A FANTASTIC MEATBALL CASSEROLE! European Print This
Nutrition facts: 200 calories 20 grams fat
Rating: 5.0/5
( 1 voted )

Ingredients

  • 1 (16 ounces) package Barilla uncooked rotini pasta
  • 1 (25 ounces) jar marinara sauce
  • 3 cups of water
  • 1 (14 ounces) package fully-cooked miniature (cocktail-size) meatballs (if using frozen meatballs, make sure that they are completely thawed before using)
  • 2 cups Kraft shredded mozzarella (or Italian blend) cheese
  • Optional: Parmesan cheese and fresh chopped herbs (such as basil, oregano, and parsley) for garnish

Instructions

Step 1: Prepare the oven. Preheat it to 425 degrees F.

Step 2: Add the uncooked pasta, marinara sauce, water, and meatballs in a large baking dish. Stir well.

Step 3: Tightly cover the dish with aluminum foil.

Step 4: Place inside the preheated oven and bake for about 30 minutes.

Step 5: After 30 minutes, remove the cover and stir.

Step 6: Then, sprinkle over the mozzarella and put the dish back in the oven and bake for another 10 minutes, uncovered, or until the cheese has melted and the pasta is tender.

September 22, 2020 0 comment
0 FacebookTwitterPinterestEmail
Newer Posts
Older Posts

Popular Posts

  • 1

    Crispy Crunchy Parmesan Potatoes

    March 21, 2020
  • 2

    CROCK POT SMOTHERED PORK CHOPS

    March 21, 2020
  • Facebook
  • Twitter

@2019 - All Right Reserved.


Back To Top