Cook it once
  • Home
  • Privacy Policy
  • Recipes
    • KETO
    • LC
    • WW
  • Tips
  • Contact
Cook it once
  • Home
  • Privacy Policy
  • Recipes
    • KETO
    • LC
    • WW
  • Tips
  • Contact
Category:

General Recipes

General Recipes

Stuffed Pepper Dip

by Rebecca May 16, 2022
written by Rebecca

Prep Time: 15 mins | Cook Time: 45 mins | Total Time: 1 hr | Servings: 12 people

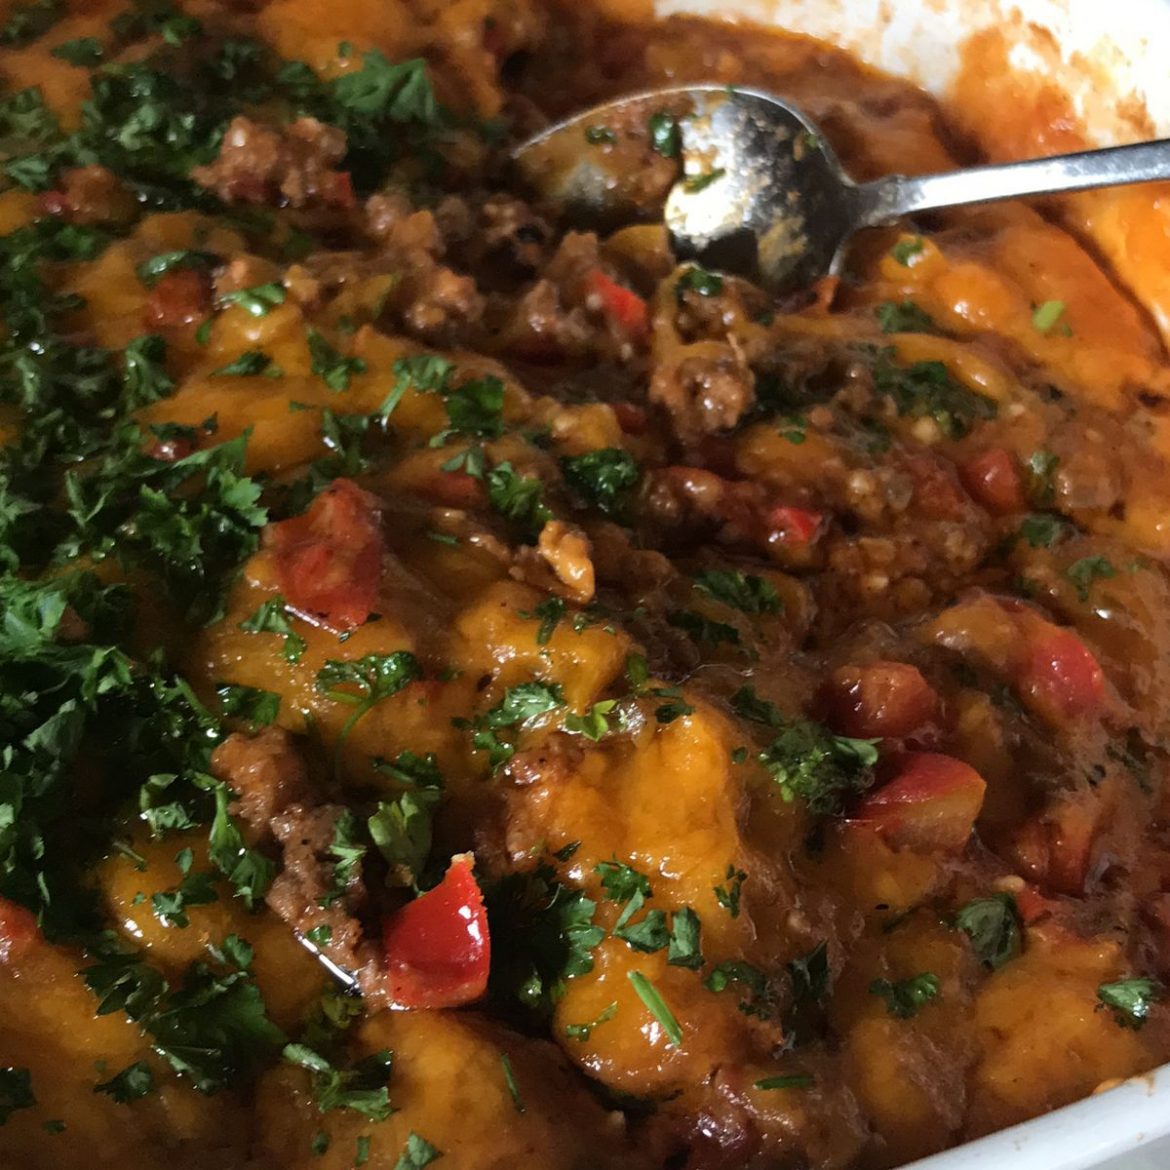
Beefy, cheesy, and hearty – this stuffed pepper dip has the familiar and comforting flavors of our favorite stuffed peppers. Serve this with chips and enjoy a meal-kind of dish anytime.

I always love stuffed peppers. My mom is fond of making it. One day, she made a stuffed pepper dip and we were blown away! It’s a must if you have not tried it yet so make sure not to miss this mouthwatering stuffed pepper dip!

Ingredients

1 tbsp olive oil

1 lb lean ground beef

1 large onion, finely diced

4 oz. canned diced green chilies

2 cloves garlic, minced

1 whole red bell pepper, finely diced

1 whole green bell pepper, finely diced

14 oz. canned fire-roasted tomatoes

1 tsp cumin

4 c. cheddar cheese, shredded

2 tsp chili powder

1/4 c. parsley, chopped, for garnish, optional

1/2 tsp salt

1/2 tsp ground black pepper

How to make Stuffed Pepper Dip

Step 1: Drizzle olive oil in a large skillet over medium heat. Then, add the ground beef and onions and cook for about 15 minutes until the ground beef has browned.

Step 2: To the skillet, add the garlic and the green & red bell peppers. Stir well and continue to cook for another 5 minutes. Next, stir in the fire-roasted tomatoes, diced green chilies, chili powder, cumin, salt, and ground black pepper.

Step 3: Turn the heat off when done and let the mixture cool for about 20 minutes. In the meantime, prepare the oven. Preheat it to 350 degrees.

Step 4: Add 3 c of the shredded cheese once the mixture has cooled and stir well.

Step 5: To a casserole dish, transfer the mixture and sprinkle the remaining 1 c of cheese on top. Place in the preheated oven and bake for about 30 minutes.

Step 6: Remove from the oven when done and serve the stuffed pepper dip with corn chips. Enjoy!

Nutrition Facts:

Calories: 231 kcal | Carbohydrates: 4g | Protein: 18g | Fat: 15g | Saturated Fat: 8g | Cholesterol: 62mg | Sodium: 414mg | Potassium: 220mg | Sugar: 1g | Vitamin A: 725IU | Vitamin C: 4.3mg | Calcium: 296mg | Iron: 1.7mg
Stuffed Pepper Dip

Rebecca Prep Time: 15 mins | Cook Time: 45 mins | Total Time: 1 hr | Servings: 12 people Beefy, cheesy, and hearty – this stuffed pepper dip has the familiar… General Recipes Stuffed Pepper Dip European Print This
Serves: 12 Prep Time: 15 mins Cooking Time: 45 mins 45 mins
Nutrition facts: 231 calories 15 fat
Rating: 5.0/5
( 1 voted )

Ingredients

  • 1 tbsp olive oil
  • 1 lb lean ground beef
  • 1 large onion, finely diced
  • 4 oz. canned diced green chilies
  • 2 cloves garlic, minced
  • 1 whole red bell pepper, finely diced
  • 1 whole green bell pepper, finely diced
  • 14 oz. canned fire-roasted tomatoes
  • 1 tsp cumin
  • 4 c. cheddar cheese, shredded
  • 2 tsp chili powder
  • 1/4 c. parsley, chopped, for garnish, optional
  • 1/2 tsp salt
  • 1/2 tsp ground black pepper

Instructions

Step 1: Drizzle olive oil in a large skillet over medium heat. Then, add the ground beef and onions and cook for about 15 minutes until the ground beef has browned.

Step 2: To the skillet, add the garlic and the green & red bell peppers. Stir well and continue to cook for another 5 minutes. Next, stir in the fire-roasted tomatoes, diced green chilies, chili powder, cumin, salt, and ground black pepper.

Step 3: Turn the heat off when done and let the mixture cool for about 20 minutes. In the meantime, prepare the oven. Preheat it to 350 degrees.

Step 4: Add 3 c of the shredded cheese once the mixture has cooled and stir well.

Step 5: To a casserole dish, transfer the mixture and sprinkle the remaining 1 c of cheese on top. Place in the preheated oven and bake for about 30 minutes.

Step 6: Remove from the oven when done and serve the stuffed pepper dip with corn chips. Enjoy!
May 16, 2022 0 comment
0 FacebookTwitterPinterestEmail
General Recipes

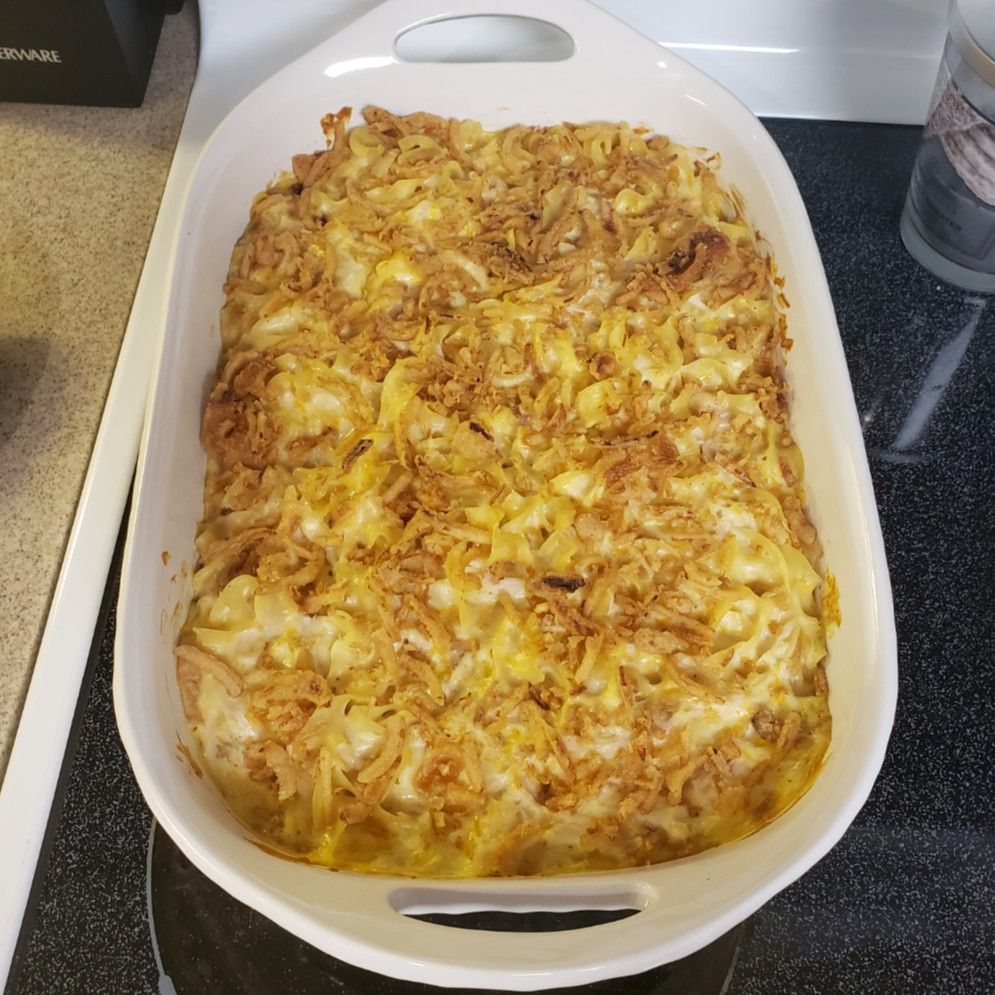
FRENCH ONION CHICKEN NOODLE CASSEROLE

by Rebecca May 16, 2022
written by Rebecca

Prep Time: 10 mins | Cook Time: 25 mins | Total Time: 35 mins | Yield: 6 people

Casseroles are my go-to whenever I have no time to cook, no inspiration whatsoever, especially when I need something easy and quick on the dinner table. I have tons of casserole recipes and one of my favorites is this French Onion Chicken Noodle Casserole. It’s made with simple, readily available ingredients and ready in no time. Another delicious make-ahead dish that is freezer-friendly. You can also divide this casserole into two foil pans and keep the other one in the freezer. Leftovers are great, too!

This casserole is also a great freezer meal. Once frozen, let the casserole thaw in the fridge overnight before baking. Also, add 15 minutes to the baking time if the casserole is still frozen after thawing all day.

Ingredients

12 ounces egg noodles

4 c. cooked chopped chicken

1 (16 ounces) container refrigerated French Onion Dip, sour cream-based

2 (10.75 ounces) can cream of chicken soup

1 c. crushed French fried onions

1 c. cheddar cheese

HOW TO MAKE FRENCH ONION CHICKEN NOODLE CASSEROLE

Step 1: Following the package directions, cook the egg noodles. Drain when done.

Step 2: Prepare the oven. Preheat it to 350 degrees F. Using cooking spray, lightly grease a 9 x 13-inch pan.

Step 3: Mix the chicken with soup, dip, and cheese. Then, toss in the cooked egg noodles. Into the prepared pan, pour the mixture, and top with crushed French fried onions.

Step 4: Place in the preheated oven and bake for about 25 to 30 minutes or until the casserole is heated through.

Notes:

Feel free to make this casserole ahead of time. Simply keep it in the fridge or freeze it.

Thaw the frozen casserole completely before baking as directed.

After the casserole is completely thawed, tent with aluminium foil and reheat for about 30 to 40 minutes in the oven until heated through.

FRENCH ONION CHICKEN NOODLE CASSEROLE

Rebecca Prep Time: 10 mins | Cook Time: 25 mins | Total Time: 35 mins | Yield: 6 people Casseroles are my go-to whenever I have no time to cook, no… General Recipes FRENCH ONION CHICKEN NOODLE CASSEROLE European Print This
Serves: 6 Prep Time: 10 mins Cooking Time: 25 mins 25 mins
Nutrition facts: 200 calories 20 grams fat
Rating: 5.0/5
( 1 voted )

Ingredients

  • 12 ounces egg noodles
  • 4 c. cooked chopped chicken
  • 1 (16 ounces) container refrigerated French Onion Dip, sour cream-based
  • 2 (10.75 ounces) can cream of chicken soup
  • 1 c. crushed French fried onions
  • 1 c. cheddar cheese

Instructions

Step 1: Following the package directions, cook the egg noodles. Drain when done.

Step 2: Prepare the oven. Preheat it to 350 degrees F. Using cooking spray, lightly grease a 9 x 13-inch pan.

Step 3: Mix the chicken with soup, dip, and cheese. Then, toss in the cooked egg noodles. Into the prepared pan, pour the mixture, and top with crushed French fried onions.

Step 4: Place in the preheated oven and bake for about 25 to 30 minutes or until the casserole is heated through.

May 16, 2022 0 comment
0 FacebookTwitterPinterestEmail
General Recipes

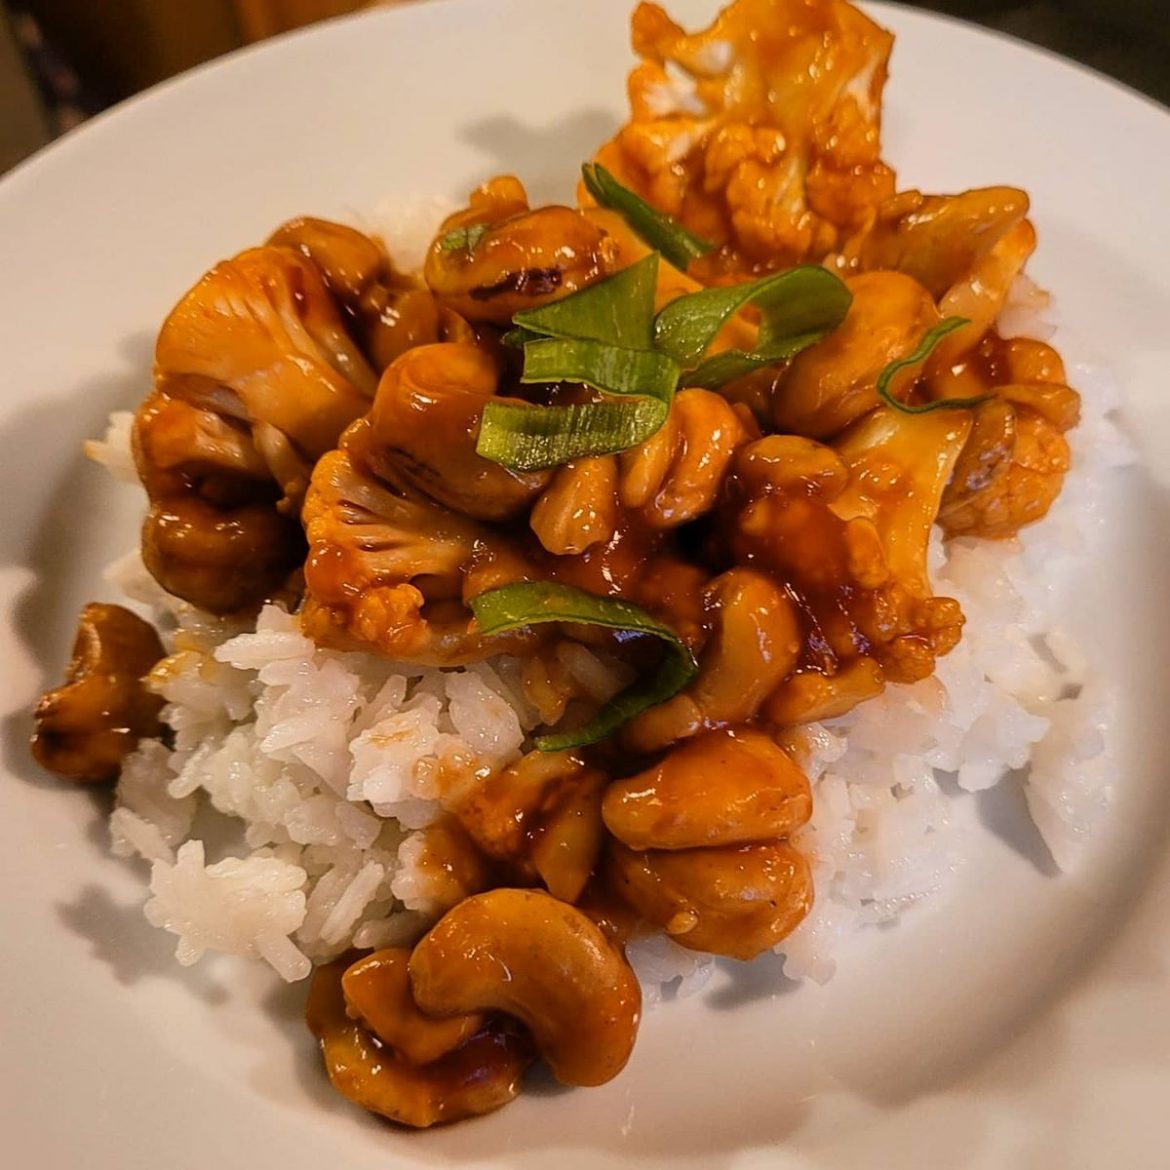
Cashew Cauliflower

by Rebecca May 16, 2022
written by Rebecca

Prep Time: 15 mins | Cook Time: 30 mins | Total Time: 45 mins | Servings: 4

This vegetarian dish never fails to impress everyone around the dinner table. It is similar to the classic Cashew chicken, but instead of chicken, we use cauliflower. The same taste, amazing flavors, but a vegetarian variety. Enjoy this sticky, sweet, and thick cashew cauliflower served with rice for a simple and quick meal that even your fussiest eaters will love!

Ingredients

Cauliflower:

1/2 c. cornstarch

1 large cauliflower, washed, and cut into florets

Sauce:

1 c. cashews, roasted and unsalted

1/2 c. water

1/4 c. soy sauce

1 tsp cornstarch

1/4 c. ketchup

2 cloves garlic, minced

2 tbsp brown sugar

1 tsp fresh ginger, grated

1/4 tsp dried red chili flakes

1/4 tsp ground black pepper

How to make Cashew Cauliflower

Cauliflower:

Step 1: Prepare the oven. Preheat it to 350 degrees. Using olive oil, lightly grease a shallow baking dish and set aside.

Step 2: Into a large bowl, place the cauliflower and toss in half a c of cornstarch. Gently toss the cauliflower florets using your hands until fully coated.

Step 3: Lightly shake the excess cornstarch off the florets and place them into the prepared baking dish. Place in the preheated oven and bake for about 10 minutes.

Sauce:

Step 4: In the meantime, stir the water and cornstarch in a bowl or large measuring cup until completely dissolved. Then, add the rest of the sauce ingredients and mix well. Set aside.

Step 5: Once the cauliflower florets are done baking, take them out of the oven and pour the sauce over them. Using a small wooden spoon, gently move the cauliflower around to make sure the sauce gets underneath the florets. Return to the oven and resume baking for about 5 minutes.

Step 6: Remove from the oven when done and add the throw in the cashews. Into the cauliflower and sauce, lightly stir the cashews. Resume baking for another 15 minutes.

Step 7: When done, serve the cashew cauliflower right away. Enjoy!

Nutrition Facts:

Calories: 345 kcal | Carbohydrates: 47g | Protein: 12g | Fat: 15g | Saturated Fat: 3g | Sodium: 1020mg | Potassium: 939mg | Fiber: 6g | Sugar: 15g | Vitamin A: 115IU | Vitamin C: 102mg | Calcium: 73mg | Iron: 4mg

Cashew Cauliflower

Rebecca Prep Time: 15 mins | Cook Time: 30 mins | Total Time: 45 mins | Servings: 4 This vegetarian dish never fails to impress everyone around the dinner table. It… General Recipes Cashew Cauliflower European Print This
Serves: 4 Prep Time: 15 mins Cooking Time: 30 mins 30 mins
Nutrition facts: 345 calories 15 fat
Rating: 5.0/5
( 1 voted )

Ingredients

  • Cauliflower:
  • 1/2 c. cornstarch
  • 1 large cauliflower, washed, and cut into florets
  • Sauce:
  • 1 c. cashews, roasted and unsalted
  • 1/2 c. water
  • 1/4 c. soy sauce
  • 1 tsp cornstarch
  • 1/4 c. ketchup
  • 2 cloves garlic, minced
  • 2 tbsp brown sugar
  • 1 tsp fresh ginger, grated
  • 1/4 tsp dried red chili flakes
  • 1/4 tsp ground black pepper

Instructions

Cauliflower:

Step 1: Prepare the oven. Preheat it to 350 degrees. Using olive oil, lightly grease a shallow baking dish and set aside.

Step 2: Into a large bowl, place the cauliflower and toss in half a c of cornstarch. Gently toss the cauliflower florets using your hands until fully coated.

Step 3: Lightly shake the excess cornstarch off the florets and place them into the prepared baking dish. Place in the preheated oven and bake for about 10 minutes.

Sauce:

Step 4: In the meantime, stir the water and cornstarch in a bowl or large measuring cup until completely dissolved. Then, add the rest of the sauce ingredients and mix well. Set aside.

Step 5: Once the cauliflower florets are done baking, take them out of the oven and pour the sauce over them. Using a small wooden spoon, gently move the cauliflower around to make sure the sauce gets underneath the florets. Return to the oven and resume baking for about 5 minutes.

Step 6: Remove from the oven when done and add the throw in the cashews. Into the cauliflower and sauce, lightly stir the cashews. Resume baking for another 15 minutes.

Step 7: When done, serve the cashew cauliflower right away. Enjoy!

May 16, 2022 0 comment
0 FacebookTwitterPinterestEmail
General Recipes

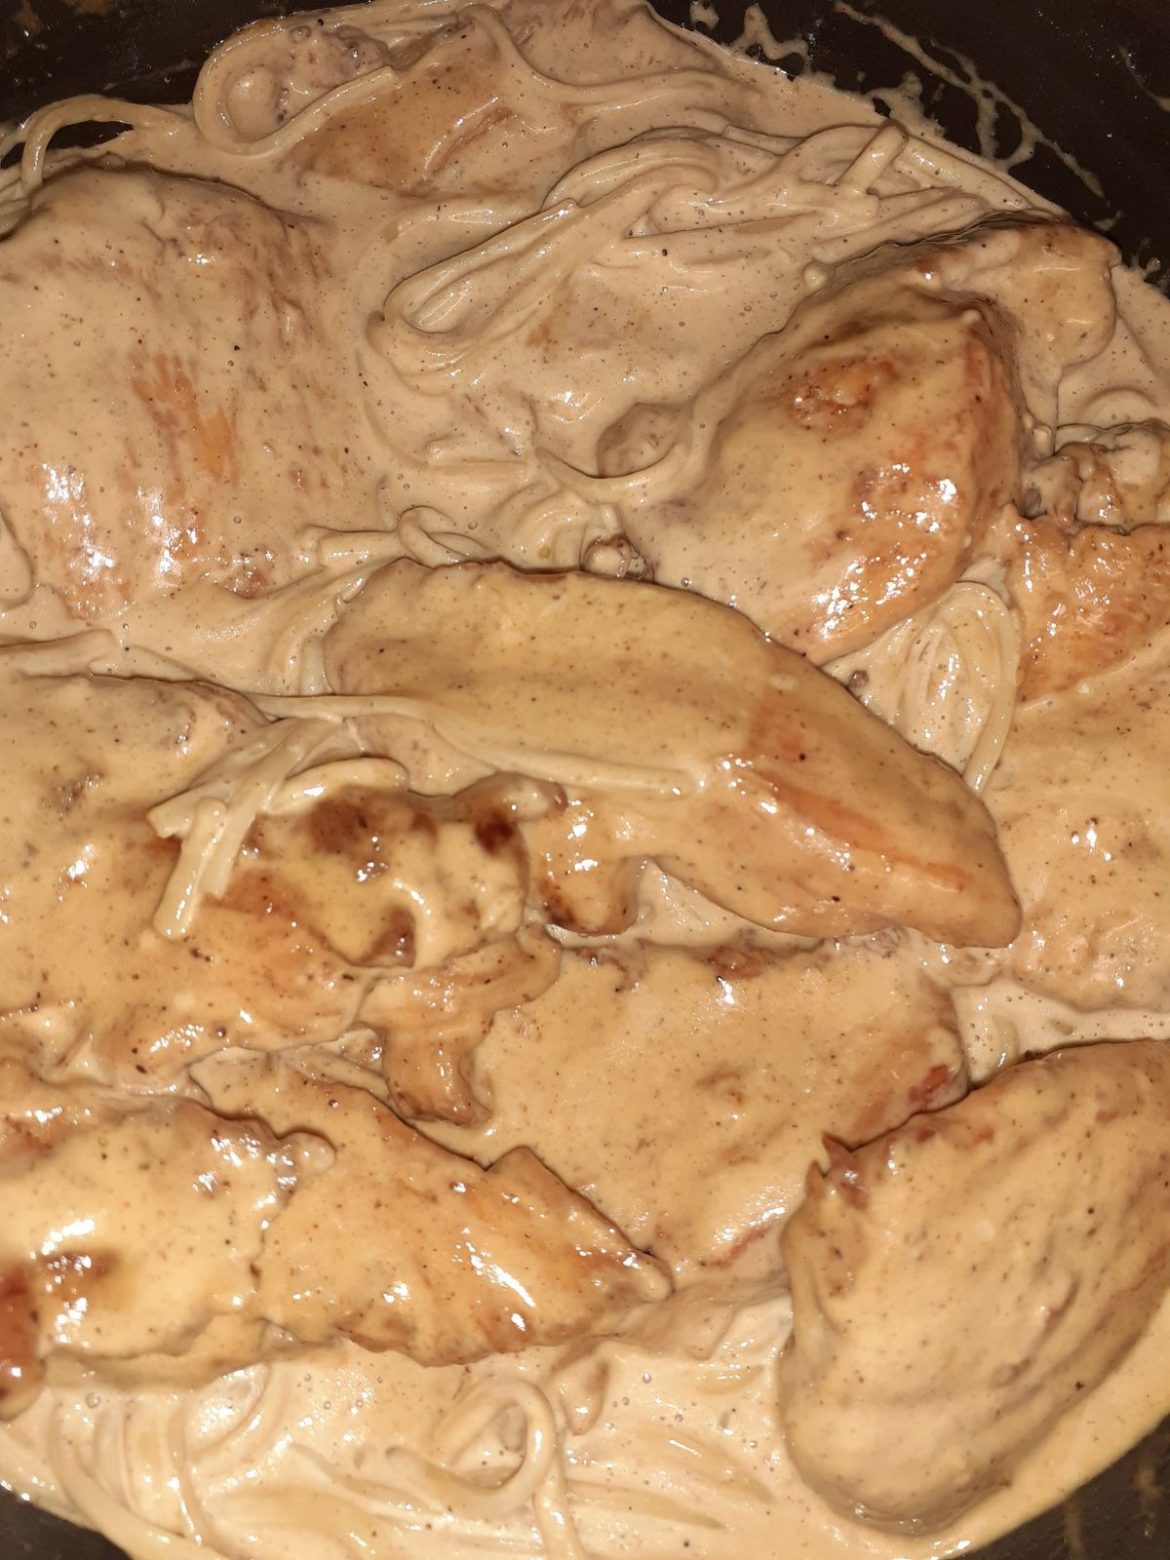
Chicken Lazone

by Rebecca May 16, 2022
written by Rebecca

Prep time: 5 mins | Cook time: 20 mins | Total time: 25 mins | Yield: 6 to 8 servings

Creamy and incredibly delicious! This chicken lazone is a flavor-packed meal that your entire family will love! Pan-seared chicken with an easy creamy pan sauce. Serve this over spaghetti and enjoy with your favorite veggies or a side salad for a simple and quick meal anytime!

INGREDIENTS

1/2 c. butter, divided

2 lbs chicken breast tenderloins

1 tsp chili powder

1 tsp onion powder

1 tsp paprika

3 c. heavy cream

2 tsp garlic powder

10-12 ounces spaghetti, cooked

1/2 tsp white pepper

1 tsp salt

How to make Chicken Lazone

Step 1: In a bowl, place the garlic, salt, onion powder, chili powder, paprika, and white pepper. Mix well and set aside 2 tsp of the spice mixture. Season the chicken with the rest of the spice mixture.

Step 2: In a large skillet, melt 3 tbsp butter over medium heat. Add half of the chicken pieces into the skillet once the butter has melted and cook until browned. Add another tbsp butter, then turn the chicken. Continue to cook the other side until brown. Set the chicken aside when done and cook the rest. Once all the chicken is cooked, tent them with aluminium foil to keep them warm.

Step 3: To the skillet, add the cream and the reserved spice mixture. Bring to a simmer over medium heat while slowly stirring. Continue to cook for about 10 to 15 minutes over medium heat until the mixture is thick and creamy. To taste, season with more salt and/or garlic powder.

Step 4: Over the spaghetti, serve the chicken with the sauce. Enjoy!

NOTES:

To make sure I have enough to serve for 6 to 8 people, I add 3 c of cream. I suggest using white pepper, but you can swap this black pepper if needed.

Easily cut this recipe in half. Although, I recommend using 2 c of cream.

Chicken Lazone

Rebecca Prep time: 5 mins | Cook time: 20 mins | Total time: 25 mins | Yield: 6 to 8 servings Creamy and incredibly delicious! This chicken lazone is a flavor-packed… General Recipes Chicken Lazone European Print This
Serves: 6-8 Prep Time: 5 mins Cooking Time: 20 mins 20 mins
Nutrition facts: 200 calories 20 grams fat
Rating: 5.0/5
( 1 voted )

Ingredients

  • 1/2 c. butter, divided
  • 2 lbs chicken breast tenderloins
  • 1 tsp chili powder
  • 1 tsp onion powder
  • 1 tsp paprika
  • 3 c. heavy cream
  • 2 tsp garlic powder
  • 10-12 ounces spaghetti, cooked
  • 1/2 tsp white pepper
  • 1 tsp salt

Instructions

Step 1: In a bowl, place the garlic, salt, onion powder, chili powder, paprika, and white pepper. Mix well and set aside 2 tsp of the spice mixture. Season the chicken with the rest of the spice mixture.

Step 2: In a large skillet, melt 3 tbsp butter over medium heat. Add half of the chicken pieces into the skillet once the butter has melted and cook until browned. Add another tbsp butter, then turn the chicken. Continue to cook the other side until brown. Set the chicken aside when done and cook the rest. Once all the chicken is cooked, tent them with aluminium foil to keep them warm.

Step 3: To the skillet, add the cream and the reserved spice mixture. Bring to a simmer over medium heat while slowly stirring. Continue to cook for about 10 to 15 minutes over medium heat until the mixture is thick and creamy. To taste, season with more salt and/or garlic powder.

Step 4: Over the spaghetti, serve the chicken with the sauce. Enjoy!

Notes

To make sure I have enough to serve for 6 to 8 people, I add 3 c of cream. I suggest using white pepper, but you can swap this black pepper if needed. Easily cut this recipe in half. Although, I recommend using 2 c of cream.

May 16, 2022 0 comment
0 FacebookTwitterPinterestEmail
General Recipes

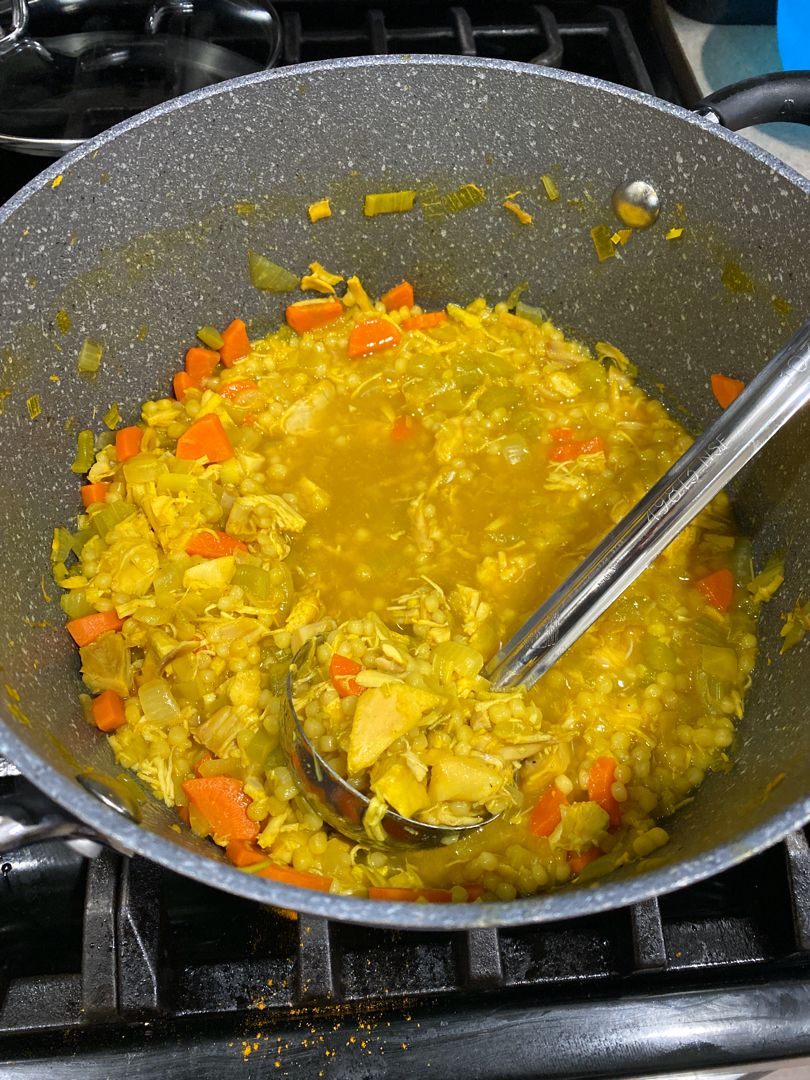
Cold-Fighting Couscous Chicken Soup

by Rebecca May 16, 2022
written by Rebecca

Prep Time: 15 mins | Cook Time: 20 mins | Total Time: 35 mins | Servings: 4 generous servings

This soup will warm you up inside and out. Easily make this couscous chicken soup either on your stovetop or Instant Pot. This cold-fighting soup is not only delicious, but loaded with anti-inflammatory ingredients.

Ingredients

3/4 c. sliced leeks, about 1 medium, white and light green parts only

1 c. chopped onions about 1/2 of a medium

1/2 c. sliced carrots about 1 medium

1/2 tsp ground turmeric

1/2 c. chopped celery about 2 ribs

1 tbsp minced lemongrass or paste

1 tbsp minced ginger

2 cloves minced garlic

4 c. chicken stock

3/4 lb. raw chicken breasts (INSTANT POT VERSION)

8 oz. cooked, shredded chicken (STOVETOP VERSION) (rotisserie chicken is great)

1 c. pearl couscous

1/2 of a lemon

1/2 tsp Better Than Bouillon chicken seasoning (optional)

chopped fresh parsley for garnish

salt and pepper

How to make Cold-Fighting Couscous Chicken Soup

Stove Top:

Step 1: In a 4 to 5-quart Dutch oven or stockpot, heat 1 tbsp stock over medium heat. Then, add the onions to the pot along with the leeks, carrots, and celery. Cook for about 5 minutes, stirring often, until the veggies have softened. Next, add the ginger, lemongrass, and garlic. Stir and heat until fragrant. Over the veggies, sprinkle the turmeric, and stir.

Step 2: To the pot, pour in the stock and add the chicken and couscous. Bring everything to a light boil, then decrease the heat. Maintain and gentle simmer for about 15 minutes. Into the soup, squeeze half of the lemon. To taste, season with salt and pepper.

Step 3: Ladle the soup into a bowl and serve garnished with some parsley. Enjoy!

Instant Pot:

Step 1: Set your IP into Saute. Then, add the oil. Once the oil is shimmering, add the onions along with the leeks, celery, and carrots. Saute for about 8 minutes or until the veggies have softened. Next, stir in the ginger, lemongrass, and garlic. Heat until aromatic. Over the vegetables, sprinkle the turmeric. Stir and turn the unit off.

Step 2: To the IP, pour in the chicken broth and Better Than Bouillon (optional). Add the couscous, then the chicken breasts.

Step 3: Put the lid on and seal the valve. For 5 minutes, set the IP to manual high pressure. When done, allow a natural release for 7 minutes, then immediately release the rest of the pressure.

Step 4: Take the chicken breast out of the pot and shred (or chop) using two forks. Add the shredded chicken to the soup and squeeze in the lemon. Next, add the parsley and season with salt and pepper.

Cold-Fighting Couscous Chicken Soup

Rebecca Prep Time: 15 mins | Cook Time: 20 mins | Total Time: 35 mins | Servings: 4 generous servings This soup will warm you up inside and out. Easily make… General Recipes Cold-Fighting Couscous Chicken Soup European Print This
Serves: 4 Prep Time: 15 mins Cooking Time: 20 mins 20 mins
Nutrition facts: 200 calories 20 grams fat
Rating: 5.0/5
( 1 voted )

Ingredients

  • 3/4 c. sliced leeks, about 1 medium, white and light green parts only
  • 1 c. chopped onions about 1/2 of a medium
  • 1/2 c. sliced carrots about 1 medium
  • 1/2 tsp ground turmeric
  • 1/2 c. chopped celery about 2 ribs
  • 1 tbsp minced lemongrass or paste
  • 1 tbsp minced ginger
  • 2 cloves minced garlic
  • 4 c. chicken stock
  • 3/4 lb. raw chicken breasts (INSTANT POT VERSION)
  • 8 oz. cooked, shredded chicken (STOVETOP VERSION) (rotisserie chicken is great)
  • 1 c. pearl couscous
  • 1/2 of a lemon
  • 1/2 tsp Better Than Bouillon chicken seasoning (optional)
  • chopped fresh parsley for garnish
  • salt and pepper

Instructions

Stove Top:

Step 1: In a 4 to 5-quart Dutch oven or stockpot, heat 1 tbsp stock over medium heat. Then, add the onions to the pot along with the leeks, carrots, and celery. Cook for about 5 minutes, stirring often, until the veggies have softened. Next, add the ginger, lemongrass, and garlic. Stir and heat until fragrant. Over the veggies, sprinkle the turmeric, and stir.

Step 2: To the pot, pour in the stock and add the chicken and couscous. Bring everything to a light boil, then decrease the heat. Maintain and gentle simmer for about 15 minutes. Into the soup, squeeze half of the lemon. To taste, season with salt and pepper.

Step 3: Ladle the soup into a bowl and serve garnished with some parsley. Enjoy!

Instant Pot:

Step 1: Set your IP into Saute. Then, add the oil. Once the oil is shimmering, add the onions along with the leeks, celery, and carrots. Saute for about 8 minutes or until the veggies have softened. Next, stir in the ginger, lemongrass, and garlic. Heat until aromatic. Over the vegetables, sprinkle the turmeric. Stir and turn the unit off.

Step 2: To the IP, pour in the chicken broth and Better Than Bouillon (optional). Add the couscous, then the chicken breasts.

Step 3: Put the lid on and seal the valve. For 5 minutes, set the IP to manual high pressure. When done, allow a natural release for 7 minutes, then immediately release the rest of the pressure.

Step 4: Take the chicken breast out of the pot and shred (or chop) using two forks. Add the shredded chicken to the soup and squeeze in the lemon. Next, add the parsley and season with salt and pepper.

May 16, 2022 0 comment
0 FacebookTwitterPinterestEmail
General Recipes

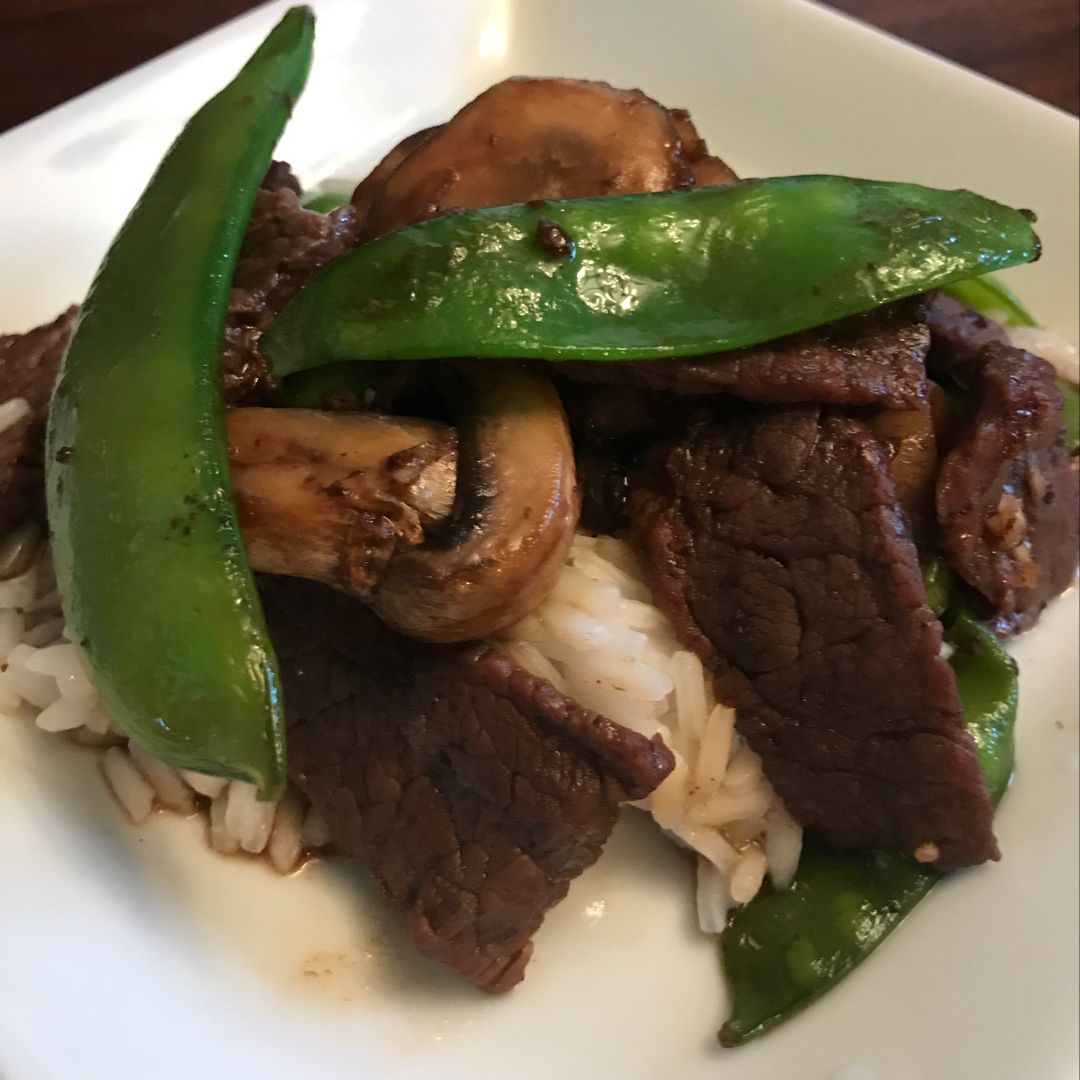
Asian Beef with Mushrooms & Snow Peas

by Rebecca May 16, 2022
written by Rebecca

PREP TIME: 20 MINS | COOK TIME: 30 MINS | TOTAL TIME: 50 MINS | SERVINGS: 4

Enjoy a simple yet scrumptious dinner at home with the Asian beef with mushrooms and snow peas. Super easy to throw together and ready in no time. Tender mushrooms with crisp snow peas and thinly sliced sirloin steak. Everything is sauteed in garlic and tossed in a homemade Asian sauce.

Ingredients

Homemade Asian Sauce:

5 tbsp brown sugar

½ c tamari or low-sodium soy sauce

6 garlic cloves, minced

2 tsp rice vinegar

½ tsp ginger

Beef:

4 tbsp olive oil

10 ounces of snow peas

1 lb beef thinly sliced (sirloin steak strips, flank steak, or any other steak)

10 ounces mushrooms, sliced thinly

How to make Asian Beef with Mushrooms & Snow Peas

Step 1: In a bowl, place the Asian sauce ingredients. Mix well and set aside.

Step 2: In a medium pan, bring water to a boil. Once boiling, add the snow peas and cook for about 5 minutes. Drain when done and set aside.

Step 3: Drizzle 2 tbsp in a hot large skillet. Once the oil sizzles, quickly add the thinly sliced mushrooms into the pan and cook over high heat, stirring often, until the mushrooms turned nicely brown. Midway, slightly salt the mushrooms. To a bowl, transfer the mushrooms when done.

Step 4: In the now-empty skillet, add 2 tbsp olive oil over high heat. Quickly add the thinly sliced meat (you can sear the beef in two batches to prevent overcrowding the pan). Cook the beef until the first side browns nicely. Flip the beef and continue to cook the other side over high heat until the slices are nicely browned. To a bowl, transfer the seared beef.

Step 5: To the skillet, place all the cooked slices of beef back. Then, add the snow peas and cooked mushrooms. Pour in the Asian sauce and stir well. Cook for about a minute over high heat. Turn the heat off and put the lid on.

Nutrition Facts:

Amount per Serving: Calories 538, Fat 37g 57%, Saturated Fat 10g 63%, Cholesterol 80mg 27%, Sodium 1707mg 74%, Potassium 772mg 22%, Carbohydrates 25g 8%, Fiber 2g 8%, Sugar 19g 21%, Protein 2g 54%, Vitamin A 770IU 15%, Vitamin C 45.5mg 55%, Calcium 77mg 8%, Iron 5mg 28%

Asian Beef with Mushrooms & Snow Peas

Rebecca PREP TIME: 20 MINS | COOK TIME: 30 MINS | TOTAL TIME: 50 MINS | SERVINGS: 4 Enjoy a simple yet scrumptious dinner at home with the Asian beef with… General Recipes Asian Beef with Mushrooms & Snow Peas European Print This
Serves: 4 Prep Time: 20 mins Cooking Time: 30 mins 30 mins
Nutrition facts: 538 calories 37 fat
Rating: 5.0/5
( 1 voted )

Ingredients

  • Homemade Asian Sauce:
  • 5 tbsp brown sugar
  • ½ c tamari or low-sodium soy sauce
  • 6 garlic cloves, minced
  • 2 tsp rice vinegar
  • ½ tsp ginger
  • Beef:
  • 4 tbsp olive oil
  • 10 ounces of snow peas
  • 1 lb beef thinly sliced (sirloin steak strips, flank steak, or any other steak)
  • 10 ounces mushrooms, sliced thinly

Instructions

Step 1: In a bowl, place the Asian sauce ingredients. Mix well and set aside.

Step 2: In a medium pan, bring water to a boil. Once boiling, add the snow peas and cook for about 5 minutes. Drain when done and set aside.

Step 3: Drizzle 2 tbsp in a hot large skillet. Once the oil sizzles, quickly add the thinly sliced mushrooms into the pan and cook over high heat, stirring often, until the mushrooms turned nicely brown. Midway, slightly salt the mushrooms. To a bowl, transfer the mushrooms when done.

Step 4: In the now-empty skillet, add 2 tbsp olive oil over high heat. Quickly add the thinly sliced meat (you can sear the beef in two batches to prevent overcrowding the pan). Cook the beef until the first side browns nicely. Flip the beef and continue to cook the other side over high heat until the slices are nicely browned. To a bowl, transfer the seared beef.

Step 5: To the skillet, place all the cooked slices of beef back. Then, add the snow peas and cooked mushrooms. Pour in the Asian sauce and stir well. Cook for about a minute over high heat. Turn the heat off and put the lid on.

May 16, 2022 0 comment
0 FacebookTwitterPinterestEmail
General Recipes

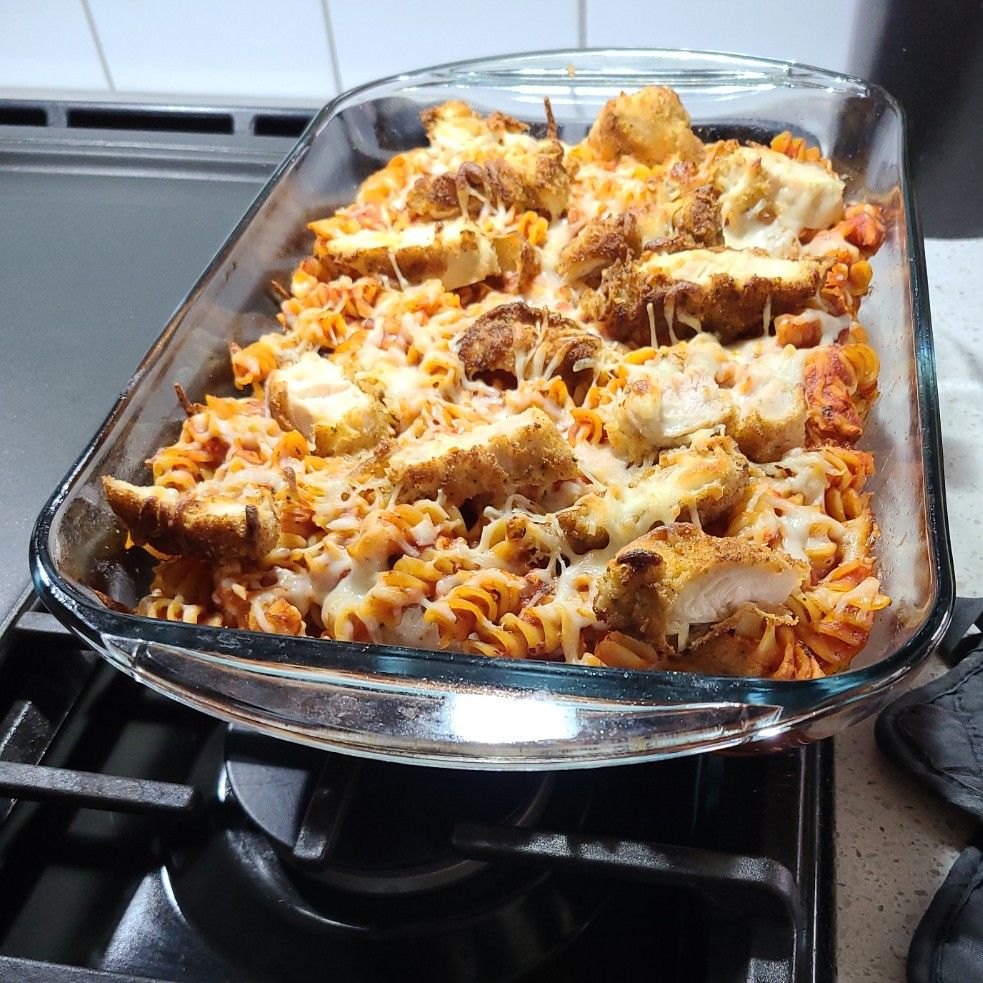
Chicken Parmesan Casserole

by Rebecca May 16, 2022
written by Rebecca

Prep time: 40 mins | Cook time: 40 mins | Total time: 1 hr 20 mins | Servings: 5

This is an amazing casserole with crispy chicken tenders, pasta, and loads of mozzarella and Parmesan cheese. For this recipe, you are welcome to use either frozen chicken tenders or leftover rotisserie chicken. For the cheese, make sure to use low-moisture, whole milk mozzarella. Freshly shred the cheese from a block as it melts better.

Ingredients

¾ c. vegetable oil

2 tbsp butter

2 small boneless skinless chicken breasts

¾ lb rigatoni pasta

32 ounces marinara sauce

¾ c. flour

1/4 tsp pepper

2 tsp seasoned salt

2 eggs

1 ½ c. Italian bread crumbs

Fresh Parsley, to garnish

3 c. mozzarella cheese, shredded & separated

1/3 c. Parmesan cheese, finely grated

How to make Chicken Parmesan Casserole

Pasta:

Step 1: Following the package directions, cook the rigatoni in a large pot with boiling water for a minute less than al dente.

Step 2: Drain the pasta when done and return it to the pot. Toss the pasta with 32 ounces of sauce, 1/3 of the Parmesan cheese, and a cup of mozzarella. Set aside.

Chicken:

Step 3: Using paper towels, pat the chicken dry and slice it into about 1/2 inch strips.

Step 4: For the chicken breading, create an assembly: Mix 3/4 c flour with 2 tsp salt and 1/4 tsp pepper in the first bowl. Whisk the eggs in a second bowl. And in the third bowl, place 1 1/2 c bread crumbs.

Step 5: In the flour mixture, dredge the chicken, then shortly in the whisked eggs, and smother the chicken in the breadcrumbs until fully coated. Gently flatten the chicken using your palms in the breadcrumbs again.

Step 6: To a pan with butter, drizzle 1/4 inch of oil and heat over medium-high heat. Into the hot oil, carefully place the chicken strips and cook for about 4 minutes on each side or until both sides are golden brown. Cook the chicken strips in batches and add extra oil as the chicken cooks as needed.

Step 7: On a paper towel-lined plate, transfer the cooked chicken strips. Then, slice the strips into smaller bite-sized pieces.

Assemble the Casserole and Bake:

Step 8: Prepare the oven. Preheat it to 375 degrees.

Step 9: Add half of the rigatoni/sauce mixture to a lightly greased 9 x 13-inch casserole dish and top with half of the chicken strips followed by 1/3 of the Parmesan cheese and 1 c mozzarella cheese.

Step 10: On top, add the rest of the rigatoni. Lay the chicken strips over the rigatoni and sprinkle with the rest of the Parmesan and mozzarella cheese.

Step 11: Place in the preheated oven and bake for about 25 minutes, uncovered. For a crisper and browner top, adjust the oven temperature to 425 degrees and bake for another 5 minutes.

Step 12: Remove from the oven when done and serve garnished with some fresh parsley. Enjoy the casserole with garlic bread with cheese.

Notes:

Storage:

In an airtight container, store any leftovers and keep them in the fridge for up to 3 days. You can also freeze this casserole and thaw it in the fridge overnight before reheating it in the microwave or oven.

To prevent the pasta from drying out, spoon more sauce on it before reheating.

Make-Ahead Method:

You can assemble this casserole up to 2 days in advance.

Allow the casserole to sit out at room temperature for about 30 minutes before baking.

Bake the casserole for about 15 minutes at 375 degrees F, covered. Then, uncover and bake for another 25 minutes.

Nutrition Facts:

Calories: 740 kcal, Carbohydrates: 80g, Protein: 42g, Fat: 28g, Saturated Fat: 16g, Cholesterol: 122mg, Sodium: 2645mg, Potassium: 1025mg, Fiber: 6g, Sugar: 12g, Vitamin A: 1388IU, Vitamin C: 13mg, Calcium: 502mg, Iron: 5mg

Chicken Parmesan Casserole

Rebecca Prep time: 40 mins | Cook time: 40 mins | Total time: 1 hr 20 mins | Servings: 5 This is an amazing casserole with crispy chicken tenders, pasta, and… General Recipes Chicken Parmesan Casserole European Print This
Serves: 5 Prep Time: 40 mins Cooking Time: 40 mins 40 mins
Nutrition facts: 740 calories 28 fat
Rating: 5.0/5
( 1 voted )

Ingredients

  • ¾ c. vegetable oil
  • 2 tbsp butter
  • 2 small boneless skinless chicken breasts
  • ¾ lb rigatoni pasta
  • 32 ounces marinara sauce
  • ¾ c. flour
  • 1/4 tsp pepper
  • 2 tsp seasoned salt
  • 2 eggs
  • 1 ½ c. Italian bread crumbs
  • Fresh Parsley, to garnish
  • 3 c. mozzarella cheese, shredded & separated
  • 1/3 c. Parmesan cheese, finely grated

Instructions

Pasta:

Step 1: Following the package directions, cook the rigatoni in a large pot with boiling water for a minute less than al dente.

Step 2: Drain the pasta when done and return it to the pot. Toss the pasta with 32 ounces of sauce, 1/3 of the Parmesan cheese, and a cup of mozzarella. Set aside.

Chicken:

Step 3: Using paper towels, pat the chicken dry and slice it into about 1/2 inch strips.

Step 4: For the chicken breading, create an assembly: Mix 3/4 c flour with 2 tsp salt and 1/4 tsp pepper in the first bowl. Whisk the eggs in a second bowl. And in the third bowl, place 1 1/2 c bread crumbs.

Step 5: In the flour mixture, dredge the chicken, then shortly in the whisked eggs, and smother the chicken in the breadcrumbs until fully coated. Gently flatten the chicken using your palms in the breadcrumbs again.

Step 6: To a pan with butter, drizzle 1/4 inch of oil and heat over medium-high heat. Into the hot oil, carefully place the chicken strips and cook for about 4 minutes on each side or until both sides are golden brown. Cook the chicken strips in batches and add extra oil as the chicken cooks as needed.

Step 7: On a paper towel-lined plate, transfer the cooked chicken strips. Then, slice the strips into smaller bite-sized pieces.

Assemble the Casserole and Bake:

Step 8: Prepare the oven. Preheat it to 375 degrees.

Step 9: Add half of the rigatoni/sauce mixture to a lightly greased 9 x 13-inch casserole dish and top with half of the chicken strips followed by 1/3 of the Parmesan cheese and 1 c mozzarella cheese.

Step 10: On top, add the rest of the rigatoni. Lay the chicken strips over the rigatoni and sprinkle with the rest of the Parmesan and mozzarella cheese.

Step 11: Place in the preheated oven and bake for about 25 minutes, uncovered. For a crisper and browner top, adjust the oven temperature to 425 degrees and bake for another 5 minutes.

Step 12: Remove from the oven when done and serve garnished with some fresh parsley. Enjoy the casserole with garlic bread with cheese.

Notes

Storage: In an airtight container, store any leftovers and keep them in the fridge for up to 3 days. You can also freeze this casserole and thaw it in the fridge overnight before reheating it in the microwave or oven. To prevent the pasta from drying out, spoon more sauce on it before reheating. Make-Ahead Method: You can assemble this casserole up to 2 days in advance. Allow the casserole to sit out at room temperature for about 30 minutes before baking. Bake the casserole for about 15 minutes at 375 degrees F, covered. Then, uncover and bake for another 25 minutes.

May 16, 2022 0 comment
0 FacebookTwitterPinterestEmail
General Recipes

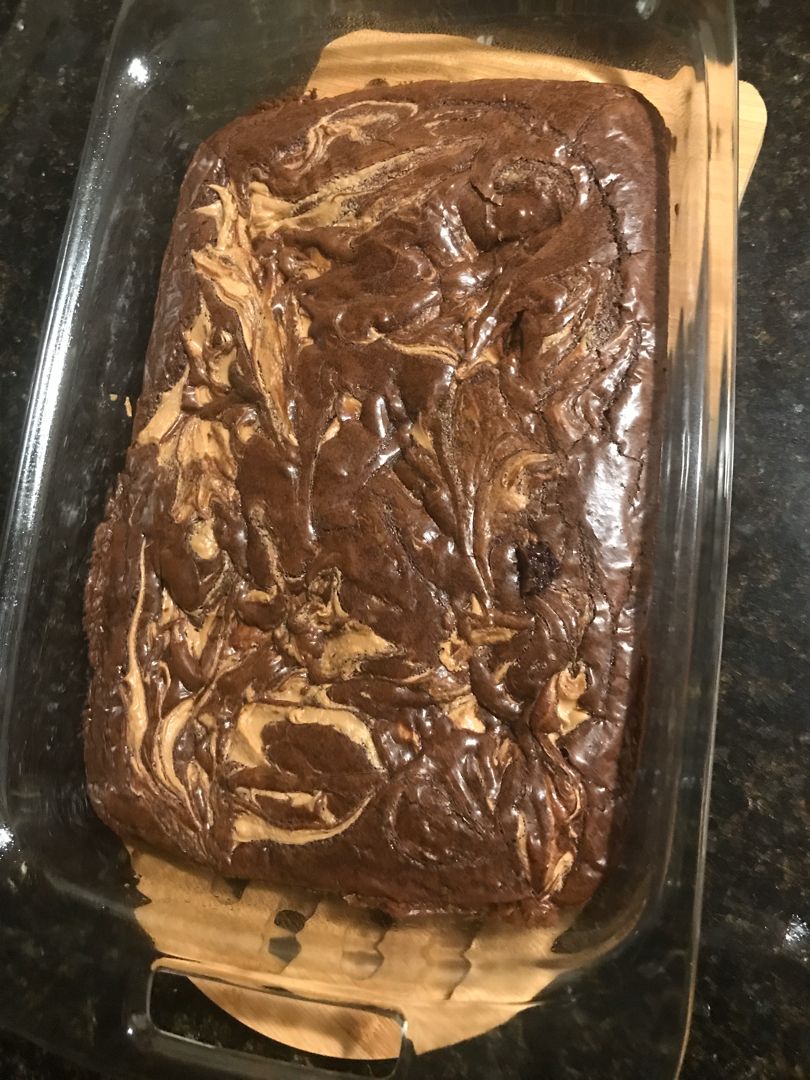
Fudgy Peanut Butter Swirl Brownies

by Rebecca May 14, 2022
written by Rebecca

Prep Time: 15 mins | Cook Time: 30 mins | Total Time: 45 mins | Yield: 9 medium squares

These moist and delicious fudgy brownies with peanut butter swirls are amazing! I keep them wrapped in plastic after completely cooled and serve them the next day. I like them better the next day as the flavor becomes richer and deeper. These brownies can also be frozen for up to a month.

INGREDIENTS

Brownie base:

¾ c. unsalted butter

¾ c. (4.5 ounces) semi-sweet chocolate, coarsely chopped

¾ c. granulated sugar

3 eggs, at room temperature

¾ c. dark brown sugar

Drops of almond extract

2 tsp vanilla extract

1 ½ tbsp unsweetened cocoa powder

1 c. all-purpose flour

Peanut butter swirl:

5 tbsp powdered sugar

⅔ c. peanut butter

2 or 3 tbsp cream (double, whipping, or heavy)

½ tsp vanilla (optional)

How to make Fudgy Peanut Butter Swirl Brownies

Brownie base:

Step 1: Prepare the oven. Preheat it to 350 degrees F or 180 degrees C.

Step 2: Using the parchment paper, line a 9-inch square pan and grease the sides that are not lined.

Step 3: In a large glass bowl, melt the chocolate and butter in the microwave, stirring every 10 seconds until smooth. Or do this over a pot of boiling water.

Step 4: Into the melted chocolate, stir in both sugars. Then, add the eggs, vanilla, almond extract (optional), and cocoa. Stir well until blended. In two parts, add the flour, mixing until just combined.

Step 5: Into the prepared pan, spread the batter.

Peanut butter swirl:

Step 6: Place the peanut butter, powdered sugar, vanilla, and cream in a medium bowl. Mix well until the lumps are gone.

Step 7: Over the brownie base. Drop spoonfuls of the mixture. Using a knife, lightly swirl, leaving whole chunks of peanut butter intact.

Step 8: Place in the preheated oven and bake for about 30 minutes or until a tester comes out clean and the top of the brownie looks dry.

Step 9: Remove from the oven when done and allow the brownie to cool fully on a wire rack.

NUTRITION FACTS:

Serving Size: 1/12 Calories: 336 | Sugar: 34.8 g | Sodium: 27.4 mg | Fat: 16.9 g | Carbohydrates: 44.3 g | Protein: 3.8 g | Cholesterol: 79.8 mg

May 14, 2022 0 comment
0 FacebookTwitterPinterestEmail
General Recipes

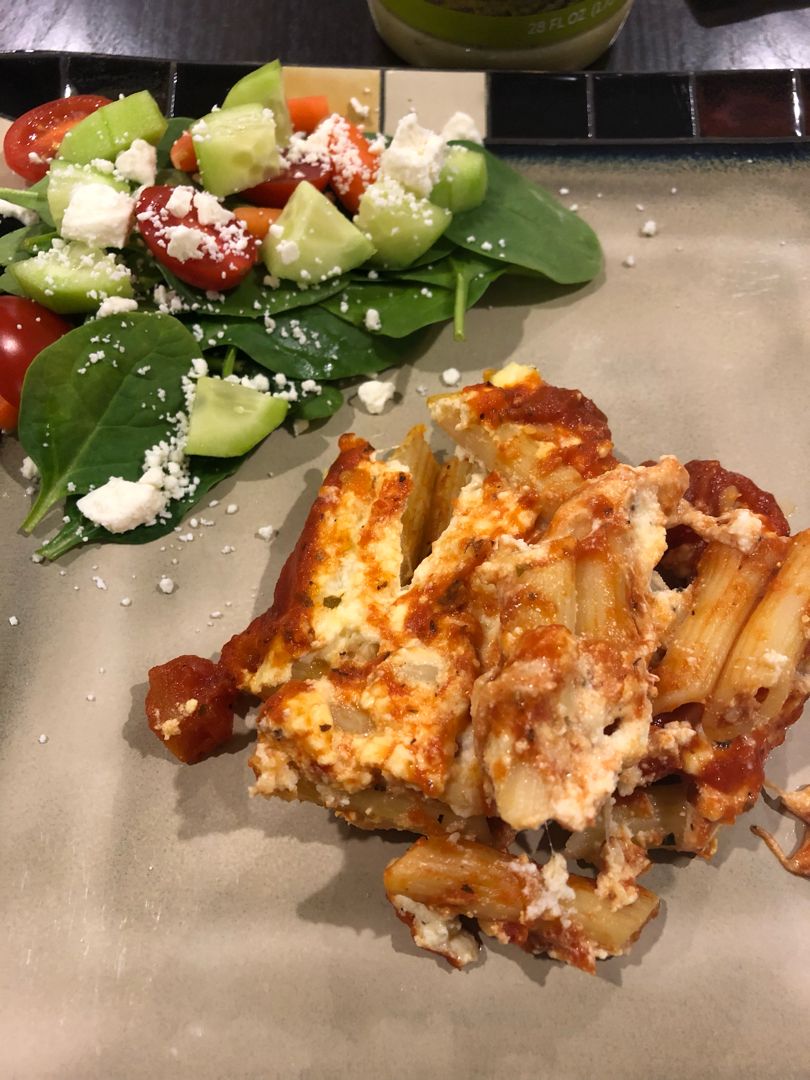
Baked Penne Rigate Recipe

by Rebecca May 14, 2022
written by Rebecca

Prep time: 10 mins | Cook time: 30 mins | Total time: 40 mins

If you are looking for another pasta dish to serve to your family, then you have to give this baked penne rigate a try. It is made with only a few simple ingredients and ready in no time. Enjoy a no-fuss weeknight meal packed with delicious cheese and marinara sauce any time with this easy-baked penne rigate recipe.

Feel free to add your preferred protein like ground beef and chicken or simply stick to the recipe if that’s what you desire.

This amazing pasta dish is ready in less than forty minutes making this excellent for busy weeknights. The combination of the cheeses makes this dish stand out! For an easy and quick meal, prep this in advance and keep it in the fridge until ready to bake.

INGREDIENTS

2 eggs

1/2 pound Penne Rigate Pasta

1 c. Mozzarella Cheese

2 c. Ricotta Cheese

3/4 c. Parmesan Cheese

1 jar of Marinara Sauce

salt and pepper to taste

Topping:

1/4 c. Parmesan Cheese

How to make Baked Penne Rigate

Step 1: Prepare the oven. Preheat it to 350 degrees.

Step 2: In a large pot with boiling salted water, add the penne rigate and cook following the package directions until al dente.

Step 3: Place the mozzarella, ricotta, and Parmesan cheese in a bowl along with the eggs, salt, and pepper. Mix well until blended.

Step 4: Drain the pasta when done. Return the pasta to the pot and pour in half of the marinara sauce. Toss well.

Step 5: On top of the pasta, scoop the cheese mixture and evenly spread.

Step 6: Place in the preheated oven and bake for about 18 to 20 minutes. Remove from the oven and drizzle the rest of the marinara sauce on top, then sprinkle with 1/4 c of the Parmesan cheese. Return to the oven and resume baking for an additional 5 to 10 minutes.

Baked Penne Rigate Recipe

Rebecca Prep time: 10 mins | Cook time: 30 mins | Total time: 40 mins If you are looking for another pasta dish to serve to your family, then you have… General Recipes Baked Penne Rigate Recipe European Print This
Prep Time: 10 mins Cooking Time: 30 mins 30 mins
Nutrition facts: 200 calories 20 grams fat
Rating: 5.0/5
( 1 voted )

Ingredients

  • 2 eggs
  • 1/2 pound Penne Rigate Pasta
  • 1 c. Mozzarella Cheese
  • 2 c. Ricotta Cheese
  • 3/4 c. Parmesan Cheese
  • 1 jar of Marinara Sauce
  • salt and pepper to taste
  • Topping:
  • 1/4 c. Parmesan Cheese

Instructions

Step 1: Prepare the oven. Preheat it to 350 degrees.

Step 2: In a large pot with boiling salted water, add the penne rigate and cook following the package directions until al dente.

Step 3: Place the mozzarella, ricotta, and Parmesan cheese in a bowl along with the eggs, salt, and pepper. Mix well until blended.

Step 4: Drain the pasta when done. Return the pasta to the pot and pour in half of the marinara sauce. Toss well.

Step 5: On top of the pasta, scoop the cheese mixture and evenly spread.

Step 6: Place in the preheated oven and bake for about 18 to 20 minutes. Remove from the oven and drizzle the rest of the marinara sauce on top, then sprinkle with 1/4 c of the Parmesan cheese. Return to the oven and resume baking for an additional 5 to 10 minutes.

May 14, 2022 0 comment
0 FacebookTwitterPinterestEmail
General Recipes

BAKED STUFFED FLANK STEAK

by Rebecca May 14, 2022
written by Rebecca

Prep time: 10 mins | Cook time: 40 mins | Resting Time: 15 mins | Yield: 4 servings

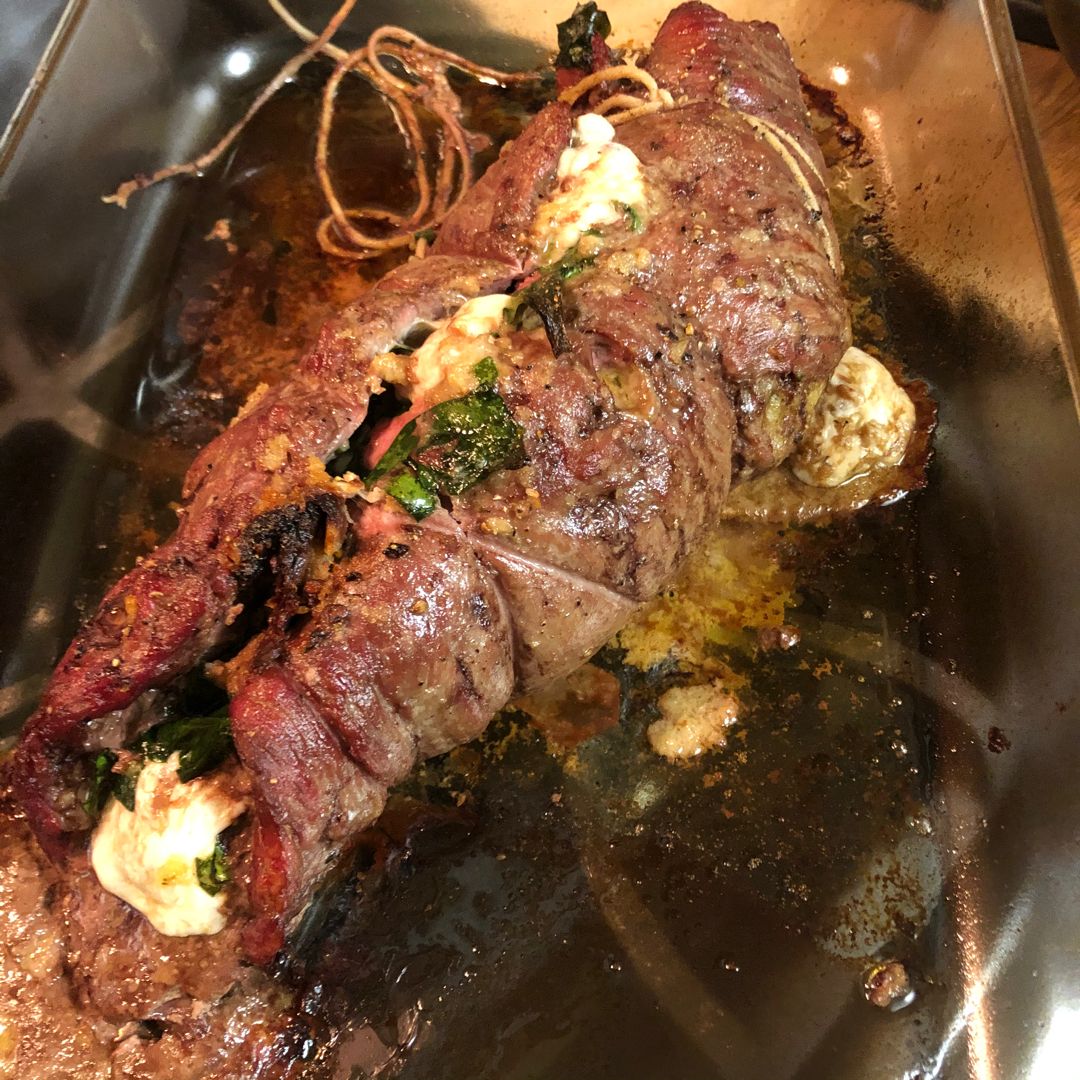
Impressive and flavorful – this baked stuffed flank steak will surely spice up your dinner! A fine cut of meat stuffed with spinach, mozzarella, and sun-dried tomatoes, then baked to perfection.

INGREDIENTS

2 tbsp olive oil

1-2 lbs flank steak, butterflied

1 egg yolk

1 c. spinach, frozen pkg – thawed, rinsed, and well-drained

1 and 1/2 c. mozzarella cheese, grated or shredded

1/2 c. sun-dried tomatoes, roughly chopped

1/2 tsp garlic salt, divided

2 tbsp panko breadcrumbs

1 pinch black pepper, to taste

HOW TO MAKE BAKED STUFFED FLANK STEAK

Step 1: Prepare the oven. Preheat it to 425 degrees F.

Step 2: To butterfly the steak, line your knife up parallel using a cutting board and slice through the center of the steak. Stop just short of cutting all the way.

Step 3: Pound the steak to about 1/4 to 1/2 inch thickness using a meat tenderizer.

Step 4: Place the egg yolks in a large bowl and whisk using a fork. Then, add the spinach and panko bread crumbs. Mix well before stirring in the mozzarella and sun-dried tomatoes.

Step 5: Evenly spread the cheese stuffing on the butterflied steak, leaving about a 1-inch border along the edges. Then, sprinkle with 1/4 tsp garlic salt and pepper.

Step 6: Along the “grain”, roll the steak, beginning with the smallest end. Tightly roll the steak and tuck in the stray pieces.

Step 7: Snugly loop and tie the cooking twine on the steak in 2-inch intervals.

Step 8: On a baking sheet, place the stuffed and tied flank steak. Drizzle with olive oil. Rub the oil into the meat using your fingers. Lastly, sprinkle the steak with the rest of the 1/4 tsp garlic.

Step 9: Place in the preheated oven and bake for about 35 minutes. Then, broil for 5 to 10 minutes.

Step 10: Allow the steak to rest for about 15 minutes, exposing it to air. Make sure not to disturb the steak.

NUTRITION FACTS:

Serving: 1serving | Calories: 415 kcal | Carbohydrates: 13g | Protein: 37g | Fat: 24g | Saturated Fat: 9g | Cholesterol: 150mg | Sodium: 693mg | Potassium: 947mg | Fiber: 2g | Sugar: 6g | Vitamin A: 1172IU | Vitamin C: 7mg | Calcium: 274mg | Iron: 4mg

BAKED STUFFED FLANK STEAK

Rebecca Prep time: 10 mins | Cook time: 40 mins | Resting Time: 15 mins | Yield: 4 servings Impressive and flavorful – this baked stuffed flank steak will surely spice… General Recipes BAKED STUFFED FLANK STEAK European Print This
Serves: 4 Prep Time: 10 mins Cooking Time: 40 mins 40 mins
Nutrition facts: 415 calories 24 fat
Rating: 5.0/5
( 1 voted )

Ingredients

  • 2 tbsp olive oil
  • 1-2 lbs flank steak, butterflied
  • 1 egg yolk
  • 1 c. spinach, frozen pkg - thawed, rinsed, and well-drained
  • 1 and 1/2 c. mozzarella cheese, grated or shredded
  • 1/2 c. sun-dried tomatoes, roughly chopped
  • 1/2 tsp garlic salt, divided
  • 2 tbsp panko breadcrumbs
  • 1 pinch black pepper, to taste

Instructions

Step 1: Prepare the oven. Preheat it to 425 degrees F.

Step 2: To butterfly the steak, line your knife up parallel using a cutting board and slice through the center of the steak. Stop just short of cutting all the way.

Step 3: Pound the steak to about 1/4 to 1/2 inch thickness using a meat tenderizer.

Step 4: Place the egg yolks in a large bowl and whisk using a fork. Then, add the spinach and panko bread crumbs. Mix well before stirring in the mozzarella and sun-dried tomatoes.

Step 5: Evenly spread the cheese stuffing on the butterflied steak, leaving about a 1-inch border along the edges. Then, sprinkle with 1/4 tsp garlic salt and pepper.

Step 6: Along the “grain”, roll the steak, beginning with the smallest end. Tightly roll the steak and tuck in the stray pieces.

Step 7: Snugly loop and tie the cooking twine on the steak in 2-inch intervals.

Step 8: On a baking sheet, place the stuffed and tied flank steak. Drizzle with olive oil. Rub the oil into the meat using your fingers. Lastly, sprinkle the steak with the rest of the 1/4 tsp garlic.

Step 9: Place in the preheated oven and bake for about 35 minutes. Then, broil for 5 to 10 minutes.

Step 10: Allow the steak to rest for about 15 minutes, exposing it to air. Make sure not to disturb the steak.

May 14, 2022 0 comment
0 FacebookTwitterPinterestEmail
Newer Posts
Older Posts

Popular Posts

  • 1

    Crispy Crunchy Parmesan Potatoes

    March 21, 2020
  • 2

    CROCK POT SMOTHERED PORK CHOPS

    March 21, 2020
  • Facebook
  • Twitter

@2019 - All Right Reserved.


Back To Top