Cook it once
  • Home
  • Privacy Policy
  • Recipes
    • KETO
    • LC
    • WW
  • Tips
  • Contact
Cook it once
  • Home
  • Privacy Policy
  • Recipes
    • KETO
    • LC
    • WW
  • Tips
  • Contact
Category:

Main Dish Recipes

Main Dish Recipes

Easy Homemade Apple Fritters

by Rebecca August 5, 2020
written by Rebecca

Servings: 15 | Prep Time: 15m | Cook Time: 3m | Ready In: 18m

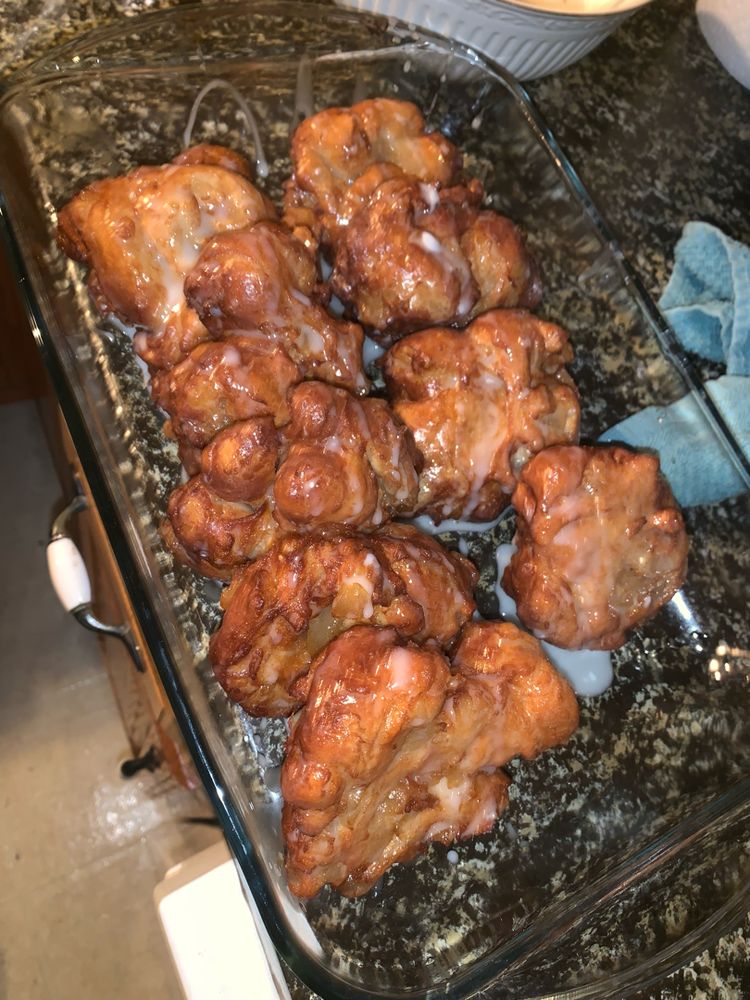
No one is going to say no to a light, pillow-soft, deep-fried donuts that are stuffed with fresh fall apples. This easy and quick to Make Homemade Apple Fritters are made with fresh apples and are fried to perfection. Crispy on the outside with a delightful chewy dough. These fritters are double-glazed which makes them insanely satisfying and better than those in a doughnut shop.

Ingredients

1 cup all-purpose flour

1/4 cup granulated sugar

3/4 teaspoon salt

1 1/2 teaspoons baking powder

1 teaspoon ground cinnamon

1/3 cup milk (used low-fat)

1 large egg

1 cup apple, chopped (used 2 small apples, peeled)

Oil (for frying, we used vegetable oil)

FOR THE GLAZE:

2 cups powdered sugar

1 1/2 tablespoons milk

How to make Easy Homemade Apple Fritters

Step 1: In a mixing bowl, combine the flour, sugar, salt, baking powder, and cinnamon. Then, stir in the milk and egg until just mixed. Once just combined, fold in the chopped apples.

Step 2: Place oil into the skillet about 1 1/2 deep. Heat the oil to 350 degrees F. Throw in a small dough to test if the oil is hot. When the dough floats the oil is ready.

Step 3: Add the dough in tablespoons carefully into the hot oil. Cook for approximately 2 minutes until brown. Flip and continue to cook for 1 to 2 minutes more until both sides are browned. Then, briefly place the dough to paper towels to absorb the excess oil before transferring to a cooling rack.

Step 4: Meanwhile, prepare the glaze. In a small bowl, stir the milk and powdered sugar.

Step 5: When the glaze is ready, drizzle it over the apple fritters and let the glaze harden. It’ll take about 3 minutes, then, flip the fritters and drizzle the glaze over the other side.

Step 6: Once the drizzle is set, serve the fritters immediately. Enjoy!

Nutritional:

Serving Size: 1 (56.9 g); Calories 157.1; Total Fat – 0.8 g; Saturated Fat – 0.3 g; Cholesterol – 14.6 mg; Sodium – 165.6 mg; Total; Carbohydrate – 37.3 g; Dietary Fiber – 1 g; Sugars – 31.1 g; Protein – 1.8 g; Calcium – 49.1 mg; Iron – 0.4 mg; Vitamin C – 0.3 mg; Thiamin – 0 mg

Easy Homemade Apple Fritters

Rebecca Servings: 15 | Prep Time: 15m | Cook Time: 3m | Ready In: 18m No one is going to say no to a light, pillow-soft, deep-fried donuts that are stuffed… Main Dish Recipes Easy Homemade Apple Fritters European Print This
Serves: 15 Prep Time: 15 mins Cooking Time: 3 mins 3 mins
Nutrition facts: 157.1 calories 0.8 fat
Rating: 5.0/5
( 1 voted )

Ingredients

  • 1 cup all-purpose flour
  • 1/4 cup granulated sugar
  • 3/4 teaspoon salt
  • 1 1/2 teaspoons baking powder
  • 1 teaspoon ground cinnamon
  • 1/3 cup milk (used low-fat)
  • 1 large egg
  • 1 cup apple, chopped (used 2 small apples, peeled)
  • Oil (for frying, we used vegetable oil)
  • FOR THE GLAZE:
  • 2 cups powdered sugar
  • 1 1/2 tablespoons milk

Instructions

Step 1: In a mixing bowl, combine the flour, sugar, salt, baking powder, and cinnamon. Then, stir in the milk and egg until just mixed. Once just combined, fold in the chopped apples.

Step 2: Place oil into the skillet about 1 1/2 deep. Heat the oil to 350 degrees F. Throw in a small dough to test if the oil is hot. When the dough floats the oil is ready.

Step 3: Add the dough in tablespoons carefully into the hot oil. Cook for approximately 2 minutes until brown. Flip and continue to cook for 1 to 2 minutes more until both sides are browned. Then, briefly place the dough to paper towels to absorb the excess oil before transferring to a cooling rack.

Step 4: Meanwhile, prepare the glaze. In a small bowl, stir the milk and powdered sugar.

Step 5: When the glaze is ready, drizzle it over the apple fritters and let the glaze harden. It'll take about 3 minutes, then, flip the fritters and drizzle the glaze over the other side.

Step 6: Once the drizzle is set, serve the fritters immediately. Enjoy!
August 5, 2020 0 comment
0 FacebookTwitterPinterestEmail
Main Dish Recipes

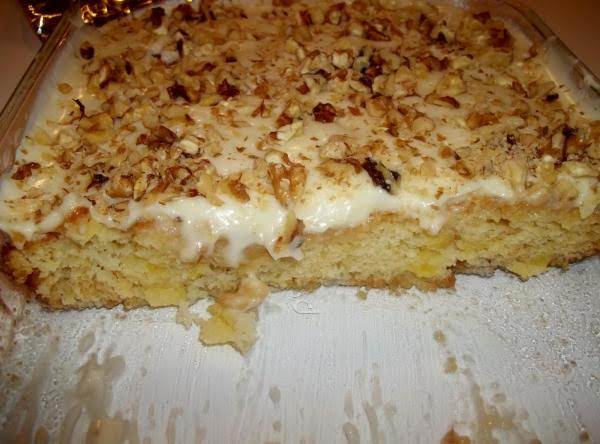
The Original “Easiest Pineapple Cake”

by Rebecca August 5, 2020
written by Rebecca

Serves: 15 | Prep: 5 Min | Cook: 40 Min

If you are a huge pineapple fan, you’ll love this cake. This moist, homemade yellow cake has a refreshing pineapple flavor with a heavenly cream crease frosting. I love to sprinkle some chopped nuts on top and that brings this cake to the next level. The crushed pineapples give this cake a fluffy texture that is not overwhelmingly sweet. I love how light, fluffy, and refreshing this cake is. It screams summertime! And this is perfect for any occasion or no occasion at all! I love to serve a slice with freshly brewed coffee for a midday snack. This cake is for every one of is a huge fan of all things pineapple including myself.

Ingredients

The cake does not contain butter or oil. The frosting has butter, though.

2 cups all-purpose flour

2 cups of sugar

2 eggs

1 teaspoon baking soda

1 teaspoon vanilla

1 pinch salt

1 can crushed pineapple (undrained) in its juice – not syrup, 20 oz.

1 cup chopped nuts, optional

FOR THE CREAM CHEESE FROSTING:

1/2 cup butter or 1 stick

1 pkg cream cheese, softened, 8 oz.

1 teaspoon vanilla

1 1/2 cups confectioners’ sugar

shredded coconut for garnish, optional

How to Make The Original “Easiest Pineapple Cake”

Step 1: Prepare the oven. Preheat it to 350 degrees F.

Step 2: In a large mixing bowl, combine the flour, sugar, eggs, baking soda, vanilla, salt, crushed pineapples, and chopped nuts.

Step 3: Once the cake ingredients are mixed, pour the batter into a greased 9 x 13-inch pan.

Step 4: Place inside the preheated oven and bake for about 35 to 40 minutes or until the top of the cake is golden brown.

Step 5: Meanwhile, prepare the frosting. Beat the butter, cream cheese, and vanilla until creamy. Slowly stir in the powdered sugar and mix until the frosting is incorporated.

Step 6: Once the cake is done, remove from the oven and frost while still warm. Sprinkle over some chopped nuts if you’d like. Enjoy!

The Original "Easiest Pineapple Cake"

Rebecca Serves: 15 | Prep: 5 Min | Cook: 40 Min If you are a huge pineapple fan, you’ll love this cake. This moist, homemade yellow cake has a refreshing pineapple… Main Dish Recipes The Original “Easiest Pineapple Cake” European Print This
Serves: 15 Prep Time: 5 mins Cooking Time: 40 mins 40 mins
Nutrition facts: 200 calories 20 grams fat
Rating: 5.0/5
( 1 voted )

Ingredients

  • The cake does not contain butter or oil. The frosting has butter, though.
  • 2 cups all-purpose flour
  • 2 cups of sugar
  • 2 eggs
  • 1 teaspoon baking soda
  • 1 teaspoon vanilla
  • 1 pinch salt
  • 1 can crushed pineapple (undrained) in its juice - not syrup, 20 oz.
  • 1 cup chopped nuts, optional
  • FOR THE CREAM CHEESE FROSTING:
  • 1/2 cup butter or 1 stick
  • 1 pkg cream cheese, softened, 8 oz.
  • 1 teaspoon vanilla
  • 1 1/2 cups confectioners' sugar
  • shredded coconut for garnish, optional

Instructions

Step 1: Prepare the oven. Preheat it to 350 degrees F.

Step 2: In a large mixing bowl, combine the flour, sugar, eggs, baking soda, vanilla, salt, crushed pineapples, and chopped nuts.

Step 3: Once the cake ingredients are mixed, pour the batter into a greased 9 x 13-inch pan.

Step 4: Place inside the preheated oven and bake for about 35 to 40 minutes or until the top of the cake is golden brown.

Step 5: Meanwhile, prepare the frosting. Beat the butter, cream cheese, and vanilla until creamy. Slowly stir in the powdered sugar and mix until the frosting is incorporated.

Step 6: Once the cake is done, remove from the oven and frost while still warm. Sprinkle over some chopped nuts if you'd like. Enjoy!

August 5, 2020 0 comment
0 FacebookTwitterPinterestEmail
Main Dish Recipes

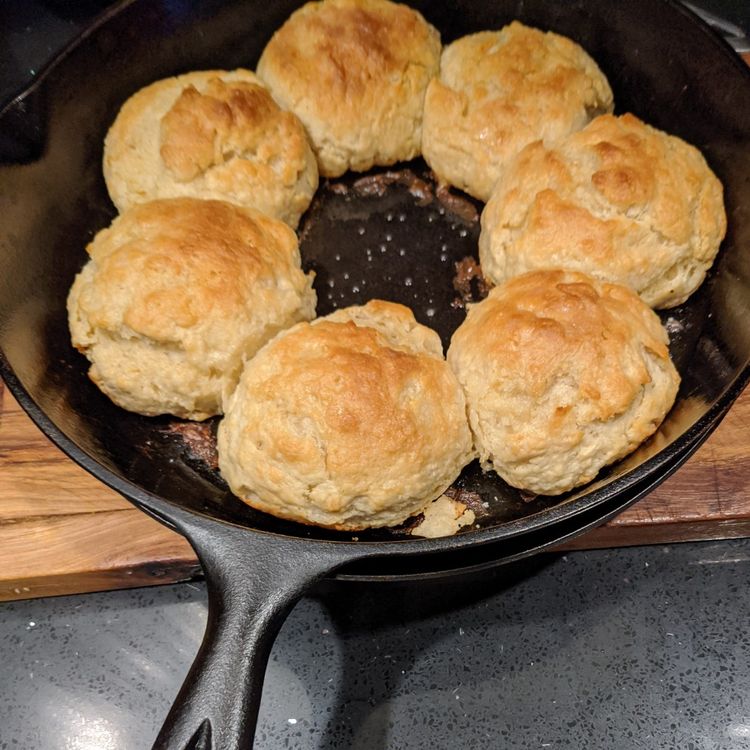
Southern Buttermilk Biscuits

by Rebecca August 5, 2020
written by Rebecca

Serves: 5 | Prep: 10 Min | Cook: 20 Min

These fluffy biscuits are one of the greatest Southern recipes you’ll ever lay your hands on. They are light as a cloud, simple, and breeze to make. A pretty straightforward biscuit recipe that reveals the secrets of making this traditional Southern Buttermilk Biscuits.

I love a good old Southern recipe. They make the best comfort food. Like these biscuits that are extremely easy and quick to prepare. A quick bread that is perfect with just about anything and is great too when slathered with butter and strawberry jam. And nothing beats a freshly baked warm biscuit every day.

My husband is obsessed with these fluffy, tender, and butter biscuits. His favorite morning breakfast with some eggs and bacon on the side, or easy dinner with chicken and some coleslaw. Whenever I am baking these gorgeous biscuits, he always comes to the kitchen to check when it is done so he can steal a piece without me knowing. He’s crazy obsessed with these biscuits and I can understand why. This no-fuss Southern Buttermilk biscuit deserves a big round of applause.

Ingredients

3 cups self-rising flour

1/2 cup lard

pinch sugar

3/4 cup buttermilk, possibly more

2 tablespoons melted butter

How to Make Southern Buttermilk Biscuits

Step 1: Use a pastry blender or two forks to cut lard into the flour. Then, add in a pinch of sugar and enough buttermilk to make a soft dough.

Step 2: Knead the dough but make sure to not over-knead because it will make a tough biscuit.

Step 3: Pinch off a small of dough with your floured hands. Roll into a ball and flatten lightly in a greased iron skillet or pan.

Step 4: Place inside the oven and bake at 425 degrees for about 15 to 18 minutes.

Step 5: Once done, remove from the oven and brush the biscuit with melted butter.

Southern Buttermilk Biscuits

Rebecca Serves: 5 | Prep: 10 Min | Cook: 20 Min These fluffy biscuits are one of the greatest Southern recipes you’ll ever lay your hands on. They are light as… Main Dish Recipes Southern Buttermilk Biscuits European Print This
Serves: 5 Prep Time: 10 mins Cooking Time: 20 mins 20 mins
Nutrition facts: 200 calories 20 grams fat
Rating: 4.5/5
( 2 voted )

Ingredients

  • 3 cups self-rising flour
  • 1/2 cup lard
  • pinch sugar
  • 3/4 cup buttermilk, possibly more
  • 2 tablespoons melted butter

Instructions

Step 1: Use a pastry blender or two forks to cut lard into the flour. Then, add in a pinch of sugar and enough buttermilk to make a soft dough.

Step 2: Knead the dough but make sure to not over-knead because it will make a tough biscuit.

Step 3: Pinch off a small of dough with your floured hands. Roll into a ball and flatten lightly in a greased iron skillet or pan.

Step 4: Place inside the oven and bake at 425 degrees for about 15 to 18 minutes.

Step 5: Once done, remove from the oven and brush the biscuit with melted butter.

August 5, 2020 0 comment
0 FacebookTwitterPinterestEmail
Main Dish Recipes

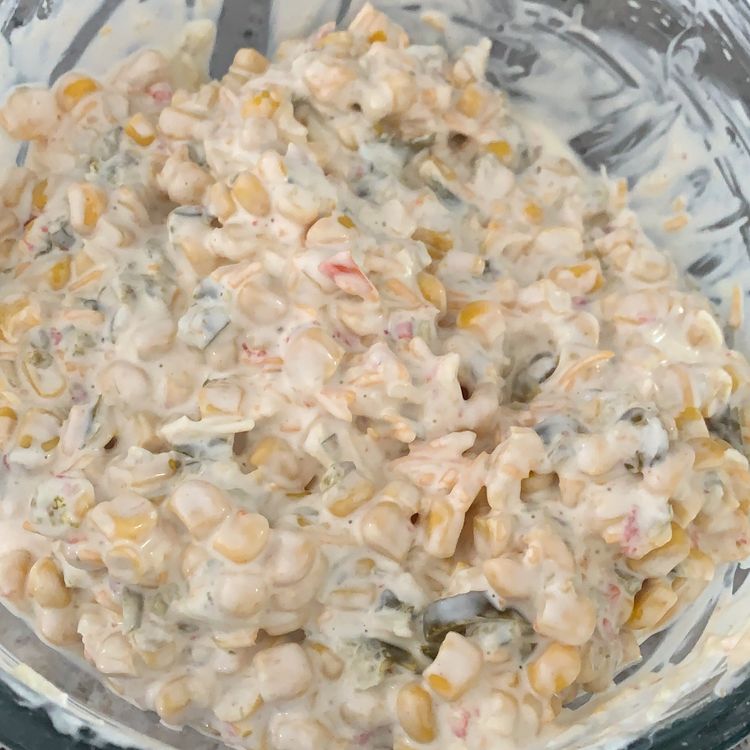
Mexican Corn Dip

by Rebecca August 5, 2020
written by Rebecca

Serves: makes a lot of | Prep: 20 Min

I love this dip. It’s super easy to prepare and it goes along with just about anything! I like the spicy bite as it makes my mouth water. And I don’t think that this dip will be near as good if it is not a tad spicy. This is the best dip for Fritos or any chips or crackers. The combination of flavors is perfect and is bursting inside the mouth.

This mouthwatering Mexican Corn Dip is kind of addicting! A dip that everyone is raving about. It is perfect for game night. Whenever I serve everyone can’t help themselves but ask for the recipe. Little do they know, this dip requires only a few simple ingredients from Mexicorn, Rotel tomatoes, sour cream, real mayo, green onions, and Monterey and cheddar cheese. Try adding some cumin if you want to spice it up big time. I have been making this for a year now and this dip never fails to please the crowd. It is an excellent party staple and is great as a veggie dip, too! You can easily whip up this Mexican-style corn dip. It will only take you 20 minutes to prepare this addictive, homemade dip that conquers everyone’s heart! Follow the instruction below, it’s very straightforward. Enjoy!

Ingredients

3 cans Mexicorn, drained (11 oz each)

1 can Rotel tomatoes, extra hot, drained

1 cup sour cream

1 cup real mayo

1/2 bunch green onion, chopped (optional) I leave these out.

1 1/2 cups Monterey jack and cheddar shredded cheese

How to Make Mexican Corn Dip

Step 1: In a bowl, combine the Mexicorn, Rotel tomatoes, sour cream, real mayo, green onions, Monterey Jack, and cheddar cheese. Mix well.

Step 2: Let the mixture sit for several hours to thicken.

Step 3: When ready, serve with Fritos or any chip or cracker. Enjoy!

August 5, 2020 0 comment
0 FacebookTwitterPinterestEmail
Main Dish Recipes

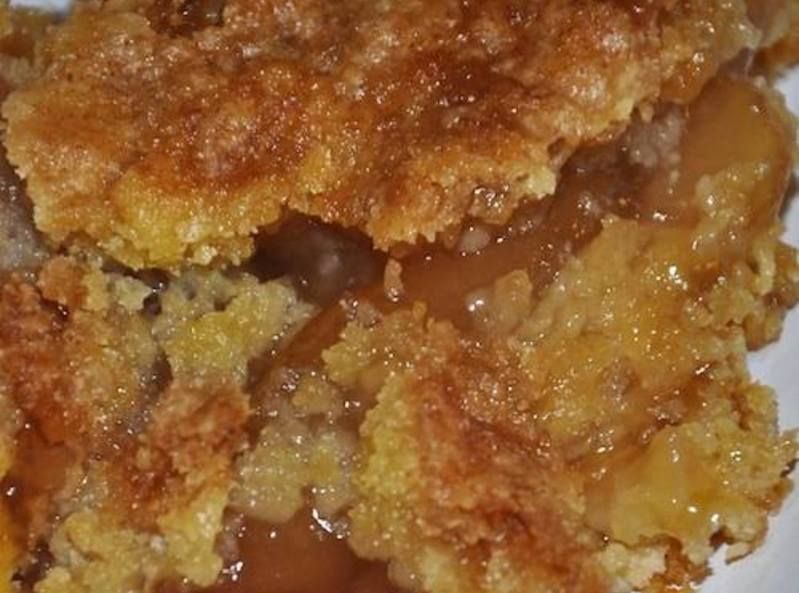
Caramel Apple Dump Cake

by Rebecca August 5, 2020
written by Rebecca

PREP TIME: 5 minutes | COOK TIME: 1 hour | TOTAL TIME: 1 hour 5 minutes

This simple cake is filled with apple pie filling with heavenly caramel sauce. Whether it is oven-baked or slow-cooked, still this cake will have the same exciting flavor. This Caramel Apple Dump Cake is one of the easiest to whip up and you only need a few simple ingredients; cake mix, apple pie filling, caramel sauce or topping, and butter. And if you want to cut on some fat, you can use one stick of butter instead of two. This no-fuss dessert is perfect for when you are craving something sweet. Serve this with vanilla or ice cream of your choice.

Ingredients

1 yellow cake mix

2 cans apple pie filling, (21-ounce cans)

1/2 cup caramel sauce or topping

2 sticks butter, melted or sliced

How to make Caramel Apple Dump Cake

Oven-Baked Caramel Apple Dump Cake:

Step 1: Prepare the oven. Preheat it to 350 degrees.

Step 2: Spoon the cans of apple pie filling into a 9 x 13-inch baking dish.

Step 3: Then, pour the caramel over the pie filling and spread evenly before sprinkling the cake mix on top.

Step 4: Evenly put the thinly sliced pats of butter over the cake mix. Or you can melt the butter and drizzle over the cake mix.

Step 5: Place inside the preheated oven and bake for about 50 to 60 minutes.

Step 6: Once done, remove from the oven and serve with a scoop of vanilla or your choice of ice cream.

Slow Cooker Caramel Apple Dump Cake:

Step 1: Grease a 6-quart oval or oblong slow cooker crock.

Step 2: Follow the exact layering as stated above.

Step 3: Cover the slow cooker or place first some paper towels or a tea towel beneath the lid, making sure that it is not touching the top of the cake. This way the towels can catch the water droplets that may form on the lid.

Step 4: Then, cook the cake for 2 hours on high or 4 hours on low.

Notes:

If you want to cut some fat, you can use 1 stick of butter instead.

Caramel Apple Dump Cake

Rebecca PREP TIME: 5 minutes | COOK TIME: 1 hour | TOTAL TIME: 1 hour 5 minutes This simple cake is filled with apple pie filling with heavenly caramel sauce. Whether… Main Dish Recipes Caramel Apple Dump Cake European Print This
Nutrition facts: 200 calories 20 grams fat
Rating: 3.5/5
( 106 voted )

Ingredients

  • 1 yellow cake mix
  • 2 cans apple pie filling, (21-ounce cans)
  • 1/2 cup caramel sauce or topping
  • 2 sticks butter, melted or sliced

Instructions

Oven-Baked Caramel Apple Dump Cake:

Step 1: Prepare the oven. Preheat it to 350 degrees.

Step 2: Spoon the cans of apple pie filling into a 9 x 13-inch baking dish.

Step 3: Then, pour the caramel over the pie filling and spread evenly before sprinkling the cake mix on top.

Step 4: Evenly put the thinly sliced pats of butter over the cake mix. Or you can melt the butter and drizzle over the cake mix.

Step 5: Place inside the preheated oven and bake for about 50 to 60 minutes.

Step 6: Once done, remove from the oven and serve with a scoop of vanilla or your choice of ice cream.

Slow Cooker Caramel Apple Dump Cake:

Step 1: Grease a 6-quart oval or oblong slow cooker crock.

Step 2: Follow the exact layering as stated above.

Step 3: Cover the slow cooker or place first some paper towels or a tea towel beneath the lid, making sure that it is not touching the top of the cake. This way the towels can catch the water droplets that may form on the lid.

Step 4: Then, cook the cake for 2 hours on high or 4 hours on low.

Notes:

If you want to cut some fat, you can use 1 stick of butter instead.

August 5, 2020 0 comment
0 FacebookTwitterPinterestEmail
Main Dish Recipes

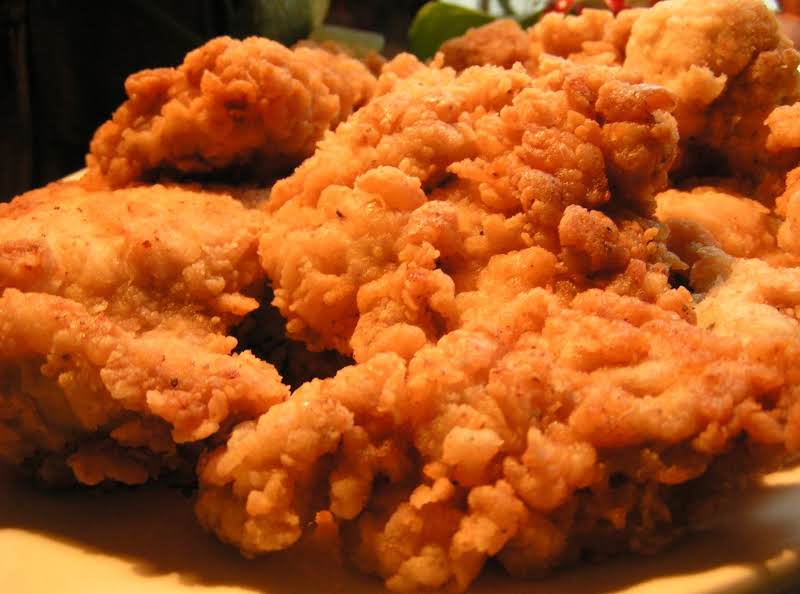
Southern Fried Buttermilk Chicken

by Rebecca August 5, 2020
written by Rebecca

Prep: 8 Hr | Cook: 15 Min

This recipe is a very straightforward buttermilk drench fried chicken. An uncomplicated dish that only requires a few simple ingredients; chicken, buttermilk, flour, peanut oil, and a few spices. These pan-fried chicken pieces are juicy inside and crispy outside. Thanks to the buttermilk brine.

Ingredients

2 1/2 to 3 lb chicken parts or pieces

BUTTERMILK BRINE

2 to 3 cups buttermilk

1 teaspoon salt

1 teaspoon pepper

1 teaspoon seasoning salt

FOR THE FLOUR BATTER INGREDIENTS:

3 cups self-rising flour

2 tablespoons seasoning salt

1/2 teaspoon black pepper

1/4 teaspoon cayenne pepper

1 teaspoon Hungarian paprika

1 teaspoon salt

1/2 teaspoon garlic powder

FOR THE COOKING OIL:

peanut oil

How to Make Dee Dee’s Southern Fried Buttermilk Chicken

TO MAKE BUTTERMILK BRINE:

Step 1: Prepare the chicken. Rinse and slice away any excess fat.

Step 2: Stir in a teaspoon of salt, pepper, and seasoning salt into the buttermilk then soak the chicken into the buttermilk mixture. Refrigerate for 8 hours.

TO MAKE THE BATTER:

Step 3: In a large freezer bag, combine the flour, seasoning salt, pepper, salt, cayenne pepper, Hungarian paprika, and garlic powder. And set aside.

Step 4: After at least 8 hours, remove the chicken from the fridge and take out the chicken from the buttermilk mixture, shaking excess buttermilk mixture off.

Step 5: Transfer the chicken a few pieces at a time to the flour mixture and evenly coat them. Once coated, place the chicken pieces on a wire rack, allowing them to air dry for about 30 to 40 minutes. When doing so, you are allowing the chicken to come to room temperature and for the moisture to dry out. This will help cook the pieces evenly and fry up crispier.

Step 6: When frying, make sure that the peanut oil is already 370 to 375 degrees. Fry the chicken pieces and make sure to not overcrowd the pan until golden brown on each side. It is suggested to use peanut oil so the chicken will not burn.

Southern Fried Buttermilk Chicken

Rebecca Prep: 8 Hr | Cook: 15 Min This recipe is a very straightforward buttermilk drench fried chicken. An uncomplicated dish that only requires a few simple ingredients; chicken, buttermilk, flour,… Main Dish Recipes Southern Fried Buttermilk Chicken European Print This
Prep Time: 8 hrs Cooking Time: 15 mins 15 mins
Nutrition facts: 200 calories 20 grams fat
Rating: 5.0/5
( 1 voted )

Ingredients

  • 2 1/2 to 3 lb chicken parts or pieces
  • BUTTERMILK BRINE
  • 2 to 3 cups buttermilk
  • 1 teaspoon salt
  • 1 teaspoon pepper
  • 1 teaspoon seasoning salt
  • FOR THE FLOUR BATTER INGREDIENTS:
  • 3 cups self-rising flour
  • 2 tablespoons seasoning salt
  • 1/2 teaspoon black pepper
  • 1/4 teaspoon cayenne pepper
  • 1 teaspoon Hungarian paprika
  • 1 teaspoon salt
  • 1/2 teaspoon garlic powder
  • FOR THE COOKING OIL:
  • peanut oil

Instructions

TO MAKE BUTTERMILK BRINE:

Step 1: Prepare the chicken. Rinse and slice away any excess fat.

Step 2: Stir in a teaspoon of salt, pepper, and seasoning salt into the buttermilk then soak the chicken into the buttermilk mixture. Refrigerate for 8 hours.

TO MAKE THE BATTER:

Step 3: In a large freezer bag, combine the flour, seasoning salt, pepper, salt, cayenne pepper, Hungarian paprika, and garlic powder. And set aside.

Step 4: After at least 8 hours, remove the chicken from the fridge and take out the chicken from the buttermilk mixture, shaking excess buttermilk mixture off.

Step 5: Transfer the chicken a few pieces at a time to the flour mixture and evenly coat them. Once coated, place the chicken pieces on a wire rack, allowing them to air dry for about 30 to 40 minutes. When doing so, you are allowing the chicken to come to room temperature and for the moisture to dry out. This will help cook the pieces evenly and fry up crispier.

Step 6: When frying, make sure that the peanut oil is already 370 to 375 degrees. Fry the chicken pieces and make sure to not overcrowd the pan until golden brown on each side. It is suggested to use peanut oil so the chicken will not burn.

August 5, 2020 0 comment
0 FacebookTwitterPinterestEmail
Main Dish Recipes

Perfect Italian Cream Cake

by Rebecca August 5, 2020
written by Rebecca

Serves: 12 | Prep: 15 Min | Cook: 15 Min

This cake is gorgeous and pretty amazing! It is perfect for any occasion or even on regular days when you’re craving for coconut flavored desserts. It has a touch of toasted pecans, coconut filled batter with an indulging cream cheese frosting. Turn your occasions into something special with this cake’s spectacular and heavenly flavors.

Ingredients

1 box white cake mix with pudding

3 large eggs

1/4 cup oil

1 teaspoon vanilla extract

1 1/4 cups buttermilk

3 1/2 oz shredded coconut (about 1 1/2 cups; 1/2 a 7 oz bag)

2/3 cup chopped pecans, toasted

FOR THE CREAM CHEESE FROSTING:

16 oz cream cheese, room temperature

1 cup butter, room temperature

32 oz confectioners’ sugar

2 1/2 teaspoons vanilla extract

How to Make Perfect Italian Cream Cake

Step 1: Prepare the oven. Preheat it to 350 degrees.

Step 2: Grease and flour three 9-inch pans or 8-inch pans if you prefer a taller cake.

Step 3: Combine the cake mix with pudding, eggs, vanilla extract, and buttermilk. Mix them for about 2 minutes at medium speed before stirring in the shredded coconut and chopped toasted pecans.

Step 4: Once the batter is all set, pour it into the prepared pans. The batter will spread moderately thin if you’re using 9-inch pans.

Step 5: Place inside the preheated oven and bake for 15 to 17 minutes or until the cakes are done.

Step 6: Once the cakes are done, remove from the oven and let them cool on wire racks for at least 10 minutes.

Step 7: After 10 minutes, remove the cakes from the pan and allow them to cool completely on wire racks.

Step 8: To make the frosting, combine the cream cheese and butter. Mix thoroughly. Then, slowly add in the confectioner’s sugar while mixing continuously until the frosting has a fluffy consistency. Stir in the vanilla and mix well.

Step 10: Frost the cooled cake between layers, sides, and top. And garnish with toasted pecans that are cut in half. Enjoy!

Perfect Italian Cream Cake

Rebecca Serves: 12 | Prep: 15 Min | Cook: 15 Min This cake is gorgeous and pretty amazing! It is perfect for any occasion or even on regular days when you’re… Main Dish Recipes Perfect Italian Cream Cake European Print This
Serves: 12 Prep Time: 15 mins Cooking Time: 15 mins 15 mins
Nutrition facts: 200 calories 20 grams fat
Rating: 5.0/5
( 1 voted )

Ingredients

  • 1 box white cake mix with pudding
  • 3 large eggs
  • 1/4 cup oil
  • 1 teaspoon vanilla extract
  • 1 1/4 cups buttermilk
  • 3 1/2 oz shredded coconut (about 1 1/2 cups; 1/2 a 7 oz bag)
  • 2/3 cup chopped pecans, toasted
  • FOR THE CREAM CHEESE FROSTING:
  • 16 oz cream cheese, room temperature
  • 1 cup butter, room temperature
  • 32 oz confectioners' sugar
  • 2 1/2 teaspoons vanilla extract

Instructions

Step 1: Prepare the oven. Preheat it to 350 degrees.

Step 2: Grease and flour three 9-inch pans or 8-inch pans if you prefer a taller cake.

Step 3: Combine the cake mix with pudding, eggs, vanilla extract, and buttermilk. Mix them for about 2 minutes at medium speed before stirring in the shredded coconut and chopped toasted pecans.

Step 4: Once the batter is all set, pour it into the prepared pans. The batter will spread moderately thin if you're using 9-inch pans.

Step 5: Place inside the preheated oven and bake for 15 to 17 minutes or until the cakes are done.

Step 6: Once the cakes are done, remove from the oven and let them cool on wire racks for at least 10 minutes.

Step 7: After 10 minutes, remove the cakes from the pan and allow them to cool completely on wire racks.

Step 8: To make the frosting, combine the cream cheese and butter. Mix thoroughly. Then, slowly add in the confectioner's sugar while mixing continuously until the frosting has a fluffy consistency. Stir in the vanilla and mix well.

Step 10: Frost the cooled cake between layers, sides, and top. And garnish with toasted pecans that are cut in half. Enjoy!

August 5, 2020 0 comment
0 FacebookTwitterPinterestEmail
Main Dish Recipes

Runza Casserole

by Rebecca August 5, 2020
written by Rebecca

Serves: 8 | Prep: 20 Min | Cook: 40 Min

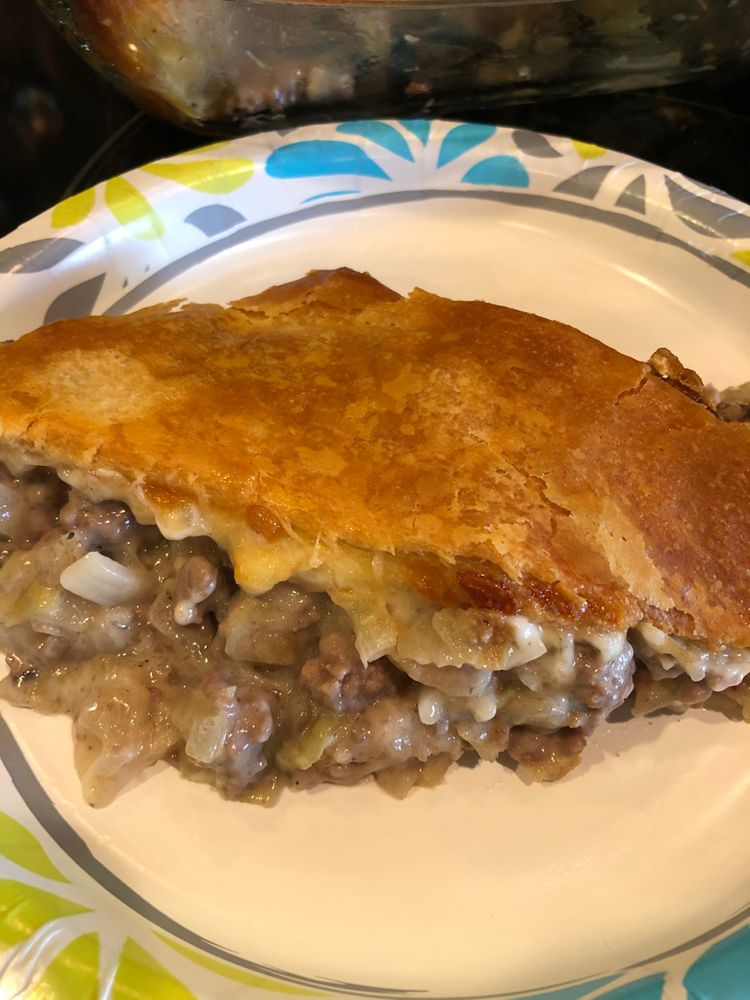
This is an amazing dish from Nebraska that has two layers of crescent roll dough and loaded with meat, vegetable, and cheese. A world-famous sandwich inspired that’s super delicious, filling, and budget-friendy. This recipe for Runza Casserole can easily feed the crowd! I have never been to Nebraska, but a lot of my friends testified that this is like the real thing! This has been my absolute favorite because it’s pretty straightforward and requires only a few simple ingredients that transform into a savory, comforting, and mouth-watering dish.

This casserole is freaking delicious and will undoubtedly make your mouth water! One bite and you’ll get hooked! It is perfect to serve at any time of the day.

Ingredients

2 lb hamburger

2 finely chopped onions

4 cups fresh chopped cabbage

salt and pepper to taste

2 pkg refrigerated crescent rolls

1 lb shredded mozzarella cheese

How to Make Runza Casserole

Step 1: Prepare the oven. Preheat it to 350 degrees.

Step 2: Unroll a tube of crescent rolls into the bottom of a 9 x 13 x 2-inch pan. Place inside the preheated oven and bake for about 7 minutes or until brown.

Step 3: Meanwhile, in a skillet, brown the hamburger and onion. You can add your choice of thickener if you prefer a more gravy-like texture.

Step 4: Once done, drain any excess oil from the hamburger before adding in the cabbage. Allow it to steam for several minutes.

Step 5: Sprinkle some salt and pepper to taste.

Step 6: When the hamburger and cabbage mixture is done, spread it over the baked crescent dough.

Step 7: Then, sprinkle the cheese over the meat mixture.

Step 8: Unroll the second tube of the crescent rolls on top of the cheese.

Step 9: Place inside the preheated oven again and bake for 35 to 40 minutes. Cover the casserole with foil in the last 10 minutes to soften the crust.

Runza Casserole

Rebecca Serves: 8 | Prep: 20 Min | Cook: 40 Min This is an amazing dish from Nebraska that has two layers of crescent roll dough and loaded with meat, vegetable,… Main Dish Recipes Runza Casserole European Print This
Serves: 8 Prep Time: 20 mins Cooking Time: 40 mins 40 mins
Nutrition facts: 200 calories 20 grams fat
Rating: 3.8/5
( 4 voted )

Ingredients

  • 2 lb hamburger
  • 2 finely chopped onions
  • 4 cups fresh chopped cabbage
  • salt and pepper to taste
  • 2 pkg refrigerated crescent rolls
  • 1 lb shredded mozzarella cheese

Instructions

Step 1: Prepare the oven. Preheat it to 350 degrees.

Step 2: Unroll a tube of crescent rolls into the bottom of a 9 x 13 x 2-inch pan. Place inside the preheated oven and bake for about 7 minutes or until brown.

Step 3: Meanwhile, in a skillet, brown the hamburger and onion. You can add your choice of thickener if you prefer a more gravy-like texture.

Step 4: Once done, drain any excess oil from the hamburger before adding in the cabbage. Allow it to steam for several minutes.

Step 5: Sprinkle some salt and pepper to taste.

Step 6: When the hamburger and cabbage mixture is done, spread it over the baked crescent dough.

Step 7: Then, sprinkle the cheese over the meat mixture.

Step 8: Unroll the second tube of the crescent rolls on top of the cheese.

Step 9: Place inside the preheated oven again and bake for 35 to 40 minutes. Cover the casserole with foil in the last 10 minutes to soften the crust.

August 5, 2020 0 comment
0 FacebookTwitterPinterestEmail
Main Dish Recipes

KEY LIME POKE CAKE

by Rebecca August 5, 2020
written by Rebecca

PREP TIME: 10 MINUTES | COOK TIME: 25 MINUTES | TOTAL TIME: 35 MINUTES | SERVINGS: 12 PIECES

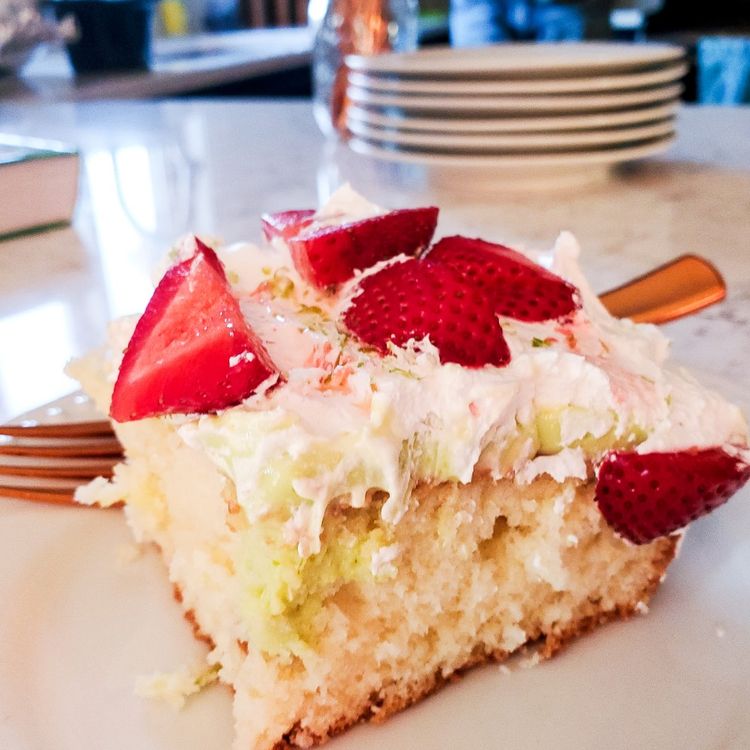
If you are looking for an easy but delightful cake, this Key Lime Cake is perfect! It’s tangy-and-sweet, light, and refreshing. A delightful spring and summer dessert that is excellent for summer parties, picnics, and potlucks! This amazing lime flavor cake is unquestionably a crowd pleaser!

Ingredients

1 box white cake mix plus ingredients called for on the box

For the Key Lime Filling:

1 can sweeten condensed milk 14 oz.

3/4 cup whipping cream

grated zest of 1/2 a lime

4 drops yellow food coloring opt.

1 drop green food coloring opt.

1/2 cup bottled key lime juice I use Nellie and Joe’s

For Topping:

1 1/4 cup whipping cream

1 teaspoon vanilla

3 tablespoons sugar

For Garnish:

Fresh strawberries sliced

lime slices optional

grated lime zest optional

HOW TO MAKE KEY LIME POKE CAKE

Step 1: To make the cake, bake it in a 9 x 13-inch pan following the package direction. Once done, remove the cake from the oven and let it cool for at least 15 minutes before poking holes all over the cake. Use the handle of the spoon to poke the cake and be careful not to poke to the bottom of the cake. Set aside.

For the Filling:

Step 2: Whisk the sweetened condensed milk, whipping cream, lime zest, and food coloring in a medium bowl. Then, stir in the key lime juice. Once the key lime juice is added the mixture will thicken rather quickly so immediately pour the filling over the cake and spread so the holes will be filled with the filling. Place the cake inside the fridge for at least an hour or overnight.

For the Topping:

Step 3: In a medium bowl, add the chilled whipping cream and with a hand mixer. mix the whipped cream until frothy.

Step 4: Stir in the vanilla and slowly add in the sugar as you mix until peaks form.

Step 5: Remove the cake from the fridge and spread the topping over the cake.

Step 6: If desired, you can garnish the cake with sliced strawberries, limes, and grated lime zest.
Recipe Notes: The bottled key lime juice is available at the grocery. They are next to bottled lime and juice.

Nutrition Facts:

Amount Per Serving: Calories 421Calories from Fat 171; Fat 19g29%; Saturated Fat 12g60%; Cholesterol 66mg22%; Sodium 356mg15%; Potassium 191mg5%; Carbohydrates 59g20%; Fiber 1g4%; Sugar 40g44%; Protein 5g10%; Vitamin A 676IU14%; Vitamin C 4mg5%; Calcium 215mg22%; Iron 1mg6%
*Percent Daily Values are based on a 2000 calorie diet

KEY LIME POKE CAKE

Rebecca PREP TIME: 10 MINUTES | COOK TIME: 25 MINUTES | TOTAL TIME: 35 MINUTES | SERVINGS: 12 PIECES If you are looking for an easy but delightful cake, this Key… Main Dish Recipes KEY LIME POKE CAKE European Print This
Serves: 12 Prep Time: 10 mins Cooking Time: 25 mins 25 mins
Nutrition facts: 421 calories 19 fat
Rating: 5.0/5
( 1 voted )

Ingredients

  • 1 box white cake mix plus ingredients called for on the box
  • For the Key Lime Filling:
  • 1 can sweeten condensed milk 14 oz.
  • 3/4 cup whipping cream
  • grated zest of 1/2 a lime
  • 4 drops yellow food coloring opt.
  • 1 drop green food coloring opt.
  • 1/2 cup bottled key lime juice I use Nellie and Joe's
  • For Topping:
  • 1 1/4 cup whipping cream
  • 1 teaspoon vanilla
  • 3 tablespoons sugar
  • For Garnish:
  • Fresh strawberries sliced
  • lime slices optional
  • grated lime zest optional

Instructions

Step 1: To make the cake, bake it in a 9 x 13-inch pan following the package direction. Once done, remove the cake from the oven and let it cool for at least 15 minutes before poking holes all over the cake. Use the handle of the spoon to poke the cake and be careful not to poke to the bottom of the cake. Set aside.

For the Filling:

Step 2: Whisk the sweetened condensed milk, whipping cream, lime zest, and food coloring in a medium bowl. Then, stir in the key lime juice. Once the key lime juice is added the mixture will thicken rather quickly so immediately pour the filling over the cake and spread so the holes will be filled with the filling. Place the cake inside the fridge for at least an hour or overnight.

For the Topping:

Step 3: In a medium bowl, add the chilled whipping cream and with a hand mixer. mix the whipped cream until frothy.

Step 4: Stir in the vanilla and slowly add in the sugar as you mix until peaks form.

Step 5: Remove the cake from the fridge and spread the topping over the cake.

Step 6: If desired, you can garnish the cake with sliced strawberries, limes, and grated lime zest.
Recipe Notes: The bottled key lime juice is available at the grocery. They are next to bottled lime and juice.

August 5, 2020 0 comment
0 FacebookTwitterPinterestEmail
Main Dish Recipes

BONNIE’S 30-MINUTE HOT DOG OR HAMBURGER BUNS

by Rebecca August 4, 2020
written by Rebecca

Serves: 10 hot dog or hamburger buns | Prep: 20 Min | Cook: 10 Min

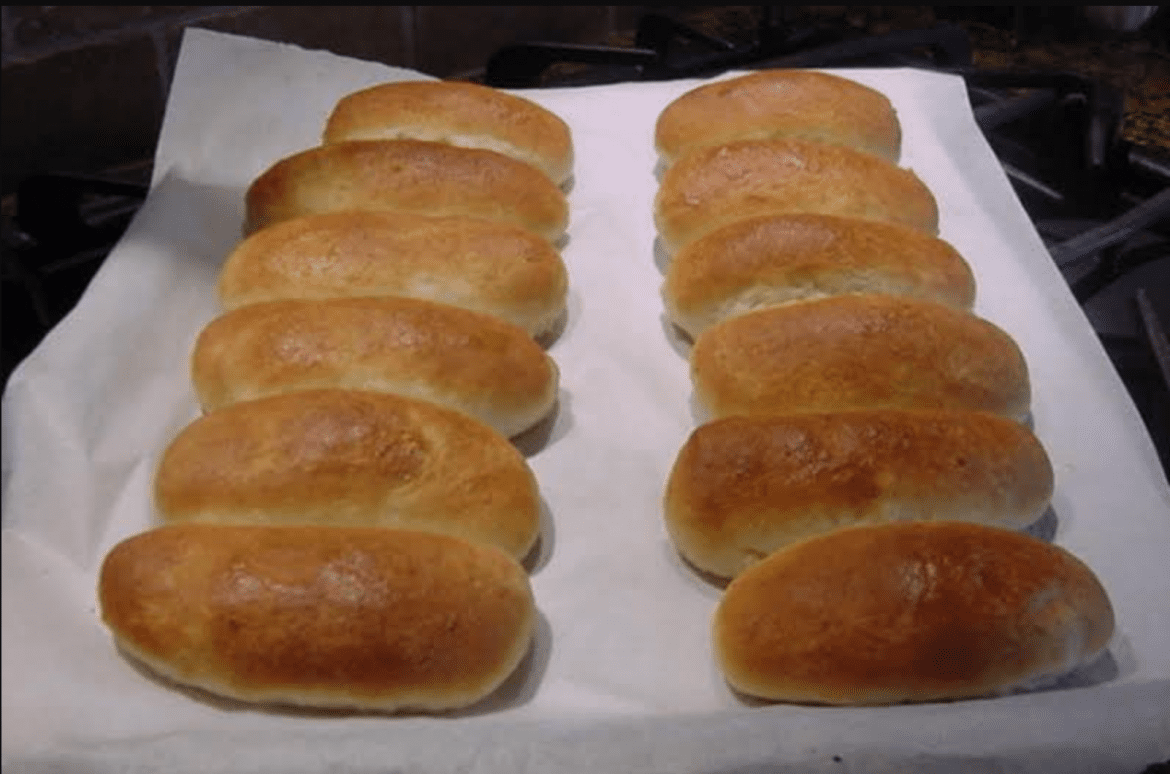
I don’t normally make buns but when I do I make sure that they will be just like the store-bought buns. And this recipe is all I need to do to achieve that. An overwhelmingly easy one-bowl recipe for these gorgeous buns that you can whip up in 30 minutes.

Ingredients

1 cup plus 3 tablespoons warm water 110 degrees

1/3 cup of canola oil

1/4 cup of sugar

2 full tablespoons active dry yeast

1 teaspoon salt

1 egg beaten

3 1/3 cups bread flour

1 pat of real butter

HOW TO MAKE BONNIE’S 30-MINUTE HOT DOG OR HAMBURGER BUNS

Step 1: Place parchment paper on a cookie sheet and set aside.

Step 2: Wash with hot water a large mixing bowl to warm it up. Place warm water, oil, sugar, and yeast into the warm bowl, then, set the timer to 15 minutes.

Step 3: Meanwhile, measure the flour and add in a teaspoon of salt and mix well. Then, beat in the eggs.

Step 4: Once the yeast is set, whisk in the egg and the flour mixture a little at a time until the mixture begins to thicken. Once the mixture has thickened, stir in the remaining flour as needed with a wooden spoon until you reach a tender dough that you can roll.

Step 5: Knead the dough into a lightly floured board and roll it to about 3/4-inch thick. Using a 4-inch glass or clean can, cut the dough and transfer to the prepared parchment paper. To make hotdog buns, you need to turn the sides down and under to overlap. Or use the whole circle to make hamburger buns.

Step 6: Once the buns are set on the parchment paper, brush the tops with melted butter.

Step 7: Place the buns inside the oven with the light on for at least 10 minutes to let the buns rise. Then, preheat the oven to 425 degrees. Bake the buns for about 10 minutes. Make sure though to remove the bunds from the oven before preheating.

TIPS:

If not yet using, you can put the buns in the fridge. They freeze well.

Make sure to use exact measurements of ingredients and do not substitute, you should follow this recipe exactly to get the same buns I have on my photo.

BONNIE'S 30-MINUTE HOT DOG OR HAMBURGER BUNS

Rebecca Serves: 10 hot dog or hamburger buns | Prep: 20 Min | Cook: 10 Min I don’t normally make buns but when I do I make sure that they will… Main Dish Recipes BONNIE’S 30-MINUTE HOT DOG OR HAMBURGER BUNS European Print This
Serves: 10 Prep Time: 20 mins Cooking Time: 10 mins 10 mins
Nutrition facts: 200 calories 20 grams fat
Rating: 5.0/5
( 1 voted )

Ingredients

  • 1 cup plus 3 tablespoons warm water 110 degrees
  • 1/3 cup of canola oil
  • 1/4 cup of sugar
  • 2 full tablespoons active dry yeast
  • 1 teaspoon salt
  • 1 egg beaten
  • 3 1/3 cups bread flour
  • 1 pat of real butter

Instructions

Step 1: Place parchment paper on a cookie sheet and set aside.

Step 2: Wash with hot water a large mixing bowl to warm it up. Place warm water, oil, sugar, and yeast into the warm bowl, then, set the timer to 15 minutes.

Step 3: Meanwhile, measure the flour and add in a teaspoon of salt and mix well. Then, beat in the eggs.

Step 4: Once the yeast is set, whisk in the egg and the flour mixture a little at a time until the mixture begins to thicken. Once the mixture has thickened, stir in the remaining flour as needed with a wooden spoon until you reach a tender dough that you can roll.

Step 5: Knead the dough into a lightly floured board and roll it to about 3/4-inch thick. Using a 4-inch glass or clean can, cut the dough and transfer to the prepared parchment paper. To make hotdog buns, you need to turn the sides down and under to overlap. Or use the whole circle to make hamburger buns.

Step 6: Once the buns are set on the parchment paper, brush the tops with melted butter.

Step 7: Place the buns inside the oven with the light on for at least 10 minutes to let the buns rise. Then, preheat the oven to 425 degrees. Bake the buns for about 10 minutes. Make sure though to remove the bunds from the oven before preheating.

TIPS:

If not yet using, you can put the buns in the fridge. They freeze well.

Make sure to use exact measurements of ingredients and do not substitute, you should follow this recipe exactly to get the same buns I have on my photo.


August 4, 2020 0 comment
0 FacebookTwitterPinterestEmail
Newer Posts
Older Posts

Popular Posts

  • 1

    Crispy Crunchy Parmesan Potatoes

    March 21, 2020
  • 2

    CROCK POT SMOTHERED PORK CHOPS

    March 21, 2020
  • Facebook
  • Twitter

@2019 - All Right Reserved.


Back To Top