Cook it once
  • Home
  • Privacy Policy
  • Recipes
    • KETO
    • LC
    • WW
  • Tips
  • Contact
Cook it once
  • Home
  • Privacy Policy
  • Recipes
    • KETO
    • LC
    • WW
  • Tips
  • Contact
Category:

General Recipes

General Recipes

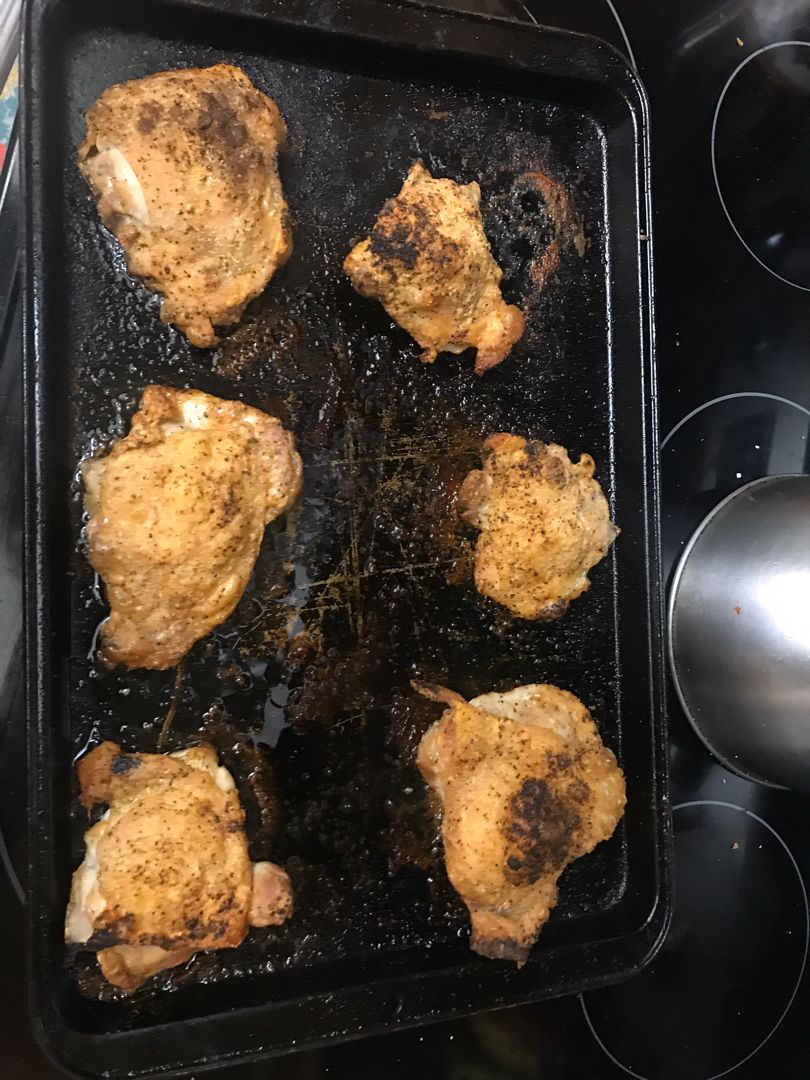
Extra Crispy Oven-Fried Chicken Thighs

by Rebecca July 15, 2022
written by Rebecca

Prep Time: 5 mins | Cook Time: 30 mins | Resting time: 5 mins | Total Time: 35 mins | Servings: 10

These are the best baked (oven-fried) chicken thighs! Extra crispy with tender and moist interior just like pan-fried or even deep-fried, but without a shipload of calories and added cholesterol.

Ingredients

1 tablespoon BAKING POWDER (do NOT use baking soda, it’s NOT the same)

10 bone-in, skin-on chicken thighs (about 3 pounds, trimmed)

2 teaspoons sweet paprika

3 tablespoons Buffalo wing sauce (plus more to taste)

1 teaspoon black pepper

2 teaspoons kosher salt (plus more to taste)

How to make Extra Crispy Oven-Fried Chicken Thighs

Step 1: Prepare the oven. Preheat it to 450 degrees F.

Step 2: Using paper towels, pat dry the chicken thighs and sprinkle with salt, paprika, pepper, and baking powder. Gently rub the seasonings on the entire chicken using your hands.

Step 3: On the cooling rack, lay the chicken thighs, leaving enough space between each piece. I grease the cooling rack with PAM. Or you can rub it with some oil.
NOTE: If you desired, you can skip using a cooling rack, but remember that the bottom of the chicken thighs will be slightly greasy. If this is your preferred method, transfer the thighs to paper towels after baking to drain the grease.

Step 4: To a large baking sheet lined with aluminium foil and/or parchment paper, transfer the chicken thighs. Place in the preheated oven. Adjust the oven temperature to 425 degrees F convection and bake the chicken thighs for about 30 minutes if you prefer moderate crispiness and supreme juiciness. For fall-off-the-bone tenderness and ultimate crispiness, bake the chicken thighs for about 35 to 40 minutes.

Step 5: When done baking, take the thighs out of the oven and allow them to rest for about 5 minutes.

Step 6: After 5 minutes, toss the chicken thighs in Buffalo wing sauce or your preferred sauce. You can also use a combination of hot wing and BBQ sauce. Or serve the crispy oven-fried chicken thighs with dipping sauce on the side. Enjoy!

Nutrition Facts:

Calories: 250 kcal | Carbohydrates: 1g | Protein: 18g | Fat: 18g | Saturated Fat: 5g | Cholesterol: 110mg | Sodium: 691mg | Potassium: 361mg | Fiber: 0g | Sugar: 0g | Vitamin A: 285IU | Calcium: 61mg | Iron: 1mg

Extra Crispy Oven-Fried Chicken Thighs

Rebecca Prep Time: 5 mins | Cook Time: 30 mins | Resting time: 5 mins | Total Time: 35 mins | Servings: 10 These are the best baked (oven-fried) chicken thighs!… General Recipes Extra Crispy Oven-Fried Chicken Thighs European Print This
Serves: 10 Prep Time: 5 mins Cooking Time: 30 mins 30 mins
Nutrition facts: 250 calories 18 fat
Rating: 5.0/5
( 1 voted )

Ingredients

  • 1 tablespoon BAKING POWDER (do NOT use baking soda, it's NOT the same)
  • 10 bone-in, skin-on chicken thighs (about 3 pounds, trimmed)
  • 2 teaspoons sweet paprika
  • 3 tablespoons Buffalo wing sauce (plus more to taste)
  • 1 teaspoon black pepper
  • 2 teaspoons kosher salt (plus more to taste)

Instructions

Step 1: Prepare the oven. Preheat it to 450 degrees F.

Step 2: Using paper towels, pat dry the chicken thighs and sprinkle with salt, paprika, pepper, and baking powder. Gently rub the seasonings on the entire chicken using your hands.

Step 3: On the cooling rack, lay the chicken thighs, leaving enough space between each piece. I grease the cooling rack with PAM. Or you can rub it with some oil.
NOTE: If you desired, you can skip using a cooling rack, but remember that the bottom of the chicken thighs will be slightly greasy. If this is your preferred method, transfer the thighs to paper towels after baking to drain the grease.

Step 4: To a large baking sheet lined with aluminium foil and/or parchment paper, transfer the chicken thighs. Place in the preheated oven. Adjust the oven temperature to 425 degrees F convection and bake the chicken thighs for about 30 minutes if you prefer moderate crispiness and supreme juiciness. For fall-off-the-bone tenderness and ultimate crispiness, bake the chicken thighs for about 35 to 40 minutes.

Step 5: When done baking, take the thighs out of the oven and allow them to rest for about 5 minutes.

Step 6: After 5 minutes, toss the chicken thighs in Buffalo wing sauce or your preferred sauce. You can also use a combination of hot wing and BBQ sauce. Or serve the crispy oven-fried chicken thighs with dipping sauce on the side. Enjoy!
July 15, 2022 0 comment
0 FacebookTwitterPinterestEmail
General Recipes

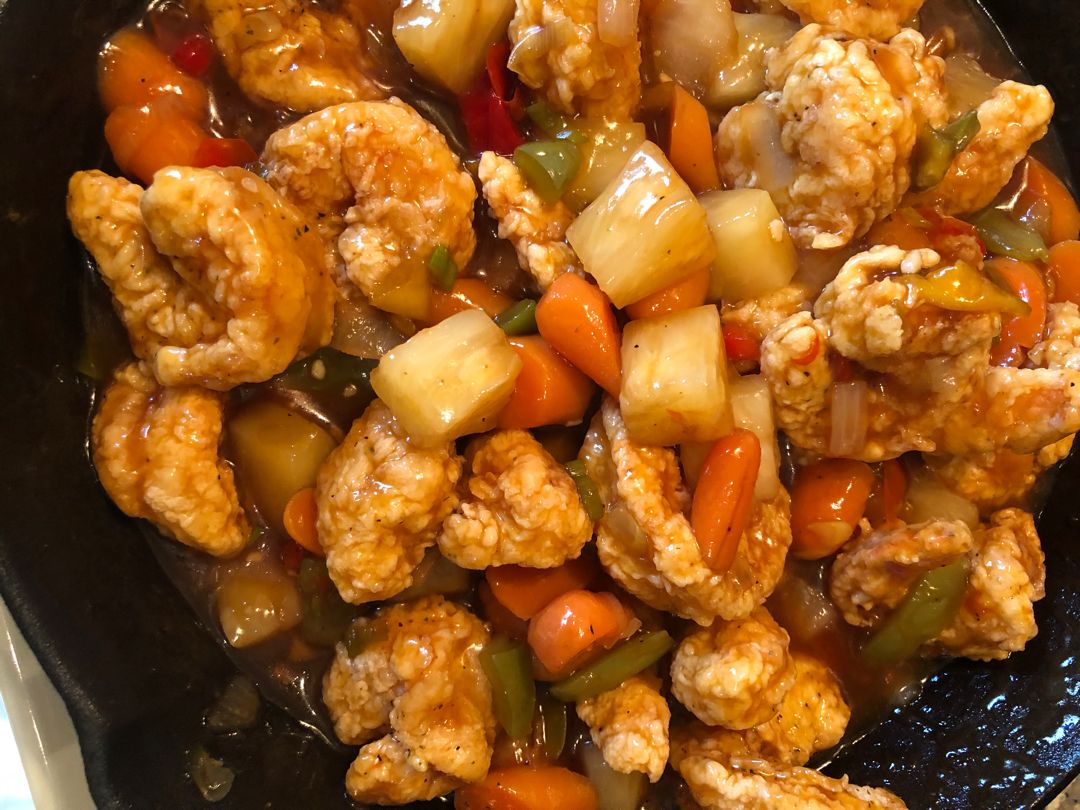
SWEET AND SOUR SHRIMP

by Rebecca July 15, 2022
written by Rebecca

Prep time: 15 mins | Cook time: 10 mins | Total time: 25 mins | Servings: 4

This dish with shrimp, green peppers, pea pods, and carrots in a scrumptious sweet and sour pineapple sauce is a pretty simple dish that you can easily whip up in minutes. Serve this over rice for an easy and quick-filling meal perfect for busy days or any time!

INGREDIENTS

2-3 tbsp oil

1 pound medium or large shrimp – shelled and deveined

1 1/2 c. sweet peppers

1 can pineapple slices (reserve the juice)

2 c. pea pods

1 c. chopped onion

1 carrot – optional

Marinade for Shrimp:

1 tbsp Soy Sauce

Pepper to taste

1 tbsp Oyster Sauce

Sweet and Sour Sauce:

3 tbsp brown sugar

1 c. juice from the canned pineapple

3 tbsp water

3 tbsp vinegar (white or rice vinegar)

2 tbsp soy sauce

2 tbsp cornstarch mixed with water

2 tbsp oyster sauce

HOW TO MAKE SWEET AND SOUR SHRIMP

Step 1: Place the shrimp in a bowl with soy sauce and oyster sauce. Toss to coat the chicken. Marinate the chicken while preparing the vegetables.

Step 2: In the meantime, chop the onions into small pieces. Into small, very thin circles, chop the carrots. Into strips, slice the sweet peppers, slicing in half if the pieces are very big.

Step 3: Next, drain the pineapple, reserving the juice. Into large chunks, cut the pineapple. Take the strings off the pods if needed.

Step 4: Whisk the sauce ingredients until well combined and set aside.

Step 5: To a saute pan, add the oil. Once the oil is hot, add the shrimp to the pan and cook for about 2 to 3 minutes, making sure not to cook the chicken all the way. On a plate, transfer the shrimp.

Step 6: To the pan, add the onions, carrots, and sweet pepper strips. Cook for a few minutes until they begin to wilt and the onion is transparent. Next, add the pineapple and pea pods. Continue to cook for another 2 minutes, stirring occasionally.

Step 7: Return the shrimp to the pan. Stir the sauce and pour this into the pan. Stir well and cook until the sauce has thickened.

Step 8: Remove from the heat when done and serve the sweet and sour shrimp right away over rice. Enjoy!

SWEET AND SOUR SHRIMP

Rebecca Prep time: 15 mins | Cook time: 10 mins | Total time: 25 mins | Servings: 4 This dish with shrimp, green peppers, pea pods, and carrots in a scrumptious… General Recipes SWEET AND SOUR SHRIMP European Print This
Serves: 4 Prep Time: 15 mins Cooking Time: 10 mins 10 mins
Nutrition facts: 200 calories 20 grams fat
Rating: 5.0/5
( 1 voted )

Ingredients

  • 2-3 tbsp oil
  • 1 pound medium or large shrimp - shelled and deveined
  • 1 1/2 c. sweet peppers
  • 1 can pineapple slices (reserve the juice)
  • 2 c. pea pods
  • 1 c. chopped onion
  • 1 carrot - optional
  • Marinade for Shrimp:
  • 1 tbsp Soy Sauce
  • Pepper to taste
  • 1 tbsp Oyster Sauce
  • Sweet and Sour Sauce:
  • 3 tbsp brown sugar
  • 1 c. juice from the canned pineapple
  • 3 tbsp water
  • 3 tbsp vinegar (white or rice vinegar)
  • 2 tbsp soy sauce
  • 2 tbsp cornstarch mixed with water
  • 2 tbsp oyster sauce

Instructions

Step 1: Place the shrimp in a bowl with soy sauce and oyster sauce. Toss to coat the chicken. Marinate the chicken while preparing the vegetables.

Step 2: In the meantime, chop the onions into small pieces. Into small, very thin circles, chop the carrots. Into strips, slice the sweet peppers, slicing in half if the pieces are very big.

Step 3: Next, drain the pineapple, reserving the juice. Into large chunks, cut the pineapple. Take the strings off the pods if needed.

Step 4: Whisk the sauce ingredients until well combined and set aside.

Step 5: To a saute pan, add the oil. Once the oil is hot, add the shrimp to the pan and cook for about 2 to 3 minutes, making sure not to cook the chicken all the way. On a plate, transfer the shrimp.

Step 6: To the pan, add the onions, carrots, and sweet pepper strips. Cook for a few minutes until they begin to wilt and the onion is transparent. Next, add the pineapple and pea pods. Continue to cook for another 2 minutes, stirring occasionally.

Step 7: Return the shrimp to the pan. Stir the sauce and pour this into the pan. Stir well and cook until the sauce has thickened.

Step 8: Remove from the heat when done and serve the sweet and sour shrimp right away over rice. Enjoy!

July 15, 2022 0 comment
0 FacebookTwitterPinterestEmail
General Recipes

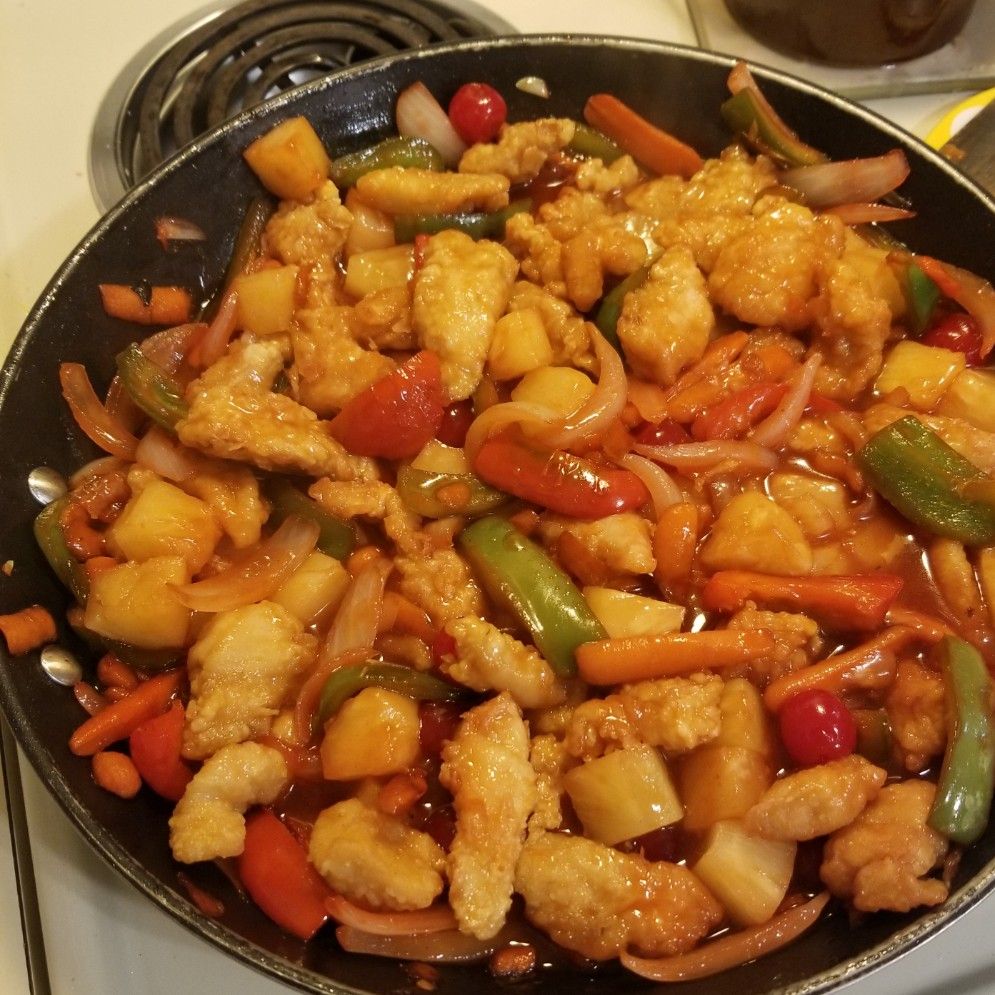
Sweet and Sour Chicken

by Rebecca July 14, 2022
written by Rebecca

PREP TIME: 45 mins | COOK TIME: 30 mins | TOTAL TIME: 1 hr 15 mins | YIELD: 6-8 servings

This sweet and sour chicken is a very simple dish, but loads with flavor. It’s a famous take-out dish that you can easily make at home at any time!

INGREDIENTS

Sauce:

¾ c. ketchup

1 20-oz. can pineapple chunks in juice, juice separated from chunks (do not discard juice)

¼ c. brown sugar

2 tsp soy sauce

½ tsp garlic powder

2 tbsp granulated sugar

½ tsp dry ginger

2 tbsp cider vinegar

1 tsp cornstarch

½ tsp kosher salt

¼ tsp white pepper

To coat the chicken:

1 ½ lbs boneless, skinless chicken thighs, trimmed and cut into ½” sized pieces

1 whole egg

1 egg white

1 tsp granulated sugar

1 tbsp soy sauce

1 tsp kosher salt

Enough vegetable oil to come a third of the way up a wok or heavy pot

1 ½ c. corn starch for coating

For the remainder of the dish:

2 tbsp peanut oil

1 10-oz.jar maraschino cherries, juice separated from cherries (but do not discard juice)

1 c. carrot, peeled and cut into ¼ slices, cut on the bias

1 tbsp soy sauce

1 ½ c. onion, cut into thick strips (vertical strips)

2 c. hot, cooked white rice

1 ½ c. green bell pepper, cut into thick strips (vertical strips)

How to make Sweet and Sour Chicken

Step 1: Combine the pineapple juice drained from canned pineapple, ketchup, vinegar, both sugars, soy sauce, garlic powder, ginger, salt, pepper, and the 1 tsp of corn starch in a very large bowl until well mixed. Set aside.

Step 2: Whisk the whole egg with egg white in a medium bowl. Add the soy sauce, sugar, and salt. Mix well until blended, then add the cut-up chicken. Toss to completely coat the chicken.

Step 3: Add the 1 ½ cups of corn starch to another medium bowl. While working in batches, dredge the chicken pieces from batter to cornstarch, completely coating every piece. To a platter, transfer the chicken. If needed, you can add more cornstarch.

Step 4: In a wok, heat the vegetable oil to 350 degrees. I recommend using a candy thermometer to maintain the same temperature.

Step 5: Into the hot oil, add the pieces of chicken (cooking in four batches) and cook for about 4 minutes, moving the chicken around to prevent them from sticking to each other. To a plate lined with paper towels, transfer the cooked chicken.

Step 6: Add the chicken to the large bowl with the sauce as soon as it drains. Repeat with the rest of the chicken.

Step 7: Whisk the cherry juice with 1 tbsp soy sauce in a small bowl until combined. Set aside.

Step 8: Heat the same (already cleaned) wok over high heat and add 2 tbsp peanut oil. Add the carrots to the wok once the oil begins shimmering and stir fry for about 2 minutes. To the edges, move the carrots, then add the onion and pepper. Stir fry for 4 minutes. Pour in the cherry juice mixture and continue to cook for another 2 minutes or until the liquid has evaporated.

Step 9: To the wok, add the pineapple chunks, cherries, cooked chicken, and sauce. Stir well and cook until heated through.

Step 10: Serve the sweet and sour chicken right away with white rice. Enjoy!

Sweet and Sour Chicken

Rebecca PREP TIME: 45 mins | COOK TIME: 30 mins | TOTAL TIME: 1 hr 15 mins | YIELD: 6-8 servings This sweet and sour chicken is a very simple dish,… General Recipes Sweet and Sour Chicken European Print This
Serves: 6-8 Prep Time: 45 mins Cooking Time: 30 mins 30 mins
Nutrition facts: 200 calories 20 grams fat
Rating: 5.0/5
( 1 voted )

Ingredients

  • Sauce:
  • ¾ c. ketchup
  • 1 20-oz. can pineapple chunks in juice, juice separated from chunks (do not discard juice)
  • ¼ c. brown sugar
  • 2 tsp soy sauce
  • ½ tsp garlic powder
  • 2 tbsp granulated sugar
  • ½ tsp dry ginger
  • 2 tbsp cider vinegar
  • 1 tsp cornstarch
  • ½ tsp kosher salt
  • ¼ tsp white pepper
  • To coat the chicken:
  • 1 ½ lbs boneless, skinless chicken thighs, trimmed and cut into ½” sized pieces
  • 1 whole egg
  • 1 egg white
  • 1 tsp granulated sugar
  • 1 tbsp soy sauce
  • 1 tsp kosher salt
  • Enough vegetable oil to come a third of the way up a wok or heavy pot
  • 1 ½ c. corn starch for coating
  • For the remainder of the dish:
  • 2 tbsp peanut oil
  • 1 10-oz.jar maraschino cherries, juice separated from cherries (but do not discard juice)
  • 1 c. carrot, peeled and cut into ¼ slices, cut on the bias
  • 1 tbsp soy sauce
  • 1 ½ c. onion, cut into thick strips (vertical strips)
  • 2 c. hot, cooked white rice
  • 1 ½ c. green bell pepper, cut into thick strips (vertical strips)

Instructions

Step 1: Combine the pineapple juice drained from canned pineapple, ketchup, vinegar, both sugars, soy sauce, garlic powder, ginger, salt, pepper, and the 1 tsp of corn starch in a very large bowl until well mixed. Set aside.

Step 2: Whisk the whole egg with egg white in a medium bowl. Add the soy sauce, sugar, and salt. Mix well until blended, then add the cut-up chicken. Toss to completely coat the chicken.

Step 3: Add the 1 ½ cups of corn starch to another medium bowl. While working in batches, dredge the chicken pieces from batter to cornstarch, completely coating every piece. To a platter, transfer the chicken. If needed, you can add more cornstarch.

Step 4: In a wok, heat the vegetable oil to 350 degrees. I recommend using a candy thermometer to maintain the same temperature.

Step 5: Into the hot oil, add the pieces of chicken (cooking in four batches) and cook for about 4 minutes, moving the chicken around to prevent them from sticking to each other. To a plate lined with paper towels, transfer the cooked chicken.

Step 6: Add the chicken to the large bowl with the sauce as soon as it drains. Repeat with the rest of the chicken.

Step 7: Whisk the cherry juice with 1 tbsp soy sauce in a small bowl until combined. Set aside.

Step 8: Heat the same (already cleaned) wok over high heat and add 2 tbsp peanut oil. Add the carrots to the wok once the oil begins shimmering and stir fry for about 2 minutes. To the edges, move the carrots, then add the onion and pepper. Stir fry for 4 minutes. Pour in the cherry juice mixture and continue to cook for another 2 minutes or until the liquid has evaporated.

Step 9: To the wok, add the pineapple chunks, cherries, cooked chicken, and sauce. Stir well and cook until heated through.

Step 10: Serve the sweet and sour chicken right away with white rice. Enjoy!

July 14, 2022 0 comment
0 FacebookTwitterPinterestEmail
General Recipes

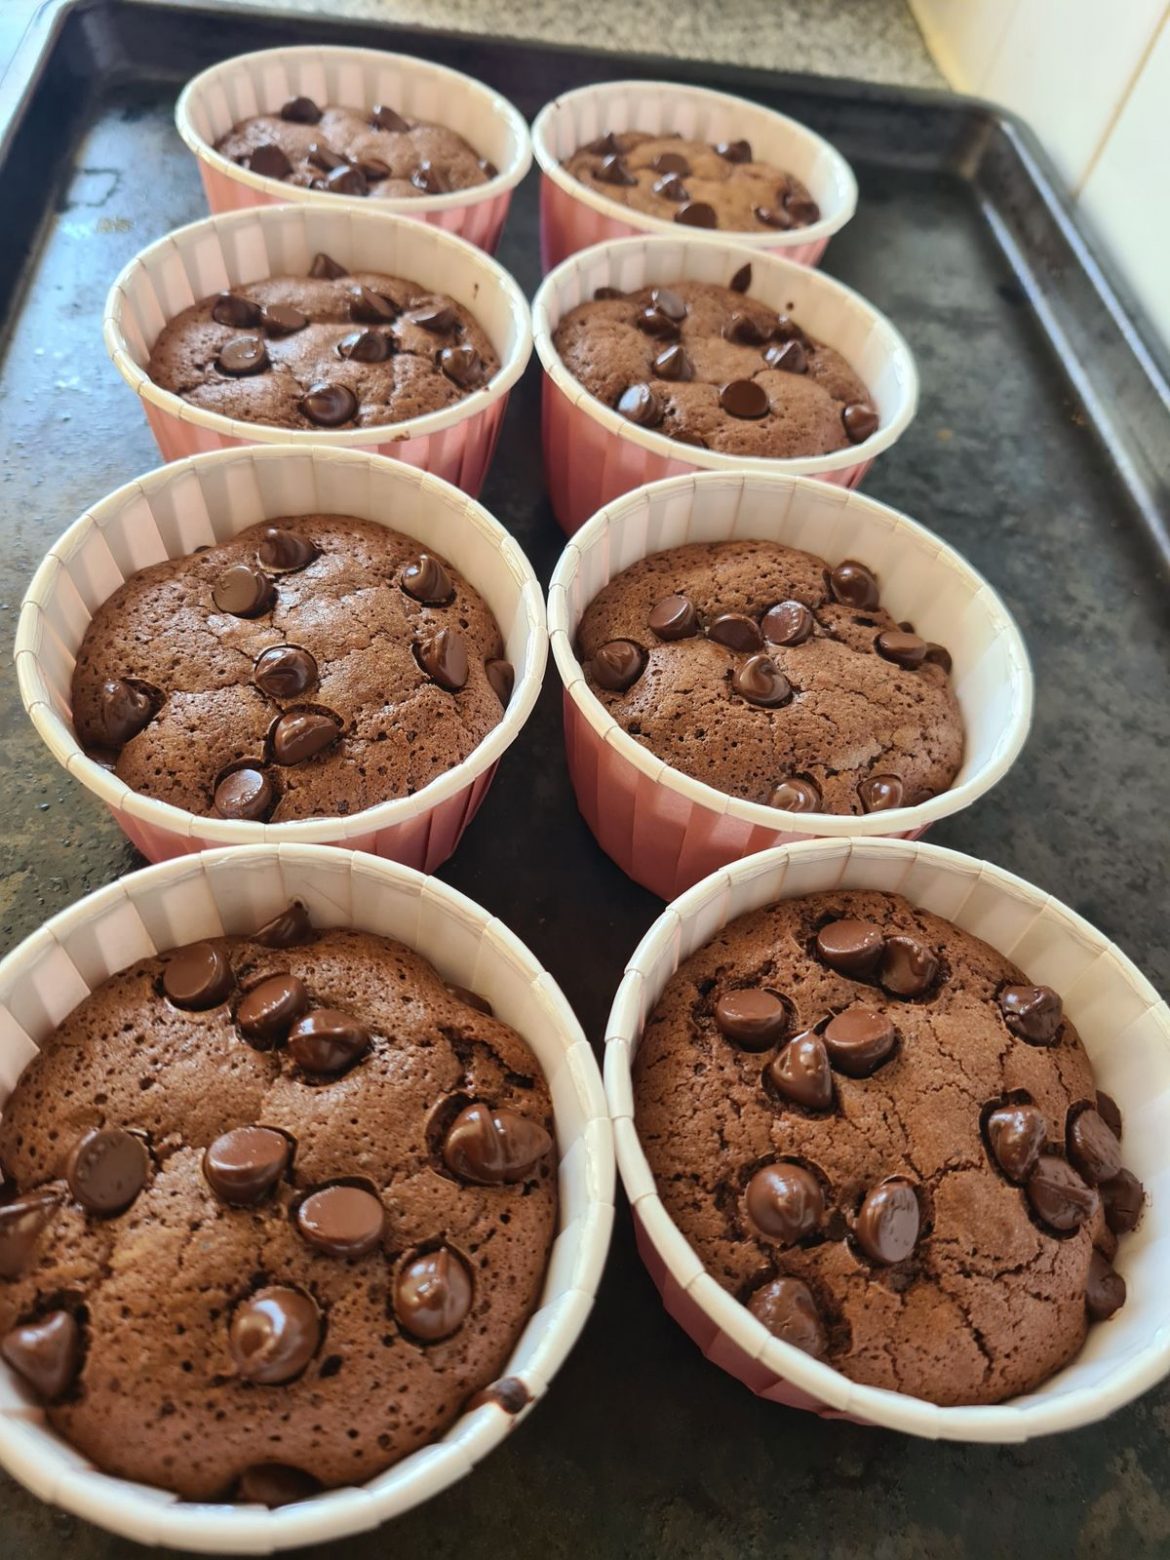
ULTIMATE BROWNIE MUFFINS

by Rebecca July 14, 2022
written by Rebecca

YIELD: 12 muffins

Dense, rich, dark, and fudgy – these are the best brownie muffins I’ve ever tasted! These ultimate brownie muffins have an impressive and addictive, deep chocolate flavor that is to die for!

Ingredients

2 large eggs

4 ounces/113 grams bittersweet or semisweet chocolate, coarsely chopped

1/3 c (35 grams/1.2 ounces) unsweetened cocoa powder (Dutch-processed)

1/3 c plus 1 tbsp (55 grams/2 ounces) all-purpose flour

½ c (1 stick/113 grams) unsalted butter, cut into small pieces

¾ c (150 grams/5.3 ounces) granulated sugar

1/8 tsp salt

HOW TO MAKE ULTIMATE BROWNIE MUFFINS

Step 1: Prepare the oven. Preheat it to 350 degrees F or 180 degrees C. Using liners, line 12 muffin cups and set them aside.

Step 2: Place the chocolate and butter in a medium heatproof bowl and heat in 20-seconds intervals in the microwave, stirring between each interval until melted. Or place the bowl over a saucepan of simmering water, stirring often. Set aside.

Step 3: Sift the flour, cocoa, and salt in a small bowl and set aside.

Step 4: Whisk the eggs and sugar using a mixer fitted with the whisk attachment on high speed for about 4 minutes or until thick and pale. Adjust the speed to low and gradually add in the chocolate mixture. End the mixer, then fold in the flour mixture with a rubber spatula until just mixed.

Step 5: Between the liners, divide the batter, filling each to about 3/4 full. Place in the preheated oven and bake for about 13 to 16 minutes or until a toothpick inserted in the middle of the muffins comes out clean. Remove from the oven and transfer to a wire rack. Allow the muffins to cool for about 10 minutes before taking the muffins out of the pan, then let them cool fully on the wire rack.

Step 6: In an airtight container, keep the muffins and store them at room temperature or in the fridge for up to 2 days. Before serving, let the muffins come to room temperature.

ULTIMATE BROWNIE MUFFINS

Rebecca YIELD: 12 muffins Dense, rich, dark, and fudgy – these are the best brownie muffins I’ve ever tasted! These ultimate brownie muffins have an impressive and addictive, deep chocolate flavor… General Recipes ULTIMATE BROWNIE MUFFINS European Print This
Serves: 12
Nutrition facts: 200 calories 20 grams fat
Rating: 5.0/5
( 1 voted )

Ingredients

  • 2 large eggs
  • 4 ounces/113 grams bittersweet or semisweet chocolate, coarsely chopped
  • 1/3 c (35 grams/1.2 ounces) unsweetened cocoa powder (Dutch-processed)
  • 1/3 c plus 1 tbsp (55 grams/2 ounces) all-purpose flour
  • ½ c (1 stick/113 grams) unsalted butter, cut into small pieces
  • ¾ c (150 grams/5.3 ounces) granulated sugar
  • 1/8 tsp salt

Instructions

Step 1: Prepare the oven. Preheat it to 350 degrees F or 180 degrees C. Using liners, line 12 muffin cups and set them aside.

Step 2: Place the chocolate and butter in a medium heatproof bowl and heat in 20-seconds intervals in the microwave, stirring between each interval until melted. Or place the bowl over a saucepan of simmering water, stirring often. Set aside.

Step 3: Sift the flour, cocoa, and salt in a small bowl and set aside.

Step 4: Whisk the eggs and sugar using a mixer fitted with the whisk attachment on high speed for about 4 minutes or until thick and pale. Adjust the speed to low and gradually add in the chocolate mixture. End the mixer, then fold in the flour mixture with a rubber spatula until just mixed.

Step 5: Between the liners, divide the batter, filling each to about 3/4 full. Place in the preheated oven and bake for about 13 to 16 minutes or until a toothpick inserted in the middle of the muffins comes out clean. Remove from the oven and transfer to a wire rack. Allow the muffins to cool for about 10 minutes before taking the muffins out of the pan, then let them cool fully on the wire rack.

Step 6: In an airtight container, keep the muffins and store them at room temperature or in the fridge for up to 2 days. Before serving, let the muffins come to room temperature.

July 14, 2022 0 comment
0 FacebookTwitterPinterestEmail
General Recipes

Chicken Shawarma Recipe – Middle Eastern, Low Carb, Keto, Paleo

by Rebecca July 14, 2022
written by Rebecca

Prep Time: 1 hr | Cook Time: 12 mins | Total Time: 1 hr 12 mins | Servings: 6

Enjoy healthy grilled chicken with warming spices and Middle Eastern flavors with this low-carb, Keto, and Paleo Chicken Shawarma recipe. If you love grilled chicken, I am pretty sure that you’ll fall head over heels for this mouthwatering chicken shawarma!

Ingredients

2 pounds boneless, skinless chicken thighs, 907 grams

Chicken Shawarma Marinade:

3 tablespoons olive oil

4 cloves garlic, minced

2 teaspoons black pepper

4 teaspoons ground cumin

3 tablespoons fresh lemon juice

2 teaspoons paprika

1 teaspoon turmeric

4 teaspoons ground coriander

1/2 teaspoon ground cloves

1/2 teaspoon cayenne pepper, or more to taste

2 teaspoons salt, fine salt, not flaked

How to make Chicken Shawarma

To a large ziplock bag, add the chicken shawarma marinade and the chicken thighs. Let the chicken marinate for 1 to 8 hours or overnight.

To Cook Chicken Shawarma on a Grill:

About 20 minutes before cooking, take the chicken from the fridge and let it come to room temperature.

Onto the hot grill grates, place the chicken thighs. Then, close the lid and cook for about 3 to 4 minutes. Flip the chicken thighs and continue to cook the other side for another 3 to 4 minutes or until cooked through and the internal temperature of the chicken reaches 165 degrees F.

To cook Chicken Shawarma on the Stove:

In a well-seasoned cast-iron skillet, place the chicken thighs and cook for about 4 to 6 minutes on each side until completely cooked and the internal temperature of the chicken reaches 165 degrees F.

To Cook Chicken Shawarma in Oven:

Using parchment paper, line a sheet pan. I do not recommend using foil as the chicken will stick to it.

Prepare the oven. Preheat it to 400 degrees F.

Place the chicken in the preheated oven and bake for about 25 to 35 minutes or until cooked through and the internal temperature of the chicken reaches 165 degrees F.

Notes:

3g net carbs per serving
Total Carbs: 3 g
Net Carbs: 3 g
Protein: 29 g

Nutrition Facts:

Amount Per Serving: Calories 258, Calories from Fat 117, Fat 13g20%, Saturated Fat 2g13%, Cholesterol 143mg48%, Sodium 914mg40%, Potassium 463mg13%, Carbohydrates 3g1%, Protein 29g58%, Vitamin A 515IU10%, Vitamin C 5.8mg7%, Calcium 39mg4%, Iron 2.7 mg15%

Chicken Shawarma Recipe - Middle Eastern, Low Carb, Keto, Paleo

Rebecca Prep Time: 1 hr | Cook Time: 12 mins | Total Time: 1 hr 12 mins | Servings: 6 Enjoy healthy grilled chicken with warming spices and Middle Eastern flavors… General Recipes Chicken Shawarma Recipe – Middle Eastern, Low Carb, Keto, Paleo European Print This
Serves: 6 Prep Time: 1 hr Cooking Time: 12 mins 12 mins
Nutrition facts: 258 calories 13 fat
Rating: 5.0/5
( 1 voted )

Ingredients

  • 2 pounds boneless, skinless chicken thighs, 907 grams
  • Chicken Shawarma Marinade:
  • 3 tablespoons olive oil
  • 4 cloves garlic, minced
  • 2 teaspoons black pepper
  • 4 teaspoons ground cumin
  • 3 tablespoons fresh lemon juice
  • 2 teaspoons paprika
  • 1 teaspoon turmeric
  • 4 teaspoons ground coriander
  • 1/2 teaspoon ground cloves
  • 1/2 teaspoon cayenne pepper, or more to taste
  • 2 teaspoons salt, fine salt, not flaked

Instructions

To a large ziplock bag, add the chicken shawarma marinade and the chicken thighs. Let the chicken marinate for 1 to 8 hours or overnight.

To Cook Chicken Shawarma on a Grill:

About 20 minutes before cooking, take the chicken from the fridge and let it come to room temperature.

Onto the hot grill grates, place the chicken thighs. Then, close the lid and cook for about 3 to 4 minutes. Flip the chicken thighs and continue to cook the other side for another 3 to 4 minutes or until cooked through and the internal temperature of the chicken reaches 165 degrees F.

To cook Chicken Shawarma on the Stove:

In a well-seasoned cast-iron skillet, place the chicken thighs and cook for about 4 to 6 minutes on each side until completely cooked and the internal temperature of the chicken reaches 165 degrees F.

To Cook Chicken Shawarma in Oven:

Using parchment paper, line a sheet pan. I do not recommend using foil as the chicken will stick to it.

Prepare the oven. Preheat it to 400 degrees F.

Place the chicken in the preheated oven and bake for about 25 to 35 minutes or until cooked through and the internal temperature of the chicken reaches 165 degrees F.

July 14, 2022 0 comment
0 FacebookTwitterPinterestEmail
General Recipes

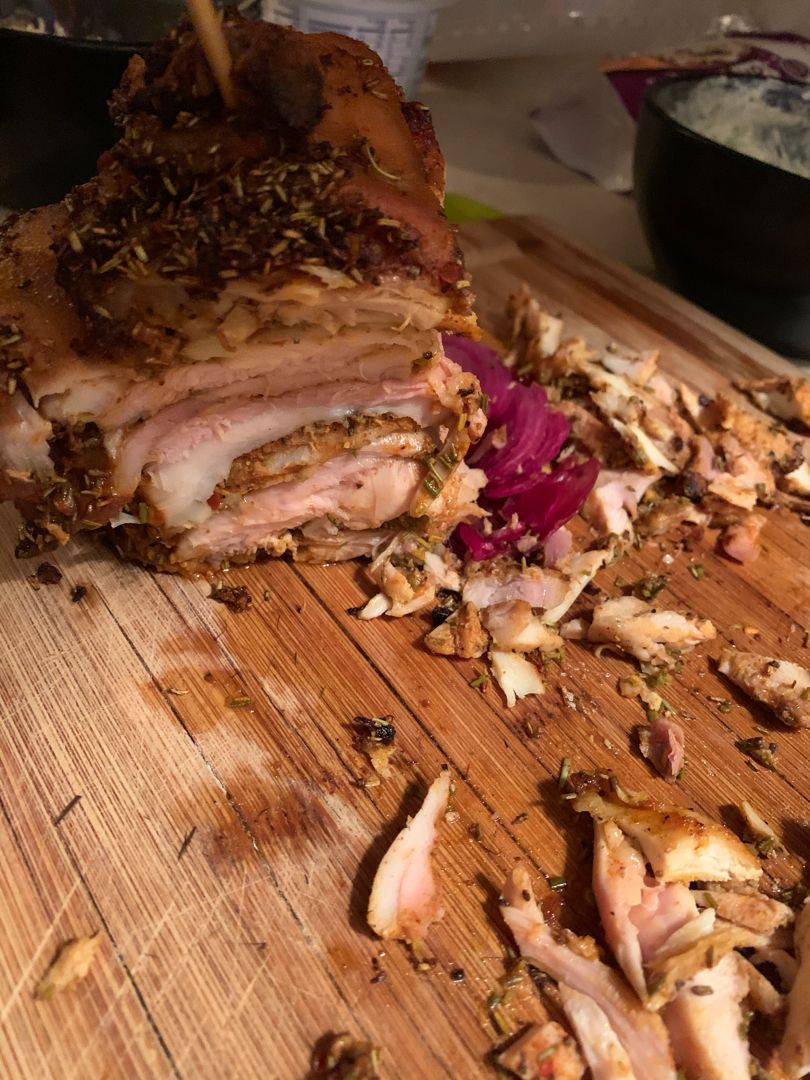
Authentic Greek Chicken Gyros Recipe with Tzatziki Sauce

by Rebecca July 14, 2022
written by Rebecca

Prep Time: 15 mins | Cook Time: 1 hr | Total Time: 1 hr 15 mins | Servings: 5 people

Insanely flavorful, tender, and juicy chicken strips. These Authentic Greek Chicken Gyros surpass my expectations! Serve this with Tzatziki sauce for a full-on experience!

Ingredients

1.32 lbs Boneless Chicken Thighs (or 600 grams)

Chicken Gyro Marinade:

¾ c. Extra Virgin Olive Oil

2 tablespoons Finely Chopped Garlic

1 teaspoon Black Peppercorns (black)

2 tablespoons Paprika

2 tablespoons Lemon Juice

2.5 tablespoons dried rosemary

2.5 tablespoons whole coriander seeds

Coarse sea salt to taste

2.5 tablespoons red chili flakes

Vertical home-made rotisserie:

1 Bamboo Skewer

½ large Onion

How to make Authentic Greek Chicken Gyros Recipe with Tzatziki Sauce

Step 1: Using a meat mallet, pound the meat to about half an inch or 1 cm thickness. Do this same step for all the chicken thighs.

Step 2: In a mortar and pestle, add the paprika, coriander seeds, peppercorns, dried rosemary, dried red chili flakes, and coarse sea salt. Grind until you have a semi-coarse powder.

Step 3: To the semi-coarse powder, add the chopped garlic and grind until the garlic is well blended.

Step 4: To the spice mix, add the extra virgin olive oil and lemon juice. Mix well using a spoon. To tenderize chicken thighs, add the marinade and mix well until the pieces of chicken are evenly coated.

Step 5: Using a cling film, wrap the container and place it in the fridge. Let the chicken marinate for at least 2 hours or preferably overnight.

Step 6: Stick the middle of a large stump of an onion (half onion) in a bamboo skewer to make a vertical pole. Then, skewer the individual pieces of the marinated chicken thighs. Do the same step until all the chickens are skewered/stacked on top of each around.

Step 7: Prepare the oven. Preheat it to 375 degrees F.

Step 8: Over the cookie tray, place the vertical rotisserie and bake in the preheated oven for about 1 hour or until the internal temperature of the meat reaches 165 degrees F.

Step 9: Let the chicken gyros cool for about 15 minutes before shaving. Serve with tons of Tzatziki sauce. Enjoy!

Nutrition Facts:

Amount Per Serving: Calories 570, Calories from Fat 182, Fat 20.2g31%, Saturated Fat 6.7g42%, Cholesterol 163mg54%, Sodium 1254mg55%, Potassium 983mg28%, Carbohydrates 47.9g16%, Fiber 4g17%, Sugar 7.9g9%, Protein 51.2g102%, Vitamin A 1200IU24%, Vitamin C 33.8mg41%, Calcium 140mg14%, Iron 4.3mg24%

Authentic Greek Chicken Gyros Recipe with Tzatziki Sauce

Rebecca Prep Time: 15 mins | Cook Time: 1 hr | Total Time: 1 hr 15 mins | Servings: 5 people Insanely flavorful, tender, and juicy chicken strips. These Authentic Greek… General Recipes Authentic Greek Chicken Gyros Recipe with Tzatziki Sauce European Print This
Serves: 5 Prep Time: 15 mins Cooking Time: 1 hr 1 hr
Nutrition facts: 570 calories 20.2 fat
Rating: 5.0/5
( 1 voted )

Ingredients

  • 1.32 lbs Boneless Chicken Thighs (or 600 grams)
  • Chicken Gyro Marinade:
  • ¾ c. Extra Virgin Olive Oil
  • 2 tablespoons Finely Chopped Garlic
  • 1 teaspoon Black Peppercorns (black)
  • 2 tablespoons Paprika
  • 2 tablespoons Lemon Juice
  • 2.5 tablespoons dried rosemary
  • 2.5 tablespoons whole coriander seeds
  • Coarse sea salt to taste
  • 2.5 tablespoons red chili flakes
  • Vertical home-made rotisserie:
  • 1 Bamboo Skewer
  • ½ large Onion

Instructions

Step 1: Using a meat mallet, pound the meat to about half an inch or 1 cm thickness. Do this same step for all the chicken thighs.

Step 2: In a mortar and pestle, add the paprika, coriander seeds, peppercorns, dried rosemary, dried red chili flakes, and coarse sea salt. Grind until you have a semi-coarse powder.

Step 3: To the semi-coarse powder, add the chopped garlic and grind until the garlic is well blended.

Step 4: To the spice mix, add the extra virgin olive oil and lemon juice. Mix well using a spoon. To tenderize chicken thighs, add the marinade and mix well until the pieces of chicken are evenly coated.

Step 5: Using a cling film, wrap the container and place it in the fridge. Let the chicken marinate for at least 2 hours or preferably overnight.

Step 6: Stick the middle of a large stump of an onion (half onion) in a bamboo skewer to make a vertical pole. Then, skewer the individual pieces of the marinated chicken thighs. Do the same step until all the chickens are skewered/stacked on top of each around.

Step 7: Prepare the oven. Preheat it to 375 degrees F.

Step 8: Over the cookie tray, place the vertical rotisserie and bake in the preheated oven for about 1 hour or until the internal temperature of the meat reaches 165 degrees F.

Step 9: Let the chicken gyros cool for about 15 minutes before shaving. Serve with tons of Tzatziki sauce. Enjoy!

July 14, 2022 0 comment
0 FacebookTwitterPinterestEmail
General Recipes

Chicken Curry with coconut milk

by Rebecca July 14, 2022
written by Rebecca

Prep Time: 10 mins | Cook Time: 15 mins | Total Time: 25 mins | Servings: 4

I always enjoy this Filipino-style Chicken Curry with coconut milk. It’s insanely delicious, very creamy, and packed with flavors. This is also pretty easy to whip up and ready in under thirty minutes. This has been one of my favorite go-to dinners for busy days.

INGREDIENTS

3 cloves garlic – minced

1 small onion – chopped

2-3 tbsp vegetable oil

1 medium carrot – cut into wedges

1 medium potato – cut into wedges

2 lbs chicken

2 tbsp fish sauce

1 tbsp paprika powder (optional)

2 tbsp curry powder

½ tsp ground black pepper

1 medium green bell pepper – cut into squares

1 piece of fresh chili pepper cut into 4-5 pieces (or dried chili flakes)

1 can (400mL) coconut milk (2 tbsp powder dissolved in water)

How to make Chicken Curry with coconut milk

Step 1: In oil, fry the potato and carrots until lightly browned around the edges and cooked. Set aside when done.

Step 2: In the rest of the oil, saute the garlic and onion over medium heat. Then, add the chicken meat and cook for about a minute on both sides. Next, add the fish sauce along with the curry powder, paprika powder, and ground pepper. Put the lid on and let everything simmer for about 5 minutes.

Step 3: Adjust the heat to low and pour in the coconut milk. Allow everything to simmer until the sauce has thickened and the chicken is cooked through.

Step 4: Now, add the carrots along with the potatoes, bell pepper, and chili. Continue to cook for a minute more.

Step 5: To a serving dish, transfer the dish and serve with rice and your preferred side. Enjoy!

NOTES:

You can swap fish sauce with 2 tsp salt or more according to taste.

Remember that when you simmer the coconut milk longer, the oilier the dish will become.

NUTRITION FACTS:

CALORIES: 594 KCAL, CARBOHYDRATES: 9G, PROTEIN: 44G, FAT: 42G, SATURATED FAT: 15G, CHOLESTEROL: 170MG, SODIUM: 881MG, POTASSIUM: 712MG, FIBER: 3G, SUGAR: 3G, VITAMIN A: 3975IU, VITAMIN C: 46.9MG, CALCIUM: 63MG, IRON: 3.6MG

Chicken Curry with coconut milk

Rebecca Prep Time: 10 mins | Cook Time: 15 mins | Total Time: 25 mins | Servings: 4 I always enjoy this Filipino-style Chicken Curry with coconut milk. It’s insanely delicious,… General Recipes Chicken Curry with coconut milk European Print This
Serves: 4 Prep Time: 10 mins Cooking Time: 15 mins 15 mins
Nutrition facts: 594 calories 42 fat
Rating: 5.0/5
( 1 voted )

Ingredients

  • 3 cloves garlic - minced
  • 1 small onion - chopped
  • 2-3 tbsp vegetable oil
  • 1 medium carrot - cut into wedges
  • 1 medium potato - cut into wedges
  • 2 lbs chicken
  • 2 tbsp fish sauce
  • 1 tbsp paprika powder (optional)
  • 2 tbsp curry powder
  • ½ tsp ground black pepper
  • 1 medium green bell pepper - cut into squares
  • 1 piece of fresh chili pepper cut into 4-5 pieces (or dried chili flakes)
  • 1 can (400mL) coconut milk (2 tbsp powder dissolved in water)

Instructions

Step 1: In oil, fry the potato and carrots until lightly browned around the edges and cooked. Set aside when done.

Step 2: In the rest of the oil, saute the garlic and onion over medium heat. Then, add the chicken meat and cook for about a minute on both sides. Next, add the fish sauce along with the curry powder, paprika powder, and ground pepper. Put the lid on and let everything simmer for about 5 minutes.

Step 3: Adjust the heat to low and pour in the coconut milk. Allow everything to simmer until the sauce has thickened and the chicken is cooked through.

Step 4: Now, add the carrots along with the potatoes, bell pepper, and chili. Continue to cook for a minute more.

Step 5: To a serving dish, transfer the dish and serve with rice and your preferred side. Enjoy!

Notes

You can swap fish sauce with 2 tsp salt or more according to taste. Remember that when you simmer the coconut milk longer, the oilier the dish will become.

July 14, 2022 0 comment
0 FacebookTwitterPinterestEmail
General Recipes

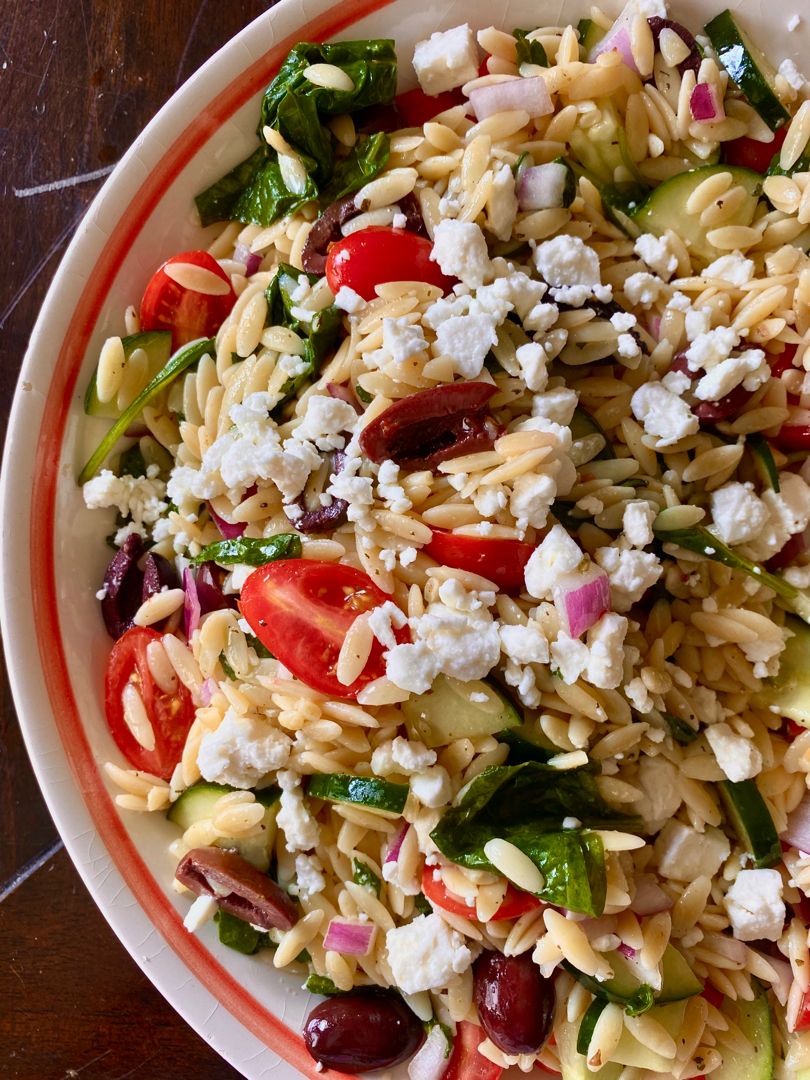
GREEK ORZO PASTA SALAD

by Rebecca July 14, 2022
written by Rebecca

PREP TIME: 10 MINS | COOK TIME: 8 MINS | TOTAL TIME: 18 MINS | YIELD: 6 servings

I love this refreshing Greek Orzo Pasta Salad. It is super easy to throw together and this gets even better when you allow it to sit in the fridge for long. The perfect dish to serve during the hot summer, at parties, or if you enjoy meal prepping.

INGREDIENTS

⅓ c. olive oil

8 ounces of Orzo pasta

1 c. cherry tomatoes, sliced in half

½ c. red onion, thinly sliced

1 c. English cucumber, diced

⅓ c. kalamata olives, sliced in half

¼ c. parsley, chopped

¼ c. red wine vinegar

¼ c. feta cheese

1 lemon, freshly squeezed juice

½ teaspoon kosher salt

½ teaspoon ground black pepper

1 ½ teaspoons dried oregano

HOW TO MAKE GREEK ORZO PASTA SALAD

Step 1: Following the package directions, cook the pasta in a small pot until al dente. Drain when done, rinse, and set aside.

Step 2: Place the olive oil, red wine vinegar, lemon juice, oregano, salt, and pepper in a small bowl. Mix well until blended and set aside.

Step 3: Add all the ingredients including the vinaigrette to a large mixing bowl. Mix well until everything is combined.

Step 4: Place in the fridge for at least an hour.

NOTES:

ADD-INS plus SUBSTITUTIONS:

You can add some pepperoncini peppers if you love spicy foods.

Feel free to swap feta with crumbled goat cheese.

PASTA:

For this recipe, you are welcome to use any type of pasta.

Do not overcook the pasta to prevent it from getting soggy.

Make sure the orzo is cooled before adding the remaining ingredients.

VINAIGRETTE:

Let the dish marinate for at least 1 hour in the fridge before serving so you can enjoy that refreshing bite. This will also let everything marinate and meld with the vinaigrette. Remember that this pasta gets even better the longer it sits in the fridge!

STORING/LEFTOVERS:

Keep any leftovers in the fridge.

If needed, lightly drizzle with olive oil before serving.

NUTRITION FACTS:

YIELD: 6 SERVING SIZE: 1
Amount Per Serving: CALORIES: 266 | TOTAL FAT: 15g | SATURATED FAT: 3g | TRANS FAT: 0g | UNSATURATED FAT: 12g | CHOLESTEROL: 6mg | SODIUM: 134mg | CARBOHYDRATES: 28g | FIBER: 2g | SUGAR: 8g | PROTEIN: 5g

GREEK ORZO PASTA SALAD

Rebecca PREP TIME: 10 MINS | COOK TIME: 8 MINS | TOTAL TIME: 18 MINS | YIELD: 6 servings I love this refreshing Greek Orzo Pasta Salad. It is super easy… General Recipes GREEK ORZO PASTA SALAD European Print This
Serves: 6 Prep Time: 10 mins Cooking Time: 8 mins 8 mins
Nutrition facts: 266 calories 15 fat
Rating: 5.0/5
( 1 voted )

Ingredients

  • ⅓ c. olive oil
  • 8 ounces of Orzo pasta
  • 1 c. cherry tomatoes, sliced in half
  • ½ c. red onion, thinly sliced
  • 1 c. English cucumber, diced
  • ⅓ c. kalamata olives, sliced in half
  • ¼ c. parsley, chopped
  • ¼ c. red wine vinegar
  • ¼ c. feta cheese
  • 1 lemon, freshly squeezed juice
  • ½ teaspoon kosher salt
  • ½ teaspoon ground black pepper
  • 1 ½ teaspoons dried oregano

Instructions

Step 1: Following the package directions, cook the pasta in a small pot until al dente. Drain when done, rinse, and set aside.

Step 2: Place the olive oil, red wine vinegar, lemon juice, oregano, salt, and pepper in a small bowl. Mix well until blended and set aside.

Step 3: Add all the ingredients including the vinaigrette to a large mixing bowl. Mix well until everything is combined.

Step 4: Place in the fridge for at least an hour.

Notes

ADD-INS plus SUBSTITUTIONS: You can add some pepperoncini peppers if you love spicy foods. Feel free to swap feta with crumbled goat cheese. PASTA: For this recipe, you are welcome to use any type of pasta. Do not overcook the pasta to prevent it from getting soggy. Make sure the orzo is cooled before adding the remaining ingredients. VINAIGRETTE: Let the dish marinate for at least 1 hour in the fridge before serving so you can enjoy that refreshing bite. This will also let everything marinate and meld with the vinaigrette. Remember that this pasta gets even better the longer it sits in the fridge! STORING/LEFTOVERS: Keep any leftovers in the fridge. If needed, lightly drizzle with olive oil before serving.

July 14, 2022 0 comment
0 FacebookTwitterPinterestEmail
General Recipes

Beef Tips & Gravy

by Rebecca July 14, 2022
written by Rebecca

Prep time: 10 mins | Cook time: 1 hr 45 mins | Total time: 1 hr 55 mins | Servings: 4

This beef tip and gravy has been my long-time favorite dish. It’s a very delicious dish with tender beef chunks in a rich brown gravy that is best served over mashed potatoes, pasta noodles, or rice. The best part of this beef tips and gravy is this makes for amazing leftovers! Simply place any leftovers in an airtight container and store them in the fridge. Before serving, reheat either in the microwave or stovetop with a dash of salt and pepper. You can even store these beef tips and gravy in the freezer for up to 2 months!

Ingredients

2 lbs cubed chuck or stew meat

2 tbsp olive oil

1 onion, chopped

10 ½ oz. beef broth

1 tbsp Worcestershire sauce

10 ½ oz. French onion soup, condensed

salt & pepper to taste

1 bay leaf

To thicken gravy:

1/3 c. water

3 tbsp cornstarch

How to make Beef Tips & Gravy

Step 1: Heat 1 tbsp olive oil in a large pot or Dutch oven over medium-high heat. In the meantime, season the beef with salt and pepper. Place in the pot and sear the beef in small batches until browned. Set the beef aside when done.

Step 2: Adjust the heat to medium. In the same pan, add the rest of the oil. Then, add the onion and cook for about 10 minutes or until tender.

Step 3: To the pot, add the beef, broth, soup, Worcestershire sauce, and bay leaf. Bring everything to a boil, put the lid on, and decrease the heat. Simmer for about 1 1/2 to 2 hours or until beef is fork tender.

Step 4: Whisk the cornstarch with 1/3 cup of cold water. Slowly pour this into the beef, stirring constantly until you have reached your preferred consistency.

Step 5: Season with salt and pepper to taste. Then, remove the bay leaf and discard it.

Step 6: Serve the beef tips and gravy over mashed potatoes, pasta noodles, or rice. Enjoy!

Nutrition Facts:

Serving: 4g | Calories: 448 | Carbohydrates: 12g | Protein: 53g | Fat: 19g | Saturated Fat: 5g | Cholesterol: 144mg | Sodium: 692mg | Potassium: 1327mg | Fiber: 1g | Sugar: 4g | Vitamin C: 3mg | Calcium: 66mg | Iron: 5mg

Beef Tips & Gravy

Rebecca Prep time: 10 mins | Cook time: 1 hr 45 mins | Total time: 1 hr 55 mins | Servings: 4 This beef tip and gravy has been my long-time… General Recipes Beef Tips & Gravy European Print This
Serves: 4 Prep Time: 10 mins Cooking Time: 1 hr 45 mins 1 hr 45 mins
Nutrition facts: 448 calories 19 fat
Rating: 5.0/5
( 1 voted )

Ingredients

  • 2 lbs cubed chuck or stew meat
  • 2 tbsp olive oil
  • 1 onion, chopped
  • 10 ½ oz. beef broth
  • 1 tbsp Worcestershire sauce
  • 10 ½ oz. French onion soup, condensed
  • salt & pepper to taste
  • 1 bay leaf
  • To thicken gravy:
  • 1/3 c. water
  • 3 tbsp cornstarch

Instructions

Step 1: Heat 1 tbsp olive oil in a large pot or Dutch oven over medium-high heat. In the meantime, season the beef with salt and pepper. Place in the pot and sear the beef in small batches until browned. Set the beef aside when done.

Step 2: Adjust the heat to medium. In the same pan, add the rest of the oil. Then, add the onion and cook for about 10 minutes or until tender.

Step 3: To the pot, add the beef, broth, soup, Worcestershire sauce, and bay leaf. Bring everything to a boil, put the lid on, and decrease the heat. Simmer for about 1 1/2 to 2 hours or until beef is fork tender.

Step 4: Whisk the cornstarch with 1/3 cup of cold water. Slowly pour this into the beef, stirring constantly until you have reached your preferred consistency.

Step 5: Season with salt and pepper to taste. Then, remove the bay leaf and discard it.

Step 6: Serve the beef tips and gravy over mashed potatoes, pasta noodles, or rice. Enjoy!

July 14, 2022 0 comment
0 FacebookTwitterPinterestEmail
General Recipes

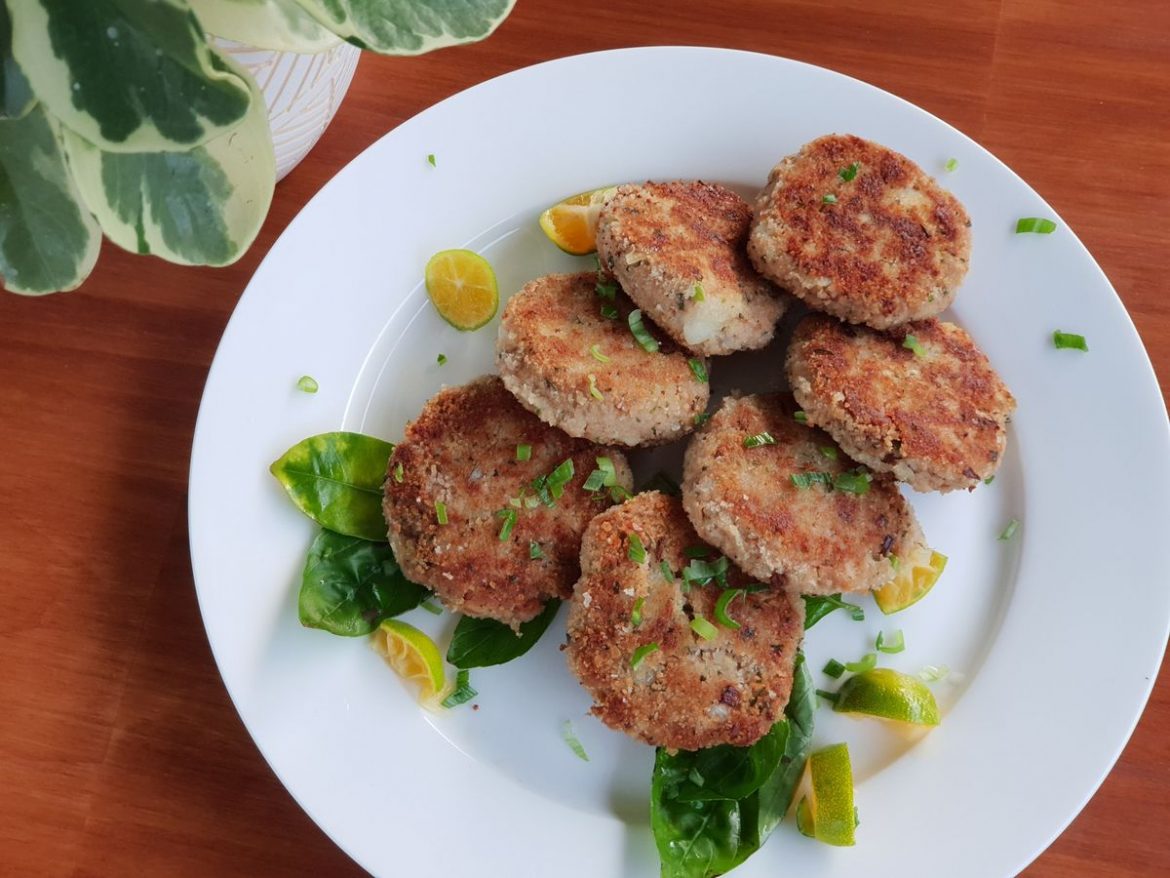
Crispy Tuna Patties

by Rebecca July 14, 2022
written by Rebecca

PREP TIME: 10 mins | COOK TIME: 8 mins | SERVINGS: 5 people

These delicious, crispy tuna patties, also known as tuna fish cakes, are very easy and quick to throw together. The perfect recipe to use up cans of tuna. You’ll be surprised how cans of tuna can make a filling, great dinner option with this simple recipe!

INGREDIENTS

3 tablespoons mayonnaise

¼ c Panko plus an additional 2 tablespoons

1 12-ounces can of tuna in water, drained very well

½ c. Parmesan

3 teaspoons minced garlic

¼ teaspoon dried dill

2 teaspoons dried parsley

¼ teaspoon onion powder

⅛ teaspoon crushed red pepper

½ teaspoon celery seeds

½ c. chopped red onions

2 teaspoons lemon zest

1 5-ounces tuna in water, drained very well

3 eggs, lightly beaten

3 teaspoons lemon juice

2 teaspoons pepper

1 ¼ teaspoons salt

Patties:

6 tablespoons vegetable oil, add more as needed

¼-1/2 c panko

How to make Crispy Tuna Patties

Step 1: In a bowl, place all the ingredients and mix well until blended.

Step 2: Scoop the mixture using a 1/4 measuring cup and form it into patties.

Patties:

Step 3: To a shallow dish, add 1/4 c of panko, making sure to lightly coast both sides of the bowl with panko. If needed, add more panko.

Step 4: Drizzle 3 tablespoons of oil in a large skillet over medium-high heat. You can add more oil if needed. Once the oil is hot, add around 4 to 5 patties to the skillet. Flatten the cakes using a spatula to about 1/8-inch thick. Cook the patties for about 3 to 4 minutes or until golden brown. Carefully flip the patties.

Step 5: On a paper towel-lined plate, transfer the cooked patties. Repeat until you have cooked the remaining patties.

Step 6: Let the crispy tuna patties cool for a couple of minutes, then serve. Enjoy!

NUTRITION FACTS:

Calories: 360 kcal, Carbohydrates: 7g, Protein: 20g, Fat: 24g, Saturated Fat: 16g, Cholesterol: 129mg, Sodium: 1043mg, Potassium: 169mg, Fiber: 1g, Sugar: 1g, Vitamin A: 271IU, Vitamin C: 2mg, Calcium: 162mg, Iron: 2mg

Crispy Tuna Patties

Rebecca PREP TIME: 10 mins | COOK TIME: 8 mins | SERVINGS: 5 people These delicious, crispy tuna patties, also known as tuna fish cakes, are very easy and quick to… General Recipes Crispy Tuna Patties European Print This
Serves: 5 Prep Time: 10 mins Cooking Time: 8 mins 8 mins
Nutrition facts: 360 calories 24 fat
Rating: 5.0/5
( 1 voted )

Ingredients

  • 3 tablespoons mayonnaise
  • ¼ c Panko plus an additional 2 tablespoons
  • 1 12-ounces can of tuna in water, drained very well
  • ½ c. Parmesan
  • 3 teaspoons minced garlic
  • ¼ teaspoon dried dill
  • 2 teaspoons dried parsley
  • ¼ teaspoon onion powder
  • ⅛ teaspoon crushed red pepper
  • ½ teaspoon celery seeds
  • ½ c. chopped red onions
  • 2 teaspoons lemon zest
  • 1 5-ounces tuna in water, drained very well
  • 3 eggs, lightly beaten
  • 3 teaspoons lemon juice
  • 2 teaspoons pepper
  • 1 ¼ teaspoons salt
  • Patties:
  • 6 tablespoons vegetable oil, add more as needed
  • ¼-1/2 c panko

Instructions

Step 1: In a bowl, place all the ingredients and mix well until blended.

Step 2: Scoop the mixture using a 1/4 measuring cup and form it into patties.

Patties:

Step 3: To a shallow dish, add 1/4 c of panko, making sure to lightly coast both sides of the bowl with panko. If needed, add more panko.

Step 4: Drizzle 3 tablespoons of oil in a large skillet over medium-high heat. You can add more oil if needed. Once the oil is hot, add around 4 to 5 patties to the skillet. Flatten the cakes using a spatula to about 1/8-inch thick. Cook the patties for about 3 to 4 minutes or until golden brown. Carefully flip the patties.

Step 5: On a paper towel-lined plate, transfer the cooked patties. Repeat until you have cooked the remaining patties.

Step 6: Let the crispy tuna patties cool for a couple of minutes, then serve. Enjoy!

July 14, 2022 0 comment
0 FacebookTwitterPinterestEmail
Newer Posts
Older Posts

Popular Posts

  • 1

    Crispy Crunchy Parmesan Potatoes

    March 21, 2020
  • 2

    CROCK POT SMOTHERED PORK CHOPS

    March 21, 2020
  • Facebook
  • Twitter

@2019 - All Right Reserved.


Back To Top