Cook it once
  • Home
  • Privacy Policy
  • Recipes
    • KETO
    • LC
    • WW
  • Tips
  • Contact
Cook it once
  • Home
  • Privacy Policy
  • Recipes
    • KETO
    • LC
    • WW
  • Tips
  • Contact
Category:

General Recipes

General Recipes

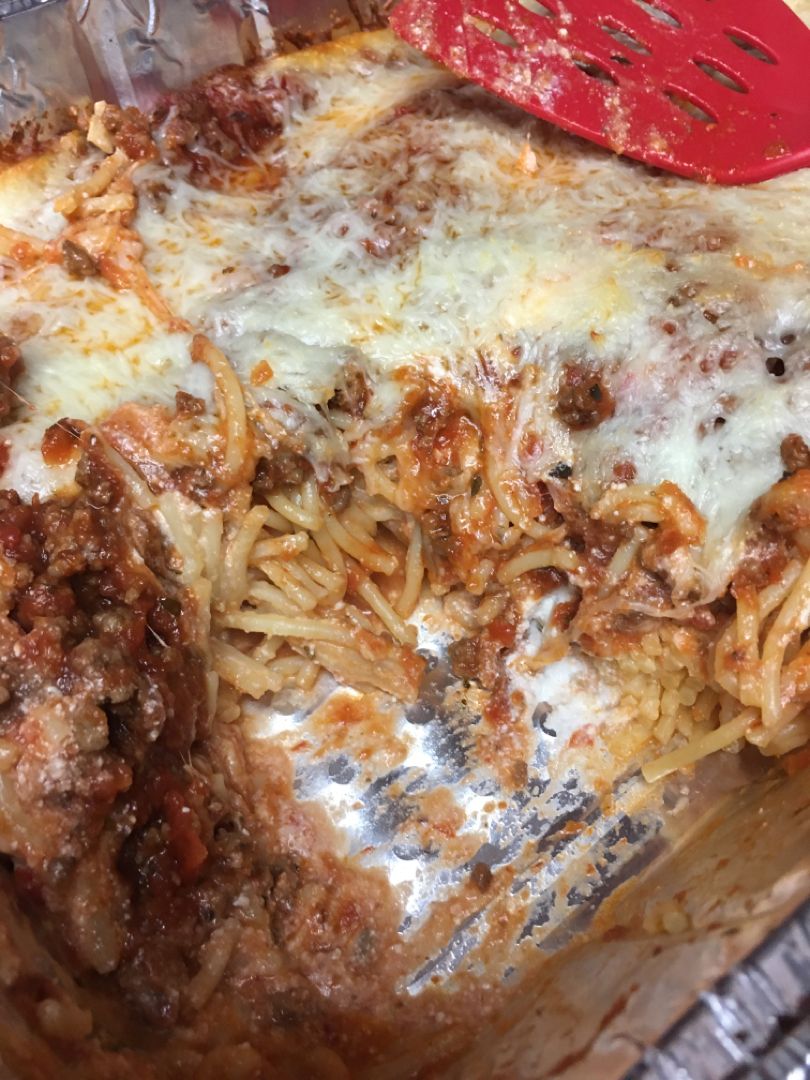
Baked Beef Spaghetti: A Delicious And Easy To Prepare Dish

by Rebecca July 27, 2022
written by Rebecca

Prep time: 15 mins | Cook time: 1 hr | Serves: 6

This beef-baked spaghetti is a very delicious pasta dinner. It is incredibly easy to prepare, and it takes only about an hour to make. Serve this hot with a simple side salad for a family-friendly meal any time!

INGREDIENTS

2 tablespoons olive oil

1 pound of ground beef

1 1-pound box of spaghetti

1 white onion, finely chopped

3 cloves garlic, minced

1 teaspoon Italian seasoning

1/2 c. chopped fresh basil

1/4 c. grated Parmesan

1 c. shredded mozzarella

1 28-ounces can of San Marzano tomatoes

Chopped fresh parsley (for garnish)

salt and pepper to taste

How to make Baked Beef Spaghetti

Step 1: Prepare the oven. Preheat it to 350 degrees F.

Step 2: Following the package directions, cook the pasta until al dente. Drain when done and set aside.

Step 3: Heat the olive oil in a large skillet over medium heat. Once the oil is hot, add the onions to the skillet and saute for about 5 minutes or until the onions are beginning to turn translucent.

Step 4: To the onions in the skillet, add the garlic and continue to cook for a minute more. Next, add the ground beef and season with salt, pepper, and Italian seasoning. Cook the meat for about 8 minutes or until no longer pink.

Step 5: Place the tomatoes in a medium bowl and crush them by hand. Over the beef, pour the tomatoes and the juice. Let it simmer for about 10 minutes. Take the skillet off the heat and add the chopped basil and spaghetti. Toss well. If needed, season with extra salt and pepper.

Step 6: At this point, you can transfer the mixture to a casserole dish if it won’t fit into the skillet. Then, top with the cheeses. Place in the preheated oven and bake for about 20 minutes or until the cheese has melted and started to brown.

Step 7: Remove from the oven when done and top the spaghetti with some chopped parsley. Enjoy hot!

Baked Beef Spaghetti: A Delicious And Easy To Prepare Dish

Rebecca Prep time: 15 mins | Cook time: 1 hr | Serves: 6 This beef-baked spaghetti is a very delicious pasta dinner. It is incredibly easy to prepare, and it takes… General Recipes Baked Beef Spaghetti: A Delicious And Easy To Prepare Dish European Print This
Serves: 6 Prep Time: 15 mins Cooking Time: 1 hr 1 hr
Nutrition facts: 200 calories 20 grams fat
Rating: 5.0/5
( 1 voted )

Ingredients

  • 2 tablespoons olive oil
  • 1 pound of ground beef
  • 1 1-pound box of spaghetti
  • 1 white onion, finely chopped
  • 3 cloves garlic, minced
  • 1 teaspoon Italian seasoning
  • 1/2 c. chopped fresh basil
  • 1/4 c. grated Parmesan
  • 1 c. shredded mozzarella
  • 1 28-ounces can of San Marzano tomatoes
  • Chopped fresh parsley (for garnish)
  • salt and pepper to taste

Instructions

Step 1: Prepare the oven. Preheat it to 350 degrees F.

Step 2: Following the package directions, cook the pasta until al dente. Drain when done and set aside.

Step 3: Heat the olive oil in a large skillet over medium heat. Once the oil is hot, add the onions to the skillet and saute for about 5 minutes or until the onions are beginning to turn translucent.

Step 4: To the onions in the skillet, add the garlic and continue to cook for a minute more. Next, add the ground beef and season with salt, pepper, and Italian seasoning. Cook the meat for about 8 minutes or until no longer pink.

Step 5: Place the tomatoes in a medium bowl and crush them by hand. Over the beef, pour the tomatoes and the juice. Let it simmer for about 10 minutes. Take the skillet off the heat and add the chopped basil and spaghetti. Toss well. If needed, season with extra salt and pepper.

Step 6: At this point, you can transfer the mixture to a casserole dish if it won’t fit into the skillet. Then, top with the cheeses. Place in the preheated oven and bake for about 20 minutes or until the cheese has melted and started to brown.

Step 7: Remove from the oven when done and top the spaghetti with some chopped parsley. Enjoy hot!
July 27, 2022 0 comment
0 FacebookTwitterPinterestEmail
General Recipes

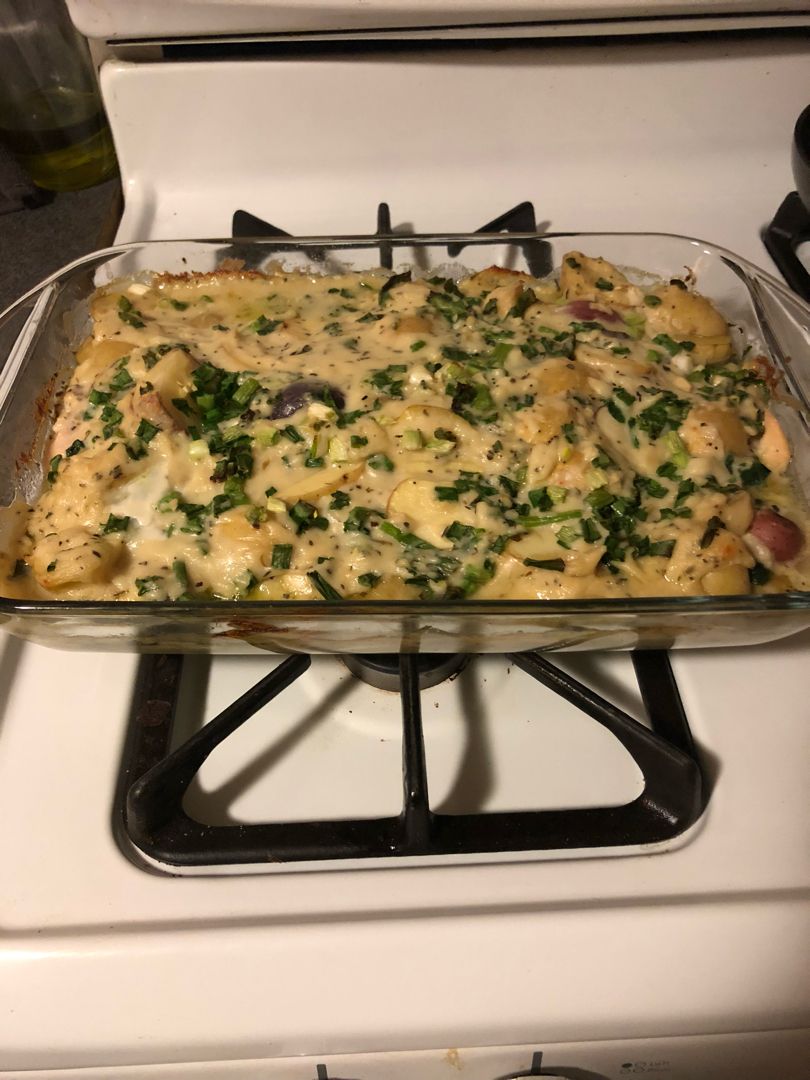
Baked Garlic Parmesan Chicken And Potatoes

by Rebecca July 27, 2022
written by Rebecca

Juicy chicken in mouthwatering butter, garlic herb sauce. This is a one-skillet dish with not only the juiciest chicken thighs, but with sauteed spinach and potatoes. It is an outrageously scrumptious and stress-free weeknight meal that you can easily make at any time!

INGREDIENTS

1 lb baby Dutch potatoes, halved or quartered

6 bone-in chicken thighs (skin-on, optional)

4 tbsp unsalted butter, divided

3-4 c. baby spinach, chopped

1 tbsp Italian seasoning

Fresh parsley, optional

Kosher salt and freshly ground pepper, to taste

Sauce:

1/4 c (1/2 stick) unsalted butter

1/2 c. half and half

4 cloves garlic, minced

1/2 c. Parmesan cheese, grated

1/4 c. all-purpose flour

1 tsp dried basil

1 tsp dried thyme

1/2 tsp dried oregano

1 c. low-sodium chicken broth

How to make Baked Garlic Parmesan Chicken And Potatoes

Step 1: Prepare the oven. Preheat it to 400 degrees F. Using butter or non-stick spray, lightly grease a 9 x 13-inch baking dish.

Step 2: In a large pan or skillet, melt 2 tbsp butter over medium-high heat. Add the spinach and cook until just wilted. Set aside.

Step 3: To make the sauce, melt the butter in the skillet over low to medium heat. Once the butter has melted, add the minced garlic and cook for about 1 to 2 minutes, stirring often to make sure the garlic doesn’t burn. Then, stir in the flour and continue to cook for another minute or until the roux is thick and golden brown. Next, gradually whisk in the chicken broth. Add the Parmesan cheese and half-and-half. Stir well and cook for an additional 3 to 5 minutes or until the sauce has thickened. Stir in the thyme along with the basil and oregano. To taste, season with salt and pepper.

Step 4: Season all sides of the chicken thighs with salt, pepper, and Italian seasoning. Lay the chicken in the prepared baking dish, skin-side up. On top of the chicken thighs, distribute the sauteed spinach and halved potatoes. Pour the cream sauce over.

Step 5: Place the baking dish in the preheated oven and bake the chicken and potatoes for about 20 to 25 minutes or until the chicken is completely cooked.

Step 6: In the last 5 minutes of baking, set the oven to broil. This step is optional but recommended if you like the skin of the chicken crispy.

Baked Garlic Parmesan Chicken And Potatoes

Rebecca Juicy chicken in mouthwatering butter, garlic herb sauce. This is a one-skillet dish with not only the juiciest chicken thighs, but with sauteed spinach and potatoes. It is an outrageously… General Recipes Baked Garlic Parmesan Chicken And Potatoes European Print This
Nutrition facts: 200 calories 20 grams fat
Rating: 5.0/5
( 1 voted )

Ingredients

  • 1 lb baby Dutch potatoes, halved or quartered
  • 6 bone-in chicken thighs (skin-on, optional)
  • 4 tbsp unsalted butter, divided
  • 3-4 c. baby spinach, chopped
  • 1 tbsp Italian seasoning
  • Fresh parsley, optional
  • Kosher salt and freshly ground pepper, to taste
  • Sauce:
  • 1/4 c (1/2 stick) unsalted butter
  • 1/2 c. half and half
  • 4 cloves garlic, minced
  • 1/2 c. Parmesan cheese, grated
  • 1/4 c. all-purpose flour
  • 1 tsp dried basil
  • 1 tsp dried thyme
  • 1/2 tsp dried oregano
  • 1 c. low-sodium chicken broth

Instructions

Step 1: Prepare the oven. Preheat it to 400 degrees F. Using butter or non-stick spray, lightly grease a 9 x 13-inch baking dish.

Step 2: In a large pan or skillet, melt 2 tbsp butter over medium-high heat. Add the spinach and cook until just wilted. Set aside.

Step 3: To make the sauce, melt the butter in the skillet over low to medium heat. Once the butter has melted, add the minced garlic and cook for about 1 to 2 minutes, stirring often to make sure the garlic doesn’t burn. Then, stir in the flour and continue to cook for another minute or until the roux is thick and golden brown. Next, gradually whisk in the chicken broth. Add the Parmesan cheese and half-and-half. Stir well and cook for an additional 3 to 5 minutes or until the sauce has thickened. Stir in the thyme along with the basil and oregano. To taste, season with salt and pepper.

Step 4: Season all sides of the chicken thighs with salt, pepper, and Italian seasoning. Lay the chicken in the prepared baking dish, skin-side up. On top of the chicken thighs, distribute the sauteed spinach and halved potatoes. Pour the cream sauce over.

Step 5: Place the baking dish in the preheated oven and bake the chicken and potatoes for about 20 to 25 minutes or until the chicken is completely cooked.

Step 6: In the last 5 minutes of baking, set the oven to broil. This step is optional but recommended if you like the skin of the chicken crispy.

July 27, 2022 0 comment
0 FacebookTwitterPinterestEmail
General Recipes

LEMON BLUEBERRY BREAD

by Rebecca July 26, 2022
written by Rebecca

Prep time: 25 mins | Cook time: 1 hr 5 mins | Total time: 1 hr 30 mins | Servings: 10

I am drooling over this fluffy, sweet, and moist lemon blueberry bread. It’s a real treat for people like me who loves blueberries and lemon-infused desserts. Serve this delicious bread any time by itself, or pair this up with a cup of your favorite coffee or tea.

Ingredients

2 eggs

1 tsp baking powder

1/3 c. unsalted butter, melted

1 c. granulated sugar

½ tsp vanilla extract

2 tbsp fresh lemon juice

2 tsp fresh grated lemon zest

½ c. milk

1 ½ c. all-purpose flour

1 tbsp all-purpose flour

1 c. fresh or frozen blueberries – I used fresh

1 tsp salt

For the Lemon Glaze:

½ c. powdered sugar

2 tbsp butter, melted

½ tsp vanilla extract

2 tbsp fresh lemon juice

HOW TO MAKE LEMON BLUEBERRY BREAD

Step 1: Prepare the oven. Preheat it to 350 degrees F. Using parchment paper, line a loaf pan.

Step 2: In a bowl, place the flour, baking powder, and salt. Mix well and set aside.

Step 3: Using an electric mixer, beat the melted butter, sugar, eggs, vanilla, lemon zest, and lemon juice until well blended. While the mixer is running, add the flour and milk in two batches. Mix until well incorporated. Set aside.

Step 4: In a small bowl, rinse the blueberries. Add 1 tbsp of flour and toss to coat the blueberries. To the batter, add the flour-coated blueberries. Gently mix.

Step 5: Into the prepared pan, pour the batter. Place in the preheated oven and bake for about 55 to 65 minutes or until a toothpick inserted in the middle of the loaf comes out clean.

Step 6: Remove from the oven when done and let the bread cool for about 30 minutes in the pan before inverting it to a wire cooling rack with a baking sheet underneath.

To make the Lemon glaze:

Step 7: Mix the melted butter with powdered sugar, lemon juice, and vanilla until well combined. Pour this over the loaf and let it sit for a couple of minutes. Slice and serve. Enjoy!

Tips:

You can whip this loaf up a day in advance. Let it cool completely and do not glaze. Wrap the loaf in plastic wrap and keep it at room temperature. Before serving, glaze the loaf.

Nutritional Facts:

Calories: 259 kcal, Carbs: 44g, Proteins: 4g, Total fat: 8g, Cholesterol: 51mg, Sodium: 298mg

LEMON BLUEBERRY BREAD

Rebecca Prep time: 25 mins | Cook time: 1 hr 5 mins | Total time: 1 hr 30 mins | Servings: 10 I am drooling over this fluffy, sweet, and moist… General Recipes LEMON BLUEBERRY BREAD European Print This
Serves: 10 Prep Time: 25 mins Cooking Time: 1 hr 5 mins 1 hr 5 mins
Nutrition facts: 259 calories 8 fat
Rating: 5.0/5
( 1 voted )

Ingredients

  • 2 eggs
  • 1 tsp baking powder
  • 1/3 c. unsalted butter, melted
  • 1 c. granulated sugar
  • ½ tsp vanilla extract
  • 2 tbsp fresh lemon juice
  • 2 tsp fresh grated lemon zest
  • ½ c. milk
  • 1 ½ c. all-purpose flour
  • 1 tbsp all-purpose flour
  • 1 c. fresh or frozen blueberries - I used fresh
  • 1 tsp salt
  • For the Lemon Glaze:
  • ½ c. powdered sugar
  • 2 tbsp butter, melted
  • ½ tsp vanilla extract
  • 2 tbsp fresh lemon juice

Instructions

Step 1: Prepare the oven. Preheat it to 350 degrees F. Using parchment paper, line a loaf pan.

Step 2: In a bowl, place the flour, baking powder, and salt. Mix well and set aside.

Step 3: Using an electric mixer, beat the melted butter, sugar, eggs, vanilla, lemon zest, and lemon juice until well blended. While the mixer is running, add the flour and milk in two batches. Mix until well incorporated. Set aside.

Step 4: In a small bowl, rinse the blueberries. Add 1 tbsp of flour and toss to coat the blueberries. To the batter, add the flour-coated blueberries. Gently mix.

Step 5: Into the prepared pan, pour the batter. Place in the preheated oven and bake for about 55 to 65 minutes or until a toothpick inserted in the middle of the loaf comes out clean.

Step 6: Remove from the oven when done and let the bread cool for about 30 minutes in the pan before inverting it to a wire cooling rack with a baking sheet underneath.

To make the Lemon glaze:

Step 7: Mix the melted butter with powdered sugar, lemon juice, and vanilla until well combined. Pour this over the loaf and let it sit for a couple of minutes. Slice and serve. Enjoy!

Notes

You can whip this loaf up a day in advance. Let it cool completely and do not glaze. Wrap the loaf in plastic wrap and keep it at room temperature. Before serving, glaze the loaf.

July 26, 2022 0 comment
0 FacebookTwitterPinterestEmail
General Recipes

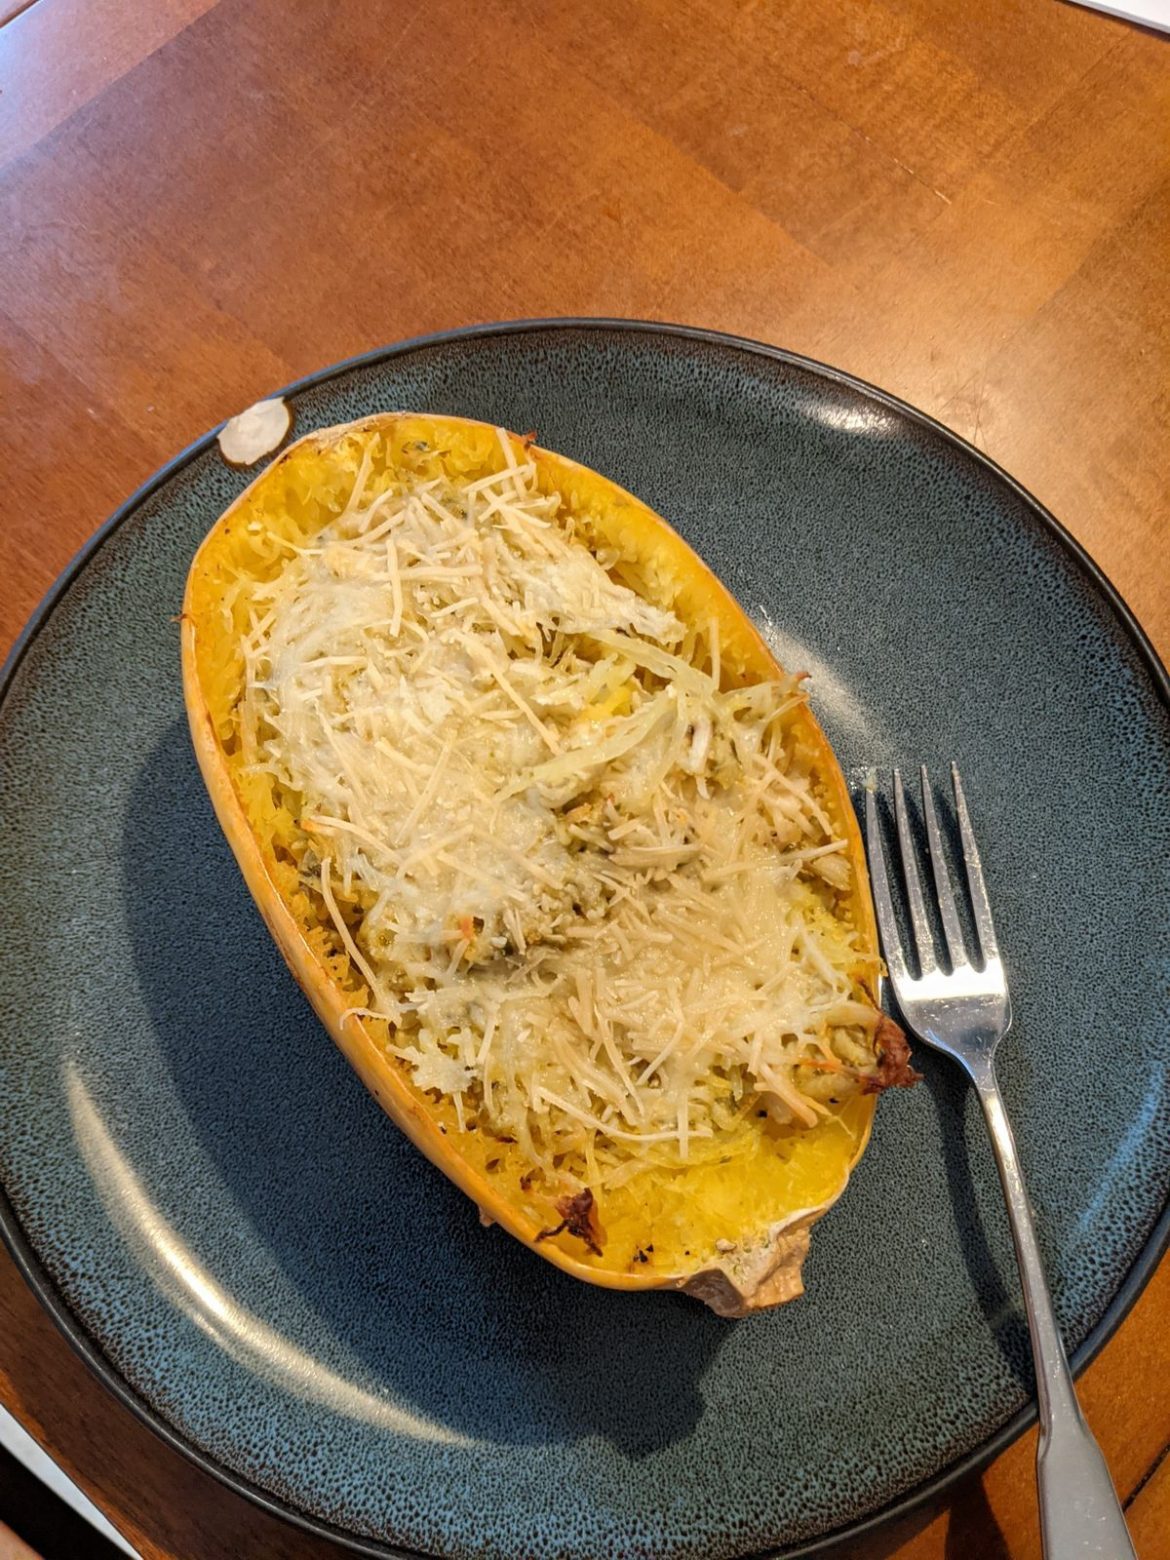
Green Chile Chicken- Stuffed Spaghetti Squash

by Rebecca July 26, 2022
written by Rebecca

Total time: 1 hr 15 mins | Serves: 8

If you are searching for a healthy alternative to your favorite pasta dishes, then this stuffed spaghetti squash is a must! Devour this spaghetti squash without the guilt, and keep coming back for more!

INGREDIENTS

2 c. cooked chicken, shredded

1 large spaghetti squash, cut in half lengthwise

1 (4 ounces) can of diced green chiles

1/4 c. crema

1 green onion, thinly sliced

1/2 c. fresh or frozen corn

1/2 c. green enchilada sauce

1/2 c. Mexican cheese blend

1 tsp chili powder, plus more for garnish, optional

olive oil, as needed

kosher salt and freshly ground pepper, to taste

fresh cilantro, garnish

How to make Green Chile Chicken- Stuffed Spaghetti Squash

Step 1: Prepare the oven. Preheat it to 400 degrees. Using parchment paper or aluminium foil, line a baking sheet.

Step 2: With olive oil, drizzle both cut sides of spaghetti squash and generously sprinkle with salt and pepper.

Step 3: On the prepared baking sheet, place the cut side down. Put in the preheated oven and roast for about 35 minutes or until fork tender. When done, remove from the oven and allow the squash to rest until cool enough to handle.

Step 4: Scrape the inside of the squash using a fork, leaving about half an inch of space around the bottom and sides. To a colander, transfer the scraped “spaghetti” and place it in the sink or over a large bowl.

Step 5: Place the chicken, green chiles, green onion, enchilada sauce, corn, 1/4 cup chopped cilantro, crema, and chile powder in another bowl. Mix well until combined.

Step 6: Into the sauce mixture, combine the squash strands. In half, divide the filling and place them back into the squash shells. Place the squash on the baking sheets and evenly sprinkle each with Mexican cheese.

Step 7: Bake in the preheated oven for about 15 to 20 minutes or until the cheese has melted and bubbly.

Step 8: Serve the stuffed spaghetti squash right away. Enjoy!

Green Chile Chicken- Stuffed Spaghetti Squash

Rebecca Total time: 1 hr 15 mins | Serves: 8 If you are searching for a healthy alternative to your favorite pasta dishes, then this stuffed spaghetti squash is a must!… General Recipes Green Chile Chicken- Stuffed Spaghetti Squash European Print This
Serves: 8
Nutrition facts: 200 calories 20 grams fat
Rating: 5.0/5
( 1 voted )

Ingredients

  • 2 c. cooked chicken, shredded
  • 1 large spaghetti squash, cut in half lengthwise
  • 1 (4 ounces) can of diced green chiles
  • 1/4 c. crema
  • 1 green onion, thinly sliced
  • 1/2 c. fresh or frozen corn
  • 1/2 c. green enchilada sauce
  • 1/2 c. Mexican cheese blend
  • 1 tsp chili powder, plus more for garnish, optional
  • olive oil, as needed
  • kosher salt and freshly ground pepper, to taste
  • fresh cilantro, garnish

Instructions

Step 1: Prepare the oven. Preheat it to 400 degrees. Using parchment paper or aluminium foil, line a baking sheet.

Step 2: With olive oil, drizzle both cut sides of spaghetti squash and generously sprinkle with salt and pepper.

Step 3: On the prepared baking sheet, place the cut side down. Put in the preheated oven and roast for about 35 minutes or until fork tender. When done, remove from the oven and allow the squash to rest until cool enough to handle.

Step 4: Scrape the inside of the squash using a fork, leaving about half an inch of space around the bottom and sides. To a colander, transfer the scraped “spaghetti” and place it in the sink or over a large bowl.

Step 5: Place the chicken, green chiles, green onion, enchilada sauce, corn, 1/4 cup chopped cilantro, crema, and chile powder in another bowl. Mix well until combined.

Step 6: Into the sauce mixture, combine the squash strands. In half, divide the filling and place them back into the squash shells. Place the squash on the baking sheets and evenly sprinkle each with Mexican cheese.

Step 7: Bake in the preheated oven for about 15 to 20 minutes or until the cheese has melted and bubbly.

Step 8: Serve the stuffed spaghetti squash right away. Enjoy!

July 26, 2022 0 comment
0 FacebookTwitterPinterestEmail
General Recipes

MINI CORN DOGS

by Rebecca July 26, 2022
written by Rebecca

These mini corn dogs are such a simple and delicious treat that you can easily make using cornmeal and flour. The perfect appetizer for all ages! If you have kids that are always requesting appetizers before the proper meal, then these mini corn dogs are a great option. For this recipe, I used smoked sausages. They are my favorite! They have a distinct flavor that even the kids enjoy so much.

If you are searching for a kid-friendly appetizer, then these tasty mini corn dogs are perfect! These are very easy and super fast to make. You can throw together a huge batch and freeze it. Before serving, simply reheat them in the microwave or oven.

Ingredients

2 packages (1 pound each) of cocktail-size smoked link sausages (40 sausages each)

1 large egg

¾ c. of all-purpose flour

1 c. of yellow cornmeal

1 tbsp of sugar

½ tsp of baking powder

1 c. of milk

Vegetable oil for deep frying

½ c. of ketchup

80 round wooden sticks with one pointed end

½ c. of yellow mustard

½ tsp of ground red pepper

½ tsp of kosher salt

HOW TO MAKE MINI CORN DOGS

Step 1: In a large bowl, combine the cornmeal, flour, sugar, salt, baking powder, and red pepper. Whisk in the milk and egg until you have a homogeneous batter.

Step 2: In a deep fryer, pour oil to a depth of 3 inches and heat to 375 degrees. In the batter, dip each sausage and drop them in the hot oil. In batches, fry the sausages for about 2 to 3 minutes or until golden brown.

Step 3: Remove the fried sausages from the oil and transfer them to paper towels. Into the sausages, insert the ends of pointed sticks.

Step 4: Serve the mini corn dogs immediately and enjoy!

TIPS:

To make life easier, use a long-handled fork for dipping the sausages in the batter.

I love to serve these mini corn dogs with ketchup and mustard for dipping.

MINI CORN DOGS

Rebecca These mini corn dogs are such a simple and delicious treat that you can easily make using cornmeal and flour. The perfect appetizer for all ages! If you have kids… General Recipes MINI CORN DOGS European Print This
Nutrition facts: 200 calories 20 grams fat
Rating: 5.0/5
( 1 voted )

Ingredients

  • 2 packages (1 pound each) of cocktail-size smoked link sausages (40 sausages each)
  • 1 large egg
  • ¾ c. of all-purpose flour
  • 1 c. of yellow cornmeal
  • 1 tbsp of sugar
  • ½ tsp of baking powder
  • 1 c. of milk
  • Vegetable oil for deep frying
  • ½ c. of ketchup
  • 80 round wooden sticks with one pointed end
  • ½ c. of yellow mustard
  • ½ tsp of ground red pepper
  • ½ tsp of kosher salt

Instructions

Step 1: In a large bowl, combine the cornmeal, flour, sugar, salt, baking powder, and red pepper. Whisk in the milk and egg until you have a homogeneous batter.

Step 2: In a deep fryer, pour oil to a depth of 3 inches and heat to 375 degrees. In the batter, dip each sausage and drop them in the hot oil. In batches, fry the sausages for about 2 to 3 minutes or until golden brown.

Step 3: Remove the fried sausages from the oil and transfer them to paper towels. Into the sausages, insert the ends of pointed sticks.

Step 4: Serve the mini corn dogs immediately and enjoy!

Notes

To make life easier, use a long-handled fork for dipping the sausages in the batter. I love to serve these mini corn dogs with ketchup and mustard for dipping.

July 26, 2022 0 comment
0 FacebookTwitterPinterestEmail
General Recipes

SEAFOOD SALAD RECIPE

by Rebecca July 26, 2022
written by Rebecca

This seafood salad is the simplest and quickest salad! It is filled with freshness, and you can serve this salad in many ways!

INGREDIENTS

1/2 teaspoon Old Bay seasoning

16 ounces imitation crab meat (preferably flaked style)

3 tablespoons red onion – very finely diced

2 teaspoons fresh lemon juice

1 1/2 tablespoons fresh dill – chopped (or 1/2 teaspoon dried dill)

1/2 c. mayonnaise

salt & pepper – to taste

1/2 c. celery – finely diced

HOW TO MAKE SEAFOOD SALAD

Step 1: Place the imitation crab in a large bowl along with the celery, red onion, Old Bay, lemon juice, mayonnaise, dill, salt, and pepper. Mix well.

Step 2: Serve the seafood salad right away or cover the bowl and keep it in the fridge for up to 2 days.

Notes:

To serve this salad, you can pile this on a crusty baguette with lettuce. This salad is also great with crackers. You can even scoop it into a butter lettuce cup. Add this to the salad to make a chilled seafood pasta salad. If desired, you can fill puff pastry shells with this salad and bake. Or fill a hollow tomato with it.

I love Old Bay Seasoning, but whenever I can’t find it, I make a spice mixture closest to it. All you need are the ingredients below, mix them, and grind using a spice grinder or coffee grinder until you have a smooth powder. Then, store in an airtight container/spice jar.

3/4 tablespoon salt

1 tablespoon celery seed

2 teaspoons sweet paprika

1 teaspoon ground dry mustard

1 teaspoon ground ginger

5 bay leaves

1/2 teaspoon smoked paprika

1/2 teaspoon freshly ground black pepper

1/2 teaspoon freshly ground white pepper

1/4 teaspoon crushed red pepper flakes

1/8 teaspoon ground nutmeg

1/8 teaspoon ground mace

1/8 teaspoon ground cardamom

1/8 teaspoon ground allspice

1/8 teaspoon ground cinnamon

1/16 teaspoon ground cloves

SEAFOOD SALAD RECIPE

Rebecca This seafood salad is the simplest and quickest salad! It is filled with freshness, and you can serve this salad in many ways! INGREDIENTS 1/2 teaspoon Old Bay seasoning 16… General Recipes SEAFOOD SALAD RECIPE European Print This
Nutrition facts: 200 calories 20 grams fat
Rating: 5.0/5
( 1 voted )

Ingredients

  • 1/2 teaspoon Old Bay seasoning
  • 16 ounces imitation crab meat (preferably flaked style)
  • 3 tablespoons red onion – very finely diced
  • 2 teaspoons fresh lemon juice
  • 1 1/2 tablespoons fresh dill – chopped (or 1/2 teaspoon dried dill)
  • 1/2 c. mayonnaise
  • salt & pepper – to taste
  • 1/2 c. celery – finely diced

Instructions

Step 1: Place the imitation crab in a large bowl along with the celery, red onion, Old Bay, lemon juice, mayonnaise, dill, salt, and pepper. Mix well.

Step 2: Serve the seafood salad right away or cover the bowl and keep it in the fridge for up to 2 days.

Notes

To serve this salad, you can pile this on a crusty baguette with lettuce. This salad is also great with crackers. You can even scoop it into a butter lettuce cup. Add this to the salad to make a chilled seafood pasta salad. If desired, you can fill puff pastry shells with this salad and bake. Or fill a hollow tomato with it. I love Old Bay Seasoning, but whenever I can’t find it, I make a spice mixture closest to it. All you need are the ingredients below, mix them, and grind using a spice grinder or coffee grinder until you have a smooth powder. Then, store in an airtight container/spice jar. 3/4 tablespoon salt 1 tablespoon celery seed 2 teaspoons sweet paprika 1 teaspoon ground dry mustard 1 teaspoon ground ginger 5 bay leaves 1/2 teaspoon smoked paprika 1/2 teaspoon freshly ground black pepper 1/2 teaspoon freshly ground white pepper 1/4 teaspoon crushed red pepper flakes 1/8 teaspoon ground nutmeg 1/8 teaspoon ground mace 1/8 teaspoon ground cardamom 1/8 teaspoon ground allspice 1/8 teaspoon ground cinnamon 1/16 teaspoon ground cloves

July 26, 2022 0 comment
0 FacebookTwitterPinterestEmail
General Recipes

Spicy Italian Crescent Ring

by Rebecca July 26, 2022
written by Rebecca

If you love Italian Sub Sandwich, I am pretty sure that you’ll be impressed with this Spicy Italian Crescent Ring. This is the ultimate, extraordinary version that everyone will be raving about!

Ingredients

1 large egg – beaten

2 (8 ounces) cans of refrigerated crescent dinner rolls

½ c. Pepperoncini pepper rings or banana pepper rings – drained very well

½ c. sliced roasted red bell peppers – drained very well

8 ounces thinly sliced deli Genoa salami

9 ounces thinly sliced deli ham

1 c. shredded mozzarella cheese

¼ teaspoon fresh ground pepper

Italian Seasoning

6 slices provolone cheese – cut in half

How to make Spicy Italian Crescent Ring

Step 1: Prepare the oven. Preheat it to 375 degrees F.

Step 2: To make a half cup, dice the roasted red bell peppers. Scale half cup banana pepper or pepperoncini rings. Place them on a paper towel and pat them dry.

Step 3: In a small bowl, place the banana pepper or pepperoncini rings and toss with 1/4 tsp fresh ground black pepper. Set aside.

Step 4: After unrolling the crescent rolls, separate them into triangles. On a greased round pizza pan or pizza stone, arrange the crescents, wide ends slightly overlapping in the middle to create a circle, and the triangle points facing outward to form the shape of a sun.

Step 5: Around the overlapping wide triangle end edge of the crescent ring, arrange halved slices of the Provolone cheese.

Step 6: On top of the provolone, layer the following in order; folded ham slices, Genoa salami, pepper mixture, and mozzarella cheese.

Step 7: Grab the point ends of the triangle. Bring them up and around the filling to secure everything inside. Then, tuck the points under the middle of the ring to seal. Brush the dough with the beaten egg and sprinkle with the Italian seasoning and extra fresh black pepper.

Step 8: Bake in the preheated oven for about 18 to 22 minutes or until golden brown and the bottom is cooked. If the top is not yet rich, golden brown, leave it in the oven for a little longer.

Spicy Italian Crescent Ring

Rebecca If you love Italian Sub Sandwich, I am pretty sure that you’ll be impressed with this Spicy Italian Crescent Ring. This is the ultimate, extraordinary version that everyone will be… General Recipes Spicy Italian Crescent Ring European Print This
Nutrition facts: 200 calories 20 grams fat
Rating: 5.0/5
( 1 voted )

Ingredients

  • 1 large egg – beaten
  • 2 (8 ounces) cans of refrigerated crescent dinner rolls
  • ½ c. Pepperoncini pepper rings or banana pepper rings – drained very well
  • ½ c. sliced roasted red bell peppers – drained very well
  • 8 ounces thinly sliced deli Genoa salami
  • 9 ounces thinly sliced deli ham
  • 1 c. shredded mozzarella cheese
  • ¼ teaspoon fresh ground pepper
  • Italian Seasoning
  • 6 slices provolone cheese – cut in half

Instructions

Step 1: Prepare the oven. Preheat it to 375 degrees F.

Step 2: To make a half cup, dice the roasted red bell peppers. Scale half cup banana pepper or pepperoncini rings. Place them on a paper towel and pat them dry.

Step 3: In a small bowl, place the banana pepper or pepperoncini rings and toss with 1/4 tsp fresh ground black pepper. Set aside.

Step 4: After unrolling the crescent rolls, separate them into triangles. On a greased round pizza pan or pizza stone, arrange the crescents, wide ends slightly overlapping in the middle to create a circle, and the triangle points facing outward to form the shape of a sun.

Step 5: Around the overlapping wide triangle end edge of the crescent ring, arrange halved slices of the Provolone cheese.

Step 6: On top of the provolone, layer the following in order; folded ham slices, Genoa salami, pepper mixture, and mozzarella cheese.

Step 7: Grab the point ends of the triangle. Bring them up and around the filling to secure everything inside. Then, tuck the points under the middle of the ring to seal. Brush the dough with the beaten egg and sprinkle with the Italian seasoning and extra fresh black pepper.

Step 8: Bake in the preheated oven for about 18 to 22 minutes or until golden brown and the bottom is cooked. If the top is not yet rich, golden brown, leave it in the oven for a little longer.

July 26, 2022 0 comment
0 FacebookTwitterPinterestEmail
General Recipes

CRACK CHICKEN SOUP

by Rebecca July 26, 2022
written by Rebecca

This soup is a wonderful soup that everyone enjoys. It’ll surely warm you up from the inside out!

Ingredients

1 tablespoon butter or olive oil

12 slices of thick-cut bacon, cooked and diced

3 c. chicken, shredded – baked chicken breasts or leftover chicken

1 small onion – diced

1/2 c. carrots – diced

1/2 c. celery – diced

1 can of condensed chicken soup (10.5 ounces)

6 c. chicken stock – low sodium

1 cup whole milk

2 tablespoons Ranch seasoning mix

1/2 teaspoon garlic powder

3 cloves garlic

8 ounces cream cheese

2 c. cheddar cheese, shredded

1/4 c. heavy cream

8 ounces pasta – spaghetti

3 c. baby spinach

HOW TO MAKE CRACK CHICKEN SOUP

Step 1: Prepare the oven. Preheat it to 375 degrees F. Using aluminium foil or parchment paper, line a baking sheet.

Step 2: Lay the chicken on the prepared baking sheet and season both sides with salt and pepper. Then, drizzle with a bit of olive oil. Bake in the preheated oven for about 30 minutes. The chicken is done once its internal temperature reaches 165 degrees F. Take the chicken out of the oven when done and allow it to rest for about 5 minutes before shredding.

Step 3: In the meantime, cook the bacon in a soup pot or Dutch oven until crispy. Let the bacon cool. Once cool enough to handle, dice and set aside. Reserve the bacon grease.

Step 4: Heat 1 tbsp oil or butter in a large stock pot over medium heat. Add the onion, celery, and carrots. Saute for about 5 minutes.

Step 5: Place the condensed chicken soup and milk in a medium mixing bowl. Mix well until smooth.

Step 6: Add the soup mixture to the pot and stir over medium heat. Pour in the chicken broth and add the ranch seasoning, garlic, and garlic powder. Stir well and add the pasta. Bring everything to a boil while stirring often. Decrease the heat to keep a steady boil for about 5 minutes.

Step 7: To the pot, add the shredded chicken and cook for additional 5 minutes before adding the softened cream cheese. Stir well until completely melted and blended. Then, add the cheddar cheese. Stir until melted and incorporated.

Step 8: Throw in the baby spinach along with the heavy cream. Season according to taste.

Step 9: Before serving, garnish with some sliced scallions and chopped bacon. Enjoy!

Notes:

You can use kale or zucchini noodles instead of spinach.

I love to serve this soup with baguettes, garlic bread, ciabatta, or any artisan loaf.

For this recipe, you can use any pasta.

Place the completely cooled soup in an airtight container or freezer bag and store it in the freezer for up to 3 months.

CRACK CHICKEN SOUP

Rebecca This soup is a wonderful soup that everyone enjoys. It’ll surely warm you up from the inside out! Ingredients 1 tablespoon butter or olive oil 12 slices of thick-cut bacon,… General Recipes CRACK CHICKEN SOUP European Print This
Nutrition facts: 200 calories 20 grams fat
Rating: 5.0/5
( 1 voted )

Ingredients

  • 1 tablespoon butter or olive oil
  • 12 slices of thick-cut bacon, cooked and diced
  • 3 c. chicken, shredded – baked chicken breasts or leftover chicken
  • 1 small onion – diced
  • 1/2 c. carrots – diced
  • 1/2 c. celery – diced
  • 1 can of condensed chicken soup (10.5 ounces)
  • 6 c. chicken stock – low sodium
  • 1 cup whole milk
  • 2 tablespoons Ranch seasoning mix
  • 1/2 teaspoon garlic powder
  • 3 cloves garlic
  • 8 ounces cream cheese
  • 2 c. cheddar cheese, shredded
  • 1/4 c. heavy cream
  • 8 ounces pasta – spaghetti
  • 3 c. baby spinach

Instructions

Step 1: Prepare the oven. Preheat it to 375 degrees F. Using aluminium foil or parchment paper, line a baking sheet.

Step 2: Lay the chicken on the prepared baking sheet and season both sides with salt and pepper. Then, drizzle with a bit of olive oil. Bake in the preheated oven for about 30 minutes. The chicken is done once its internal temperature reaches 165 degrees F. Take the chicken out of the oven when done and allow it to rest for about 5 minutes before shredding.

Step 3: In the meantime, cook the bacon in a soup pot or Dutch oven until crispy. Let the bacon cool. Once cool enough to handle, dice and set aside. Reserve the bacon grease.

Step 4: Heat 1 tbsp oil or butter in a large stock pot over medium heat. Add the onion, celery, and carrots. Saute for about 5 minutes.

Step 5: Place the condensed chicken soup and milk in a medium mixing bowl. Mix well until smooth.

Step 6: Add the soup mixture to the pot and stir over medium heat. Pour in the chicken broth and add the ranch seasoning, garlic, and garlic powder. Stir well and add the pasta. Bring everything to a boil while stirring often. Decrease the heat to keep a steady boil for about 5 minutes.

Step 7: To the pot, add the shredded chicken and cook for additional 5 minutes before adding the softened cream cheese. Stir well until completely melted and blended. Then, add the cheddar cheese. Stir until melted and incorporated.

Step 8: Throw in the baby spinach along with the heavy cream. Season according to taste.

Step 9: Before serving, garnish with some sliced scallions and chopped bacon. Enjoy!

July 26, 2022 0 comment
0 FacebookTwitterPinterestEmail
General Recipes

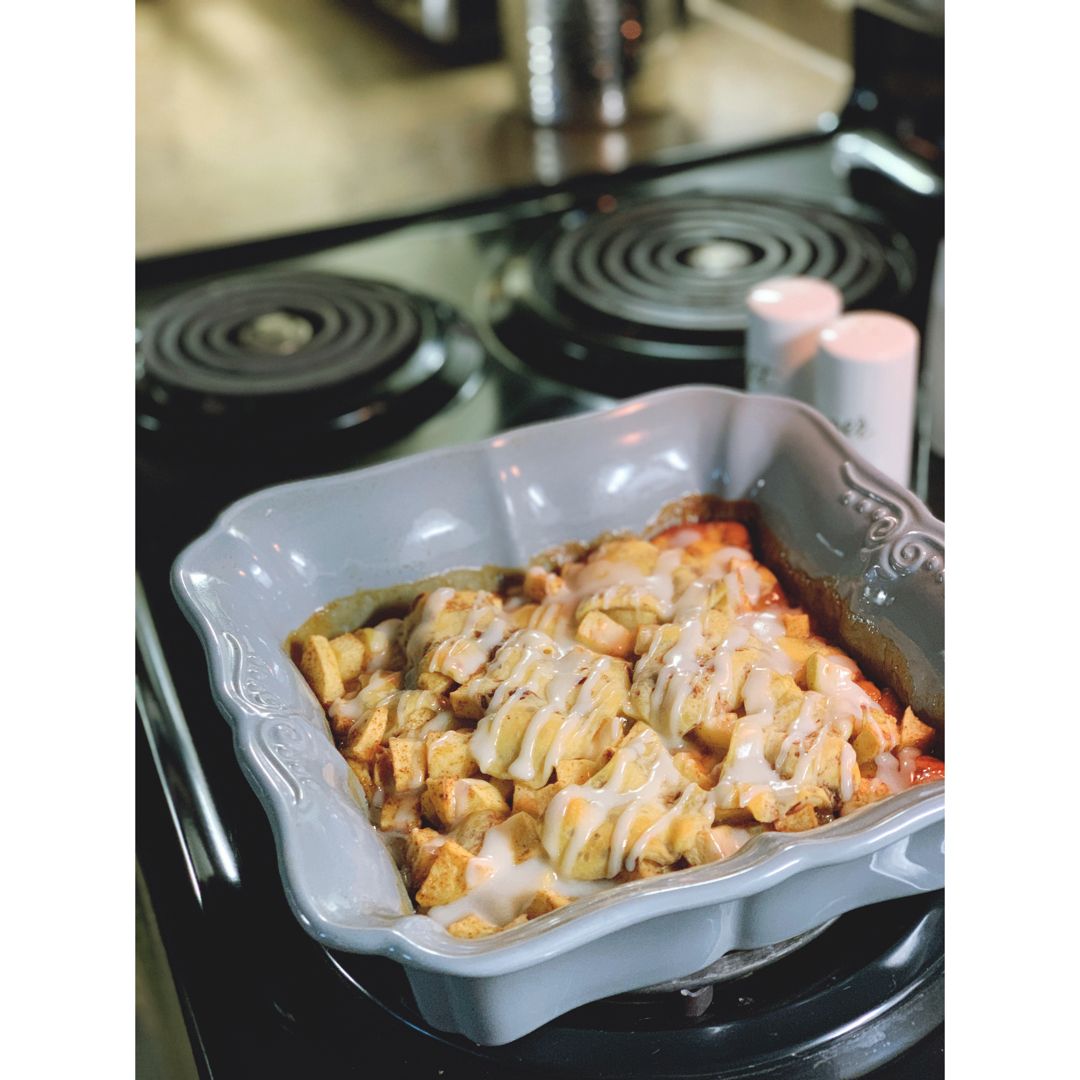
Apple Cinnamon Roll Lasagna

by Rebecca July 26, 2022
written by Rebecca

Prep time: 15 mins | Cook time: 45 mins | Yield: 8 servings

Cinnamon rolls are one of my weaknesses. They are just amazing! Soft, fluffy, sweet, with the perfect touch of slight citrusy, spicy, and woody flavor of cinnamon. This Apple Cinnamon Roll Lasagna is a staple at home. We love to serve this all year round. It’s super easy to whip up and fast!

This sweet lasagna is packed with fresh, juicy apples. This is not like your ordinary cinnamon roll. It’s a decadent, very impressive apple cinnamon roll lasagna that has layers of everything good!

INGREDIENTS

1/3 c. caramel sauce

4 large apples- peeled and diced (Granny Smith or Golden Delicious)

1/2 c. sugar

1/2 tsp nutmeg

2 tsp cinnamon

1 tbsp cornstarch

2 cans of refrigerated cinnamon rolls (save the icing packets for later)

How to make Apple Cinnamon Roll Lasagna

Step 1: Prepare the oven. Preheat it to 375 degrees F. Using a nonstick spray, grease a 9 x 13-inch dish.

Step 2: In a large bowl, place the diced apples, sugar, cornstarch, cinnamon, and nutmeg. Toss well until the diced apples are evenly coated.

Step 3: Into 1/4-inch thick pieces, slice the cinnamon rolls and sprinkle each with flour. Onto a floured surface, roll each slice using a rolling pin until thin.

Step 4: At the bottom and sides of the prepared dish, arrange the first layer of the flattened cinnamon rolls. To seal them well, press them using your hands. On top, spread half of the apple filling and drizzle with 2 to 3 tbsp caramel sauce.

Step 5: Tent the dish using aluminium foil. Place in the preheated oven and bake for about 30 minutes. Uncover and continue baking for an additional 10 to 15 minutes or until the top is golden brown.

Step 6: Remove from the oven when done and allow the apple cinnamon roll lasagna to cool for at least 30 minutes. Before serving, drizzle with the icing. Enjoy!

Apple Cinnamon Roll Lasagna

Rebecca Prep time: 15 mins | Cook time: 45 mins | Yield: 8 servings Cinnamon rolls are one of my weaknesses. They are just amazing! Soft, fluffy, sweet, with the perfect… General Recipes Apple Cinnamon Roll Lasagna European Print This
Serves: 8 Prep Time: 15 mins Cooking Time: 45 mins 45 mins
Nutrition facts: 200 calories 20 grams fat
Rating: 5.0/5
( 1 voted )

Ingredients

  • 1/3 c. caramel sauce
  • 4 large apples- peeled and diced (Granny Smith or Golden Delicious)
  • 1/2 c. sugar
  • 1/2 tsp nutmeg
  • 2 tsp cinnamon
  • 1 tbsp cornstarch
  • 2 cans of refrigerated cinnamon rolls (save the icing packets for later)

Instructions

Step 1: Prepare the oven. Preheat it to 375 degrees F. Using a nonstick spray, grease a 9 x 13-inch dish.

Step 2: In a large bowl, place the diced apples, sugar, cornstarch, cinnamon, and nutmeg. Toss well until the diced apples are evenly coated.

Step 3: Into 1/4-inch thick pieces, slice the cinnamon rolls and sprinkle each with flour. Onto a floured surface, roll each slice using a rolling pin until thin.

Step 4: At the bottom and sides of the prepared dish, arrange the first layer of the flattened cinnamon rolls. To seal them well, press them using your hands. On top, spread half of the apple filling and drizzle with 2 to 3 tbsp caramel sauce.

Step 5: Tent the dish using aluminium foil. Place in the preheated oven and bake for about 30 minutes. Uncover and continue baking for an additional 10 to 15 minutes or until the top is golden brown.

Step 6: Remove from the oven when done and allow the apple cinnamon roll lasagna to cool for at least 30 minutes. Before serving, drizzle with the icing. Enjoy!

July 26, 2022 0 comment
0 FacebookTwitterPinterestEmail
General Recipes

The Canadian Flapper Pie: A Great Homemade Recipe

by Rebecca July 26, 2022
written by Rebecca

Total time: 30 mins | Serves: 8-10

If you are searching for another amazing dessert to impress your loved ones, then look no more! This flapper pie is a great option! It is a Canadian classic that is super rich with decadent, creamy custard filling topped with meringue. The perfect dessert was excellent for all occasions!

INGREDIENTS

For the Crust:

1/4 c (1/2 stick) unsalted butter, melted

1/2 c. sugar

1/4 tsp salt

1/4 tsp ground cinnamon

1 1/4 c. Graham cracker crumbs

For the Filling:

3 egg yolks

2 1/2 c. whole milk

1/4 tsp salt

1/4 c. cornstarch

1/2 c. sugar

1 tsp vanilla extract

For the Topping:

1/4 c. sugar

1/4 tsp cream of tartar

3 egg whites

How to make The Canadian Flapper Pie

Step 1: Prepare the oven. Preheat it to 350 degrees F.

Step 2: Place the Graham cracker crumbs, sugar, cinnamon, and salt in a medium bowl. Mix well, then add the melted butter. Stir well until you have a mixture that resembles damp sand.

Step 3: Set aside about 2 to 3 tbsp of the crust mixture and press the rest into an 8 or 9-inch pie plate. Ensure to press the mixture up to the sides of the pie plate, too. Place in the preheated oven and bake for about 10 to 12 minutes or until the crust is a little browned. Remove from the oven when done and allow the crust to cool.

Step 4: In a medium saucepan, add the sugar and cornstarch. Whisk over medium heat. Add the whole milk and egg yolks. Stir well and slowly bring to a boil while constantly stirring. Take the pan out of the heat once the mixture has thickened, then whisk in the vanilla extract and salt. Allow the mixture to cool.

Step 5: Beat the egg whites and cream of tartar in another bowl for about 3 to 4 minutes or until soft peaks form. Carefully stir in the sugar, beating continuously until stiff peaks form.

Step 6: Onto the cooled crust, pour the custard filling and spread it into an even layer. On top, place the meringue, spreading it to the edges of the crust. Sprinkle with the rest of the pie crust crumbs on top (optional). Bake in the oven for about 10 minutes or until the pie is slightly browned.

Step 7: Allow the pie to cool before slicing. Enjoy!

The Canadian Flapper Pie: A Great Homemade Recipe

Rebecca Total time: 30 mins | Serves: 8-10 If you are searching for another amazing dessert to impress your loved ones, then look no more! This flapper pie is a great… General Recipes The Canadian Flapper Pie: A Great Homemade Recipe European Print This
Serves: 8-10
Nutrition facts: 200 calories 20 grams fat
Rating: 5.0/5
( 1 voted )

Ingredients

  • For the Crust:
  • 1/4 c (1/2 stick) unsalted butter, melted
  • 1/2 c. sugar
  • 1/4 tsp salt
  • 1/4 tsp ground cinnamon
  • 1 1/4 c. Graham cracker crumbs
  • For the Filling:
  • 3 egg yolks
  • 2 1/2 c. whole milk
  • 1/4 tsp salt
  • 1/4 c. cornstarch
  • 1/2 c. sugar
  • 1 tsp vanilla extract
  • For the Topping:
  • 1/4 c. sugar
  • 1/4 tsp cream of tartar
  • 3 egg whites

Instructions

Step 1: Prepare the oven. Preheat it to 350 degrees F.

Step 2: Place the Graham cracker crumbs, sugar, cinnamon, and salt in a medium bowl. Mix well, then add the melted butter. Stir well until you have a mixture that resembles damp sand.

Step 3: Set aside about 2 to 3 tbsp of the crust mixture and press the rest into an 8 or 9-inch pie plate. Ensure to press the mixture up to the sides of the pie plate, too. Place in the preheated oven and bake for about 10 to 12 minutes or until the crust is a little browned. Remove from the oven when done and allow the crust to cool.

Step 4: In a medium saucepan, add the sugar and cornstarch. Whisk over medium heat. Add the whole milk and egg yolks. Stir well and slowly bring to a boil while constantly stirring. Take the pan out of the heat once the mixture has thickened, then whisk in the vanilla extract and salt. Allow the mixture to cool.

Step 5: Beat the egg whites and cream of tartar in another bowl for about 3 to 4 minutes or until soft peaks form. Carefully stir in the sugar, beating continuously until stiff peaks form.

Step 6: Onto the cooled crust, pour the custard filling and spread it into an even layer. On top, place the meringue, spreading it to the edges of the crust. Sprinkle with the rest of the pie crust crumbs on top (optional). Bake in the oven for about 10 minutes or until the pie is slightly browned.

Step 7: Allow the pie to cool before slicing. Enjoy!

July 26, 2022 0 comment
0 FacebookTwitterPinterestEmail
Newer Posts
Older Posts

Popular Posts

  • 1

    Crispy Crunchy Parmesan Potatoes

    March 21, 2020
  • 2

    CROCK POT SMOTHERED PORK CHOPS

    March 21, 2020
  • Facebook
  • Twitter

@2019 - All Right Reserved.


Back To Top