Cook it once
  • Home
  • Privacy Policy
  • Recipes
    • KETO
    • LC
    • WW
  • Tips
  • Contact
Cook it once
  • Home
  • Privacy Policy
  • Recipes
    • KETO
    • LC
    • WW
  • Tips
  • Contact
Category:

General Recipes

General Recipes

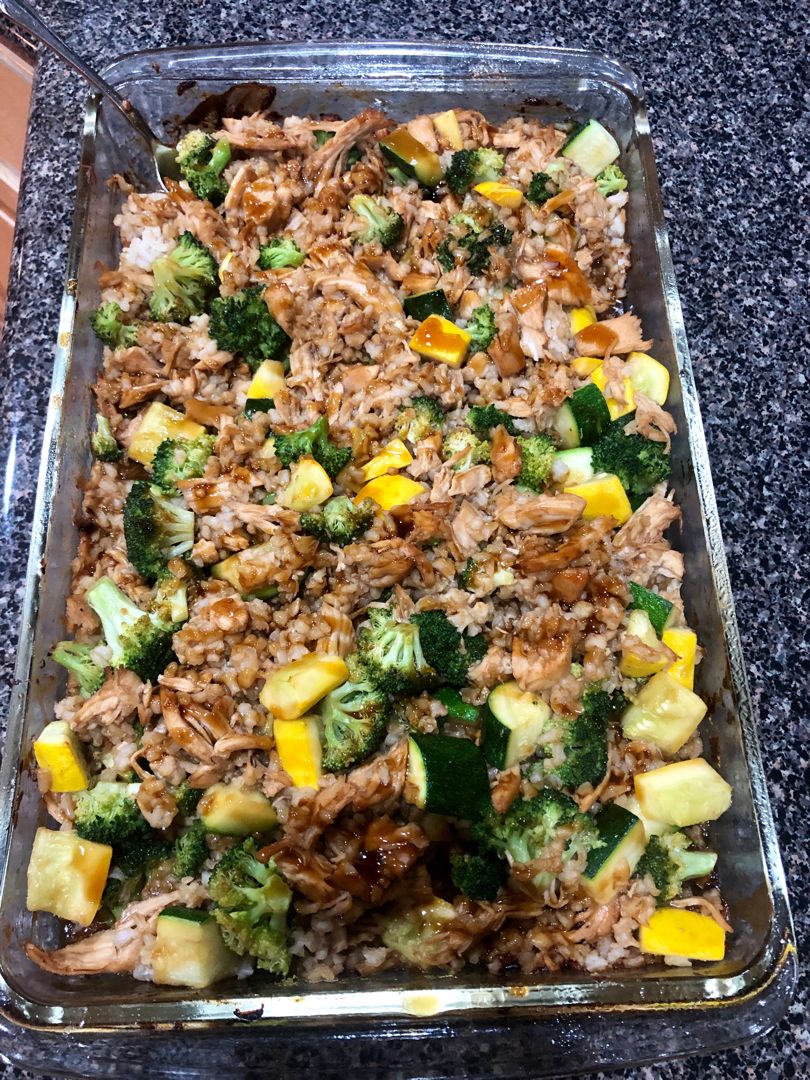
Teriyaki Chicken and Rice Casserole

by Rebecca August 4, 2022
written by Rebecca

Prep time: 15 mins | Cook time: 45 mins | Total time: 1 hr | Servings: 4

This Teriyaki Chicken and Rice Casserole is a delicious, very filling meal. A complete meal with shredded chicken, veggies, and rice in the best homemade, flavor-packed teriyaki sauce. A healthy meal that everyone will love!

Ingredients

1 ½ pound boneless, skinless chicken breasts

1 tsp olive oil

½ c. water

¾ c. low sodium soy sauce

⅓ c. packed brown sugar

¾ tsp ground ginger

1 tbsp honey

½ tsp minced garlic

2 tbsp water

2 tbsp cornstarch

3 c. cooked brown rice

1 c. drained canned pineapple tidbits or chunks, packed in juice or with no added sugar

32 ounces frozen mixed vegetables (un-sauced stir fry or Asian varieties that only include zero-point veggies for WW)

How to make Teriyaki Chicken and Rice Casserole

Step 1: Prepare the oven. Preheat it to 350 degrees F.

Step 2: In a small saucepan, add the soy sauce, ½ c water, brown sugar, honey, ginger, olive oil, and garlic. Mix well. Put the lid on and bring everything to a boil over medium heat. Take the lid off once the mixture begins boiling and continue to cook for another minute.

Step 3: In another dish, whisk the cornstarch with 2 tbsp water until smooth. Stir this into the pan and let it cook for a minute more until the sauce begins to thicken. Take the pan off the heat.

Step 4: Lay the raw chicken flat in a casserole dish. On top, pour about a cup of the sauce. Bake the chicken in the preheated oven for about 30 to 35 minutes until the chicken breasts are completely cooked. When done, take the casserole dish out of the oven and shred the chicken using two forks.

Step 5: In the meantime, cook/steam the frozen veggies following the package directions. Add the shredded chicken, and add the cooked veggies along with the pineapple and rice. Pour in most of the remaining sauce, setting aside a little amount of the sauce to drizzle on top.

Step 6: Stir well. Resume baking for additional 15 minutes.

Step 7: Drizzle the reserved sauce on the top right after removing the casserole from the oven. Enjoy!

Nutrition Facts:

Calories: 321Kcl, carbs: 43g, sugar: 18g, fat: 3g, saturated fat: 1g, Protein: 26g, fiber: 4g
Teriyaki Chicken and Rice Casserole

Rebecca Prep time: 15 mins | Cook time: 45 mins | Total time: 1 hr | Servings: 4 This Teriyaki Chicken and Rice Casserole is a delicious, very filling meal. A… General Recipes Teriyaki Chicken and Rice Casserole European Print This
Serves: 4 Prep Time: 15 mins Cooking Time: 45 mins 45 mins
Nutrition facts: 321 calories 3 fat
Rating: 5.0/5
( 1 voted )

Ingredients

  • 1 ½ pound boneless, skinless chicken breasts
  • 1 tsp olive oil
  • ½ c. water
  • ¾ c. low sodium soy sauce
  • ⅓ c. packed brown sugar
  • ¾ tsp ground ginger
  • 1 tbsp honey
  • ½ tsp minced garlic
  • 2 tbsp water
  • 2 tbsp cornstarch
  • 3 c. cooked brown rice
  • 1 c. drained canned pineapple tidbits or chunks, packed in juice or with no added sugar
  • 32 ounces frozen mixed vegetables (un-sauced stir fry or Asian varieties that only include zero-point veggies for WW)

Instructions

Step 1: Prepare the oven. Preheat it to 350 degrees F.

Step 2: In a small saucepan, add the soy sauce, ½ c water, brown sugar, honey, ginger, olive oil, and garlic. Mix well. Put the lid on and bring everything to a boil over medium heat. Take the lid off once the mixture begins boiling and continue to cook for another minute.

Step 3: In another dish, whisk the cornstarch with 2 tbsp water until smooth. Stir this into the pan and let it cook for a minute more until the sauce begins to thicken. Take the pan off the heat.

Step 4: Lay the raw chicken flat in a casserole dish. On top, pour about a cup of the sauce. Bake the chicken in the preheated oven for about 30 to 35 minutes until the chicken breasts are completely cooked. When done, take the casserole dish out of the oven and shred the chicken using two forks.

Step 5: In the meantime, cook/steam the frozen veggies following the package directions. Add the shredded chicken, and add the cooked veggies along with the pineapple and rice. Pour in most of the remaining sauce, setting aside a little amount of the sauce to drizzle on top.

Step 6: Stir well. Resume baking for additional 15 minutes.

Step 7: Drizzle the reserved sauce on the top right after removing the casserole from the oven. Enjoy!
August 4, 2022 0 comment
0 FacebookTwitterPinterestEmail
General Recipes

Chicken Fried Rice

by Rebecca August 4, 2022
written by Rebecca

Servings: 6

I am always a fan of fried rice, and this chicken fried rice recipe with teriyaki chicken is another one of my top favorites! With this simple recipe, you’ll get both worlds on a plate. If chicken and rice are a staple at your home, then you have to give this chicken fried rice a try. It is incredibly easy and super quick to throw together. And the trick is to use day-old/cold rice.

This chicken fried rice is packed with amazing flavors. For a complete, hassle-free meal, serve this chicken fried rice with some vegetables.

Ingredients

2 large eggs, slightly beaten

3 small boneless, skinless chicken breasts

3 tbsp Sesame oil (or vegetable oil)

1 small yellow onion, chopped

1 c. frozen peas and carrots thawed

2 tsp minced garlic

1 (18 oz.) bottle of Teriyaki sauce

4 tbsp soy sauce ( I use low sodium soy sauce)

3 c. cooked white rice day old/ cold rice is best

How to make Chicken Fried Rice

Step 1: In a crockpot, place the chicken and cover it with teriyaki sauce. Set to cook for 3 hours on high. Alternately, you can bake for about 35 minutes at 375 degrees F. Into small pieces, slice the chicken once cooked and set aside.

Step 2: In a large skillet or wok, heat the oil over medium-high heat. Once the oil is hot, add the peas/carrots mix, onion, and garlic to the skillet/wok. Stir fry until tender. Then, adjust the heat to medium-low. To one side of the wok, push the veggie mixture. On the other side, pour the eggs and stir fry until scrambled.

Step 3: Add the rice along with the soy sauce and mix well. Add the cooked chicken, stir, and continue to cook until heated through.

Step 4: Remove from the heat when done and serve the chicken fried rice immediately. Enjoy!

Chicken Fried Rice

Rebecca Servings: 6 I am always a fan of fried rice, and this chicken fried rice recipe with teriyaki chicken is another one of my top favorites! With this simple recipe,… General Recipes Chicken Fried Rice European Print This
Serves: 6
Nutrition facts: 200 calories 20 grams fat
Rating: 5.0/5
( 1 voted )

Ingredients

  • 2 large eggs, slightly beaten
  • 3 small boneless, skinless chicken breasts
  • 3 tbsp Sesame oil (or vegetable oil)
  • 1 small yellow onion, chopped
  • 1 c. frozen peas and carrots thawed
  • 2 tsp minced garlic
  • 1 (18 oz.) bottle of Teriyaki sauce
  • 4 tbsp soy sauce ( I use low sodium soy sauce)
  • 3 c. cooked white rice day old/ cold rice is best

Instructions

Step 1: In a crockpot, place the chicken and cover it with teriyaki sauce. Set to cook for 3 hours on high. Alternately, you can bake for about 35 minutes at 375 degrees F. Into small pieces, slice the chicken once cooked and set aside.

Step 2: In a large skillet or wok, heat the oil over medium-high heat. Once the oil is hot, add the peas/carrots mix, onion, and garlic to the skillet/wok. Stir fry until tender. Then, adjust the heat to medium-low. To one side of the wok, push the veggie mixture. On the other side, pour the eggs and stir fry until scrambled.

Step 3: Add the rice along with the soy sauce and mix well. Add the cooked chicken, stir, and continue to cook until heated through.

Step 4: Remove from the heat when done and serve the chicken fried rice immediately. Enjoy!

August 4, 2022 0 comment
0 FacebookTwitterPinterestEmail
General Recipes

Red Velvet Cheesecake

by Rebecca August 3, 2022
written by Rebecca

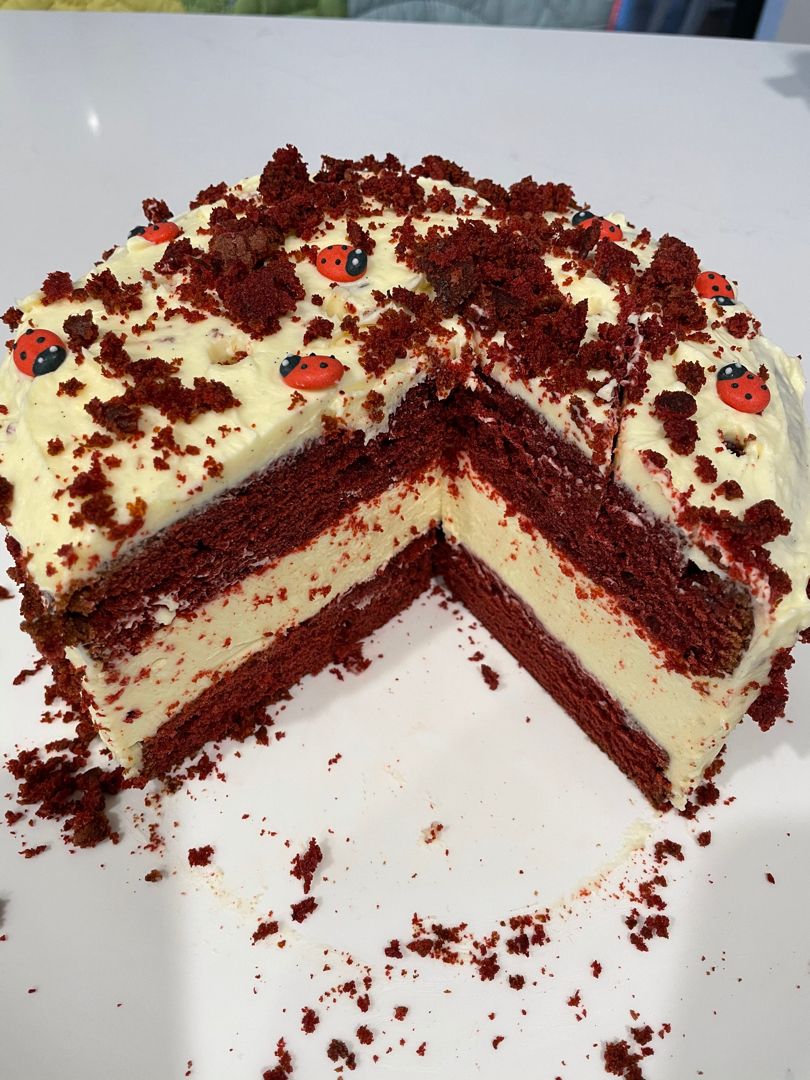
This red velvet Cheesecake is a very decadent, amazing cake that is great for every occasion. This layered cake is a wonderful treat and by far the best red velvet cheesecake I have ever made!

Ingredients

RED VELVET LAYER:

Flour, for cake pan

1 box red velvet cake mix, plus ingredients called for on the box

Butter, for cake pan

CHEESECAKE LAYER:

2 large eggs

2 8-ounces packages of cream cheese, softened

1/3 cup sour cream

2/3 cup sugar

1 tablespoon flour

1/4 teaspoon kosher salt

1 teaspoon vanilla extract

WHIPPED LAYER:

2 teaspoons vanilla

2 c. heavy cream

4 tablespoons powdered sugar

How to make Red Velvet Cheesecake

Step 1: Prepare the oven. Preheat it to 350 degrees. Flour a 9-inches springform pan and set aside.

Step 2: Into the prepared pan, place the batter, and bake it following the package directions. Take the cake out of the oven when done. To make sure the top and sides of the cake are flat, use a leveler. Set aside.

Step 3: To make the cheesecake layer, beat the cream cheese in a large bowl using a hand mixer. Add the sugar, beating until flush and blended. This takes about 3 minutes. Add the eggs a piece at a time, beating until incorporated. Add the salt, flour, and vanilla. Beat until you have a fluffy mixture.

Step 4: Into another springform pan lined with parchment paper, place the batter. Bake for about an hour or until slightly jiggle in the middle.

Step 5: Remove from the oven when done and allow the cake to cool on a cooling rack. Then, freeze before frosting.

Step 6: In the meantime, make the whipped frosting. Add the whipped ingredients to a bowl and whisk for a couple of minutes until stiff peaks form.

Step 7: Over the cake, spread the whipped layer. As needed, add more cheesecake layers.

Step 8: To ensure that there are dollops whipped along the edges, add a pastry tip to the decorators.

Step 9: To serve, sprinkle some red velvet cake crumbs on top of the cake.

Red Velvet Cheesecake

Rebecca This red velvet Cheesecake is a very decadent, amazing cake that is great for every occasion. This layered cake is a wonderful treat and by far the best red velvet… General Recipes Red Velvet Cheesecake European Print This
Nutrition facts: 200 calories 20 grams fat
Rating: 5.0/5
( 1 voted )

Ingredients

  • RED VELVET LAYER:
  • Flour, for cake pan
  • 1 box red velvet cake mix, plus ingredients called for on the box
  • Butter, for cake pan
  • CHEESECAKE LAYER:
  • 2 large eggs
  • 2 8-ounces packages of cream cheese, softened
  • 1/3 cup sour cream
  • 2/3 cup sugar
  • 1 tablespoon flour
  • 1/4 teaspoon kosher salt
  • 1 teaspoon vanilla extract
  • WHIPPED LAYER:
  • 2 teaspoons vanilla
  • 2 c. heavy cream
  • 4 tablespoons powdered sugar

Instructions

Step 1: Prepare the oven. Preheat it to 350 degrees. Flour a 9-inches springform pan and set aside.

Step 2: Into the prepared pan, place the batter, and bake it following the package directions. Take the cake out of the oven when done. To make sure the top and sides of the cake are flat, use a leveler. Set aside.

Step 3: To make the cheesecake layer, beat the cream cheese in a large bowl using a hand mixer. Add the sugar, beating until flush and blended. This takes about 3 minutes. Add the eggs a piece at a time, beating until incorporated. Add the salt, flour, and vanilla. Beat until you have a fluffy mixture.

Step 4: Into another springform pan lined with parchment paper, place the batter. Bake for about an hour or until slightly jiggle in the middle.

Step 5: Remove from the oven when done and allow the cake to cool on a cooling rack. Then, freeze before frosting.

Step 6: In the meantime, make the whipped frosting. Add the whipped ingredients to a bowl and whisk for a couple of minutes until stiff peaks form.

Step 7: Over the cake, spread the whipped layer. As needed, add more cheesecake layers.

Step 8: To ensure that there are dollops whipped along the edges, add a pastry tip to the decorators.

Step 9: To serve, sprinkle some red velvet cake crumbs on top of the cake.

August 3, 2022 0 comment
0 FacebookTwitterPinterestEmail
General Recipes

ASPARAGUS STUFFED CHICKEN BREAST

by Rebecca August 3, 2022
written by Rebecca

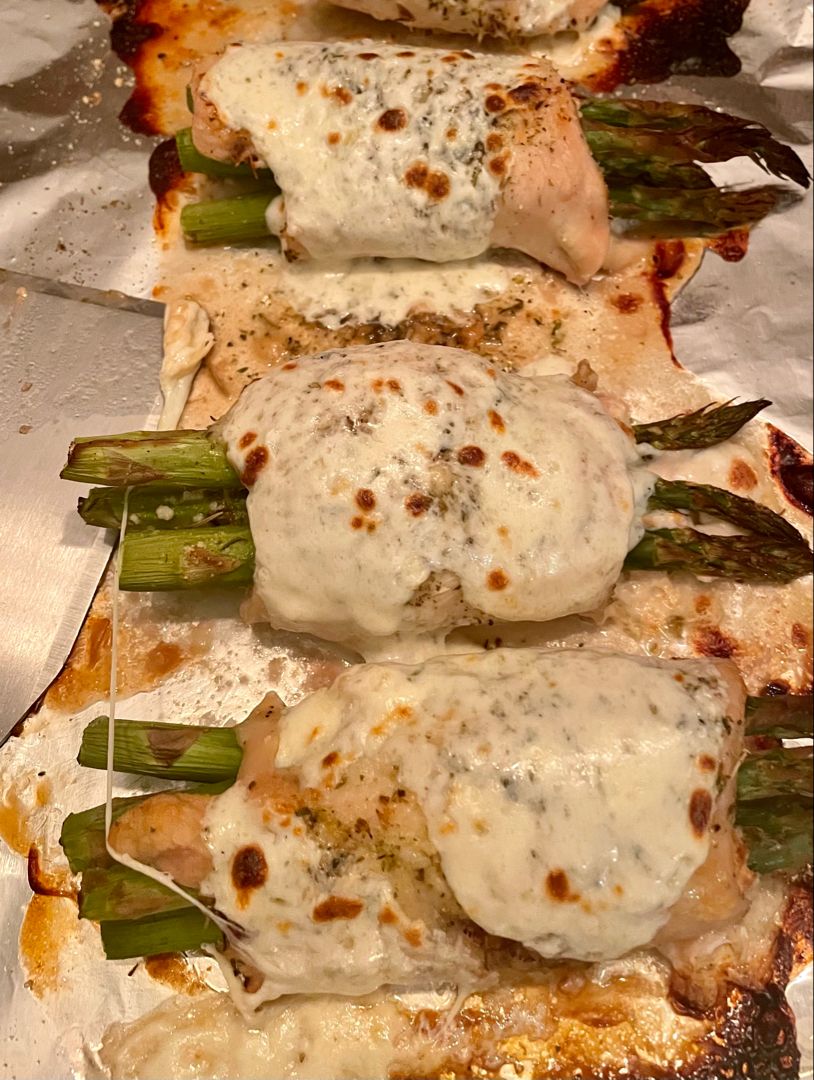
This is a great dinner option with juicy and flavorful juicy chicken. Super easy to throw together and a perfect pair to many side dishes such as roasted veggies, sauteed zucchini, risotto, and a lot more!

Ingredients

Olive Oil

4 boneless, skinless chicken breasts

1 teaspoon Italian seasoning mix

1 teaspoon Smoked Paprika

1 teaspoon Garlic Powder

3 teaspoons garlic – minced and divided (2 teaspoons and 1 teaspoon)

1 tablespoon Lemon zest

⅛ teaspoon red pepper/chili flakes – optional

12 Asparagus stalks – ends trimmed

4 slices of Fresh Mozzarella Cheese

1-ounce Sun-dried Tomatoes – chopped

2 tablespoons Butter

2-3 tablespoons fresh lemon juice

½ teaspoon Salt

¼ teaspoon Cracked Pepper

HOW TO MAKE ASPARAGUS STUFFED CHICKEN BREAST

Step 1: Prepare the oven. Preheat it to 400 degrees F.

Step 2: Place the Italian seasoning, garlic powder, paprika, salt, and pepper in a small bowl. Mix well until blended.

Step 3: On a clean chopping board, lay the chicken. Slice about 3/4 pocket on the underside of the chicken, but make sure not to cut all the way through. Using paper towels, pat dries each chicken breast.

Step 4: With olive oil, lightly coat each chicken breast and sprinkle all sides, including the pocket with herbs and spice mixture. Then, drizzle with lemon zest and sprinkle with garlic.

Step 5: Mix the 2 tbsp olive oil, 2 tsp minced garlic, and red pepper flakes (if using). Toss in the asparagus until completely coated.

Step 6: In the pocket of each chicken breast, place 2 slices of fresh mozzarella, 3 sprigs of asparagus, and a few pieces of sun-dried tomatoes. Using 2 to 3 toothpicks, close the pockets.

Step 7: In a large cast-iron skillet or oven-proof skillet, heat 1 to 2 tbsp olive oil over medium-high heat. Add the chicken once the oil is hot and sear for about 5 minutes on each side until nicely golden brown. Take the chicken pan off the heat and pour in the lemon juice and 1 teaspoon of minced garlic. Put the lid on or cover with foil.

Step 8: Into the prepared oven, place the skillet. Bake the chicken for about 10 to 15 minutes. Uncover and continue to bake for additional 5 minutes or until the internal temperature of the chicken breast reaches 165 degrees F.

Step 9: Take the skillet off the heat. Cover and allow the chicken breasts to rest for about 5 to 10 minutes.

Step 10: Before serving, remove the toothpicks. Over the chicken, spoon a bit of the pan juices. Enjoy!

ASPARAGUS STUFFED CHICKEN BREAST

Rebecca This is a great dinner option with juicy and flavorful juicy chicken. Super easy to throw together and a perfect pair to many side dishes such as roasted veggies, sauteed… General Recipes ASPARAGUS STUFFED CHICKEN BREAST European Print This
Nutrition facts: 200 calories 20 grams fat
Rating: 5.0/5
( 1 voted )

Ingredients

  • Olive Oil
  • 4 boneless, skinless chicken breasts
  • 1 teaspoon Italian seasoning mix
  • 1 teaspoon Smoked Paprika
  • 1 teaspoon Garlic Powder
  • 3 teaspoons garlic – minced and divided (2 teaspoons and 1 teaspoon)
  • 1 tablespoon Lemon zest
  • ⅛ teaspoon red pepper/chili flakes – optional
  • 12 Asparagus stalks – ends trimmed
  • 4 slices of Fresh Mozzarella Cheese
  • 1-ounce Sun-dried Tomatoes – chopped
  • 2 tablespoons Butter
  • 2-3 tablespoons fresh lemon juice
  • ½ teaspoon Salt
  • ¼ teaspoon Cracked Pepper

Instructions

Step 1: Prepare the oven. Preheat it to 400 degrees F.

Step 2: Place the Italian seasoning, garlic powder, paprika, salt, and pepper in a small bowl. Mix well until blended.

Step 3: On a clean chopping board, lay the chicken. Slice about 3/4 pocket on the underside of the chicken, but make sure not to cut all the way through. Using paper towels, pat dries each chicken breast.

Step 4: With olive oil, lightly coat each chicken breast and sprinkle all sides, including the pocket with herbs and spice mixture. Then, drizzle with lemon zest and sprinkle with garlic.

Step 5: Mix the 2 tbsp olive oil, 2 tsp minced garlic, and red pepper flakes (if using). Toss in the asparagus until completely coated.

Step 6: In the pocket of each chicken breast, place 2 slices of fresh mozzarella, 3 sprigs of asparagus, and a few pieces of sun-dried tomatoes. Using 2 to 3 toothpicks, close the pockets.

Step 7: In a large cast-iron skillet or oven-proof skillet, heat 1 to 2 tbsp olive oil over medium-high heat. Add the chicken once the oil is hot and sear for about 5 minutes on each side until nicely golden brown. Take the chicken pan off the heat and pour in the lemon juice and 1 teaspoon of minced garlic. Put the lid on or cover with foil.

Step 8: Into the prepared oven, place the skillet. Bake the chicken for about 10 to 15 minutes. Uncover and continue to bake for additional 5 minutes or until the internal temperature of the chicken breast reaches 165 degrees F.

Step 9: Take the skillet off the heat. Cover and allow the chicken breasts to rest for about 5 to 10 minutes.

Step 10: Before serving, remove the toothpicks. Over the chicken, spoon a bit of the pan juices. Enjoy!

August 3, 2022 0 comment
0 FacebookTwitterPinterestEmail
General Recipes

Two Ingredient Pumpkin Muffins

by Rebecca August 3, 2022
written by Rebecca

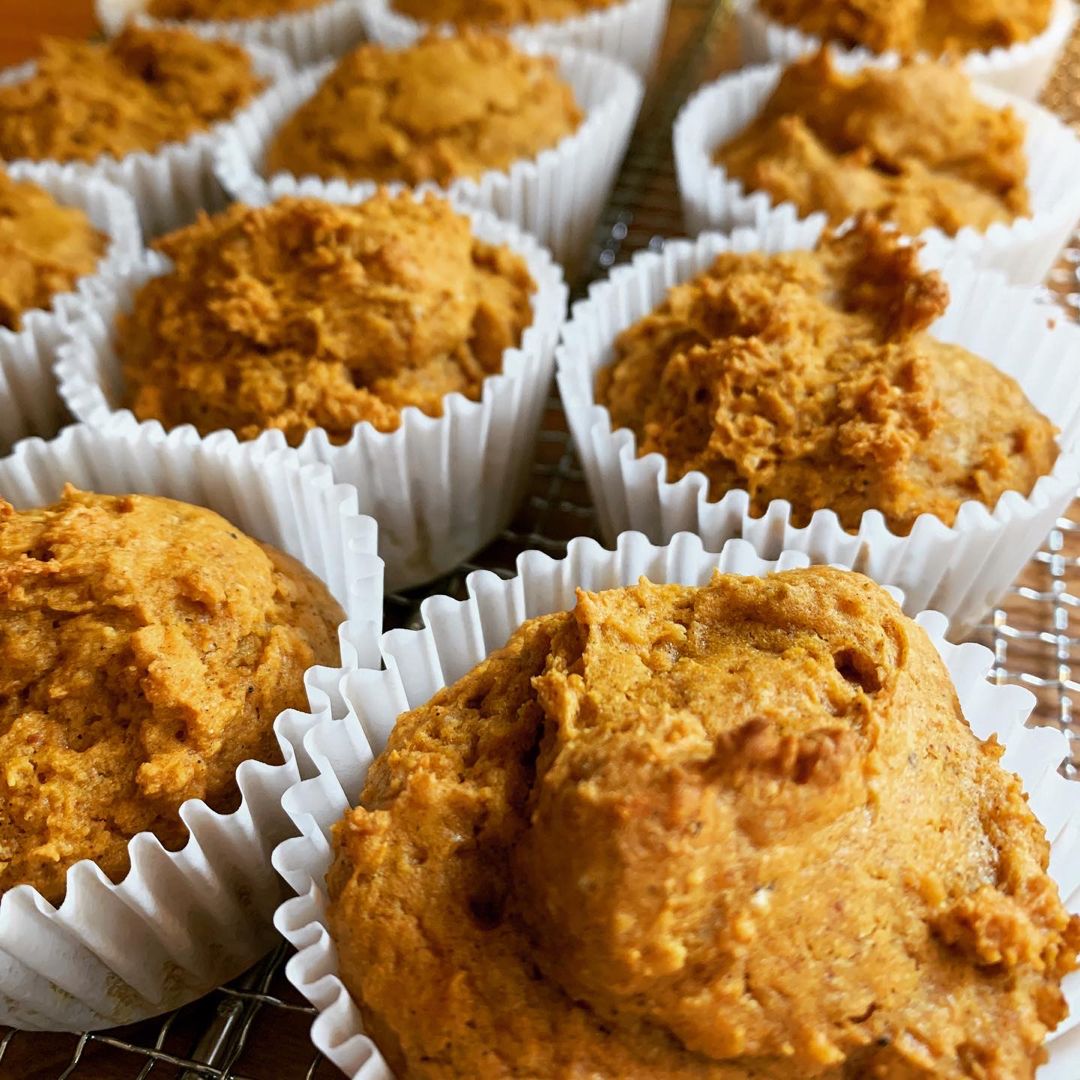
These pumpkin muffins are very flavorful, and the perfect treat not only during fall but all year round! And these pumpkin muffins are an excellent grab-and-go snack. These delicious pumpkin muffins are incredibly easy to whip up using just a box of cake mix and pumpkin puree. The raisins or chopped nuts are optional but highly recommended.

I am a pumpkin fanatic, thus these pumpkin muffins. I call these lazy muffins because I can easily throw this together using just two ingredients. Or I want to include some add-ins, you can add raisins and some chopped nuts.

These pumpkin muffins are seriously delicious and will no doubt satisfy your pumpkin spice cravings! This simple recipe is an amazing hack made with a boxed cake mix.

Enjoy these tasty pumpkin muffins for breakfast, snacks, or even as a side dish. Pair these pumpkin muffins with fresh fruit salad, sausage, hash brown casserole, and more for breakfast or brunch. If you have picky eaters and you want to sneak in extra veggies that is perfectly fine! I am sure they will not mind!

Ingredients

1 (15 oz.) can of pure pumpkin puree

1 box spice cake mix

Optional: Mix in 1/2 c. raisins or chopped nuts if desired

How to make Two Ingredient Pumpkin Muffins

Step 1: Combine the pumpkin and the spice cake mix powder until well blended.

Step 2: Into a greased muffin tin, divide the batter. Place in a preheated 350 degrees oven and bake for about 18 to 22 minutes or until a knife inserted into the muffin comes out clean.

Step 3: Remove from the oven when done and serve the Pumpkin Muffins with a bit of whipped topping on top. Enjoy!

Tips:

For this recipe, you can use fresh pumpkin instead of canned.

If desired, you can add some chopped nuts or raisins.

This recipe is very versatile. You are welcome to add other ingredients. If you think the muffins are too dry, add a little amount of milk.

Two Ingredient Pumpkin Muffins

Rebecca These pumpkin muffins are very flavorful, and the perfect treat not only during fall but all year round! And these pumpkin muffins are an excellent grab-and-go snack. These delicious pumpkin… General Recipes Two Ingredient Pumpkin Muffins European Print This
Nutrition facts: 200 calories 20 grams fat
Rating: 5.0/5
( 1 voted )

Ingredients

  • 1 (15 oz.) can of pure pumpkin puree
  • 1 box spice cake mix
  • Optional: Mix in 1/2 c. raisins or chopped nuts if desired

Instructions

Step 1: Combine the pumpkin and the spice cake mix powder until well blended.

Step 2: Into a greased muffin tin, divide the batter. Place in a preheated 350 degrees oven and bake for about 18 to 22 minutes or until a knife inserted into the muffin comes out clean.

Step 3: Remove from the oven when done and serve the Pumpkin Muffins with a bit of whipped topping on top. Enjoy!

Notes

For this recipe, you can use fresh pumpkin instead of canned. If desired, you can add some chopped nuts or raisins. This recipe is very versatile. You are welcome to add other ingredients. If you think the muffins are too dry, add a little amount of milk.

August 3, 2022 0 comment
0 FacebookTwitterPinterestEmail
General Recipes

Tex Mex Chopped Salad

by Rebecca August 3, 2022
written by Rebecca

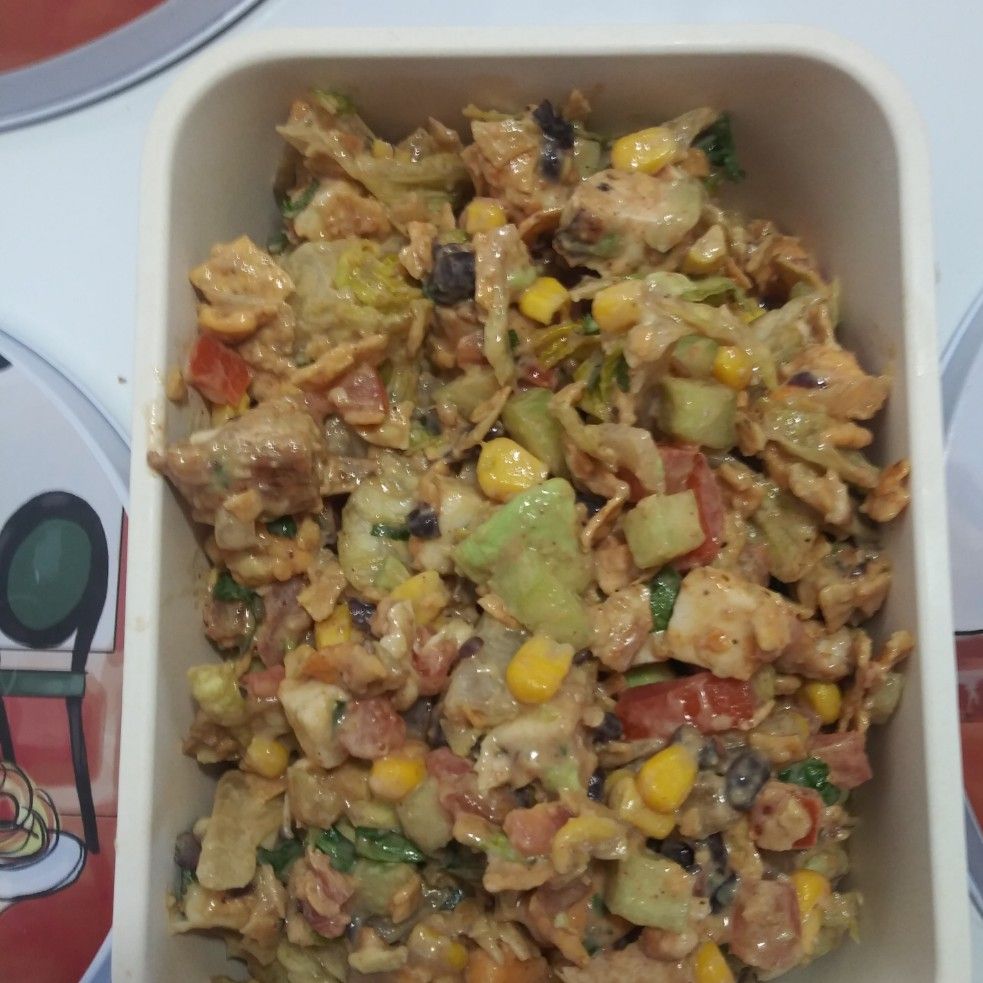
I love Tex-Mex dip. It is packed with flavor and super easy to whip up. To enjoy my favorite Tex-Mex dip in a salad form is such a blast! This Tex-Mex Chopped Salad is amazing to serve at parties, potlucks, and picnics. You can make the dressing a day in advance, but I do not recommend assembling this salad right away if not serving it yet. For best results, assemble the salad right before serving. This recipe is also pretty versatile. You can add other ingredients if desired.

The dressing is so simple. It is made with just two ingredients; ranch dressing and taco seasoning (either mild or hot depending on your preference). Toss the chicken, lettuce, tomatoes, cheese, and the other salad ingredients until completely coated in the dressing, and serve immediately.

Ingredients

Dressing:

2 tablespoons taco seasoning, hot or mild

1 c. ranch dressing

Salad:

4 c. Romaine lettuce, chopped, about 1 head

3 c. chicken, cooked, cooled, and diced

4 ounces sharp cheddar cheese, or pepper jack, cut into ¼-inch cubes

1 cucumber, seeded and diced

4-5 green onions, sliced

1 c. corn kernels, fresh or frozen

1 15-ounces can of black beans, drained and rinsed

Juice of 1/2 of a lime

1/4 c. cilantro, chopped

2 Roma tomatoes, diced

Jalapeño, diced, toasted pumpkin seeds, diced avocado, or jicama for garnish (optional)

1 c. tortilla chips, crushed

How to make Tex Mex Chopped Salad

Step 1: Place all the dressing ingredients in a small bowl. Mix well until combined. Place the dressing in the fridge until ready to use.

Step 2: In a big bowl, place the salad ingredients. Slowly add the dressing to the salad and lightly toss until the salad is completely coated. To taste, season with salt and pepper.

Step 3: Serve the salad immediately. Enjoy!

Tips:

You are welcome to make the dressing ahead and keep this in the fridge for not more than 12 hours.

I do not recommend keeping the leftovers for long. You can whip up the dressing and keep it in the fridge. Then, assemble the salad right before serving.

This recipe is very versatile. You can add other ingredients if desired.

Tex Mex Chopped Salad

Rebecca I love Tex-Mex dip. It is packed with flavor and super easy to whip up. To enjoy my favorite Tex-Mex dip in a salad form is such a blast! This… General Recipes Tex Mex Chopped Salad European Print This
Nutrition facts: 200 calories 20 grams fat
Rating: 5.0/5
( 1 voted )

Ingredients

  • Dressing:
  • 2 tablespoons taco seasoning, hot or mild
  • 1 c. ranch dressing
  • Salad:
  • 4 c. Romaine lettuce, chopped, about 1 head
  • 3 c. chicken, cooked, cooled, and diced
  • 4 ounces sharp cheddar cheese, or pepper jack, cut into ¼-inch cubes
  • 1 cucumber, seeded and diced
  • 4-5 green onions, sliced
  • 1 c. corn kernels, fresh or frozen
  • 1 15-ounces can of black beans, drained and rinsed
  • Juice of 1/2 of a lime
  • 1/4 c. cilantro, chopped
  • 2 Roma tomatoes, diced
  • Jalapeño, diced, toasted pumpkin seeds, diced avocado, or jicama for garnish (optional)
  • 1 c. tortilla chips, crushed

Instructions

Step 1: Place all the dressing ingredients in a small bowl. Mix well until combined. Place the dressing in the fridge until ready to use.

Step 2: In a big bowl, place the salad ingredients. Slowly add the dressing to the salad and lightly toss until the salad is completely coated. To taste, season with salt and pepper.

Step 3: Serve the salad immediately. Enjoy!

Notes

You are welcome to make the dressing ahead and keep this in the fridge for not more than 12 hours. I do not recommend keeping the leftovers for long. You can whip up the dressing and keep it in the fridge. Then, assemble the salad right before serving. This recipe is very versatile. You can add other ingredients if desired.

August 3, 2022 0 comment
0 FacebookTwitterPinterestEmail
General Recipes

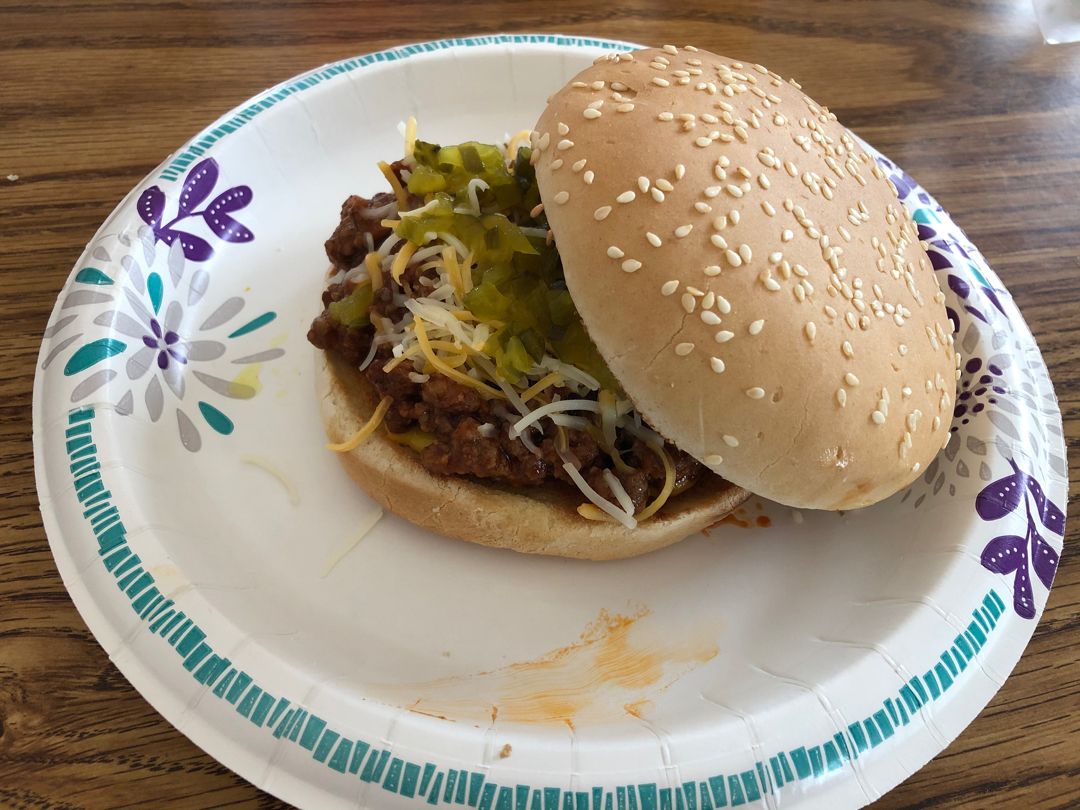
HOMEMADE SLOPPY JOES

by Rebecca August 3, 2022
written by Rebecca

Prep Time: 5 mins | Cook Time: 15 mins | Total Time: 20 mins | Servings: 4

These homemade Sloppy Joes are a great option if you want to do away from the packaged Sloppy Joes. This is incredibly easy to throw together using ingredients that you probably have on hand. Have these homemade Sloppy Joes ready in under twenty minutes and enjoy the same classic delicious taste of Sloppy Joes. Serve these mouthwatering Sloppy Joes in toasted buns. If you have any leftovers, store them in the fridge or freeze them for up to 4 months.

Ingredients

1 lb lean ground beef

1 tbsp extra-virgin olive oil

½ small green bell pepper, diced

1 small sweet onion, diced

2 cloves garlic, minced

1 tbsp tomato paste

1/3 c. water

½ c. ketchup

1 tbsp brown sugar

2 tsp yellow mustard

¼ tsp red pepper flakes

1 tbsp Worcestershire sauce

Toasted buns, for serving

½ tsp kosher salt

¼ tsp black pepper

HOW TO MAKE HOMEMADE SLOPPY JOES

Step 1: In a large non-stick skillet, heat the oil over medium-high heat. Once the oil is hot, add the beef, onion, and bell pepper to the skillet and cook for about 5 minutes, breaking the meat into crumbles using a wooden spoon until the meat is completely cooked and the veggies have softened. Then, add the garlic, stir, and cook for additional 30 minutes or until aromatic. When done, drain the excess grease.

Step 2: Stir in the tomato paste, then add the ketchup, water, brown sugar, Worcestershire, mustard, salt, pepper, and red pepper flakes. Stir well until blended.

Step 3: Cook for another 10 minutes over medium heat or until the mixture has thickened.

Step 4: Take the skillet off the heat and serve the Sloppy Joes on toasted buns. Enjoy!

Tips:

You store any leftovers in the fridge or freeze them for up to 4 months. Thaw overnight in the fridge when frozen and reheat in the oven for about 10 minutes.

HOMEMADE SLOPPY JOES

Rebecca Prep Time: 5 mins | Cook Time: 15 mins | Total Time: 20 mins | Servings: 4 These homemade Sloppy Joes are a great option if you want to do… General Recipes HOMEMADE SLOPPY JOES European Print This
Serves: 4 Prep Time: 5 mins Cooking Time: 15 mins 15 mins
Nutrition facts: 200 calories 20 grams fat
Rating: 5.0/5
( 1 voted )

Ingredients

  • 1 lb lean ground beef
  • 1 tbsp extra-virgin olive oil
  • ½ small green bell pepper, diced
  • 1 small sweet onion, diced
  • 2 cloves garlic, minced
  • 1 tbsp tomato paste
  • 1/3 c. water
  • ½ c. ketchup
  • 1 tbsp brown sugar
  • 2 tsp yellow mustard
  • ¼ tsp red pepper flakes
  • 1 tbsp Worcestershire sauce
  • Toasted buns, for serving
  • ½ tsp kosher salt
  • ¼ tsp black pepper

Instructions

Step 1: In a large non-stick skillet, heat the oil over medium-high heat. Once the oil is hot, add the beef, onion, and bell pepper to the skillet and cook for about 5 minutes, breaking the meat into crumbles using a wooden spoon until the meat is completely cooked and the veggies have softened. Then, add the garlic, stir, and cook for additional 30 minutes or until aromatic. When done, drain the excess grease.

Step 2: Stir in the tomato paste, then add the ketchup, water, brown sugar, Worcestershire, mustard, salt, pepper, and red pepper flakes. Stir well until blended.

Step 3: Cook for another 10 minutes over medium heat or until the mixture has thickened.

Step 4: Take the skillet off the heat and serve the Sloppy Joes on toasted buns. Enjoy!

Notes

You store any leftovers in the fridge or freeze them for up to 4 months. Thaw overnight in the fridge when frozen and reheat in the oven for about 10 minutes.

August 3, 2022 0 comment
0 FacebookTwitterPinterestEmail
General Recipes

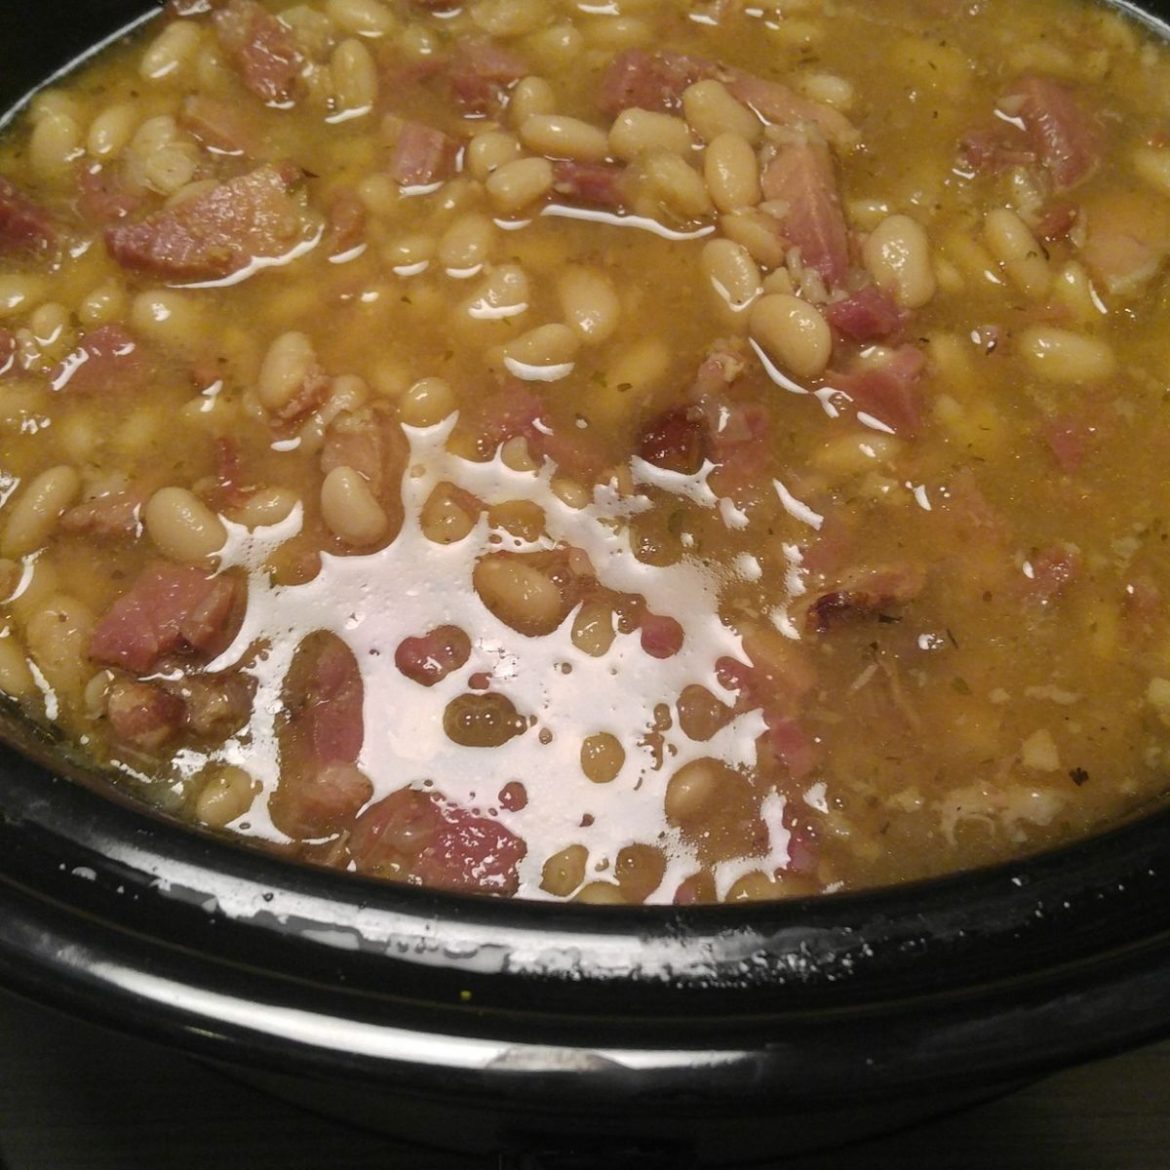
4 INGREDIENT CROCKPOT GREAT NORTHERN BEANS

by Rebecca August 3, 2022
written by Rebecca

Prep time: 10 mins | Cook time: 5 hrs | Total time: 5 hrs 10 mins | Yield: 6 servings

If you are searching for a filling dish, this Northern classic is a must! It is made with just four ingredients in your crockpot. All you need to do is dump everything in your crockpot and set it to cook. It is a no-fuss dish that you can whip up at any time.

This Great Northern Beans is a high-protein, very versatile, filing, and comforting meal. You can serve this by itself or add them to soups. This is also great to enjoy cold in a salad or as a dip.

Ingredients

1½ pounds ham shank, chopped in big chunks

1 small onion-diced water, enough to cover beans

16 ounces package of dried northern beans

Salt and pepper, to taste

⅓ c. light brown sugar

HOW TO MAKE 4 INGREDIENT CROCKPOT GREAT NORTHERN BEANS

Step 1: Sort out the beans for pebbles and rinse them under running water.

Step 2: Into the crockpot, add the rinsed beans, chopped ham shank, salt, and pepper. Pour in the onion-diced water, covering the ingredients in the crockpot.

Step 3: Put the lid on and set it to cook for 2 hours on high. Adjust the setting to low and cook for additional 3 hours or until the beans are tender.

Step 4: Remove the ham shanks from the pot and skin the meat, and remove the bones.

Step 5: Place the meat (ONLY) in the crockpot. Add the brown sugar and gently mix until the brown sugar is well blended.

Step 6: Serve the Great Northern Beans immediately. Enjoy!

Tips:

In an airtight container, keep any leftovers and store them in the fridge for up to 4 to 5 days. When ready to serve, reheat the leftovers in the microwave at medium power or in a saucepan on medium heat on the stove.

Or enjoy this Great Northern Beans cold in a salad or as a dip.

4 INGREDIENT CROCKPOT GREAT NORTHERN BEANS

Rebecca Prep time: 10 mins | Cook time: 5 hrs | Total time: 5 hrs 10 mins | Yield: 6 servings If you are searching for a filling dish, this Northern… General Recipes 4 INGREDIENT CROCKPOT GREAT NORTHERN BEANS European Print This
Serves: 6 Prep Time: 10 mins Cooking Time: 5 hrs 5 hrs
Nutrition facts: 200 calories 20 grams fat
Rating: 5.0/5
( 1 voted )

Ingredients

  • 1½ pounds ham shank, chopped in big chunks
  • 1 small onion-diced water, enough to cover beans
  • 16 ounces package of dried northern beans
  • Salt and pepper, to taste
  • ⅓ c. light brown sugar

Instructions

Step 1: Sort out the beans for pebbles and rinse them under running water.

Step 2: Into the crockpot, add the rinsed beans, chopped ham shank, salt, and pepper. Pour in the onion-diced water, covering the ingredients in the crockpot.

Step 3: Put the lid on and set it to cook for 2 hours on high. Adjust the setting to low and cook for additional 3 hours or until the beans are tender.

Step 4: Remove the ham shanks from the pot and skin the meat, and remove the bones.

Step 5: Place the meat (ONLY) in the crockpot. Add the brown sugar and gently mix until the brown sugar is well blended.

Step 6: Serve the Great Northern Beans immediately. Enjoy!

Notes

In an airtight container, keep any leftovers and store them in the fridge for up to 4 to 5 days. When ready to serve, reheat the leftovers in the microwave at medium power or in a saucepan on medium heat on the stove. Or enjoy this Great Northern Beans cold in a salad or as a dip.

August 3, 2022 0 comment
0 FacebookTwitterPinterestEmail
General Recipes

SAUSAGE HASHBROWN BITES

by Rebecca August 3, 2022
written by Rebecca

These sausage hash brown bites are the perfect breakfast or snack if you want something easy and fast. These bites are simple to whip up using just a few readily available ingredients. All you need is to mix all the ingredients and shape them into a 1 1/2-inch ball. Bake in the oven and these sausage hash brown bites are ready in a snap! These amazing bites are crunchy and very savory. Your fussiest eaters will surely dig these delicious sausages, hash brown bites!

These bites are an excellent snack. They are also a great quick and easy breakfast. You can serve these with any of your favorite dips, such as hollandaise sauce, salsa, or even hot sauce. These sausage hash brown bites are a delicious grab-and-go dish!

INGREDIENTS

4 c. shredded, frozen hash browns

8 ounces cream cheese, softened

1 pound ground breakfast sausage, uncooked

1 1/2 c. cheddar cheese, shredded

1 1/2 c. Bisquick

HOW TO MAKE SAUSAGE HASHBROWN BITES

Step 1: Prepare the oven. Preheat it to 400 degrees. Using parchment paper, line a baking sheet and set it aside.

Step 2: Place the cream cheese, sausage, biscuit mix, hash browns, and cheddar cheese in a medium bowl. Mix well until combined.

Step 3: Into about 1 1/2-inch ball, shape the mixture, and place them onto the prepared baking sheet. Place in the preheated oven and bake for about 20 to 25 minutes or until the sausage hash brown bites are completely browned.

Step 4: Remove from the oven when done and allow the bites to cool before serving. Enjoy!

Tips:

You can serve these bites with any sauce you prefer. I love hollandaise sauce. These bites are also great to pair with salsa or hot sauce for dipping if you want a little heat.

You can make these bites ahead. Allow them to cool completely and store them in an airtight container. Keep them in the fridge or at room temperature. Reheat in the oven and microwave when ready to serve.

SAUSAGE HASHBROWN BITES

Rebecca These sausage hash brown bites are the perfect breakfast or snack if you want something easy and fast. These bites are simple to whip up using just a few readily… General Recipes SAUSAGE HASHBROWN BITES European Print This
Nutrition facts: 200 calories 20 grams fat
Rating: 5.0/5
( 1 voted )

Ingredients

  • 4 c. shredded, frozen hash browns
  • 8 ounces cream cheese, softened
  • 1 pound ground breakfast sausage, uncooked
  • 1 1/2 c. cheddar cheese, shredded
  • 1 1/2 c. Bisquick

Instructions

Step 1: Prepare the oven. Preheat it to 400 degrees. Using parchment paper, line a baking sheet and set it aside.

Step 2: Place the cream cheese, sausage, biscuit mix, hash browns, and cheddar cheese in a medium bowl. Mix well until combined.

Step 3: Into about 1 1/2-inch ball, shape the mixture, and place them onto the prepared baking sheet. Place in the preheated oven and bake for about 20 to 25 minutes or until the sausage hash brown bites are completely browned.

Step 4: Remove from the oven when done and allow the bites to cool before serving. Enjoy!

Notes

You can serve these bites with any sauce you prefer. I love hollandaise sauce. These bites are also great to pair with salsa or hot sauce for dipping if you want a little heat. You can make these bites ahead. Allow them to cool completely and store them in an airtight container. Keep them in the fridge or at room temperature. Reheat in the oven and microwave when ready to serve.

August 3, 2022 0 comment
0 FacebookTwitterPinterestEmail
General Recipes

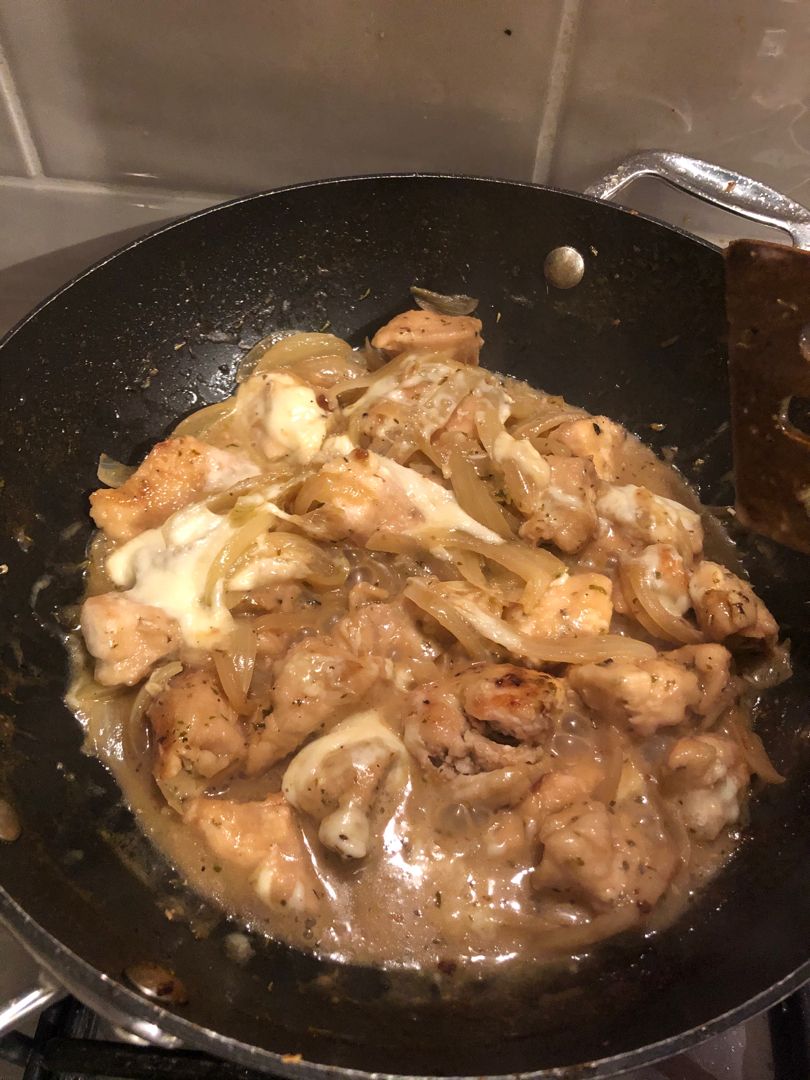
French Onion Chicken Skillet

by Rebecca August 3, 2022
written by Rebecca

This French Onion Chicken Skillet is one of the best dinner dishes I’ve made! This has been my family’s favorite for as long as I can remember. The lush chicken is smothered in a familiar flavor with lots of melted cheese.

INGREDIENTS

2 lbs boneless, skinless chicken breasts or thighs

2 lbs Vidalia onions, sliced

2 c. beef broth

2 tsp balsamic vinegar

2 tbsp all-purpose flour

1/2 tsp dried sage

1/2 tsp dried thyme

1 c. Swiss cheese, grated

kosher salt and freshly ground pepper, to taste

1/3 c. extra-virgin olive oil, divided

How to make French Onion Chicken Skillet

Step 1: Prepare the oven. Preheat it to 350 degrees F.

Step 2: In a large, oven-proof pan or skillet, heat 2 tbsp olive oil over medium heat. Once the oil is hot, add the onions to the pan and season with salt. Cook for about 15 to 20 minutes, stirring often, until the onions have softened and caramelized. Pour in the balsamic vinegar and continue to cook for an additional 3 to 5 minutes or until darkened, but not burned. To a medium bowl, transfer the onions.

Step 3: In the same skillet, drizzle the rest of the olive oil. Adjust the heat to medium-high.

Step 4: In the meantime, season the chicken breasts with salt, pepper, thyme, and sage. Once the oil is hot, add the chicken breasts to the skillet and sear until both sides are golden brown. Set the chicken aside when done.

Step 5: Into the skillet, pour in the beef broth. Bring the mixture to a boil, deglazing the pan. Then, adjust the heat to medium-low. Add the flour and stir until smooth. Continue to cook for 5 to 7 minutes more or until the mixture has thickened. Adjust the seasoning according to taste.

Step 6: Place the chicken and onions back in the pan. Stir well and top with grated Swiss cheese.

Step 7: Place the skillet into the preheated oven and bake until the cheese has melted and bubbly, and the chicken is completely cooked.

Step 8: Serve the French Onion Chicken Skillet immediately. Enjoy!

French Onion Chicken Skillet

Rebecca This French Onion Chicken Skillet is one of the best dinner dishes I’ve made! This has been my family’s favorite for as long as I can remember. The lush chicken… General Recipes French Onion Chicken Skillet European Print This
Nutrition facts: 200 calories 20 grams fat
Rating: 5.0/5
( 1 voted )

Ingredients

  • 2 lbs boneless, skinless chicken breasts or thighs
  • 2 lbs Vidalia onions, sliced
  • 2 c. beef broth
  • 2 tsp balsamic vinegar
  • 2 tbsp all-purpose flour
  • 1/2 tsp dried sage
  • 1/2 tsp dried thyme
  • 1 c. Swiss cheese, grated
  • kosher salt and freshly ground pepper, to taste
  • 1/3 c. extra-virgin olive oil, divided

Instructions

Step 1: Prepare the oven. Preheat it to 350 degrees F.

Step 2: In a large, oven-proof pan or skillet, heat 2 tbsp olive oil over medium heat. Once the oil is hot, add the onions to the pan and season with salt. Cook for about 15 to 20 minutes, stirring often, until the onions have softened and caramelized. Pour in the balsamic vinegar and continue to cook for an additional 3 to 5 minutes or until darkened, but not burned. To a medium bowl, transfer the onions.

Step 3: In the same skillet, drizzle the rest of the olive oil. Adjust the heat to medium-high.

Step 4: In the meantime, season the chicken breasts with salt, pepper, thyme, and sage. Once the oil is hot, add the chicken breasts to the skillet and sear until both sides are golden brown. Set the chicken aside when done.

Step 5: Into the skillet, pour in the beef broth. Bring the mixture to a boil, deglazing the pan. Then, adjust the heat to medium-low. Add the flour and stir until smooth. Continue to cook for 5 to 7 minutes more or until the mixture has thickened. Adjust the seasoning according to taste.

Step 6: Place the chicken and onions back in the pan. Stir well and top with grated Swiss cheese.

Step 7: Place the skillet into the preheated oven and bake until the cheese has melted and bubbly, and the chicken is completely cooked.

Step 8: Serve the French Onion Chicken Skillet immediately. Enjoy!

August 3, 2022 0 comment
0 FacebookTwitterPinterestEmail
Newer Posts
Older Posts

Popular Posts

  • 1

    Crispy Crunchy Parmesan Potatoes

    March 21, 2020
  • 2

    CROCK POT SMOTHERED PORK CHOPS

    March 21, 2020
  • Facebook
  • Twitter

@2019 - All Right Reserved.


Back To Top