Cook it once
  • Home
  • Privacy Policy
  • Recipes
    • KETO
    • LC
    • WW
  • Tips
  • Contact
Cook it once
  • Home
  • Privacy Policy
  • Recipes
    • KETO
    • LC
    • WW
  • Tips
  • Contact
Category:

Main Dish Recipes

Main Dish Recipes

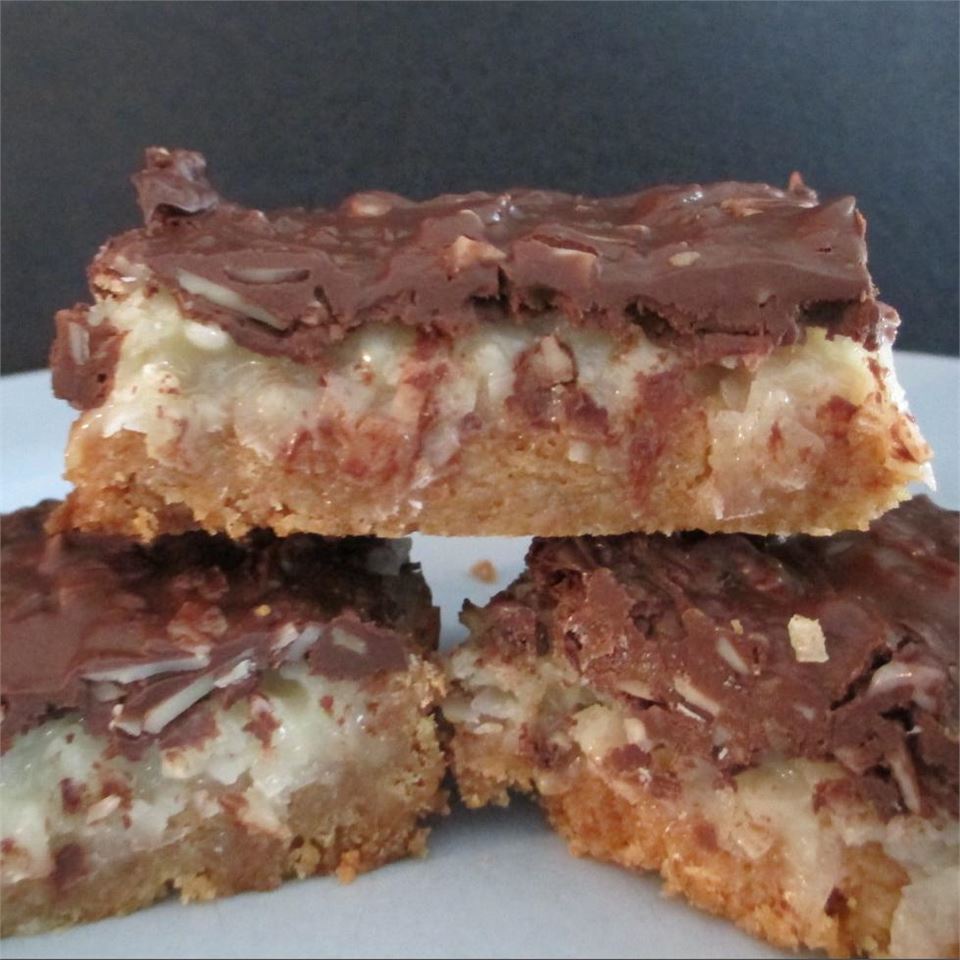
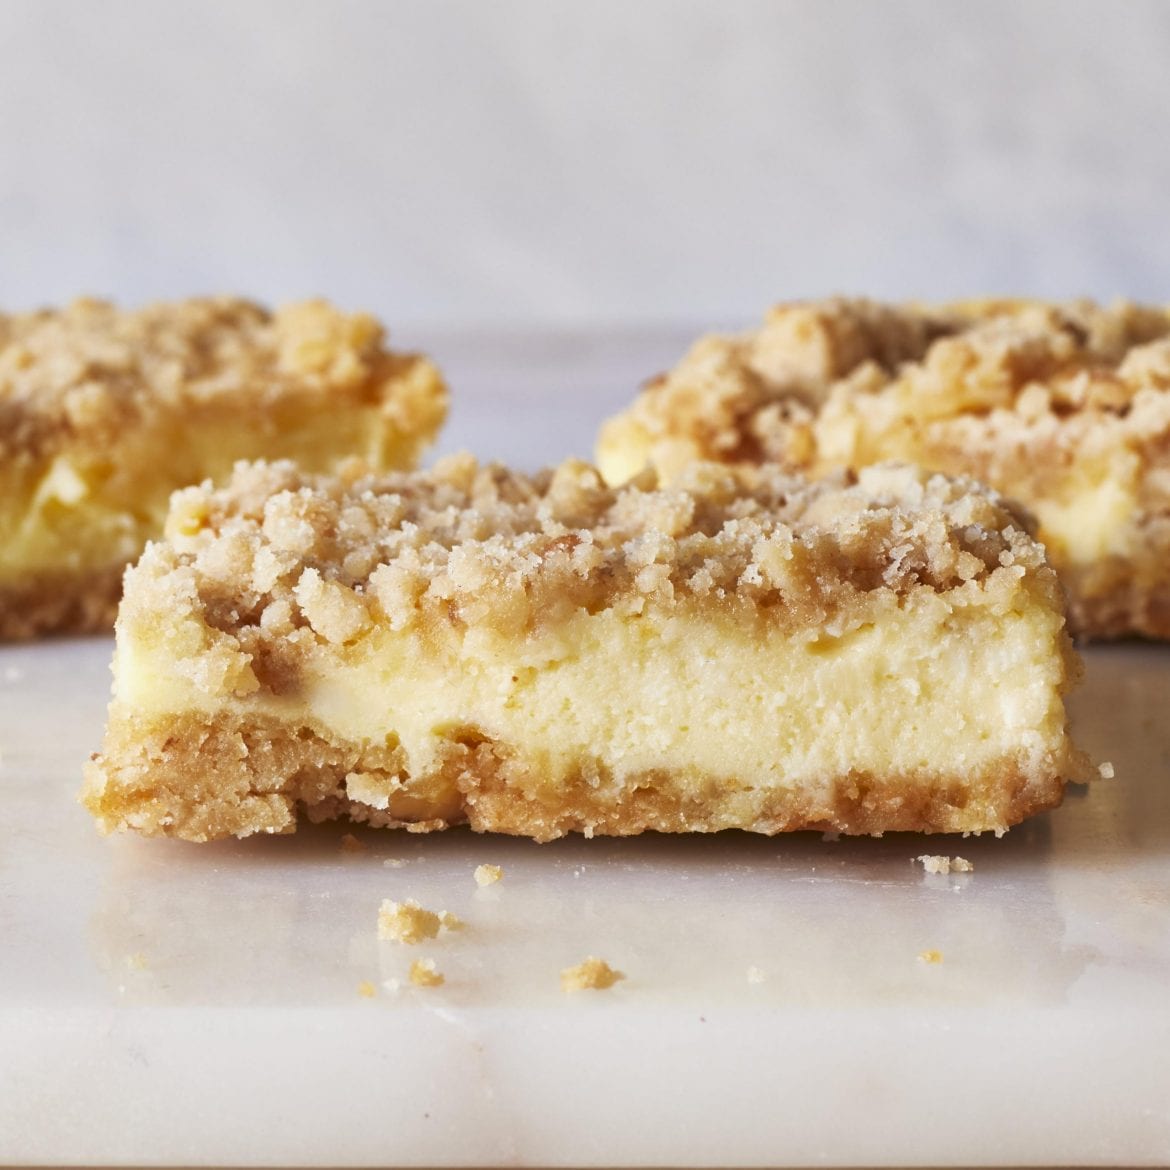
MOM’S CHEESECAKE COOKIE BARS

by Rebecca August 11, 2020
written by Rebecca

Prep time: 15 min | Cooking: 40 min | Total: 55 min | Servings: 16 | Yield: 1 9×13 inch baking pan

It’s almost Halloween! I will surely visit home. I miss my mom and her amazing Cheesecake Cookie Bars. These amazing treats were the best part of Halloween when I was a kid. My mom always made these Cookie Bars. I remember giving the kids pieces of this and candies. Good times! I have provided all the steps and ingredients. Make sure to follow them step by step and do not skip so you’d be heading to perfection!

INGREDIENTS

2 cups all-purpose flour

1 cup chopped walnuts

⅔ cup butter

⅔ cup brown sugar

2 8 oz packages cream cheese softened

½ cup white sugar

2 eggs

¼ cup milk

1 teaspoon vanilla extract

2 tablespoons lemon juice

HOW TO MAKE MOM’S CHEESECAKE COOKIE BARS

Step 1: Prepare the oven. Preheat it to 350 degrees F or 175 degrees C.

Step 2: Add and combine the flour, walnuts, butter, and brown sugar in a bowl.

Step 3: Then, line with half of the crust mixture a 9 x 13-inch baking pan.

Step 4: Place inside the preheated oven and bake for about 5 minutes until the crust is brown. When browned, remove the pan from the oven but let the oven stay on.

Step 5: In a separate bowl, add the cream cheese to the white sugar. Use an electric mixer to combine until incorporated. Then, add in the eggs, milk, and vanilla extract. Mix well.

Step 6: Transfer the mixture over the baked crust and sprinkle the rest of the crust mixture on top.

Step 7: Place inside the preheated oven and bake for another 25 minutes.

Step 8: Remove from the oven and let it sit on a wire rack to cool for at least 5 minutes.

Step 9: Serve and enjoy!

NOTE:

For the nuts, you can use whatever you prefer.

Nutrition Facts:

Per Serving: 330.7 calories; 74.7 mg cholesterol; 149.9 mg sodium; 5.9 g protein; 26.3 g carbohydrates
MOM’S CHEESECAKE COOKIE BARS

Rebecca Prep time: 15 min | Cooking: 40 min | Total: 55 min | Servings: 16 | Yield: 1 9×13 inch baking pan It’s almost Halloween! I will surely visit home. I miss my mom and her amazing Cheesecake… Main Dish Recipes MOM’S CHEESECAKE COOKIE BARS European Print This
Serves: 16 Prep Time: 15 mins Cooking Time: 40 mins 40 mins
Nutrition facts: 330.7 calories 20 grams fat
Rating: 5.0/5
( 1 voted )

Ingredients

  • 2 cups all-purpose flour
  • 1 cup chopped walnuts
  • ⅔ cup butter
  • ⅔ cup brown sugar
  • 2 8 oz packages cream cheese softened
  • ½ cup white sugar
  • 2 eggs
  • ¼ cup milk
  • 1 teaspoon vanilla extract
  • 2 tablespoons lemon juice

Instructions

Step 1: Prepare the oven. Preheat it to 350 degrees F or 175 degrees C.

Step 2: Add and combine the flour, walnuts, butter, and brown sugar in a bowl.

Step 3: Then, line with half of the crust mixture a 9 x 13-inch baking pan.

Step 4: Place inside the preheated oven and bake for about 5 minutes until the crust is brown. When browned, remove the pan from the oven but let the oven stay on.

Step 5: In a separate bowl, add the cream cheese to the white sugar. Use an electric mixer to combine until incorporated. Then, add in the eggs, milk, and vanilla extract. Mix well.

Step 6: Transfer the mixture over the baked crust and sprinkle the rest of the crust mixture on top.

Step 7: Place inside the preheated oven and bake for another 25 minutes.

Step 8: Remove from the oven and let it sit on a wire rack to cool for at least 5 minutes.

Step 9: Serve and enjoy!

NOTE:

For the nuts, you can use whatever you prefer.
August 11, 2020 0 comment
0 FacebookTwitterPinterestEmail
Main Dish Recipes

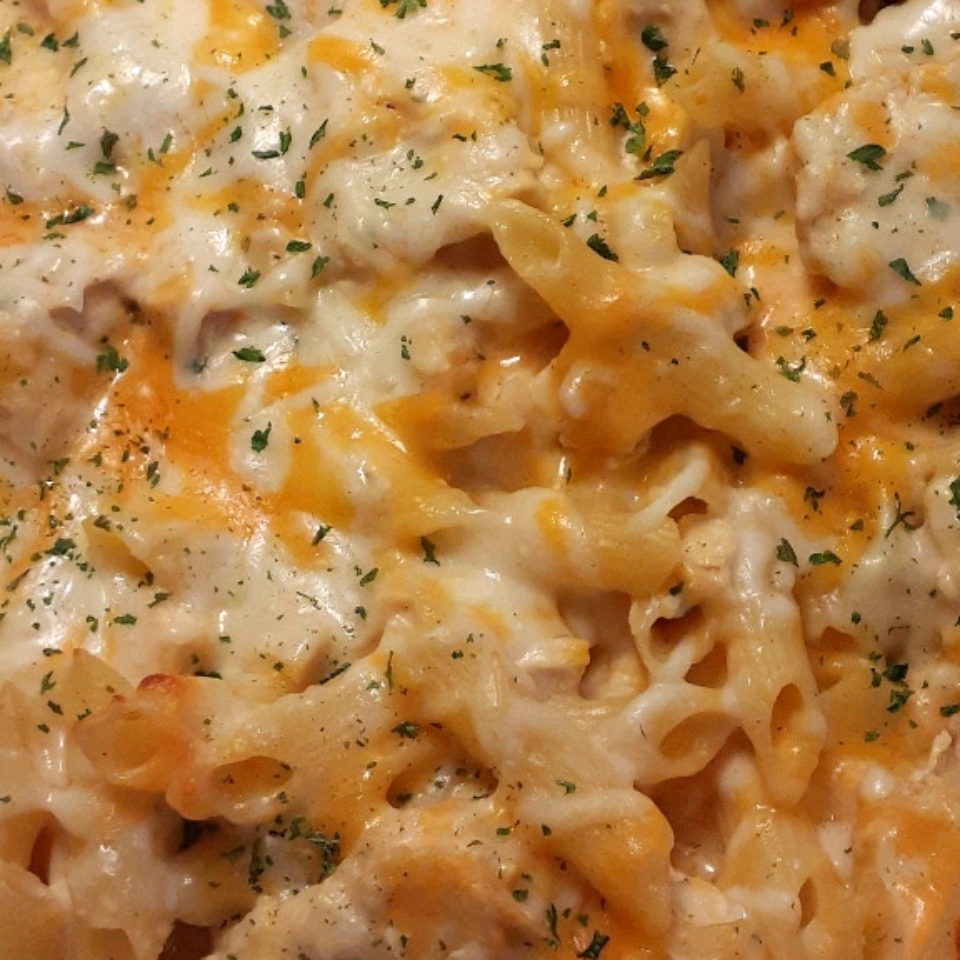
CHEESY CHICKEN ALFREDO CASSEROLE IS A COMFORTING ONE-PAN MEAL

by Rebecca August 11, 2020
written by Rebecca

Prep time: 15 min | Cook: 45 min | Total: 1 hr | Servings: 6 | Yield: 6 servings

What a very satisfying meal! If you love chicken, pasta, and cheese, this is the perfect dish for you. The flavors that this dish have are so legit and delicious! Not bad for a one-pan-meal! You will never have a boring meal for dinner ever again. Try this and taste for yourself. Be very generous with the cheese. It will make your dish extra creamy. Enjoy!

INGREDIENTS

3 eaches skinless, boneless chicken breast halves

1 8 oz package penne pasta

½ 16 oz jar Alfredo sauce

1 ½ cups shredded mozzarella cheese, divided

¼ cup milk

1 tablespoon onion powder

1 tablespoon garlic powder

1 cup shredded Cheddar cheese

HOW TO MAKE CHEESY CHICKEN ALFREDO CASSEROLE

Step 1: Prepare the oven. Preheat it to 350 degrees F or 175 degrees C.

Step 2: Put the chicken in a pot and pour enough water to cover the chicken. Allow it to boil over high heat, when boiling, adjust the heat and just simmer for about 15 minutes or until the chicken is no longer pink and the middle and the juice is clear.

Step 3: Meanwhile, bring a pot of finely salted water into a boil. When boiling and hot, add in the penne to cook for about 11 minutes, hardly stirring until tender. Then, drain once tender to the bite.

Step 4: When the chicken is cooked, drain, and slice into bite-sized pieces.

Step 5: In a large bowl, add the chicken, noodles, Alfredo sauce, half of the mozzarella cheese, milk, onion powder, and garlic powder. Mix thoroughly.

Step 6: Transfer the chicken-noodles mixture into a 1 1/2-quart casserole dish. Sprinkle the rest of the mozzarella cheese and cheddar over the top.

Step 7: Place inside the preheated oven and bake for about 25 minutes or until melted and bubbly.

NOTE:

You can prepare the Alfredo sauce 2 days beforehand. Or use a high-quality refrigerated Alfredo pasta sauce from the grocery store.

For the pasta, you can either use rigatoni, fusilli, farfalle, or any medium pasta you prefer.

Nutrition Facts:

Per Serving: 467.5 calories; 86.2 mg cholesterol; 693.4 mg sodium; 30.8 g protein; 32.4 g carbohydrates

CHEESY CHICKEN ALFREDO CASSEROLE IS A COMFORTING ONE-PAN MEAL

Rebecca Prep time: 15 min | Cook: 45 min | Total: 1 hr | Servings: 6 | Yield: 6 servings What a very satisfying meal! If you love chicken, pasta, and cheese, this is the perfect dish for you. The… Main Dish Recipes CHEESY CHICKEN ALFREDO CASSEROLE IS A COMFORTING ONE-PAN MEAL European Print This
Serves: 6 Prep Time: 15 mins Cooking Time: 45 mins 45 mins
Nutrition facts: 467.5 calories 20 grams fat
Rating: 3.6/5
( 7 voted )

Ingredients

  • 3 eaches skinless, boneless chicken breast halves
  • 1 8 oz package penne pasta
  • ½ 16 oz jar Alfredo sauce
  • 1 ½ cups shredded mozzarella cheese, divided
  • ¼ cup milk
  • 1 tablespoon onion powder
  • 1 tablespoon garlic powder
  • 1 cup shredded Cheddar cheese

Instructions

Step 1: Prepare the oven. Preheat it to 350 degrees F or 175 degrees C.

Step 2: Put the chicken in a pot and pour enough water to cover the chicken. Allow it to boil over high heat, when boiling, adjust the heat and just simmer for about 15 minutes or until the chicken is no longer pink and the middle and the juice is clear.

Step 3: Meanwhile, bring a pot of finely salted water into a boil. When boiling and hot, add in the penne to cook for about 11 minutes, hardly stirring until tender. Then, drain once tender to the bite.

Step 4: When the chicken is cooked, drain, and slice into bite-sized pieces.

Step 5: In a large bowl, add the chicken, noodles, Alfredo sauce, half of the mozzarella cheese, milk, onion powder, and garlic powder. Mix thoroughly.

Step 6: Transfer the chicken-noodles mixture into a 1 1/2-quart casserole dish. Sprinkle the rest of the mozzarella cheese and cheddar over the top.

Step 7: Place inside the preheated oven and bake for about 25 minutes or until melted and bubbly.

NOTE:

You can prepare the Alfredo sauce 2 days beforehand. Or use a high-quality refrigerated Alfredo pasta sauce from the grocery store.

For the pasta, you can either use rigatoni, fusilli, farfalle, or any medium pasta you prefer.

August 11, 2020 0 comment
0 FacebookTwitterPinterestEmail
Main Dish Recipes

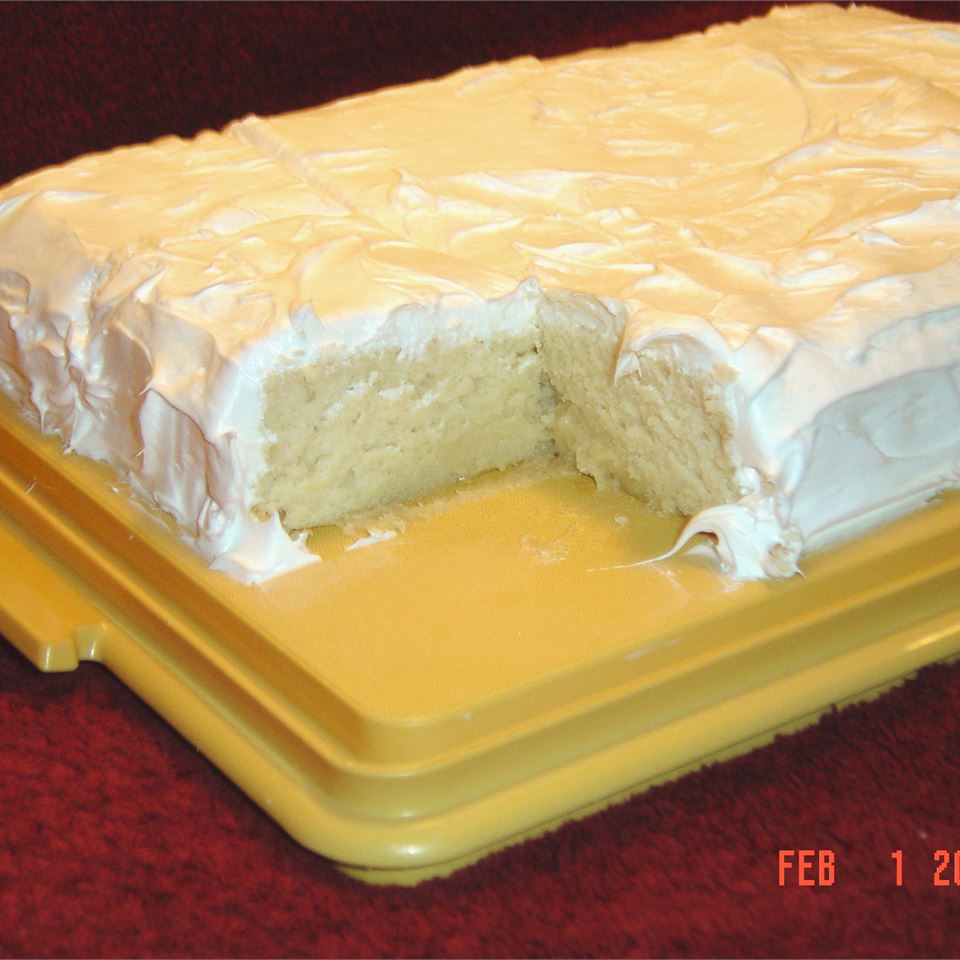
HEAVENLY WHITE CAKE

by Rebecca August 11, 2020
written by Rebecca

Prep time: 30 mins | Cook: 30 mins | Additional: 1 hr | Total: 2 hrs | Servings: 12 | Yield: 1 sheet cake or layer cake

I am so happy with this recipe! This might be one of the best cake recipes I have ever tried. It may seem a very simple cake but the flavor is so amazing I assure you. This cake is best with hot coffee or hot cocoa. Give it a try today. Enjoy!

INGREDIENTS

2 ¾ cups sifted cake flour

4 teaspoons baking powder

¾ teaspoon salt

4 egg whites

1 ½ cups white sugar

¾ cup butter

1 cup milk

1 teaspoon vanilla extract

1 teaspoon almond extract

HOW TO MAKE HEAVENLY WHITE CAKE

Step 1: Sift three times the measured sifted cake flour, baking powder, and salt.

Step 2: Place the egg whites in a mixing bowl and beat until foamy. Slowly add in half a cup of sugar while beating continuously until the form of a soft peak.

Step 3: Then, beat the butter until smooth before adding in the rest of the sugar. Cream until light and fluffy. Stir in the sifted ingredients alternately with the milk. Make sure to add a little milk at a time and beat every after each addition until smooth. Combine the flavorings, then, add in the meringue. Mix well until incorporated.

Step 4: Pour and spread the batter into a parchment-lined 15 x 10 x 1-inch pan.

Step 5: Place inside the oven and bake at 350 degrees F or 175 degrees C for about 30 to 35 minutes.

Step 6: Once done, remove the cake from the oven and allow it cool first for at least 10 minutes before removing from the pan and transferring into a wire rack to cool completely.

NOTE:

You can bake this in two 9-inch round pans for about 30 to 35 minutes or 25 to 30 minutes if you are using three 8-inch round pans.

It is suggested to line the bottom of the pan with parchment paper to avoid forming a thicker crust and to make sure that the cake comes out in the pan in one piece.

Nutrition Facts:

Per Serving: 335.6 calories; 32.1 mg cholesterol; 417.1 mg sodium; 4.7 g protein; 52.1 g carbohydrates.

HEAVENLY WHITE CAKE

Rebecca Prep time: 30 mins | Cook: 30 mins | Additional: 1 hr | Total: 2 hrs | Servings: 12 | Yield: 1 sheet cake or layer cake I am so happy with this recipe! This might be one of the best… Main Dish Recipes HEAVENLY WHITE CAKE European Print This
Serves: 12 Prep Time: 30 mins Cooking Time: 1 hr 30 mins 1 hr 30 mins
Nutrition facts: 335.6 calories 20 grams fat
Rating: 5.0/5
( 1 voted )

Ingredients

  • 2 ¾ cups sifted cake flour
  • 4 teaspoons baking powder
  • ¾ teaspoon salt
  • 4 egg whites
  • 1 ½ cups white sugar
  • ¾ cup butter
  • 1 cup milk
  • 1 teaspoon vanilla extract
  • 1 teaspoon almond extract

Instructions

Step 1: Sift three times the measured sifted cake flour, baking powder, and salt.

Step 2: Place the egg whites in a mixing bowl and beat until foamy. Slowly add in half a cup of sugar while beating continuously until the form of a soft peak.

Step 3: Then, beat the butter until smooth before adding in the rest of the sugar. Cream until light and fluffy. Stir in the sifted ingredients alternately with the milk. Make sure to add a little milk at a time and beat every after each addition until smooth. Combine the flavorings, then, add in the meringue. Mix well until incorporated.

Step 4: Pour and spread the batter into a parchment-lined 15 x 10 x 1-inch pan.

Step 5: Place inside the oven and bake at 350 degrees F or 175 degrees C for about 30 to 35 minutes.

Step 6: Once done, remove the cake from the oven and allow it cool first for at least 10 minutes before removing from the pan and transferring into a wire rack to cool completely.

NOTE:

You can bake this in two 9-inch round pans for about 30 to 35 minutes or 25 to 30 minutes if you are using three 8-inch round pans.

It is suggested to line the bottom of the pan with parchment paper to avoid forming a thicker crust and to make sure that the cake comes out in the pan in one piece.

August 11, 2020 0 comment
0 FacebookTwitterPinterestEmail
Main Dish Recipes

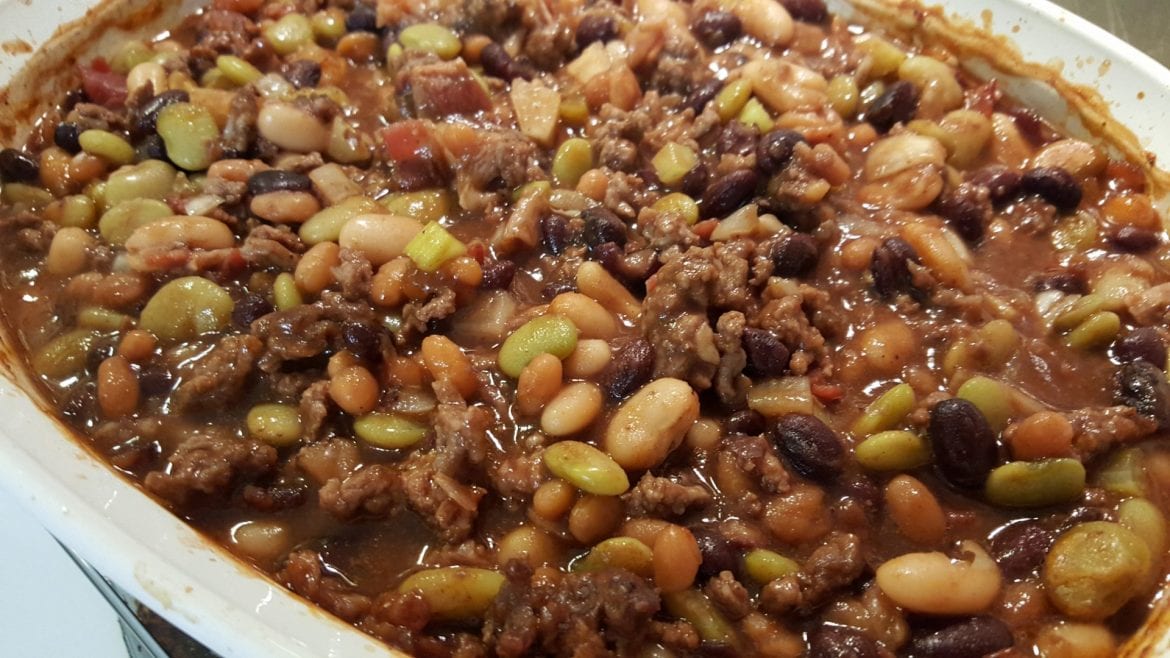
THIS CALICO BEAN CASSEROLE IS THE BEST THING YOU CAN MAKE WITH CANNED BEANS

by Rebecca August 11, 2020
written by Rebecca

Prep time: 10 min | Cook: 1 hr 15 min | Total: 1 hr 25 min | Servings: 8 | Yield: 8 to 10 servings

This dish can feed the crowd! It’s super filling, hearty, and is actually a whole meal. Just serve this with some cornbread for a satisfying dinner that everyone will love!

This casserole has a mix of a variety of beans with ground beef and savory sauce. If you are wondering why this is called Calico, that is because of the mixture of colors just like a multi-colored Calico cat. I have been making this for years now and it never fails to please the crowd. This casserole’s sauce has a sweet and tangy flavor that gives this a zesty smoky advantage that goes perfectly with sloppy joes, grilled hot dogs, chicken, hamburgers, pork, steaks, and a whole range of entrances!

INGREDIENTS

½ cup bacon, chopped

1 pound lean ground beef

(1) (15 oz) can pork and beans

(1) (15 oz) can kidney beans, drained

(1) (15 oz) can butter beans

(1) (15 oz) can lima beans, drained

½ cup ketchup

1 cup packed brown sugar

1 cup chopped onion

3 tablespoons white wine vinegar

1 teaspoon mustard powder

½ cup chopped celery

How to make Calico Bean Casserole

Step 1: Prepare the oven. Preheat it to 350 degrees F or 175 degrees C.

Step 2: In a large deep skillet, combine the bacon and ground beef.

Step 3: Cook until fairly brown over medium-high heat. then, drain any excess oil and set aside.

Step 4: Place the mix bacon, ground beef, pork and beans, kidney beans, butter beans, lima beans, ketchup, onion, vinegar, dry mustard, and celery in a four-quart casserole dish.

Step 5: Place inside the preheated oven, covered, and bake for about an hour.

NOTE:

This recipe can easily feed the crowd!  All you have to do is double the recipe and have your guests enjoy the most scrumptious beans. This casserole is also great for potlucks and picnics.

Nutrition Facts:

Per Serving: 434.5 calories; 38.2 mg cholesterol; 952.9 mg sodium; 22.3 g protein; 66.6 g carbohydrates

THIS CALICO BEAN CASSEROLE IS THE BEST THING YOU CAN MAKE WITH CANNED BEANS

Rebecca Prep time: 10 min | Cook: 1 hr 15 min | Total: 1 hr 25 min | Servings: 8 | Yield: 8 to 10 servings This dish can feed the crowd! It’s super filling, hearty, and is actually a… Main Dish Recipes THIS CALICO BEAN CASSEROLE IS THE BEST THING YOU CAN MAKE WITH CANNED BEANS European Print This
Serves: 8 Prep Time: 10 mins Cooking Time: 1 hr 15 mins 1 hr 15 mins
Nutrition facts: 434.5 calories 20 grams fat
Rating: 4.7/5
( 3 voted )

Ingredients

  • ½ cup bacon, chopped
  • 1 pound lean ground beef
  • (1) (15 oz) can pork and beans
  • (1) (15 oz) can kidney beans, drained
  • (1) (15 oz) can butter beans
  • (1) (15 oz) can lima beans, drained
  • ½ cup ketchup
  • 1 cup packed brown sugar
  • 1 cup chopped onion
  • 3 tablespoons white wine vinegar
  • 1 teaspoon mustard powder
  • ½ cup chopped celery

Instructions

Step 1: Prepare the oven. Preheat it to 350 degrees F or 175 degrees C.

Step 2: In a large deep skillet, combine the bacon and ground beef.

Step 3: Cook until fairly brown over medium-high heat. then, drain any excess oil and set aside.

Step 4: Place the mix bacon, ground beef, pork and beans, kidney beans, butter beans, lima beans, ketchup, onion, vinegar, dry mustard, and celery in a four-quart casserole dish.

Step 5: Place inside the preheated oven, covered, and bake for about an hour.

NOTE:

This recipe can easily feed the crowd!  All you have to do is double the recipe and have your guests enjoy the most scrumptious beans. This casserole is also great for potlucks and picnics.

August 11, 2020 0 comment
0 FacebookTwitterPinterestEmail
Main Dish Recipes

PEACH CAKE WITH CINNAMON AND PECANS

by Rebecca August 11, 2020
written by Rebecca

Servings: 24 | Yield: 1-9×13 inch pan

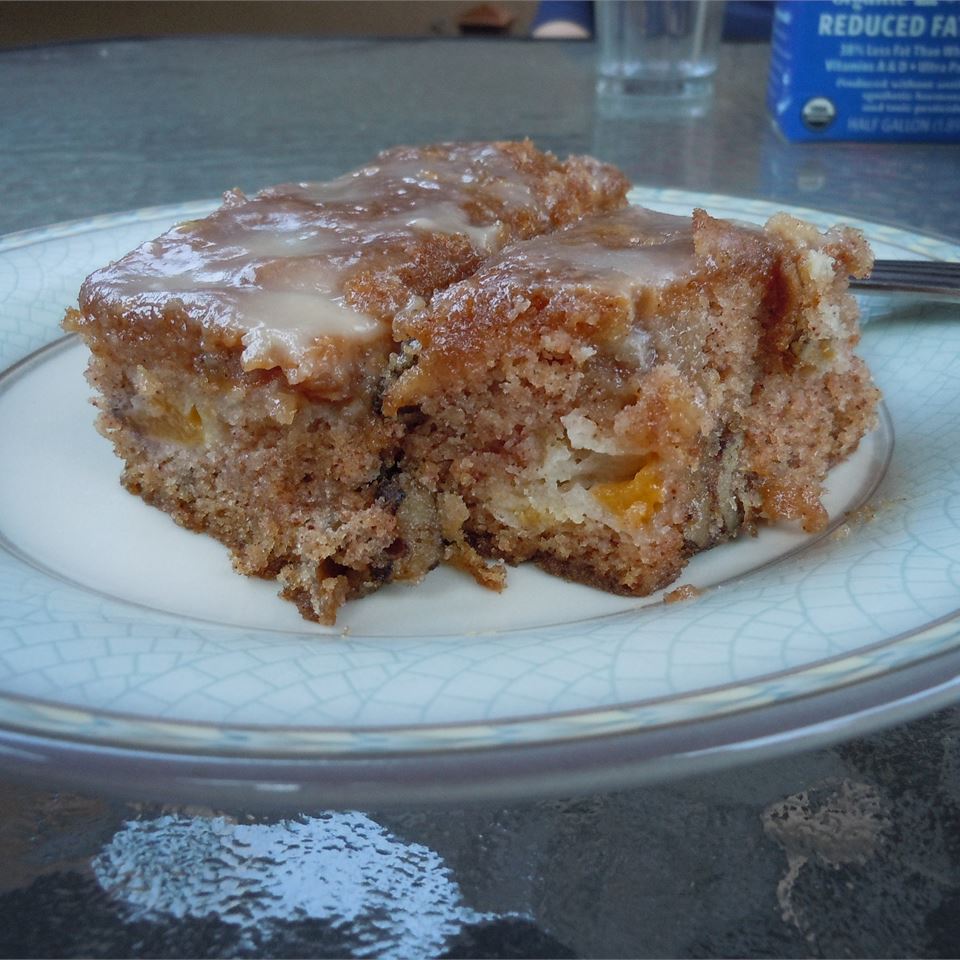
I can give you a million reasons to love this cake. But let me focus on five; very easy to prepare, the ingredients are simple and readily available, you can serve this any time of the day, goes pretty well with vanilla ice cream or whipped cream, and peaches have unique health benefits. I love peaches, they taste like a sweet floral with an acidic tang. And this cake tastes like fall, with roasted pecans topped with adorning cinnamon. Great as a breakfast cake, delicious when eaten cold during lunch, or as a Sunday family treat. This is a heavenly peach cake. Super moist and soft.

You are welcome to use canned peaches but I prefer the fresh ones. Nothing beats fresh peaches. This recipe is my mother’s. She is a lovely lady and I enjoyed all her cake recipes. I grew old loving pastries. And this Peach cake with Cinnamon and Pecans is one of the best. My favorite among many cake recipes she taught me. I have been making this glorious cake ever since and it is great for any occasion. And a favorite during potlucks and picnics.

INGREDIENTS

(3) egg, beaten

(1 ¾) cups white sugar

1 cup of vegetable oil

2 cups all-purpose flour

1 teaspoon salt

1 teaspoon ground cinnamon

1 teaspoon baking soda

2 cups of fresh peaches – peeled, pitted, and sliced

½ cup chopped pecans

HOW TO MAKE PEACH CAKE WITH CINNAMON AND PECANS

Step 1: Prepare the oven. Preheat it to 375 degrees F or 190 degrees C.

Step 2: Then, grease and flour a 9 x 13-inch pan.

Step 3: In a large bowl, combine the eggs, sugar, oil, flour, salt, cinnamon, baking soda, peaches, and pecans. Using your hands, mix them well until incorporated.

Step 4: Transfer the mixture into the prepared pan.

Step 5: Place inside the preheated oven and bake for approximately 50 minutes.

NOTE:

You can use canned peaches if fresh peaches are not available. And when serving, you can top the cake with vanilla ice cream if desired.

Nutrition Facts:

Per Serving: 202.9 calories; 23.3 mg cholesterol; 158.7 mg sodium; 2.1 g protein; 23.6 g carbohydrates

PEACH CAKE WITH CINNAMON AND PECANS

Rebecca Servings: 24 | Yield: 1-9×13 inch pan I can give you a million reasons to love this cake. But let me focus on five; very easy to prepare, the ingredients are simple and… Main Dish Recipes PEACH CAKE WITH CINNAMON AND PECANS European Print This
Serves: 24
Nutrition facts: 202.9 calories 20 grams fat
Rating: 5.0/5
( 1 voted )

Ingredients

  • (3) egg, beaten
  • (1 ¾) cups white sugar
  • 1 cup of vegetable oil
  • 2 cups all-purpose flour
  • 1 teaspoon salt
  • 1 teaspoon ground cinnamon
  • 1 teaspoon baking soda
  • 2 cups of fresh peaches - peeled, pitted, and sliced
  • ½ cup chopped pecans

Instructions

Step 1: Prepare the oven. Preheat it to 375 degrees F or 190 degrees C.

Step 2: Then, grease and flour a 9 x 13-inch pan.

Step 3: In a large bowl, combine the eggs, sugar, oil, flour, salt, cinnamon, baking soda, peaches, and pecans. Using your hands, mix them well until incorporated.

Step 4: Transfer the mixture into the prepared pan.

Step 5: Place inside the preheated oven and bake for approximately 50 minutes.

NOTE:

You can use canned peaches if fresh peaches are not available. And when serving, you can top the cake with vanilla ice cream if desired.

August 11, 2020 0 comment
0 FacebookTwitterPinterestEmail
Main Dish Recipes

Loaded Burger Bowls

by Rebecca August 10, 2020
written by Rebecca

YIELDS: 12 SERVINGS | PREP TIME: 10 MINS | TOTAL TIME: 40 MINS

These cuties are packed with bacon and cheese. A bite-size, pop-in-your-mouth burger bowls that are loaded with two of my favorites with simple spices. Baked in muffin tins instead of forming into patties. Such an unusual idea that certainly worked!

This is a certified low-carb recipe that is perfect if you are watching your weight. You will never feel guilty whenever you pop these in your mouth. Super delicious, easy-and-quick to prepare, and healthy addition to your everyday meal. It is perfect for everybody even your picky eaters will surely be addicted to these loaded burger bowls. These bites are very filling and are great with a side salad. Whenever I eat these, I feel comfortable and unquestionably worry-free because these burger bowls are keto-friendly, gluten-free, and low-carb. I cannot ask for anything!

INGREDIENTS

8  slices cooked bacon, crumbled

2 1/2 cups shredded cheddar

2 lb.  lean ground beef

Kosher salt

Freshly ground black pepper

Ranch dressing, for serving

Chopped chives, for serving

Bread and butter pickles, for serving

How to make Loaded Burger Bowls

Step 1: Prepare the oven. Preheat it to 400 degrees.

Step 2: Place the bacon and cheddar cheese in a medium bowl. Toss to coat.

Step 3: Use a cooking spray to grease a 12-cup muffin.

Step 4: To start, season the beef with salt and pepper, then, transfer a little handful to each muffin tin. Press up the sides to make a cup and evenly place the bacon-and-cheese mixture into the cups.

Step 5: Roast for approximately 5 minutes until the beef is cooked through and the cheese is melted.

Step 6: Once done, allow them to cool for a bit before releasing the hamburger bowls with an offset spatula.

Step 7: Before serving, drizzle the burger bowls with ranch dressing. Sprinkle with some chives and serve with pickles. Enjoy!

Loaded Burger Bowls

Rebecca YIELDS: 12 SERVINGS | PREP TIME: 10 MINS | TOTAL TIME: 40 MINS These cuties are packed with bacon and cheese. A bite-size, pop-in-your-mouth burger bowls that are loaded with two of my favorites… Main Dish Recipes Loaded Burger Bowls European Print This
Serves: 12 Prep Time: 10 mins Cooking Time: 30 mins 30 mins
Nutrition facts: 200 calories 20 grams fat
Rating: 5.0/5
( 1 voted )

Ingredients

  • 8  slices cooked bacon, crumbled
  • 2 1/2 cups shredded cheddar
  • 2 lb.  lean ground beef
  • Kosher salt
  • Freshly ground black pepper
  • Ranch dressing, for serving
  • Chopped chives, for serving
  • Bread and butter pickles, for serving

Instructions

Step 1: Prepare the oven. Preheat it to 400 degrees.

Step 2: Place the bacon and cheddar cheese in a medium bowl. Toss to coat.

Step 3: Use a cooking spray to grease a 12-cup muffin.

Step 4: To start, season the beef with salt and pepper, then, transfer a little handful to each muffin tin. Press up the sides to make a cup and evenly place the bacon-and-cheese mixture into the cups.

Step 5: Roast for approximately 5 minutes until the beef is cooked through and the cheese is melted.

Step 6: Once done, allow them to cool for a bit before releasing the hamburger bowls with an offset spatula.

Step 7: Before serving, drizzle the burger bowls with ranch dressing. Sprinkle with some chives and serve with pickles. Enjoy!

August 10, 2020 0 comment
0 FacebookTwitterPinterestEmail
Main Dish Recipes

Pineapple Upside-Down Pancakes

by Rebecca August 10, 2020
written by Rebecca

YIELDS: 10 | PREP TIME: 5 MINS | COOKING TIME: 15 MINS | TOTAL TIME: 20 MINS

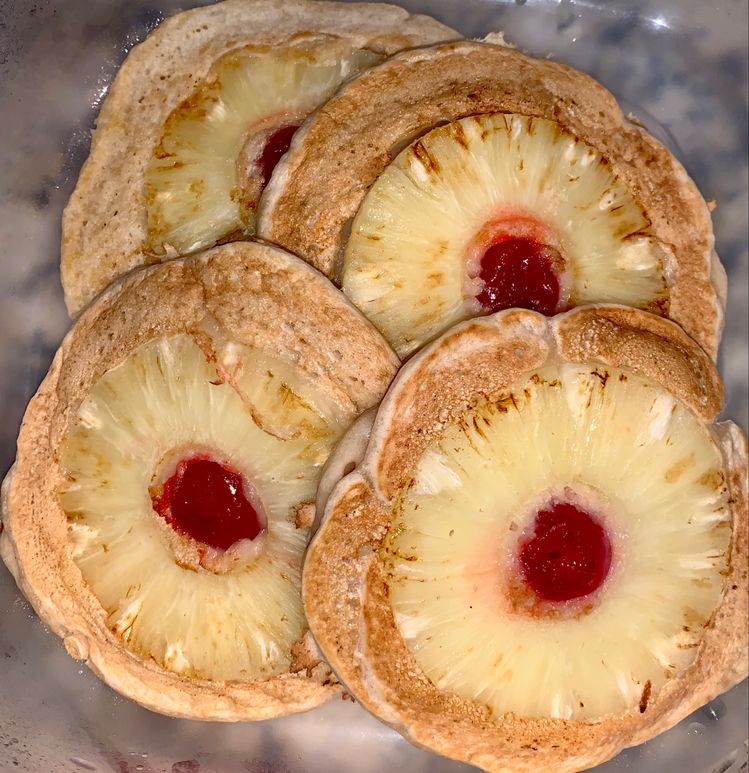
What an awesome treat! I made these amazing pancakes for breakfast and my kids could not get enough it! The taste of the pineapple together with the pancake itself is so life-changing. Serve it with a nice hot coffee or hot cocoa and you are in for a treat! I am so glad that I gave it try because my kids love it so much! They even told me to cook this again tomorrow! I am gonna make this pretty much always. be very generous with the pineapple. I know that I only place 1 ring on top but I highly recommend that you put at least two. I don’t know but it just works for me. Anyway, give it a try and taste for yourself. Enjoy!

INGREDIENTS

2 cups Bisquick

1 cup milk

2  large eggs

1 teaspoon pure vanilla extract

Butter, for pan

10  pineapple rings

10  maraschino cherries (without stems)

1/3 cup packed brown sugar

Whipped cream, for serving

Maple syrup, for serving

How to make Pineapple Upside-Down Pancakes

Step 1: Add in the milk, eggs, Bisquick, and vanilla in a large mixing bowl. Whisk until well mixed.

Step 2: Place a large skillet on the stove and turn the heat to medium.

Step 3: Add in 1 tablespoon of butter and allow it to melt.

Step 4: Add 1/4 cup of pancake batter and cook it for 2 minutes or until fluffy.

Step 5: Add 1 pineapple sliced like a ring in the middle of the pancake then, cherry in the center of the pineapple ring.

Step 6: Sprinkle a little amount of sugar on top.

Step 7: Cook for another 1 minute until the sides bubble.

Step 8: Flip the pancake and reduce the heat to medium-low and cook for another 3 minutes until it becomes golden. Repeat this procedure for the rest of the batter.

Step 9: Place on a clean plate with maple syrup and whipped cream on the side.

Step 10: Serve and enjoy!

Pineapple Upside-Down Pancakes

Rebecca YIELDS: 10 | PREP TIME: 5 MINS | COOKING TIME: 15 MINS | TOTAL TIME: 20 MINS What an awesome treat! I made these amazing pancakes for breakfast and my… Main Dish Recipes Pineapple Upside-Down Pancakes European Print This
Serves: 10 Prep Time: 5 mins Cooking Time: 15 mins 15 mins
Nutrition facts: 200 calories 20 grams fat
Rating: 5.0/5
( 1 voted )

Ingredients

  • 2 cups Bisquick
  • 1 cup milk
  • 2  large eggs
  • 1 teaspoon pure vanilla extract
  • Butter, for pan
  • 10  pineapple rings
  • 10  maraschino cherries (without stems)
  • 1/3 cup packed brown sugar
  • Whipped cream, for serving
  • Maple syrup, for serving

Instructions

Step 1: Add in the milk, eggs, Bisquick, and vanilla in a large mixing bowl. Whisk until well mixed.

Step 2: Place a large skillet on the stove and turn the heat to medium.

Step 3: Add in 1 tablespoon of butter and allow it to melt.

Step 4: Add 1/4 cup of pancake batter and cook it for 2 minutes or until fluffy.

Step 5: Add 1 pineapple sliced like a ring in the middle of the pancake then, cherry in the center of the pineapple ring.

Step 6: Sprinkle a little amount of sugar on top.

Step 7: Cook for another 1 minute until the sides bubble.

Step 8: Flip the pancake and reduce the heat to medium-low and cook for another 3 minutes until it becomes golden. Repeat this procedure for the rest of the batter.

Step 9: Place on a clean plate with maple syrup and whipped cream on the side.

Step 10: Serve and enjoy!

August 10, 2020 0 comment
0 FacebookTwitterPinterestEmail
Main Dish Recipes

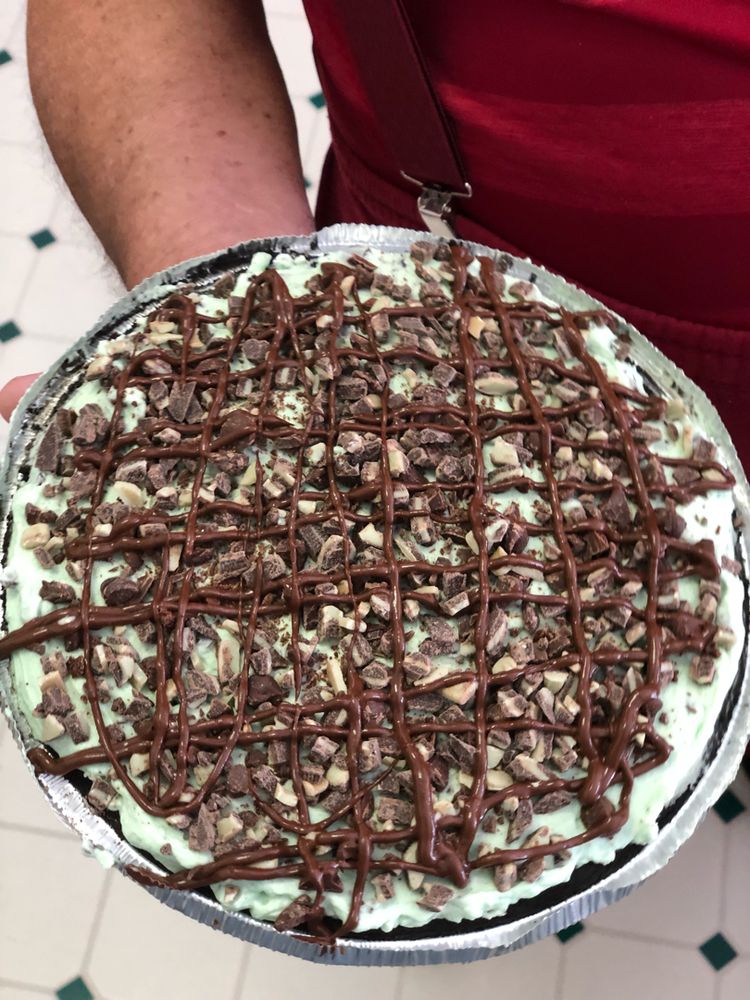
Mint Chocolate Chip Pie

by Rebecca August 10, 2020
written by Rebecca

YIELDS: 8 | PREP TIME: 6 HOURS 25 MINS | TOTAL TIME: 6 HOURS 25 MINS

I have always been intrigued by this recipe ever since I saw it on the internet. Good thing that I decided to give a try because I never would have tasted how perfect it is! I love how all the flavors incorporate with each other. Did I mention the mint? It is the best! It gives the cake a refreshing flavor. Try it and you will know. Enjoy!

INGREDIENTS

FOR THE CRUST:

24  Oreos

1/4 cup melted butter

FOR THE FILLING:

1 1/4 cup heavy cream

8 oz. cream cheese, softened1

1/4 cups powdered sugar

green gel food coloring

3/4 teaspoon pure vanilla extract

3/4 teaspoon peppermint extract

1 cup mini chocolate chips, plus more for garnish

1 cup Andes mints, roughly chopped, plus more for garnish

Melted chocolate, for drizzling

How to make Mint Chocolate Chip Pie

To Make the Crust:

Step 1: Put the Oreos in a food processor and pulse until coarse crumbs form then add in the butter. Stir until well mixed.

Step 2: Prepare a 9-inch pie dish.

Step 3: Transfer the Oreos and butter mixture into the pie dish. Press the mixture on the bottom part to make a crust with 1/8 thickness.

Step 4: Place inside the fridge to chill for 1 hour.

To Make the Filling:

Step 1: Place the heavy cream into a stand mixer with the whisk attachment.

Step 2: Beat the heavy cream until well mixed and it forms stiff peaks.

Step 3: Transfer it into a clean mixing bowl.

Step 4: Add cream cheese into the stand mixer and beat for 2 minutes at medium-high speed.

Step 5: Add in the food coloring and powdered sugar. Mix until smooth at low speed.

Step 6: Add in peppermint extract and vanilla. Mix until well blended.

Step 7: Transfer the whipped cream into the cream cheese mixture and use a rubber spatula to fold it.

Step 8: Fold in the chopped Andes mints and the mini chocolate chips.

Step 9: Pour the filling on top of the crust and flatten it until smooth.

Step 10: Sprinkle with the rest of the mini chocolate chips and the sliced Andes.

Step 11: Drizzle the chocolate on top then place inside the fridge to chill for 5 to 6 hours.

Step 12: Serve and enjoy!

Mint Chocolate Chip Pie

Rebecca YIELDS: 8 | PREP TIME: 6 HOURS 25 MINS | TOTAL TIME: 6 HOURS 25 MINS I have always been intrigued by this recipe ever since I saw it on… Main Dish Recipes Mint Chocolate Chip Pie European Print This
Serves: 8 Prep Time: 6 hrs 25 mins
Nutrition facts: 200 calories 20 grams fat
Rating: 5.0/5
( 1 voted )

Ingredients

  • FOR THE CRUST:
  • 24  Oreos
  • 1/4 cup melted butter
  • FOR THE FILLING:
  • 1 1/4 cup heavy cream
  • 8 oz. cream cheese, softened1
  • 1/4 cups powdered sugar
  • green gel food coloring
  • 3/4 teaspoon pure vanilla extract
  • 3/4 teaspoon peppermint extract
  • 1 cup mini chocolate chips, plus more for garnish
  • 1 cup Andes mints, roughly chopped, plus more for garnish
  • Melted chocolate, for drizzling

Instructions

To Make the Crust:

Step 1: Put the Oreos in a food processor and pulse until coarse crumbs form then add in the butter. Stir until well mixed.

Step 2: Prepare a 9-inch pie dish.

Step 3: Transfer the Oreos and butter mixture into the pie dish. Press the mixture on the bottom part to make a crust with 1/8 thickness.

Step 4: Place inside the fridge to chill for 1 hour.

To Make the Filling:

Step 1: Place the heavy cream into a stand mixer with the whisk attachment.

Step 2: Beat the heavy cream until well mixed and it forms stiff peaks.

Step 3: Transfer it into a clean mixing bowl.

Step 4: Add cream cheese into the stand mixer and beat for 2 minutes at medium-high speed.

Step 5: Add in the food coloring and powdered sugar. Mix until smooth at low speed.

Step 6: Add in peppermint extract and vanilla. Mix until well blended.

Step 7: Transfer the whipped cream into the cream cheese mixture and use a rubber spatula to fold it.

Step 8: Fold in the chopped Andes mints and the mini chocolate chips.

Step 9: Pour the filling on top of the crust and flatten it until smooth.

Step 10: Sprinkle with the rest of the mini chocolate chips and the sliced Andes.

Step 11: Drizzle the chocolate on top then place inside the fridge to chill for 5 to 6 hours.

Step 12: Serve and enjoy!

August 10, 2020 0 comment
0 FacebookTwitterPinterestEmail
Main Dish Recipes

Fantasio Bars

by Rebecca August 10, 2020
written by Rebecca

Prep: 10 mins | Cook: 25 mins | Additional: 20 mins | Total: 55 mins | Servings: 12 | Yield: 1 9×13-inch pan

I miss my childhood days and it is because of this simple and yummy Fantasio Bars! My grandma used to bake this for me when I was a kid. Luckily, she gave me the recipe, and now, I am sharing it with you! This is the easiest and yummiest cake you will ever eat. Feel free to add your preferred ingredients as long as the main ingredients are still present. Be very generous with the coconuts and almonds as well because they are the best thing in this cake. Enjoy!

Ingredients

½ cup butter

¼ cup white sugar

1 ½ cups graham cracker crumbs

1 ½ cups flaked coconut

1 (14 ounces) can sweeten condensed milk

1 cup semisweet chocolate chips

½ cup almonds, chopped

How to make Fantasio Bars

Step 1: Prepare the oven. Preheat it to 350 degrees F or 175 degrees C.

Step 2: In a saucepan, melt the butter. Once melted, remove from the heat and stir in the sugar and graham cracker crumbs.

Step 3: Transfer and spread the mixture into the bottom of a 9 x 13-inch baking dish.

Step 4: Place inside the preheated oven and bake for about 10 minutes or until a little firm.

Step 5: Meanwhile, combine the coconut and condensed milk in a bowl. And spread it over the baked crust.

Step 6: Place the bars back into the oven and continue baking for another 12 minutes.

Step 7: Remove from the oven and allow to cool for at least 10 minutes.

Step 8: While waiting for it to cool, melt the chocolate. Place it over a double boiler or on top of a barely simmering water. Making sure to frequently stir and scrape down the sides using a rubber spatula to prevent the chocolate from burning. Then stir in the almonds and spread the frosting over the cooled coconut layer. Let it cool until set.

Nutritional Information:

368.3 calories; 5.5 g protein; 43.6 g carbohydrates; 31.4 mg cholesterol; 185.9 mg sodium

Fantasio Bars

Rebecca Prep: 10 mins | Cook: 25 mins | Additional: 20 mins | Total: 55 mins | Servings: 12 | Yield: 1 9×13-inch pan I miss my childhood days and it… Main Dish Recipes Fantasio Bars European Print This
Serves: 12 Prep Time: 10 mins Cooking Time: 45 mins 45 mins
Nutrition facts: 368.3 calories 20 grams fat
Rating: 5.0/5
( 1 voted )

Ingredients

  • ½ cup butter
  • ¼ cup white sugar
  • 1 ½ cups graham cracker crumbs
  • 1 ½ cups flaked coconut
  • 1 (14 ounces) can sweeten condensed milk
  • 1 cup semisweet chocolate chips
  • ½ cup almonds, chopped

Instructions

Step 1: Prepare the oven. Preheat it to 350 degrees F or 175 degrees C.

Step 2: In a saucepan, melt the butter. Once melted, remove from the heat and stir in the sugar and graham cracker crumbs.

Step 3: Transfer and spread the mixture into the bottom of a 9 x 13-inch baking dish.

Step 4: Place inside the preheated oven and bake for about 10 minutes or until a little firm.

Step 5: Meanwhile, combine the coconut and condensed milk in a bowl. And spread it over the baked crust.

Step 6: Place the bars back into the oven and continue baking for another 12 minutes.

Step 7: Remove from the oven and allow to cool for at least 10 minutes.

Step 8: While waiting for it to cool, melt the chocolate. Place it over a double boiler or on top of a barely simmering water. Making sure to frequently stir and scrape down the sides using a rubber spatula to prevent the chocolate from burning. Then stir in the almonds and spread the frosting over the cooled coconut layer. Let it cool until set.

August 10, 2020 0 comment
0 FacebookTwitterPinterestEmail
Main Dish Recipes

”Cin’s Super-Moist Zucchini Cake”

by Rebecca August 10, 2020
written by Rebecca

Serves: 8 to 12 (depends on the size of slices) | Cook: 55 Minutes

This zucchini cake is legit! I have never tasted anything like this before. I love how soft and moist it is from the inside. It will make your day extra special. Give this one a try and have your friends come over and surprise them with the amazing taste and texture of this cake. Enjoy!

Ingredients

4 eggs

1 1/2 teaspoon pure vanilla

2 tablespoons butter, melted

8 oz sour cream (room temp)

1/3 cup ex virgin olive oil (or applesauce if available)

1 box (18.25 oz) Duncan Hines moist deluxe yellow cake mix

1 box (3.3 oz) white chocolate Jell-O instant pudding mix (dry)

1 dash cinnamon

1 dash nutmeg

1/3 – 1/2 cup Splenda

2 cups shredded zucchini (fresh from our garden)

1/4 – 1/3 cup orange juice w-some pulp (100% juice, not from concentrate)

(YOU ARE WELCOME TO ADD SHREDDED CARROTS AND CRUSHED PINEAPPLE  INTO THE BATTER)

1/2 cup shredded carrots, if adding

small can drain if adding

How to Make ”Cin’s Super-Moist Zucchini Cake”

Step 1: Prepare the oven. Preheat it to 350 degrees F.

Step 2: Grease and lightly flour a bundt pan.

Step 3: Combine the eggs, pure vanilla, melted butter, sour cream, olive oil, cake mix, Jell-O, cinnamon, nutmeg, and Splenda in a large mixing bowl. Beat using an electric mixer on medium speed until blended. It is okay even if the mixture may be thick and lumpy.

Step 4: Add in the zucchini and orange juice and blend for another 1 to 2 minutes on medium-high speed. At this point, the mixture should not be lumpy anymore.

Step 5: Sprinkle a little Splenda at the bottom of the pan before transferring the mixture into the prepared bundt pan.

Step 6: Place inside the preheated oven and bake for about 55 minutes. To check the doneness, insert a toothpick in the middle, and when it comes out clean the cake is done.

Step 7: Remove the cake from the oven and cool onto a wire rack for at least 20 minutes.

Step 8: Then, remove the cake from the pan and set it on a wire rack to cool completely.

Step 9: After the cake is cooled, dust it with powdered sugar.

NOTE: You can add shredded carrots into the butter or you can go all the way by adding Zucchini, Carrots, and Crushed Pineapple and glazing the cake. It is a versatile cake so it is okay to change things up.

''Cin's Super-Moist Zucchini Cake''

Rebecca Serves: 8 to 12 (depends on the size of slices) | Cook: 55 Minutes This zucchini cake is legit! I have never tasted anything like this before. I love how… Main Dish Recipes ”Cin’s Super-Moist Zucchini Cake” European Print This
Serves: 8-12 Cooking Time: 55 mins 55 mins
Nutrition facts: 200 calories 20 grams fat
Rating: 5.0/5
( 1 voted )

Ingredients

  • 4 eggs
  • 1 1/2 teaspoon pure vanilla
  • 2 tablespoons butter, melted
  • 8 oz sour cream (room temp)
  • 1/3 cup ex virgin olive oil (or applesauce if available)
  • 1 box (18.25 oz) Duncan Hines moist deluxe yellow cake mix
  • 1 box (3.3 oz) white chocolate Jell-O instant pudding mix (dry)
  • 1 dash cinnamon
  • 1 dash nutmeg
  • 1/3 - 1/2 cup Splenda
  • 2 cups shredded zucchini (fresh from our garden)
  • 1/4 - 1/3 cup orange juice w-some pulp (100% juice, not from concentrate)
  • (YOU ARE WELCOME TO ADD SHREDDED CARROTS AND CRUSHED PINEAPPLE  INTO THE BATTER)
  • 1/2 cup shredded carrots, if adding
  • small can drain if adding

Instructions

Step 1: Prepare the oven. Preheat it to 350 degrees F.

Step 2: Grease and lightly flour a bundt pan.

Step 3: Combine the eggs, pure vanilla, melted butter, sour cream, olive oil, cake mix, Jell-O, cinnamon, nutmeg, and Splenda in a large mixing bowl. Beat using an electric mixer on medium speed until blended. It is okay even if the mixture may be thick and lumpy.

Step 4: Add in the zucchini and orange juice and blend for another 1 to 2 minutes on medium-high speed. At this point, the mixture should not be lumpy anymore.

Step 5: Sprinkle a little Splenda at the bottom of the pan before transferring the mixture into the prepared bundt pan.

Step 6: Place inside the preheated oven and bake for about 55 minutes. To check the doneness, insert a toothpick in the middle, and when it comes out clean the cake is done.

Step 7: Remove the cake from the oven and cool onto a wire rack for at least 20 minutes.

Step 8: Then, remove the cake from the pan and set it on a wire rack to cool completely.

Step 9: After the cake is cooled, dust it with powdered sugar.

NOTE: You can add shredded carrots into the butter or you can go all the way by adding Zucchini, Carrots, and Crushed Pineapple and glazing the cake. It is a versatile cake so it is okay to change things up.

August 10, 2020 0 comment
0 FacebookTwitterPinterestEmail
Newer Posts
Older Posts

Popular Posts

  • 1

    Crispy Crunchy Parmesan Potatoes

    March 21, 2020
  • 2

    CROCK POT SMOTHERED PORK CHOPS

    March 21, 2020
  • Facebook
  • Twitter

@2019 - All Right Reserved.


Back To Top