Cook it once
  • Home
  • Privacy Policy
  • Recipes
    • KETO
    • LC
    • WW
  • Tips
  • Contact
Cook it once
  • Home
  • Privacy Policy
  • Recipes
    • KETO
    • LC
    • WW
  • Tips
  • Contact
Category:

Main Dish Recipes

Main Dish Recipes

The Best Crusty Bread (Dutch Oven)

by Rebecca August 17, 2020
written by Rebecca

Serves: 12 or depending on how the loaf is sliced | Prep: 10 Min | Cook: 45 Min

This impressive crackly crust bread with a chewy inside stands high above the rest.

When I first made this bread my first thought was the same loaf we used to have in Italian restaurants. The kind that we dip in olive oil? I know, it’s grand yet this Dutch Oven recipe is pretty straightforward and calls for only four simple ingredients. Easy on the wallet, right? But it’s superb texture and taste makes this bread fabulously perfect!

Ingredients

3 cups bread flour

1 teaspoon active dry yeast

1 1/2 teaspoons salt

1 1/2 cups water, warm

How to Make The Best Crusty Bread (Dutch Oven)

Step 1: In a 3 to 4-quart bowl with a secured lid, whisk the flour, yeast, and salt. Or use a plastic wrap on a bowl if you don’t have a bowl or Tupperware with lid.

Step 2: Pour in water into the mixture and use a wooden spoon to mix until the dough is combined. It’ll look shaggy and a bit sticky but it’s alright.

Step 3: Cover and let the dough rise for at least 12 to 19 hours or overnight.

Step 4: When ready to bake, prepare the oven. Preheat it to 450 degrees.

Step 5: While preheating the oven, put a cast-iron dutch oven with the lid inside to heat for at least 30 seconds.

Step 6: In the meantime, transfer the dough onto a densely floured surface. The dough will still be very sticky but that’s natural.

Step 7: Gently form a round loaf with your floured hands. Make sure that there is enough flour on the surface to prevent the dough from sticking. Allow the round loaf to just sit onto the floured surface until the oven is preheated.

Step 8: After 30 seconds, take out the hot pot from the oven. Then, carefully transfer the dough into the pot. Cover the pot with the lid and place it back into the oven and bake for about 30 minutes.

Step 9: Then, remove the lid and continue to bake for another 10 to 15 minutes.

Step 10: Once done, remove the bread from the oven and place it onto a cooling rack. Slice and serve. Enjoy!
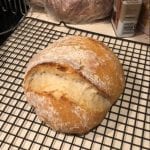
The Best Crusty Bread (Dutch Oven)

Rebecca Serves: 12 or depending on how the loaf is sliced | Prep: 10 Min | Cook: 45 Min This impressive crackly crust bread with a chewy inside stands high above… Main Dish Recipes The Best Crusty Bread (Dutch Oven) European Print This
Serves: 12 Prep Time: 10 mins Cooking Time: 45 mins 45 mins
Nutrition facts: 200 calories 20 grams fat
Rating: 5.0/5
( 1 voted )

Ingredients

  • 3 cups bread flour
  • 1 teaspoon active dry yeast
  • 1 1/2 teaspoons salt
  • 1 1/2 cups water, warm

Instructions

Step 1: In a 3 to 4-quart bowl with a secured lid, whisk the flour, yeast, and salt. Or use a plastic wrap on a bowl if you don't have a bowl or Tupperware with lid.

Step 2: Pour in water into the mixture and use a wooden spoon to mix until the dough is combined. It'll look shaggy and a bit sticky but it's alright.

Step 3: Cover and let the dough rise for at least 12 to 19 hours or overnight.

Step 4: When ready to bake, prepare the oven. Preheat it to 450 degrees.

Step 5: While preheating the oven, put a cast-iron dutch oven with the lid inside to heat for at least 30 seconds.

Step 6: In the meantime, transfer the dough onto a densely floured surface. The dough will still be very sticky but that's natural.

Step 7: Gently form a round loaf with your floured hands. Make sure that there is enough flour on the surface to prevent the dough from sticking. Allow the round loaf to just sit onto the floured surface until the oven is preheated.

Step 8: After 30 seconds, take out the hot pot from the oven. Then, carefully transfer the dough into the pot. Cover the pot with the lid and place it back into the oven and bake for about 30 minutes.

Step 9: Then, remove the lid and continue to bake for another 10 to 15 minutes.

Step 10: Once done, remove the bread from the oven and place it onto a cooling rack. Slice and serve. Enjoy!

August 17, 2020 0 comment
0 FacebookTwitterPinterestEmail
Main Dish Recipes

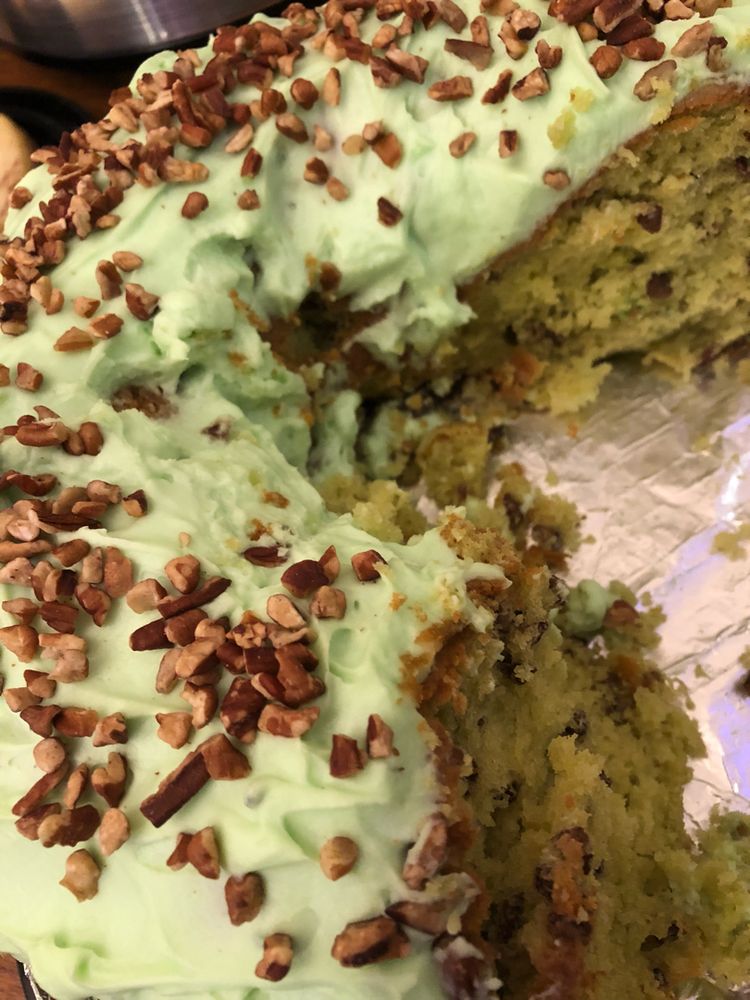
Watergate Cake With Pineapple

by Rebecca August 17, 2020
written by Rebecca

Serves: 8-10 | Prep: 10 Min | Cook: 30 Min

This iconic Watergate Cake hits all the right spots. It’s a pretty amazing cake and every bite is a full-on experience. Super moist, ideally sweet, light, with the perfect combination of pineapples and pistachio. Although, pineapples and pistachio may seem an odd pair if you haven’t had Watergate salad but for all of you who knows what I’m talking about you know that it’s not true. They are one of the best combinations! The first time I had a piece of this cake, I lose my mind a little bit. It’s so freaking good! With bits and pieces of pistachio nuts, creamy frosting, and just the right amount of sweetness, every bite is a delightful cloud of deliciousness.

Ingredients

1 box white cake mix

1 cup crushed pineapples (drained)

1/2 cup pistachio nuts, chopped

1 box pistachio pudding, 3.4 oz

3 eggs

1 cup water

1/3 cup oil

FOR THE FROSTING:

12 oz tub of Cool Whip

1 box pistachio pudding, 3.4 oz.

1 cup milk

1/4 cup pistachio nuts, chopped for garnish

How to Make Watergate Cake With Pineapple

Step 1: Prepare the oven. Preheat it to 350 degrees.

Step 2: Combine the cake mix, crushed pineapples, pistachio pudding, eggs, water, and oil in a large mixing bowl. Beat for about 2 minutes on medium speed.

Step 3: Then, fold in the pistachio nuts.

Step 4: Transfer the batter into 2 round cake pans or a 9 x 13-inch baking pan.

Step 5: Place inside the preheated oven and bake according to the cake mix package direction.

Step 6: Once done, remove the cake from the oven and allow the cakes completely.

Step 7: Meanwhile, mix the pudding and milk in a medium bowl. Then, chill for about 5 minutes before folding in the cool whip. Chill again until the cake is ready for frosting.

Step 8: Then, thoroughly frost the cooled cake.

Step 9: Place the cake inside the fridge to chill and until ready to serve. And keep the leftovers refrigerated. Enjoy!

Watergate Cake With Pineapple

Rebecca Serves: 8-10 | Prep: 10 Min | Cook: 30 Min This iconic Watergate Cake hits all the right spots. It’s a pretty amazing cake and every bite is a full-on… Main Dish Recipes Watergate Cake With Pineapple European Print This
Serves: 8-10 Prep Time: 10 mins Cooking Time: 30 mins 30 mins
Nutrition facts: 200 calories 20 grams fat
Rating: 5.0/5
( 1 voted )

Ingredients

  • 1 box white cake mix
  • 1 cup crushed pineapples (drained)
  • 1/2 cup pistachio nuts, chopped
  • 1 box pistachio pudding, 3.4 oz
  • 3 eggs
  • 1 cup water
  • 1/3 cup oil
  • FOR THE FROSTING:
  • 12 oz tub of Cool Whip
  • 1 box pistachio pudding, 3.4 oz.
  • 1 cup milk
  • 1/4 cup pistachio nuts, chopped for garnish

Instructions

Step 1: Prepare the oven. Preheat it to 350 degrees.

Step 2: Combine the cake mix, crushed pineapples, pistachio pudding, eggs, water, and oil in a large mixing bowl. Beat for about 2 minutes on medium speed.

Step 3: Then, fold in the pistachio nuts.

Step 4: Transfer the batter into 2 round cake pans or a 9 x 13-inch baking pan.

Step 5: Place inside the preheated oven and bake according to the cake mix package direction.

Step 6: Once done, remove the cake from the oven and allow the cakes completely.

Step 7: Meanwhile, mix the pudding and milk in a medium bowl. Then, chill for about 5 minutes before folding in the cool whip. Chill again until the cake is ready for frosting.

Step 8: Then, thoroughly frost the cooled cake.

Step 9: Place the cake inside the fridge to chill and until ready to serve. And keep the leftovers refrigerated. Enjoy!

August 17, 2020 0 comment
0 FacebookTwitterPinterestEmail
Main Dish Recipes

Southern-Style Hush Puppies

by Rebecca August 17, 2020
written by Rebecca

Serves: 6 to 8 | Prep: 5 Min | Cook: 5 Min

These little treats will make your day extra special. Last week, I was browsing the internet for new and easy recipes that I can try at home and this was the recipe that I saw. What got my attention was this photo. I instantly craved for it that is why I wrote down all the steps and ingredients and started prepping. It was so easy to make. It kind of like you frying chicken but instead it’s flour combined with other ingredients. Give this one a try today and I am 100 percent certain that you are gonna love it! Just follow all the steps and do not skip for a perfect result. These Hush Puppies are best to serve hot. Eat it with a nice and warm coffee or cocoa, sit on your rocking chair looking at a nice view, It is so good! I hope you all love this recipe. Enjoy!

Ingredients

3/4 cup self-rising flour

1 cup self-rising cornmeal (not mix)

1 large egg, lightly beaten

1 small onion, finely minced (I use sweet onion)

1 pinch garlic powder

1 pinch onion powder

1 pinch Old Bay seasoning

1 tablespoon sugar

3/4 to 1 cup buttermilk

canola oil for frying

How to Make Southern-Style Hush Puppies

Step 1: Combine the flour and cornmeal in a large mixing bowl. Then, whisk in the egg, onion, sugar, and spices.

Step 2: Add in the buttermilk. Stir using a fork until just combined. The consistency should be somewhat stiff. You can add more buttermilk if needed.

Step 3: In a deep-fryer, heat oil at 375 degrees.

Step 4: Drop the dough into the hot oil by teaspoons.

Step 5: Fry until the dough rises to the top and golden brown.

Step 6: Once done, remove the hush puppies from the fryer and transfer on paper towels to dry.

Step 7: Serve the hush puppies immediately with honey butter if wanted. Enjoy!

Southern-Style Hush Puppies

Rebecca Serves: 6 to 8 | Prep: 5 Min | Cook: 5 Min These little treats will make your day extra special. Last week, I was browsing the internet for new… Main Dish Recipes Southern-Style Hush Puppies European Print This
Serves: 6-8 Prep Time: 5 mins Cooking Time: 5 mins 5 mins
Nutrition facts: 200 calories 20 grams fat
Rating: 4.5/5
( 2 voted )
August 17, 2020 0 comment
0 FacebookTwitterPinterestEmail
Main Dish Recipes

Roasted Garlic Mushrooms

by Rebecca August 17, 2020
written by Rebecca

Serves: 4 | Prep: 10 Min | Cook: 10 Min

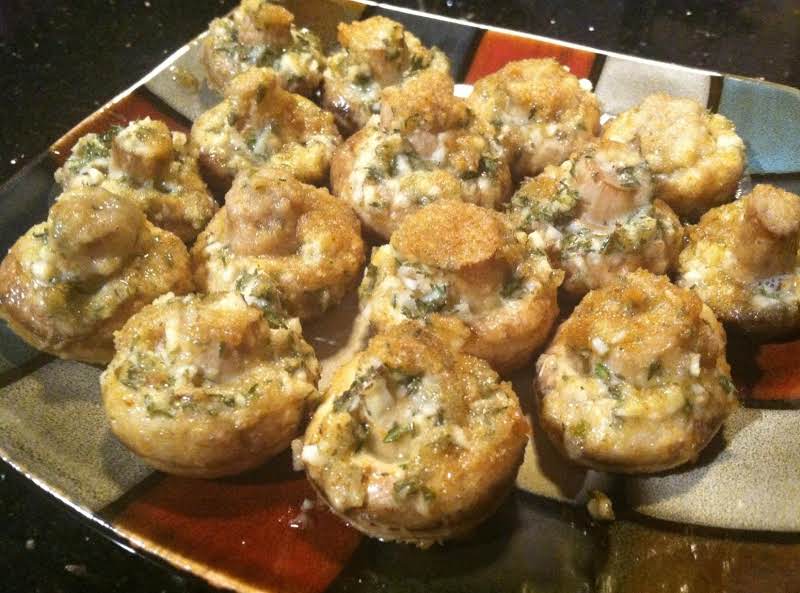
These little wonders are incredibly awesome! I have never been more satisfied in my life. I never knew that mushrooms would be so good! I am not a huge fan of mushrooms but this recipe ultimately got me hooked instantly. The taste of butter and garlic will blow your minds out. My sister introduced me to this recipe and I am so glad that she did because I never would have tasted perfection! This recipe is amazing as is but feel free to add your preferred ingredients. For example, freshly cut basil leaves and onion chives will make this Roasted Garlic Mushrooms extra delicious. Try adding toasted ground pork on top before you bake it. It will give a nice meaty flavor to it. Be very generous with the butter as well. More butter, more awesome! I can’t wait for you to try this recipe. I hope you all love it. Enjoy!

Ingredients

16 even-sized open cap mushrooms, stems cut level

3 tablespoons vegetable oil or corn oil

1 1/2 stick unsalted butter, softened

3 clove garlic, chopped very fine

2 tablespoons fresh thyme, chopped

1 1/2 tablespoons lemon juice

salt and pepper, to taste

1/2 cup bread crumbs

How to Make Roasted Garlic Mushrooms

Step 1: Prepare the oven. Preheat it to degrees.

Step 2: Remove the level of the stem by cutting the mushroom cup.

Step 3: Fry the mushrooms a little in hot oil cap side down for 20 seconds.

Step 4: In a shallow roasting pan, arrange the mushrooms stems facing upwards.

Step 5: In a small bowl, combine the butter garlic, thyme, lemon juice, and seasonings.

Step 6: Place a little amount of the garlic butter onto each mushroom.

Step 7: Gently press the bread crumbs on top of the mixture.

Step 8: Then, place inside the oven and cook for approximately 10 minutes.

Step 9: Once done, remove from the oven and serve immediately. Enjoy!

Roasted Garlic Mushrooms

Rebecca Serves: 4 | Prep: 10 Min | Cook: 10 Min These little wonders are incredibly awesome! I have never been more satisfied in my life. I never knew that mushrooms… Main Dish Recipes Roasted Garlic Mushrooms European Print This
Serves: 4 Prep Time: 10 mins Cooking Time: 10 mins 10 mins
Nutrition facts: 200 calories 20 grams fat
Rating: 5.0/5
( 1 voted )

Ingredients

  • 16 even-sized open cap mushrooms, stems cut level
  • 3 tablespoons vegetable oil or corn oil
  • 1 1/2 stick unsalted butter, softened
  • 3 clove garlic, chopped very fine
  • 2 tablespoons fresh thyme, chopped
  • 1 1/2 tablespoons lemon juice
  • salt and pepper, to taste
  • 1/2 cup bread crumbs

Instructions

Step 1: Prepare the oven. Preheat it to degrees.

Step 2: Remove the level of the stem by cutting the mushroom cup.

Step 3: Fry the mushrooms a little in hot oil cap side down for 20 seconds.

Step 4: In a shallow roasting pan, arrange the mushrooms stems facing upwards.

Step 5: In a small bowl, combine the butter garlic, thyme, lemon juice, and seasonings.

Step 6: Place a little amount of the garlic butter onto each mushroom.

Step 7: Gently press the bread crumbs on top of the mixture.

Step 8: Then, place inside the oven and cook for approximately 10 minutes.

Step 9: Once done, remove from the oven and serve immediately. Enjoy!

August 17, 2020 0 comment
0 FacebookTwitterPinterestEmail
Main Dish Recipes

BONNIE’S SIMPLE PEACH COBBLER (easy batter recipe)

by Rebecca August 17, 2020
written by Rebecca

Serves: 4 | Prep: 1 Hr 10 Min | Cook: 55 Min

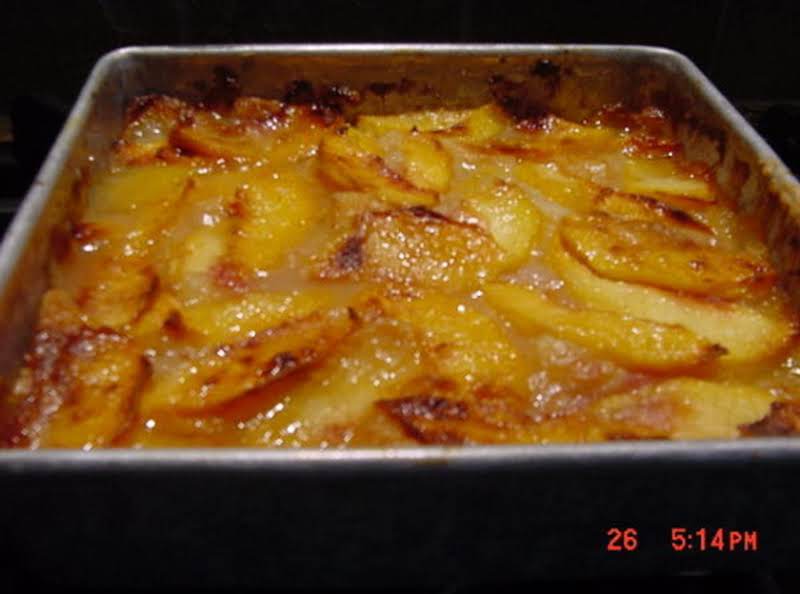
You’ll dig right into this amazingly delicious Peach Cobbler. It’s fruity sweet, pretty simple, and not fussy. I prefer using fresh fruits because canned will give you a sickly sweet cobbler with an icky gummy filling. And this cobbler calls for just a simple batter using a kitchen flour mix. One of the best-of-list and easy on the wallet.

Ingredients

3 tablespoons real butter

3/4 cup all-purpose flour (gluten-free version is below.)

1/2 cup sugar, (if the fruit is tart increase to 3/4 cup)

1 teaspoon baking powder

pinch of nutmeg

1/4 teaspoon of salt

3/4 cup buttermilk (i used ¾ cup organic milk + 1 tsp lemon juice)

2 cups only of sliced fresh peaches (or fruit of choice)

1 tablespoon of sugar for the top

HOW TO MAKE BONNIE’S SIMPLE PEACH COBBLER

Step 1: KITCHEN FLOUR MIX: Combine half a cup of brown rice flour, half a cup of corn starch, half a cup of potato starch, and a tablespoon of protein whey isolate.

Step 2: Make sure to mix the flour mixture well before measuring. You will only use 3/4 cup of this mixture in this recipe. There is no need for xanthan gum. And instead of using buttermilk, use organic milk, and lemon juice for a gluten-free variety.

Step 3: Before preheating the oven to 350 degrees, adjust the oven rack first to the upper-middle position.

Step 4: Ready the fruit and measure only 2 full cups so the batter will have room to rise through and around the fruits. Using more fruits will increase cooking time and might cause the batter to not get done in the middle.

Step 5: Pour the batter into an 8-inch square pan. Place inside the preheated oven to melt and make sure to not brown it. Once the butter has melted, remove the pan from the oven.

Step 6: In a small bowl, whisk the flour, half a cup of sugar, baking powder, salt, and nutmeg. Pour in the milk and continue whisking until you form a smooth batter.

Step 7: Transfer the batter into the prepared pan. Scatter the fruit on top, then, sprinkle over a tablespoon of sugar.

Step 8: Place the pan back in the oven and bake for about 50 to 60 minutes until browned and the fruits bubble.

Step 9: Then, remove from the oven and serve immediately with whipped cream or vanilla ice cream.

NOTE:

You can double this recipe by using an oblong pan or 2 8-inches pans to make sure that the middle is perfectly done.

To remove the peaches skin, wash the peaches first. In a large pot with boiling water, add in 5 tablespoons of baking soda, a spoon at a time to prevent the water to overflow. Put the peaches in the boiling water for not more than 30 seconds. Take them out immediately and transfer the peaches into the ice water. When the peaches cooled down, their skin will start to melt off. Since this recipe requires ripe peaches, this is the perfect technique to use so they remain firm.

BONNIE'S SIMPLE PEACH COBBLER (easy batter recipe)

Rebecca Serves: 4 | Prep: 1 Hr 10 Min | Cook: 55 Min You’ll dig right into this amazingly delicious Peach Cobbler. It’s fruity sweet, pretty simple, and not fussy. I… Main Dish Recipes BONNIE’S SIMPLE PEACH COBBLER (easy batter recipe) European Print This
Serves: 4 Prep Time: 1 hr 10 mins Cooking Time: 55 mins 55 mins
Nutrition facts: 200 calories 20 grams fat
Rating: 5.0/5
( 1 voted )

Ingredients

  • 3 tablespoons real butter
  • 3/4 cup all-purpose flour (gluten-free version is below.)
  • 1/2 cup sugar, (if the fruit is tart increase to 3/4 cup)
  • 1 teaspoon baking powder
  • pinch of nutmeg
  • 1/4 teaspoon of salt
  • 3/4 cup buttermilk (i used ¾ cup organic milk + 1 tsp lemon juice)
  • 2 cups only of sliced fresh peaches (or fruit of choice)
  • 1 tablespoon of sugar for the top

Instructions

Step 1: KITCHEN FLOUR MIX: Combine half a cup of brown rice flour, half a cup of corn starch, half a cup of potato starch, and a tablespoon of protein whey isolate.

Step 2: Make sure to mix the flour mixture well before measuring. You will only use 3/4 cup of this mixture in this recipe. There is no need for xanthan gum. And instead of using buttermilk, use organic milk, and lemon juice for a gluten-free variety.

Step 3: Before preheating the oven to 350 degrees, adjust the oven rack first to the upper-middle position.

Step 4: Ready the fruit and measure only 2 full cups so the batter will have room to rise through and around the fruits. Using more fruits will increase cooking time and might cause the batter to not get done in the middle.

Step 5: Pour the batter into an 8-inch square pan. Place inside the preheated oven to melt and make sure to not brown it. Once the butter has melted, remove the pan from the oven.

Step 6: In a small bowl, whisk the flour, half a cup of sugar, baking powder, salt, and nutmeg. Pour in the milk and continue whisking until you form a smooth batter.

Step 7: Transfer the batter into the prepared pan. Scatter the fruit on top, then, sprinkle over a tablespoon of sugar.

Step 8: Place the pan back in the oven and bake for about 50 to 60 minutes until browned and the fruits bubble.

Step 9: Then, remove from the oven and serve immediately with whipped cream or vanilla ice cream.

NOTE:

You can double this recipe by using an oblong pan or 2 8-inches pans to make sure that the middle is perfectly done.

To remove the peaches skin, wash the peaches first. In a large pot with boiling water, add in 5 tablespoons of baking soda, a spoon at a time to prevent the water to overflow. Put the peaches in the boiling water for not more than 30 seconds. Take them out immediately and transfer the peaches into the ice water. When the peaches cooled down, their skin will start to melt off. Since this recipe requires ripe peaches, this is the perfect technique to use so they remain firm.

August 17, 2020 0 comment
0 FacebookTwitterPinterestEmail
Main Dish Recipes

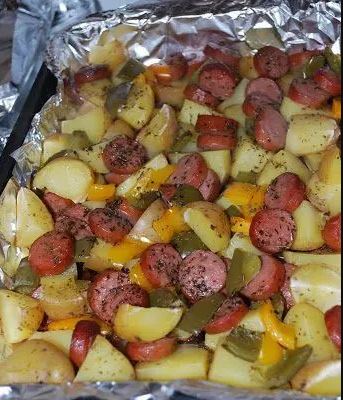
SMOKED SAUSAGE AND POTATO BAKE

by Rebecca August 15, 2020
written by Rebecca

Nothing beats a simple, straightforward recipe that you can easily customize. If you are like me then you’ll love this Smoked Sausage and Potato Bake. This tastes amazing as is but you can change it up and it’ll be as great! Try adding veggies like carrots, zucchini, broccoli, and top it with some cheese. You can even swap sausage with ham. It is all up to you. This is a very versatile dish and it’ll be great no matter what! I have never been more satisfied in my life. This Smoked Sausage and Potato Bake sure made it to my top 10 go-to-food! If you are looking for an awesome dinner recipe, this is the one for you! It pretty much has all the elements. I mean, sausage and potatoes, how awesome is that? Give this one a try today and I am 100 percent sure that you are gonna love it. You will cook this 2 or 3 times a week! I hope you all love this recipe. I have listed all the ingredients and steps that you need to follow. It will guide you to perfection. Have a good day. Enjoy!

INGREDIENTS

1 package of sliced Eckrich skinless smoked sausage

8 quartered Yukon gold potatoes

1 diced green pepper

1 diced yellow pepper

2 tablespoons of butter

1 teaspoon of oregano

1 teaspoon of basil

½ teaspoon of black pepper

2 teaspoons of olive oil

HOW TO MAKE SMOKED SAUSAGE AND POTATO BAKE

Step 1: Prepare the oven. Preheat it to 375 degrees.

Step 2: Place the sausage, then, the potatoes, followed by the peppers in a pan. Top with small cubes of butter.

Step 3: Drizzle over the olive oil and season.

Step 4: Place inside the preheated oven and bake for about 40 to 50 minutes.

Step 5: Remove from the oven and let it sit at room temperature to cool for at least 5 minutes.

Step 6: Serve and enjoy!

SMOKED SAUSAGE AND POTATO BAKE

Rebecca Nothing beats a simple, straightforward recipe that you can easily customize. If you are like me then you’ll love this Smoked Sausage and Potato Bake. This tastes amazing as is… Main Dish Recipes SMOKED SAUSAGE AND POTATO BAKE European Print This
Nutrition facts: 200 calories 20 grams fat
Rating: 4.5/5
( 2 voted )

Ingredients

  • 1 package of sliced Eckrich skinless smoked sausage
  • 8 quartered Yukon gold potatoes
  • 1 diced green pepper
  • 1 diced yellow pepper
  • 2 tablespoons of butter
  • 1 teaspoon of oregano
  • 1 teaspoon of basil
  • ½ teaspoon of black pepper
  • 2 teaspoons of olive oil

Instructions

Step 1: Prepare the oven. Preheat it to 375 degrees.

Step 2: Place the sausage, then, the potatoes, followed by the peppers in a pan. Top with small cubes of butter.

Step 3: Drizzle over the olive oil and season.

Step 4: Place inside the preheated oven and bake for about 40 to 50 minutes.

Step 5: Remove from the oven and let it sit at room temperature to cool for at least 5 minutes.

Step 6: Serve and enjoy!

August 15, 2020 0 comment
0 FacebookTwitterPinterestEmail
Main Dish Recipes

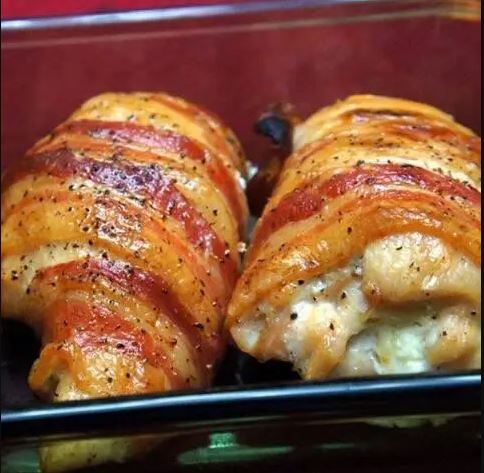
BACON WRAPPED CREAM CHEESE STUFFED CHICKEN BREAST

by Rebecca August 15, 2020
written by Rebecca

This recipe is not only easy, you can even customize it as you like. This is my go-to dinner option and everyone loves it. There is nothing to hate about chicken and bacon with cream cheese and more cheese. I mean it is perfect and it hits all the right spot! It is freaking delicious, the chicken is tender, and the bacon is bacon. Everybody loves bacon and it is amazing no matter what. And the kids are always requesting for chicken so this is excellent. Cream cheese and chicken are the most popular combination but most of the time cream cheese is overpowered by spices and seasonings. But this recipe gives way to the tart cream cheese and no one can complain because hey it’s cream cheese!

INGREDIENTS

2 Boneless skinless chicken breast

4 tablespoons cream cheese

1/4 cup Pepperjack cheese, shredded

2 tablespoons green onion, chopped

4 to 8 pieces of bacon

HOW TO MAKE BACON WRAPPED CREAM CHEESE STUFFED CHICKEN BREAST

Step 1: Slice the chicken into 4 similar size pieces and pound to make them about 1/4-inch thick.

Step 2: In a bowl, combine the softened cream cheese, chopped green onions, and shredded pepper jack cheese. Mix well.

Step 3: Spoon 1/4 of the cream cheese mixture into the center of each chicken piece.

Step 4: Roll the chicken breasts up starting at the longest side, making sure to keep the mixture in the middle.

Step 5: Then, wrap the chicken breasts with 1 to 2 slices of bacon. Secure them with toothpick.

Step 6: I use only 1 piece of bacon but you can wrap 2 pieces of bacon if needed. 1 piece is enough as 2 slices of bacon can fully wrap the chicken and it may seem overwhelming.

Step 7: Put the bacon-wrapped breasts on a baking sheet and place inside the oven to bake for about 30 minutes at 375 degrees F.

Step 8: Then, broil the top to fully brown and crisp the bacon for 5 minutes.

Step 9: Flip to the other side and broil for 3 minutes more to crisp both sides.

BACON WRAPPED CREAM CHEESE STUFFED CHICKEN BREAST

Rebecca This recipe is not only easy, you can even customize it as you like. This is my go-to dinner option and everyone loves it. There is nothing to hate about… Main Dish Recipes BACON WRAPPED CREAM CHEESE STUFFED CHICKEN BREAST European Print This
Nutrition facts: 200 calories 20 grams fat
Rating: 5.0/5
( 1 voted )

Ingredients

  • 2 Boneless skinless chicken breast
  • 4 tablespoons cream cheese
  • 1/4 cup Pepperjack cheese, shredded
  • 2 tablespoons green onion, chopped
  • 4 to 8 pieces of bacon

Instructions

Step 1: Slice the chicken into 4 similar size pieces and pound to make them about 1/4-inch thick.

Step 2: In a bowl, combine the softened cream cheese, chopped green onions, and shredded pepper jack cheese. Mix well.

Step 3: Spoon 1/4 of the cream cheese mixture into the center of each chicken piece.

Step 4: Roll the chicken breasts up starting at the longest side, making sure to keep the mixture in the middle.

Step 5: Then, wrap the chicken breasts with 1 to 2 slices of bacon. Secure them with toothpick.

Step 6: I use only 1 piece of bacon but you can wrap 2 pieces of bacon if needed. 1 piece is enough as 2 slices of bacon can fully wrap the chicken and it may seem overwhelming.

Step 7: Put the bacon-wrapped breasts on a baking sheet and place inside the oven to bake for about 30 minutes at 375 degrees F.

Step 8: Then, broil the top to fully brown and crisp the bacon for 5 minutes.

Step 9: Flip to the other side and broil for 3 minutes more to crisp both sides.

August 15, 2020 0 comment
0 FacebookTwitterPinterestEmail
Main Dish Recipes

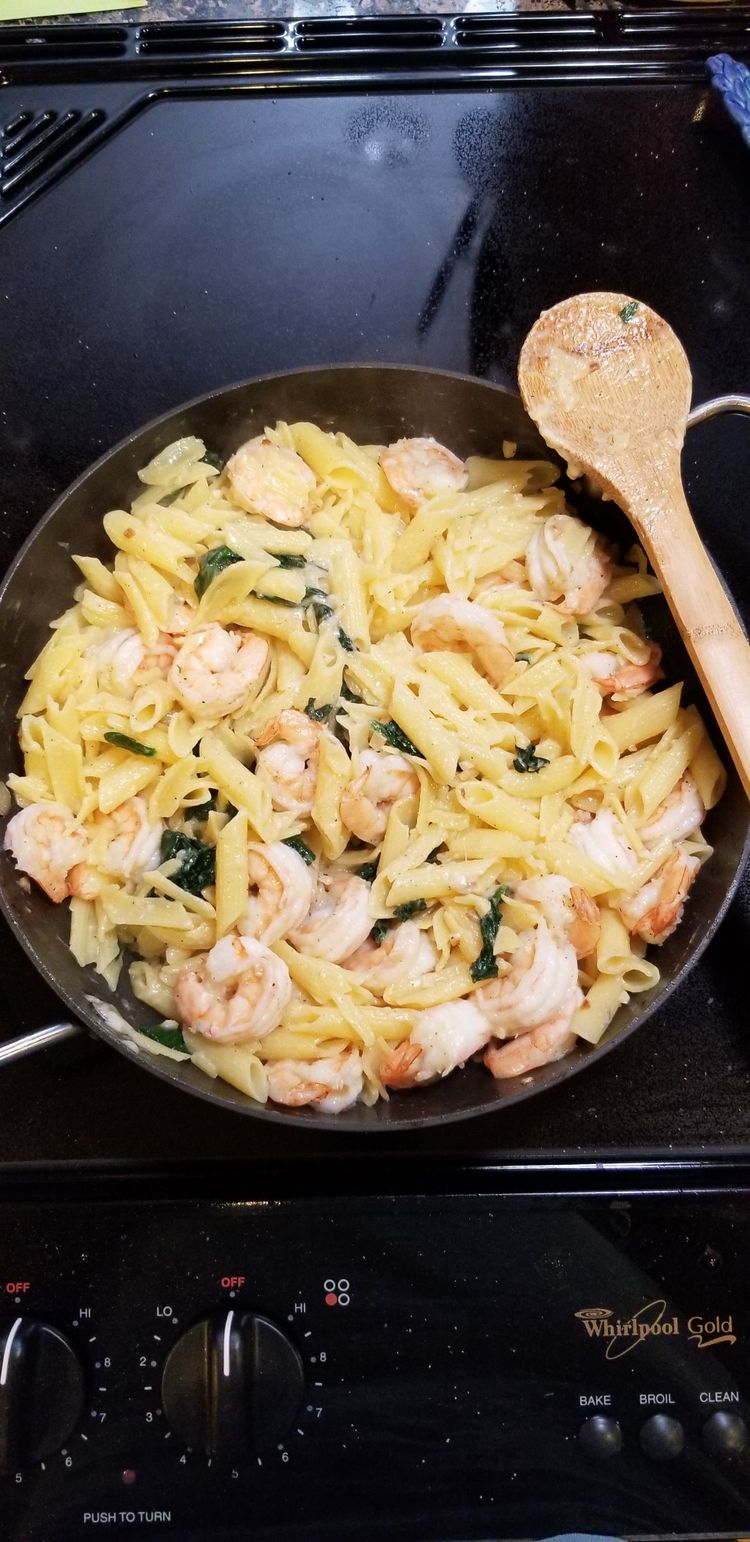
CHEESE SHRIMP PENNE PASTA & SPINACH

by Rebecca August 15, 2020
written by Rebecca

Waving my hands and feet for this Cheese Shrimp Penne Pasta and Spinach! This is the best pasta dish I have in months. It’s so refreshingly good and it has all my favorites in one plate – shrimp, butter, spinach, cheese, and pasta! I am obsessed with seafood pasta and this is one of my favorites. It’s creamy, cheesy, and savory. This is insanely good even my picky eater love this. My daughter hates spinach but she’s surprised at how delicious this dish is. She ate the spinach without complaining and even asked for another plate!

Ingredients

1 box Penne Pasta

1lb Shrimp (peeled and deveined)

3 cups Fresh Chopped Spinach, Kale or Arugula (do not use frozen)

1 cup Mozzarella or Swiss Cheese

3 Garlic cloves (minced)

2 teaspoons Salt, Pepper & Garlic Salt

8 cups Water

2 tablespoons Butter

1 tablespoon Oil

HOW TO MAKE CHEESE SHRIMP PENNE PASTA & SPINACH

Step 1: Prepare the pasta according to package instruction. In the last 5 minutes of cooking, add in the peeled shrimp into the pasta water and cook until the shrimps are no longer pink.

Step 2: Drain and do not forget to reserve a cup of pasta water for later use.

Step 3: Make sure to keep the pasta and shrimps warm.

Step 4: Add oil and butter into the pan. Melt the butter over medium heat.

Step 5: Once the butter melted, add in the pasta and toss to coat. Season according to taste and continue cooking, stirring often for 2 minutes.

Step 6: Then, add in the spinach and cook for another minute until the spinach is wilted. You can add 1/3 cup of water if needed to steam/cook the spinach.

Step 7: Add in the shrimp and cheese. Gently stir until the cheese has melted. Make sure to not overcook.

Step 8: Add more seasoning depends on how you like it.

Step 9: Garnish the pasta with dried cilantro before serving. Enjoy!

CHEESE SHRIMP PENNE PASTA & SPINACH

Rebecca Waving my hands and feet for this Cheese Shrimp Penne Pasta and Spinach! This is the best pasta dish I have in months. It’s so refreshingly good and it has… Main Dish Recipes CHEESE SHRIMP PENNE PASTA & SPINACH European Print This
Nutrition facts: 200 calories 20 grams fat
Rating: 4.1/5
( 16 voted )

Ingredients

  • 1 box Penne Pasta
  • 1lb Shrimp (peeled and deveined)
  • 3 cups Fresh Chopped Spinach, Kale or Arugula (do not use frozen)
  • 1 cup Mozzarella or Swiss Cheese
  • 3 Garlic cloves (minced)
  • 2 teaspoons Salt, Pepper & Garlic Salt
  • 8 cups Water
  • 2 tablespoons Butter
  • 1 tablespoon Oil

Instructions

Step 1: Prepare the pasta according to package instruction. In the last 5 minutes of cooking, add in the peeled shrimp into the pasta water and cook until the shrimps are no longer pink.

Step 2: Drain and do not forget to reserve a cup of pasta water for later use.

Step 3: Make sure to keep the pasta and shrimps warm.

Step 4: Add oil and butter into the pan. Melt the butter over medium heat.

Step 5: Once the butter melted, add in the pasta and toss to coat. Season according to taste and continue cooking, stirring often for 2 minutes.

Step 6: Then, add in the spinach and cook for another minute until the spinach is wilted. You can add 1/3 cup of water if needed to steam/cook the spinach.

Step 7: Add in the shrimp and cheese. Gently stir until the cheese has melted. Make sure to not overcook.

Step 8: Add more seasoning depends on how you like it.

Step 9: Garnish the pasta with dried cilantro before serving. Enjoy!

August 15, 2020 0 comment
0 FacebookTwitterPinterestEmail
Main Dish Recipes

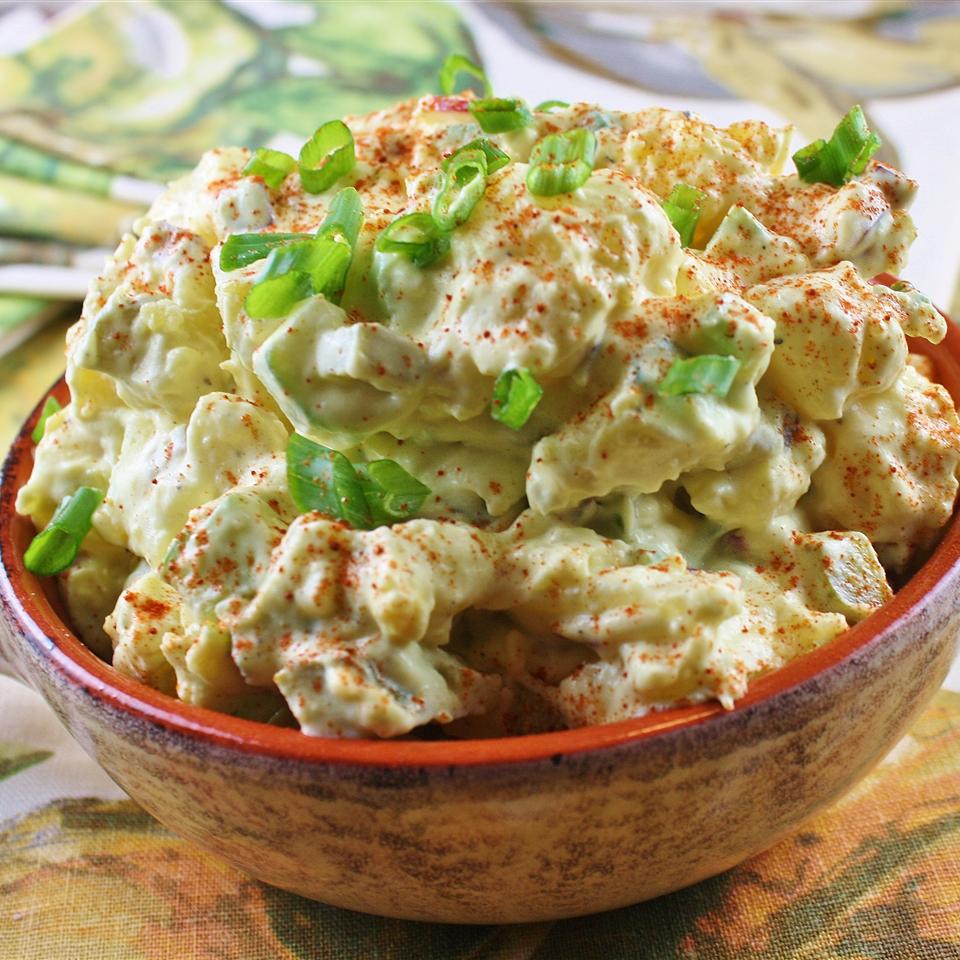
Old-Fashioned Potato Salad

by Rebecca August 15, 2020
written by Rebecca

Salads are simply the best! You can make them in a heartbeat and they taste amazing when kept long. The same thing I can say with this Old-Fashioned Potato Salad. It’s a no-fuss, it tastes superb, and perfect not only as a side dish but as the main entree. I am pretty sure everyone will love the creamy, smooth texture of this salad. This is a must-try and a must-have!

Prep time: 20 min | Cooking: 10 min | Additional: 6 hrs | Total: 6 hrs 30 min | Servings: 20 | Yield: 20 servings

Ingredients

5 lbs red potatoes, chopped

3 cups mayonnaise

2 cups finely chopped pickles

(5) eaches hard-cooked eggs, chopped

½ cup chopped red onion

½ cup chopped celery

3 tablespoons prepared mustard

1 tablespoon apple cider vinegar

1 teaspoon salt, or to taste

½ teaspoon ground black pepper

How to make Old-Fashioned Potato Salad

Step 1: In a large pot, place the potatoes and pour enough salted water to cover the potatoes. Bring it to a boil, then, adjust the heat to medium-low and simmer for approximately 10 minutes until tender.

Step 2: Once tender, drain the potatoes. Put them back into the pan and sprinkle with salt. Set aside to dry.

Step 3: Meanwhile, combine the mayonnaise, pickles, hard-cooked eggs, red onion, celery, mustard, cider vinegar, a teaspoon salt, and pepper in a large bowl. Mix well, then, fold in the potatoes.

Step 4: Place inside the fridge to chill for at least 6 hours or overnight before serving.

Notes:

You can add four strips of sliced and cooked bacon or a cup of diced ham for variety.

When in the fridge, potato salad can stays for about a week. Just make sure to put the salad in a sealed container and it stays cold.

This old-fashioned Potato Salad can be made ahead as long as you keep it covered and it stays cool. It will taste better the longer the ingredients blend.

Nutrition Facts:

Per Serving: 338.8 calories; 53.5 mg cholesterol; 538.1 mg sodium; 4.1 g protein; 20.4 g carbohydrates

Old-Fashioned Potato Salad

Rebecca Salads are simply the best! You can make them in a heartbeat and they taste amazing when kept long. The same thing I can say with this Old-Fashioned Potato Salad.… Main Dish Recipes Old-Fashioned Potato Salad European Print This
Serves: 20 Prep Time: 20 mins Cooking Time: 10 mins 10 mins
Nutrition facts: 338.8 calories 20 grams fat
Rating: 5.0/5
( 1 voted )

Ingredients

  • 5 lbs red potatoes, chopped
  • 3 cups mayonnaise
  • 2 cups finely chopped pickles
  • (5) eaches hard-cooked eggs, chopped
  • ½ cup chopped red onion
  • ½ cup chopped celery
  • 3 tablespoons prepared mustard
  • 1 tablespoon apple cider vinegar
  • 1 teaspoon salt, or to taste
  • ½ teaspoon ground black pepper

Instructions

Step 1: In a large pot, place the potatoes and pour enough salted water to cover the potatoes. Bring it to a boil, then, adjust the heat to medium-low and simmer for approximately 10 minutes until tender.

Step 2: Once tender, drain the potatoes. Put them back into the pan and sprinkle with salt. Set aside to dry.

Step 3: Meanwhile, combine the mayonnaise, pickles, hard-cooked eggs, red onion, celery, mustard, cider vinegar, a teaspoon salt, and pepper in a large bowl. Mix well, then, fold in the potatoes.

Step 4: Place inside the fridge to chill for at least 6 hours or overnight before serving.

Notes:

You can add four strips of sliced and cooked bacon or a cup of diced ham for variety.

When in the fridge, potato salad can stays for about a week. Just make sure to put the salad in a sealed container and it stays cold.

This old-fashioned Potato Salad can be made ahead as long as you keep it covered and it stays cool. It will taste better the longer the ingredients blend.

August 15, 2020 0 comment
0 FacebookTwitterPinterestEmail
Main Dish Recipes

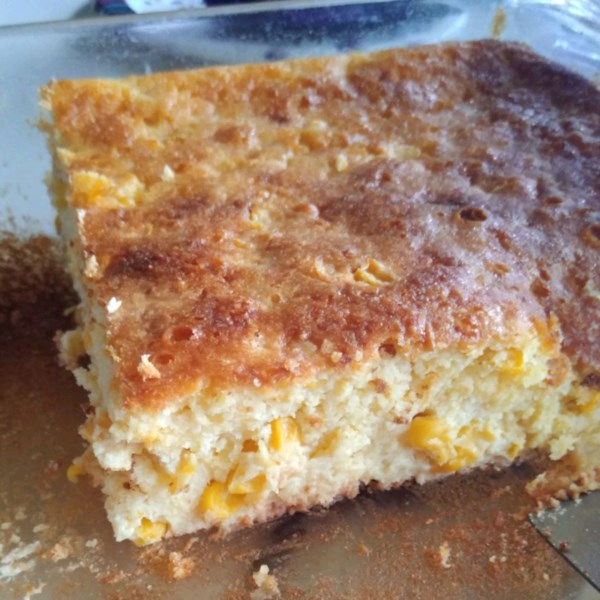
Perfect Corn Casserole

by Rebecca August 15, 2020
written by Rebecca

Whoever invented casserole recipes is a genius! I mean, it is the best thing aside from no-bakes. You can make any kind of casserole from desserts to this perfect corn casserole. I stumbled upon this recipe not long ago. I am a mom and I am always looking for a way to spice up my family’s meal. And this is perfect because not only that it calls for just a few simple ingredients but it tastes amazing! My kids love corn and this corn casserole is their new addiction. When I made this the first time, this did not even stayed for long, it’s gone in a blink! We love the buttery, soft golden crunch of this casserole with it’s creamy inside. I put a handful of cheese on top because the kids also love cheese. This became their most requested side dish. I can’t complain because it’s so good and it is super easy to make! You can even make this ahead and it reheats perfectly. I plan on making this fabulous corn casserole this Holiday and I am confident that this will be a hit!

Servings: 6-8

INGREDIENTS

1 box Jiffy cornbread mix

1 can cream corn

1 can whole kernel corn drained

2 eggs

1 stick butter melted

1 cup Sour cream

EQUIPMENTS

An oven

A mixer

One 8×8-inch baking pan

How to make Perfect Corn Casserole

Step 1: In a bowl, combine the cornbread mix, cream corn, drained kernel, eggs, and butter. Mix until smooth. Add in the sour cream and mix well.

Step 2: Then, grease an 8 x 8-inch baking pan or casserole to prevent the bits from sticking into the pan.

Step 3: Transfer the mixture into the prepared pan.

Step 4: Place inside the oven and bake at 350 degrees for about 45 minutes.

Step 5: Once done, remove from the oven and serve immediately. Enjoy!

Nutrition facts:

150.7 calories, 7.0g total fat, 2.9g saturated fat, 34.4mg cholesterol, 314.4 mg sodium, 110.0 mg potassium, 1.2g fiber and 3.0g protein

Perfect Corn Casserole

Rebecca Whoever invented casserole recipes is a genius! I mean, it is the best thing aside from no-bakes. You can make any kind of casserole from desserts to this perfect corn… Main Dish Recipes Perfect Corn Casserole European Print This
Nutrition facts: 150.7 calories 7 fat
Rating: 5.0/5
( 1 voted )

Ingredients

  • 1 box Jiffy cornbread mix
  • 1 can cream corn
  • 1 can whole kernel corn drained
  • 2 eggs
  • 1 stick butter melted
  • 1 cup Sour cream

Instructions

Step 1: In a bowl, combine the cornbread mix, cream corn, drained kernel, eggs, and butter. Mix until smooth. Add in the sour cream and mix well.

Step 2: Then, grease an 8 x 8-inch baking pan or casserole to prevent the bits from sticking into the pan.

Step 3: Transfer the mixture into the prepared pan.

Step 4: Place inside the oven and bake at 350 degrees for about 45 minutes.

Step 5: Once done, remove from the oven and serve immediately. Enjoy!

August 15, 2020 0 comment
0 FacebookTwitterPinterestEmail
Newer Posts
Older Posts

Popular Posts

  • 1

    Crispy Crunchy Parmesan Potatoes

    March 21, 2020
  • 2

    CROCK POT SMOTHERED PORK CHOPS

    March 21, 2020
  • Facebook
  • Twitter

@2019 - All Right Reserved.


Back To Top