Cook it once
  • Home
  • Privacy Policy
  • Recipes
    • KETO
    • LC
    • WW
  • Tips
  • Contact
Cook it once
  • Home
  • Privacy Policy
  • Recipes
    • KETO
    • LC
    • WW
  • Tips
  • Contact
Category:

Main Dish Recipes

Main Dish Recipes

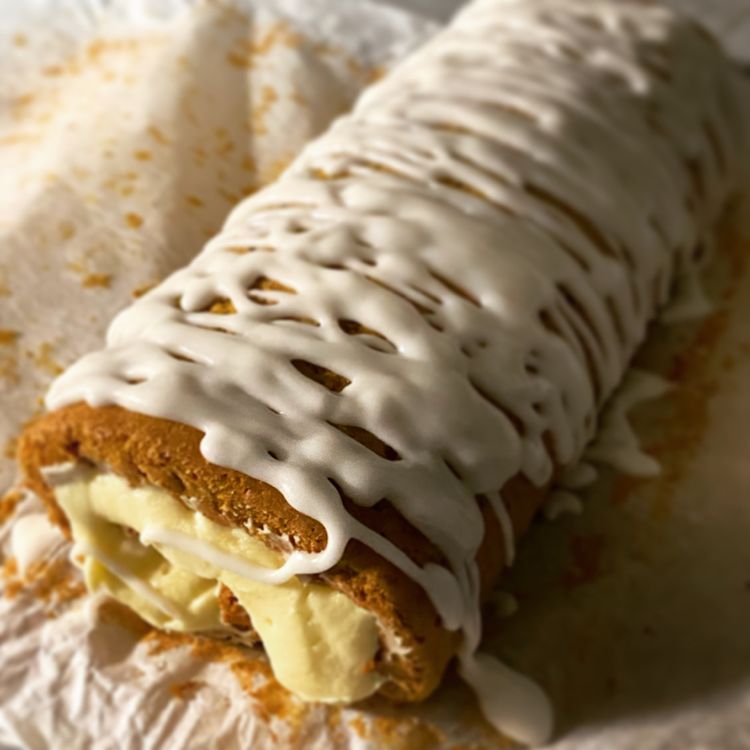
Carrot Cake Roll with Cream Cheese Frosting Filling

by Rebecca May 1, 2020
written by Rebecca

Hi there! Last week was awesome. I ate this amazing cake at my cousin’s wedding. It was so good that I contacted the pastry chef which happened to be my cousin’s best friend and she gave me this incredible recipe. I’m telling you guys, try this one out. You are in for a treat. I’m waiting for it to finish baking actually, while I’m writing this. Lol! Have fun baking everyone! Have a good day!

Ingredients

For the Cake

3/4 c flour

2 tsp. ground cinnamon

1 tsp. baking powder

1/2 tsp. kosher salt

1/2 tsp. ground ginger

1/4 tsp. ground nutmeg

1/8 tsp. ground cloves

3 large eggs

1/2 c granulated sugar

2 tbsp. vegetable oil

1 tsp. pure vanilla extract

3 medium carrots, shredded

For the Filling

1 c confectioners sugar

1 (8 oz.) package cream cheese, softened

6 tbsp. salted butter softened

1 tsp. pure vanilla extract

For the Glaze Drizzle:

3 c confectioners sugar

1/2 teaspoon vanilla extract

10-11 tbsp. milk

Instructions

Ready the oven then, preheat to 375 degrees F. Align parchment paper with the 15 x 10-inch jelly roll pan. The sides should stick out a little.

Mix flour, baking powder, salt, nutmeg, cloves, and cinnamon in a medium-sized bowl then whisk well.

Combine eggs and sugar in a large-sized bowl. Whisk until well-mixed.

In the same bowl as the egg mixture, add vanilla extract, carrots, and vegetable oil. Mix until all ingredients are incorporated.

Add the dry ingredients into the egg mixture then fold to merge.

Stir the batter until well-mixed. Prepare the jelly roll pan then pour in the batter. Bake for 12 minutes. (Remember to spread the batter evenly.) Once finished baking, use the overhang on the sides to remove the cake from the oven.

Place the cake on a large-sized wood chopping board then slowly roll the cake lengthwise.

Transfer the cake to a cooling rack and let it cool.

In a medium-sized bowl, add together cream cheese, confectioners sugar, butter, and vanilla extract for the filling. Whisk thoroughly until all ingredients are well incorporated or until creamy.

Slowly unroll the cake then spread on the filling. (Remember to leave a small gap on the edges.

Roll up the cake back. Use a plastic cling to wrap it tightly.

Refrigerate for 1 hour.

In a medium-sized mixing bowl, add together the glaze ingredients and whisk until well-mixed. Before slicing, sprinkle the glaze over the cake.

Carrot Cake Roll with Cream Cheese Frosting Filling

Rebecca Hi there! Last week was awesome. I ate this amazing cake at my cousin’s wedding. It was so good that I contacted the pastry chef which happened to be my… Main Dish Recipes Carrot Cake Roll with Cream Cheese Frosting Filling European Print This
Nutrition facts: 200 calories 20 grams fat
Rating: 5.0/5
( 1 voted )

Ingredients

  • For the Cake
  • 3/4 c flour
  • 2 tsp. ground cinnamon
  • 1 tsp. baking powder
  • 1/2 tsp. kosher salt
  • 1/2 tsp. ground ginger
  • 1/4 tsp. ground nutmeg
  • 1/8 tsp. ground cloves
  • 3 large eggs
  • 1/2 c granulated sugar
  • 2 tbsp. vegetable oil
  • 1 tsp. pure vanilla extract
  • 3 medium carrots, shredded
  • For the Filling
  • 1 c confectioners sugar
  • 1 (8 oz.) package cream cheese, softened
  • 6 tbsp. salted butter softened
  • 1 tsp. pure vanilla extract
  • For the Glaze Drizzle:
  • 3 c confectioners sugar
  • 1/2 teaspoon vanilla extract
  • 10-11 tbsp. milk

Instructions

Ready the oven then, preheat to 375 degrees F. Align parchment paper with the 15 x 10-inch jelly roll pan. The sides should stick out a little.

Mix flour, baking powder, salt, nutmeg, cloves, and cinnamon in a medium-sized bowl then whisk well.

Combine eggs and sugar in a large-sized bowl. Whisk until well-mixed.

In the same bowl as the egg mixture, add vanilla extract, carrots, and vegetable oil. Mix until all ingredients are incorporated.

Add the dry ingredients into the egg mixture then fold to merge.

Stir the batter until well-mixed. Prepare the jelly roll pan then pour in the batter. Bake for 12 minutes. (Remember to spread the batter evenly.) Once finished baking, use the overhang on the sides to remove the cake from the oven.

Place the cake on a large-sized wood chopping board then slowly roll the cake lengthwise.

Transfer the cake to a cooling rack and let it cool.

In a medium-sized bowl, add together cream cheese, confectioners sugar, butter, and vanilla extract for the filling. Whisk thoroughly until all ingredients are well incorporated or until creamy.

Slowly unroll the cake then spread on the filling. (Remember to leave a small gap on the edges.

Roll up the cake back. Use a plastic cling to wrap it tightly.

Refrigerate for 1 hour.

In a medium-sized mixing bowl, add together the glaze ingredients and whisk until well-mixed. Before slicing, sprinkle the glaze over the cake.
May 1, 2020 0 comment
0 FacebookTwitterPinterestEmail
Main Dish Recipes

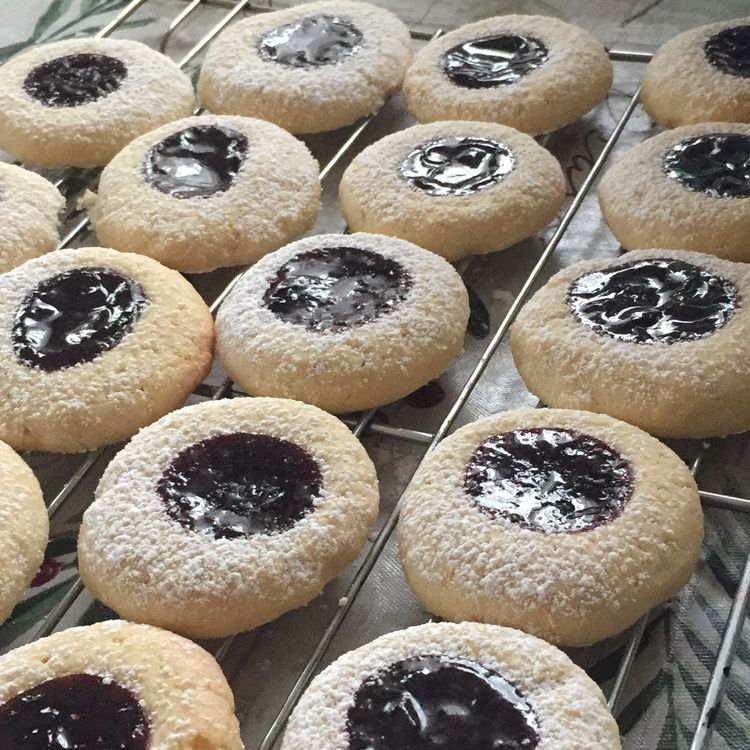
EASY THUMBPRINT COOKIES

by Rebecca May 1, 2020
written by Rebecca

These thumbnail cookies are so pretty! They’re soft, buttery and we get to fill them with our favourite fillings! A bite-size shortbread cookie that is so delicious it melts in your mouth, and they are very easy to make. The dough is made with just 5 simple ingredients and rolled into individual balls. To achieve the perfect thumbnail cookies, use only high-quality unsalted butter. Make sure to soften it before mixing, in that way we can ensure the dough is smooth and less likely to crack. For an extra soft dough, use three tablespoons of cornstarch (this gives the cookies extra lift). Then, use your thumb to make an imprint exactly after making each ball. If using the jam as a filling, add it before baking. But when using a chocolate filling, add it afterwards.

Your filling options are entirely up to you! You can use the classic Jam Filling; raspberry, apricot, strawberry, blueberry (my favourite), or cherry jam. If your jam is too thick, take a few tablespoons and microwave before use. You can also, use chocolate filling (different kinds, again sky’s the limit) and decorate your thumbnail cookies, sprinkle with candies. Oh, I love how we can great creative with it!

To prevent your cookies from cracking, remember to roll the cookie dough until the surface is smooth. Imprint as soon as possible, don’t wait for it to stiffen. If in case you still see small cracks, you can just press the dough to seal. We don’t want unpretty crack cookies anyway.

When baking you want your cookies to not spread. Not enough flour to hold them will cause your cookies to spread too much. So you have to use the correct measurement. If the kitchen scale is available, use it, if not, fill your measuring cup and level it off using a knife. Remember not to over mix your ingredients, too. You should stop mixing once everything is combined. Chill the dough before baking (the colder the dough, the less your cookies will spread). And one last thing, when you are baking in batches, never (again never) add the cookie dough directly in a hot baking sheet.

Place your homemade thumbnail cookies in an airtight container at room temperature and consume it in 5 days. When stored in the fridge, so long as they are in a sealed freezer-safe bag, they will last up to 3 months.

Ingredients

Thumbprint Cookie Dough

1 c unsalted butter, softened to room temperature

1/2 c sugar

2 cups all-purpose flour

3 Tbsp. cornstarch

1 tsp. vanilla extract

Jam Filling

1/4 cup of raspberry jam, or other flavours such as apricot, strawberry and cherry jam

Chocolate Filling with Holiday Sprinkles

3 oz white chocolate, melted

holiday sprinkles

Dark Chocolate Filling with Bear Paw Decor

3 oz semisweet chocolate, melted

White Chocolate Filling with Snowman Decor

3 oz white chocolate, melted

1 tsp. coloured sprinkles

Dark Chocolate Filling with Reindeer Decor

1/4 c candy eyeballs

1/4 c red decorating balls

1 c pretzels

Instructions

To make the Thumbnail Cookie Dough

Prepare a stand mixer with a paddle attachment, or a large mixing bowl and electric hand mixer. Line a baking sheet using a parchment paper. Set aside.

Using the stand mixer, beat softened butter, sugar, and vanilla on medium-high speed for about 2 minutes or until fluffy and well combined.

Stop the mixer. Using a spatula, scrape down the sides of the bowl. Add the flour and cornstarch while mixing on low speed for another 2 minutes or until well combined. If using a hand mixer, you can use a wooden spoon to mix.

The dough will look dry and crumbly. It is pretty normal so don’t panic. First, scrape down the sides again. Now use your hands to form the dough into one piece.

Scoop out about 1 tbsp of dough. Roll it between your palms to shape it into a 1 1/4 inch or 3cm ball. Make sure it is smooth without any cracks.

To make an imprint, use the tip of your thumb about half-inch into the middle of the ball. Or you can also use the back of a 1/4 tsp. to make an imprint. Repeat for all the dough.

Place the indented balls an inch apart on the prepared baking sheet.

Put in the fridge for 30 minutes to chill.

Jam Thumbnail Cookies

Preheat the oven to 350 degrees F or 180 degrees C ten minutes before the end of the chilling time.

Take the jam out and stir. Microwave for 10 seconds if the jam is too thick.

Remove cookie dough from the fridge. Fill the indent with jam, full but not over-flowing.

Put inside the oven and bake for 10-12 minutes. make sure to remove them before your cookies start to brown.

Remove cookies from the baking sheet with a rigid spatula and place it on wire cooling racks. Cool completely.

Chocolate Jam Thumbnail Cookies

Preheat the oven to 350 degrees F or 180 degrees C about ten minutes before the end of chilling.

Place unfilled cookies in the oven and bake for 10-12 minutes.

Microwave your chocolate for 2-3 minutes at 50% power in 30 seconds intervals, stirring each time until smooth. (This depends on the amount of chocolate and your microwave power.)

Make sure to remove the cookies from the oven before they start to brown. Transfer them to cooling racks to cool completely.

Fill each indent with melted chocolate, decorate with sprinkles, candies, or pretzel pieces (whatever you desire).

EASY THUMBPRINT COOKIES

Rebecca These thumbnail cookies are so pretty! They’re soft, buttery and we get to fill them with our favourite fillings! A bite-size shortbread cookie that is so delicious it melts in… Main Dish Recipes EASY THUMBPRINT COOKIES European Print This
Nutrition facts: 200 calories 20 grams fat
Rating: 5.0/5
( 1 voted )

Ingredients

  • Thumbprint Cookie Dough
  • 1 c unsalted butter, softened to room temperature
  • 1/2 c sugar
  • 2 cups all-purpose flour
  • 3 Tbsp. cornstarch
  • 1 tsp. vanilla extract
  • Jam Filling
  • 1/4 cup of raspberry jam, or other flavours such as apricot, strawberry and cherry jam
  • Chocolate Filling with Holiday Sprinkles
  • 3 oz white chocolate, melted
  • holiday sprinkles
  • Dark Chocolate Filling with Bear Paw Decor
  • 3 oz semisweet chocolate, melted
  • White Chocolate Filling with Snowman Decor
  • 3 oz white chocolate, melted
  • 1 tsp. coloured sprinkles
  • Dark Chocolate Filling with Reindeer Decor
  • 1/4 c candy eyeballs
  • 1/4 c red decorating balls
  • 1 c pretzels

Instructions

To make the Thumbnail Cookie Dough

Prepare a stand mixer with a paddle attachment, or a large mixing bowl and electric hand mixer. Line a baking sheet using a parchment paper. Set aside.

Using the stand mixer, beat softened butter, sugar, and vanilla on medium-high speed for about 2 minutes or until fluffy and well combined.

Stop the mixer. Using a spatula, scrape down the sides of the bowl. Add the flour and cornstarch while mixing on low speed for another 2 minutes or until well combined. If using a hand mixer, you can use a wooden spoon to mix.

The dough will look dry and crumbly. It is pretty normal so don't panic. First, scrape down the sides again. Now use your hands to form the dough into one piece.

Scoop out about 1 tbsp of dough. Roll it between your palms to shape it into a 1 1/4 inch or 3cm ball. Make sure it is smooth without any cracks.

To make an imprint, use the tip of your thumb about half-inch into the middle of the ball. Or you can also use the back of a 1/4 tsp. to make an imprint. Repeat for all the dough.

Place the indented balls an inch apart on the prepared baking sheet.

Put in the fridge for 30 minutes to chill.

Jam Thumbnail Cookies

Preheat the oven to 350 degrees F or 180 degrees C ten minutes before the end of the chilling time.

Take the jam out and stir. Microwave for 10 seconds if the jam is too thick.

Remove cookie dough from the fridge. Fill the indent with jam, full but not over-flowing.

Put inside the oven and bake for 10-12 minutes. make sure to remove them before your cookies start to brown.

Remove cookies from the baking sheet with a rigid spatula and place it on wire cooling racks. Cool completely.

Chocolate Jam Thumbnail Cookies

Preheat the oven to 350 degrees F or 180 degrees C about ten minutes before the end of chilling.

Place unfilled cookies in the oven and bake for 10-12 minutes.

Microwave your chocolate for 2-3 minutes at 50% power in 30 seconds intervals, stirring each time until smooth. (This depends on the amount of chocolate and your microwave power.)

Make sure to remove the cookies from the oven before they start to brown. Transfer them to cooling racks to cool completely.

Fill each indent with melted chocolate, decorate with sprinkles, candies, or pretzel pieces (whatever you desire).

May 1, 2020 0 comment
0 FacebookTwitterPinterestEmail
Main Dish Recipes

PEPPERMINT BARK

by Rebecca May 1, 2020
written by Rebecca

Peppermint Bark is a DIY homemade holiday dessert; it’s a classic, super delish and very easy to make. I love how the crushed candy canes give this treat a satisfying crunch, with the cool and refreshing taste of peppermint in every bite. This is popular among kids and kids at heart, and a perfect treat to give in the holiday.

INGREDIENTS

1 Cup Mini Candy Canes (Crushed)

½ Tsp Pure Peppermint Extract

2 10-oz bags Semi-Sweet Chocolate Chips

2 10-oz bags White Chocolate Chips

½ Tbsp Coconut Oil

HOW TO MAKE PEPPERMINT BARK

Step 1: Place mini candy canes in a ziplock plastic bag and seal properly. Crush the candies to uneven sizes. Set aside.

Step 2: Line parchment paper on a 9 x 13-inch baking sheet.

Step 3: Put the semi-sweet chocolate chips in a microwave-safe glass bowl. Stir the chocolate and microwave in 15 minutes interval until melted completely.

Step 4: Once melted, pour the chocolate over the parchment paper. Refrigerate.

Step 5: In a separate microwave-safe bowl, place the white chocolate chips, coconut oil, and peppermint extract and heat for 30 seconds. Stir and microwave in 15-seconds intervals (stirring in between each session) until completely melted.

Step 6: Pour the white chocolate mixture over the semi-sweet chocolate mixture. Immediately sprinkle with the mini crushed candy canes. Gently press the candy canes into the white chocolate mixture, and refrigerate to set for about 20 minutes.

Step 7: Once done, remove from the fridge and break into pieces. Enjoy!

Quick Tip:
To keep the peppermint bark from separating, make sure that before breaking it into pieces, allow it first to come to room temperature. And when freezing, make sure to wrap it well. Start with waxed paper, then, some plastic wrap, or foil, and place it into an airtight container to keep out as much moisture as possible. In that way, you can keep your peppermint bark for several months in the freezer.

PEPPERMINT BARK

Rebecca Peppermint Bark is a DIY homemade holiday dessert; it’s a classic, super delish and very easy to make. I love how the crushed candy canes give this treat a satisfying… Main Dish Recipes PEPPERMINT BARK European Print This
Nutrition facts: 200 calories 20 grams fat
Rating: 5.0/5
( 1 voted )

Ingredients

  • 1 Cup Mini Candy Canes (Crushed)
  • ½ Tsp Pure Peppermint Extract
  • 2 10-oz bags Semi-Sweet Chocolate Chips
  • 2 10-oz bags White Chocolate Chips
  • ½ Tbsp Coconut Oil

Instructions

Step 1: Place mini candy canes in a ziplock plastic bag and seal properly. Crush the candies to uneven sizes. Set aside.

Step 2: Line parchment paper on a 9 x 13-inch baking sheet.

Step 3: Put the semi-sweet chocolate chips in a microwave-safe glass bowl. Stir the chocolate and microwave in 15 minutes interval until melted completely.

Step 4: Once melted, pour the chocolate over the parchment paper. Refrigerate.

Step 5: In a separate microwave-safe bowl, place the white chocolate chips, coconut oil, and peppermint extract and heat for 30 seconds. Stir and microwave in 15-seconds intervals (stirring in between each session) until completely melted.

Step 6: Pour the white chocolate mixture over the semi-sweet chocolate mixture. Immediately sprinkle with the mini crushed candy canes. Gently press the candy canes into the white chocolate mixture, and refrigerate to set for about 20 minutes.

Step 7: Once done, remove from the fridge and break into pieces. Enjoy!

Quick Tip:
To keep the peppermint bark from separating, make sure that before breaking it into pieces, allow it first to come to room temperature. And when freezing, make sure to wrap it well. Start with waxed paper, then, some plastic wrap, or foil, and place it into an airtight container to keep out as much moisture as possible. In that way, you can keep your peppermint bark for several months in the freezer.

May 1, 2020 0 comment
0 FacebookTwitterPinterestEmail
Main Dish Recipes

Baked Burrito Casserole

by Rebecca April 30, 2020
written by Rebecca

This is another Mexican dish that is very easy to make. It is full of flavours, irresistibly good, and a great meal to spice up your Taco nights with friends and family. It will only take you 10 minutes to prepare, then pop this baby in the oven and wait until it’s done. Oh, by the way, since we are making this from scratch, we have a lot of swap options available! A secret; use lean ground beef, season well, and add more cheese! Anyway, who would not want a super cheesy burrito casserole, right?

You can make this ahead time as well. Just put it in an airtight bag and freeze. Frozen burrito casserole will last up to 2 months. And you will only need additional 15-20 minutes baking time for frozen burritos. As for the ingredients, yes, of course, you are welcome to substitute ground beef with cooked chicken, leave the beans, or go vegetarian. For a creamy burrito casserole, you can add cream of chicken soup. Sky’s the limit with this burrito casserole!

We don’t want a soggy burrito casserole so what should we do to get the right consistency? We need to boil down the liquid, get a thick enough mixture so it will be easy to wrap in the burritos.

Ingredients

1 pound ground beef, lean

1 small onion, chopped

10 oz of canned black beans, drained

2/3 c corn

¾ c salsa

1 teaspoon dried oregano

1 teaspoon cumin powder

1 teaspoon garlic powder

salt & pepper, to taste

8 flour tortillas, 8-inch size

2 1/2 cups of shredded cheese, a mixture of cheddar and jack

Serving – optional

green onions, chopped

salsa

guacamole

sour cream

How to make Baked Burrito Casserole

Ready the oven. Preheat to 350 degrees F. With a nonstick cooking spray, grease a 13 x 9-inch baking pan. Set aside.

Cook the ground beef in a large nonstick or cast-iron skillet over medium-high heat.

Stir the beef for 3-5 minutes or until mostly browned. Strain grease.

Add the chopped onion, and cook until soft.

Add the black beans, salsa, and corn. Then, add the oregano, cumin, garlic powder, and salt and pepper. Stir for about 3 minutes.

Put about 1/2 cup of beef mixture to the bottom centre of the flour tortilla, roll up into a burrito shape.

Place seam side down the filled burritos into the pan.

Fill the pan with only eight burritos, and sprinkle with shredded cheese on top.

Place inside the oven and bake at 350 degrees for 18-20 minutes until cheese is melted.

Once done, remove from the oven. Sprinkle with chopped green onions, serve warm. Enjoy!

Baked Burrito Casserole

Rebecca This is another Mexican dish that is very easy to make. It is full of flavours, irresistibly good, and a great meal to spice up your Taco nights with friends… Main Dish Recipes Baked Burrito Casserole European Print This
Nutrition facts: 200 calories 20 grams fat
Rating: 5.0/5
( 1 voted )

Ingredients

  • 1 pound ground beef, lean
  • 1 small onion, chopped
  • 10 oz of canned black beans, drained
  • 2/3 c corn
  • ¾ c salsa
  • 1 teaspoon dried oregano
  • 1 teaspoon cumin powder
  • 1 teaspoon garlic powder
  • salt & pepper, to taste
  • 8 flour tortillas, 8-inch size
  • 2 1/2 cups of shredded cheese, a mixture of cheddar and jack
  • Serving - optional
  • green onions, chopped
  • salsa
  • guacamole
  • sour cream

Instructions

Ready the oven. Preheat to 350 degrees F. With a nonstick cooking spray, grease a 13 x 9-inch baking pan. Set aside.

Cook the ground beef in a large nonstick or cast-iron skillet over medium-high heat.

Stir the beef for 3-5 minutes or until mostly browned. Strain grease.

Add the chopped onion, and cook until soft.

Add the black beans, salsa, and corn. Then, add the oregano, cumin, garlic powder, and salt and pepper. Stir for about 3 minutes.

Put about 1/2 cup of beef mixture to the bottom centre of the flour tortilla, roll up into a burrito shape.

Place seam side down the filled burritos into the pan.

Fill the pan with only eight burritos, and sprinkle with shredded cheese on top.

Place inside the oven and bake at 350 degrees for 18-20 minutes until cheese is melted.

Once done, remove from the oven. Sprinkle with chopped green onions, serve warm. Enjoy!

April 30, 2020 0 comment
0 FacebookTwitterPinterestEmail
Main Dish Recipes

Sloppy Joe Casserole

by Rebecca April 30, 2020
written by Rebecca

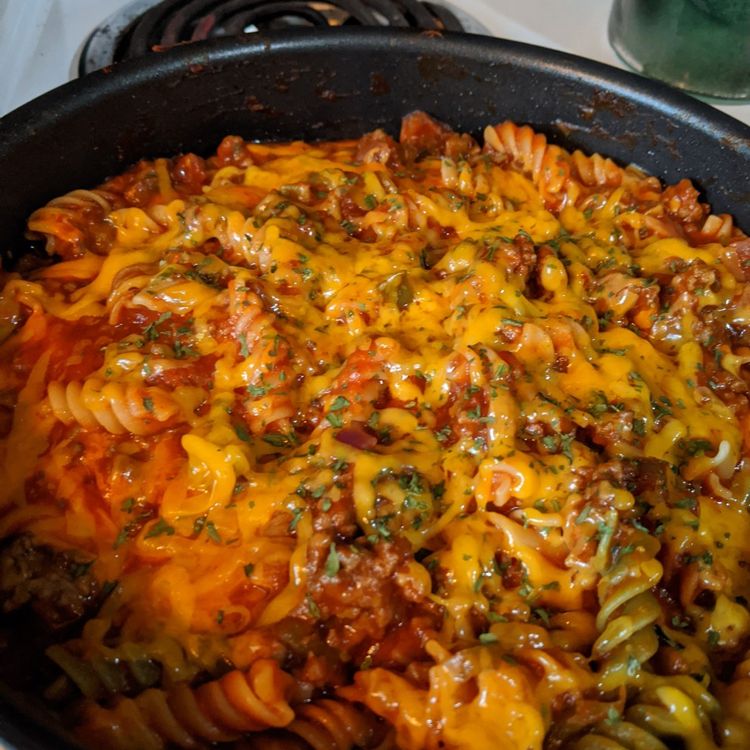
I love casseroles, it’s a perfect dish where you can put almost anything. A complete meal with all the protein, starch, vegetables, sauce, and cheese. It’s a complete meal! So today, I thought of making a Sloppy Joe Casserole. Sloppy Joe is commonly known as a sandwich with ground beef or pork, onions, tomato sauce, or ketchup. But today we are spicing things up. This is pretty easy to prepare and I’m sure that this will become the most requested dish and everyone will give it a thumbs up.

Ingredients

1 pound ground beef

1 small onion, chopped

1 green bell pepper, chopped

1 red bell pepper, chopped

1 clove garlic, chopped

1 (14.5 ounces) can petite diced tomatoes

1 cup ketchup

1 tablespoon brown sugar

1 teaspoon yellow mustard

salt and ground black pepper to taste

2 cups frozen whole-kernel corn

1 (16 ounces) package penne pasta

1 ½ cups shredded Colby-Jack cheese

How to make Sloppy Joe Casserole

Step 1: Prepare the oven. Preheat to 350 degrees F or 175 degrees C.

Step 2: In a large skillet, cook the beef over medium heat. Stir and add the onion, green bell pepper, red bell pepper, and garlic. Cook until beef is browned and crumbly, maybe around 5 to 7 minutes. Once done, drain and discard grease.

Step 3: Mix tomatoes, ketchup, brown sugar, mustard, salt, and pepper into the ground beef mixture. You may want to reduce the heat and simmer for 10 minutes until heated through.

Step 4: In a large pot, boil water with salt. Add the corn and cook for about 5 minutes.

Step 5: In a separate pot, boil lightly salted water. Cook the penne, stir occasionally until tender and firm. It will take about 11 minutes. Then, drain.

Step 6: Add the corn, paste, and Colby-Jack cheese into the ground beef mixture. Mix well. Then, pour into a 9 x 13-inch baking dish.

Step 7: Put the dish in the preheated oven and bake at 350 degrees F or 175 degrees C for 20 minutes or until heated through and cheese is melted.

Step 8: Once done, remove from the oven. Serve warm and enjoy!

Sloppy Joe Casserole

Rebecca I love casseroles, it’s a perfect dish where you can put almost anything. A complete meal with all the protein, starch, vegetables, sauce, and cheese. It’s a complete meal! So… Main Dish Recipes Sloppy Joe Casserole European Print This
Nutrition facts: 200 calories 20 grams fat
Rating: 3.9/5
( 26 voted )

Ingredients

  • 1 pound ground beef
  • 1 small onion, chopped
  • 1 green bell pepper, chopped
  • 1 red bell pepper, chopped
  • 1 clove garlic, chopped
  • 1 (14.5 ounces) can petite diced tomatoes
  • 1 cup ketchup
  • 1 tablespoon brown sugar
  • 1 teaspoon yellow mustard
  • salt and ground black pepper to taste
  • 2 cups frozen whole-kernel corn
  • 1 (16 ounces) package penne pasta
  • 1 ½ cups shredded Colby-Jack cheese

Instructions

Step 1: Prepare the oven. Preheat to 350 degrees F or 175 degrees C.

Step 2: In a large skillet, cook the beef over medium heat. Stir and add the onion, green bell pepper, red bell pepper, and garlic. Cook until beef is browned and crumbly, maybe around 5 to 7 minutes. Once done, drain and discard grease.

Step 3: Mix tomatoes, ketchup, brown sugar, mustard, salt, and pepper into the ground beef mixture. You may want to reduce the heat and simmer for 10 minutes until heated through.

Step 4: In a large pot, boil water with salt. Add the corn and cook for about 5 minutes.

Step 5: In a separate pot, boil lightly salted water. Cook the penne, stir occasionally until tender and firm. It will take about 11 minutes. Then, drain.

Step 6: Add the corn, paste, and Colby-Jack cheese into the ground beef mixture. Mix well. Then, pour into a 9 x 13-inch baking dish.

Step 7: Put the dish in the preheated oven and bake at 350 degrees F or 175 degrees C for 20 minutes or until heated through and cheese is melted.

Step 8: Once done, remove from the oven. Serve warm and enjoy!

April 30, 2020 0 comment
0 FacebookTwitterPinterestEmail
Main Dish Recipes

BLT Pasta Salad

by Rebecca April 30, 2020
written by Rebecca

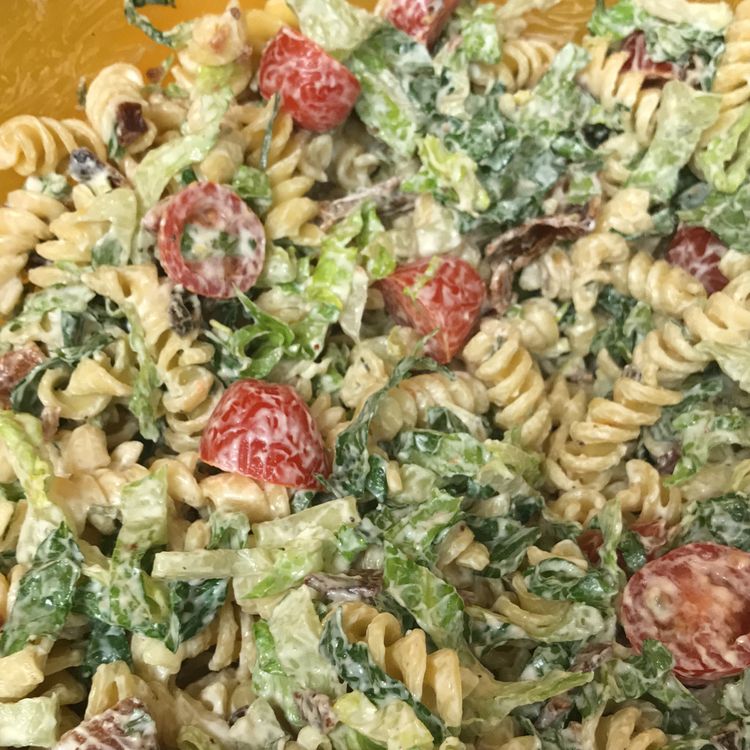
This salad is very easy to make and the ingredients are simple. Just toss everything in a bowl, and you’ll have the most delicious, bursting with flavour dish in no time! The creamy mayonnaise dressing, juicy, crispy bacon, crunchy lettuce, and sweet tomatoes mix together is screaming summer! This can be a meal itself but also a great side-dish during the summer months.

To make the freshest BLT Pasta Salad; cook bacon in the oven to get it perfectly crispy, use iceberg lettuce as a substitute to Romaine lettuce (use the top part of the iceberg lettuce for maximum crunch), you can use any shape of pasta (just make sure it is cold before adding the dressing, drizzle with olive oil after draining to keep it from sticking together), and you can make it ahead of time, just leave the lettuce, bacon and 1/3 of the dressing (add them when ready to serve to ensure the best flavour and crunch).

INGREDIENTS

Pasta Salad

16 oz package pasta

12 oz sliced bacon, cooked and crumbled

2 1/2 cups cherry tomatoes, halved

6 cups chopped romaine lettuce

1 tablespoon chopped chives

Dressing

3/4 cup mayonnaise

1/2 cup sour cream

1 tablespoon apple cider vinegar

1/2 teaspoon salt

1/4 teaspoon black pepper

How to make BLT Pasta Salad

Step 1: In a pasta pot, cook the pasta according to the package instructions. Once done, rinse with cold water and drain. Put into a large bowl (drizzle with olive oil to avoid sticking). Set aside and cool for 10-20 minutes.

Step 2: While waiting for the pasta to cool, let’s make the dressing. Combine mayo, sour cream, apple cider vinegar, salt, and pepper in a mixing bowl. Carefully whisk until combined.

Step 3: Add the crumbled bacon, cherry tomatoes, and half of the lettuce to the cooled pasta. Generously, pour the dressing over the salad and gently toss to combine. Then, stir in the remaining lettuce.

Step 4: Before serving, garnish with chopped chives. Enjoy!

BLT Pasta Salad

Rebecca This salad is very easy to make and the ingredients are simple. Just toss everything in a bowl, and you’ll have the most delicious, bursting with flavour dish in no… Main Dish Recipes BLT Pasta Salad European Print This
Nutrition facts: 200 calories 20 grams fat
Rating: 5.0/5
( 3 voted )

Ingredients

  • Pasta Salad
  • 16 oz package pasta
  • 12 oz sliced bacon, cooked and crumbled
  • 2 1/2 cups cherry tomatoes, halved
  • 6 cups chopped romaine lettuce
  • 1 tablespoon chopped chives
  • Dressing
  • 3/4 cup mayonnaise
  • 1/2 cup sour cream
  • 1 tablespoon apple cider vinegar
  • 1/2 teaspoon salt
  • 1/4 teaspoon black pepper

Instructions

Step 1: In a pasta pot, cook the pasta according to the package instructions. Once done, rinse with cold water and drain. Put into a large bowl (drizzle with olive oil to avoid sticking). Set aside and cool for 10-20 minutes.

Step 2: While waiting for the pasta to cool, let's make the dressing. Combine mayo, sour cream, apple cider vinegar, salt, and pepper in a mixing bowl. Carefully whisk until combined.

Step 3: Add the crumbled bacon, cherry tomatoes, and half of the lettuce to the cooled pasta. Generously, pour the dressing over the salad and gently toss to combine. Then, stir in the remaining lettuce.

Step 4: Before serving, garnish with chopped chives. Enjoy!

April 30, 2020 0 comment
0 FacebookTwitterPinterestEmail
Main Dish Recipes

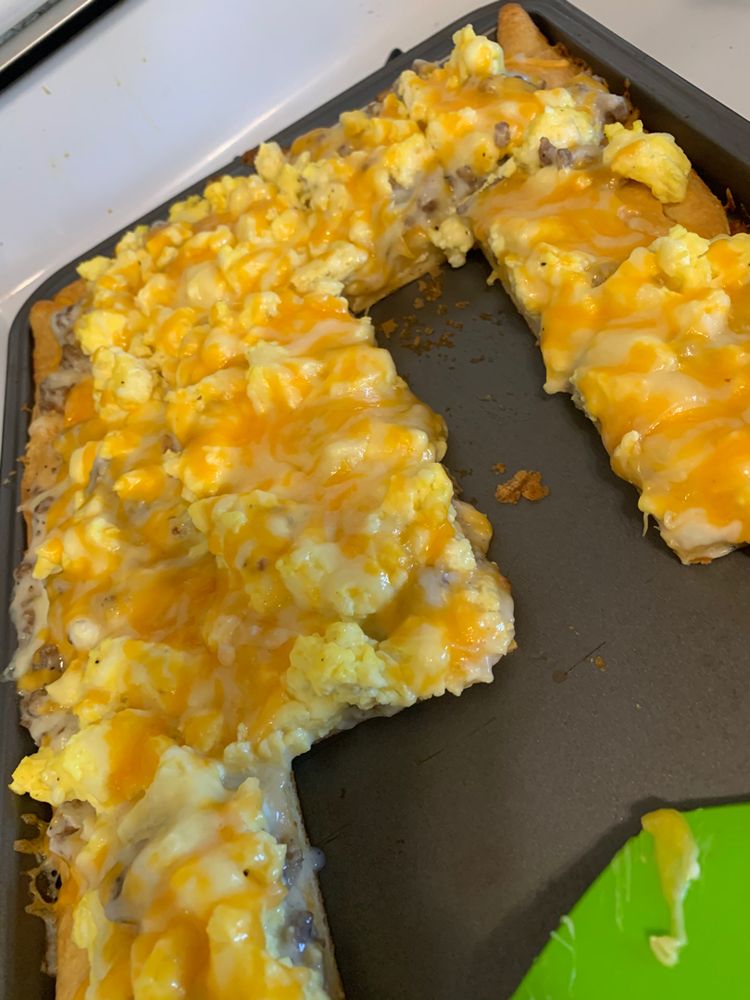
Sausage Gravy Breakfast Pizza

by Rebecca April 30, 2020
written by Rebecca

This recipe is great for when you have a family of four to six maybe more. You can even store some in the fridge, that is if you have some leftovers. Which I doubt because of how tasty and irresistible this dish is! Serve this any time of the day, I know it says breakfast pizza but doesn’t be deceived, this can be your brunch, dinner, snack pizza, too! My family can’t get over it! They love that it almost tastes like biscuits and gravy of course with extra sausage and cheese! And we like ours with lots of cheese!

Ingredients

2 packages of crescent rolls

1 package of cooked sausage crumbles

1 envelope of country gravy mix

6 eggs

2 Tbsp. milk

1/2 tsp. salt

1/4 tsp. pepper

1 Tbsp. butter

8 oz shredded cheddar cheese

4 oz shredded pepper Jack cheese

How to make Sausage Gravy Breakfast Pizza

Step 1: Preheat the oven to 375 degrees. Make 16 triangles from the crescent dough, and place (points toward the center) on a greased, round pizza pan.

Step 2: To form a crust, press bottom up the sides of the pan and seal seams. Put in the oven and bake at 375 degrees for 11-13 minutes or until golden brown.

Step 3: While waiting for it to cook. In a medium saucepan, prepare the gravy according to the package instructions. Once the gravy is thickened, add the sausage crumbles, and stir. Set aside.

Step 4: Grab another small bowl, then whisk together the eggs, milk, salt, and pepper. In a separate large pan, melt butter over medium heat.

Step 5: In the same skillet with the butter in it, add the egg mixture, cook and stir until almost set. Remove crust from the oven, spread gravy mixture over it. Top with eggs and cheeses.

Step 6: Put the crust back in the oven and bake for another 5-10 minutes or until eggs are set and the cheese is melted. Once done, cut into wedges. Enjoy!

Sausage Gravy Breakfast Pizza

Rebecca This recipe is great for when you have a family of four to six maybe more. You can even store some in the fridge, that is if you have some… Main Dish Recipes Sausage Gravy Breakfast Pizza European Print This
Nutrition facts: 200 calories 20 grams fat
Rating: 5.0/5
( 1 voted )

Ingredients

  • 2 packages of crescent rolls
  • 1 package of cooked sausage crumbles
  • 1 envelope of country gravy mix
  • 6 eggs
  • 2 Tbsp. milk
  • 1/2 tsp. salt
  • 1/4 tsp. pepper
  • 1 Tbsp. butter
  • 8 oz shredded cheddar cheese
  • 4 oz shredded pepper Jack cheese

Instructions

Step 1: Preheat the oven to 375 degrees. Make 16 triangles from a crescent dough, and place (points toward the center) on a greased, round pizza pan.

Step 2: To form a crust, press bottom up the sides of the pan and seal seams. Put in the oven and bake at 375 degrees for 11-13 minutes or until golden brown.

Step 3: While waiting for it to cook. In a medium saucepan, prepare the gravy according to the package instructions. Once the gravy is thickened, add the sausage crumbles, and stir. Set aside.

Step 4: Grab another small bowl, then whisk together the eggs, milk, salt, and pepper. In a separate large pan, melt butter over medium heat.

Step 5: In the same skillet with the butter in it, add the egg mixture, cook and stir until almost set. Remove crust from the oven, spread gravy mixture over it. Top with eggs and cheeses.

Step 6: Put the crust back in the oven and bake for another 5-10 minutes or until eggs are set and the cheese is melted. Once done, cut into wedges. Enjoy!

April 30, 2020 0 comment
0 FacebookTwitterPinterestEmail
Main Dish Recipes

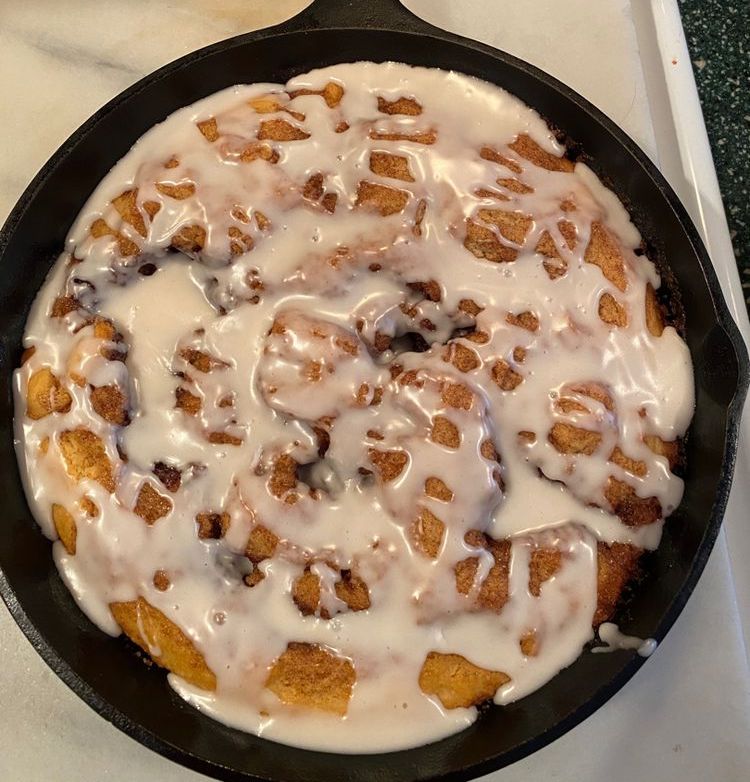
Cinnamon Roll Skillet Cake

by Rebecca April 30, 2020
written by Rebecca

It’s always messy and time-consuming to bake from scratch, that is why most of the time we resort to using cake mix, biscuit, or crescent rolls (even Pillsbury). Well, not for this recipe. It is pretty easy to make and will only take you about 30 minutes to bake. We just need some basic ingredients to make this gluten-free, melt in your mouth breakfast/dessert cake.

I think it’s about time to do some baking with real ingredients (that I’m sure you already have on hand) without compromising the taste!

Yields: 8 servings
Prep: 10 minutes | Cook: 30 minutes | Total: 40 minutes

Cake Ingredients:

1 ½ cups of gluten-free all-purpose flour

1/2 cup sugar

2 tsp. baking powder

¼ tsp.salt

¾ cup milk of choice

1 egg

¼ cup of unsalted butter, melted

1 tsp. vanilla extract

Cinnamon Sugar Topping:

1/2 cup of unsalted butter, melted

1/2 cup of light brown sugar, packed

1 tsp. ground cinnamon

Vanilla Icing Drizzle:

1 1/2 cups of powdered sugar

3 Tbsp. milk

1 tsp.vanilla extract

How to make Cinnamon Roll Skillet Cake

Step 1: Ready the oven. Preheat to 350 degrees F.

Step 2: Grease a 9-inch cast-iron skillet. Set aside.

Step 3: Put flour, sugar, baking powder, and salt in a large bowl and stir to combine.

Step 4: Add the milk, egg, melted butter, and vanilla extract to the dry ingredients. Mix well and pour cake batter into the prepared greased pan.

Step 5: Using the handle of a mixing spoon, poke holes to the cake.

Step 6: In another bowl, add the cinnamon sugar topping ingredients. Mix well. Use a spoon to transfer topping onto the cake, make sure to fill the holes. With a butter knife, swirl cinnamon sugar topping into the cake batter.

Step 7: Put in the preheated oven and bake at 350 degrees for 27-30 minutes.

Step 8: Once done, remove the cake from the oven. Cool for 10 minutes.

Step 9: While waiting for the cake to cool. In a small bowl, combine the vanilla icing drizzle ingredients.

Step 10: Drizzle icing over the top of the cake using a spoon.

Step 11: And we’re done! Have yourself a slice of this warm and amazing cake made from scratch. Enjoy!

Cinnamon Roll Skillet Cake

Rebecca It’s always messy and time-consuming to bake from scratch, that is why most of the time we resort to using cake mix, biscuit, or crescent rolls (even Pillsbury). Well, not… Main Dish Recipes Cinnamon Roll Skillet Cake European Print This
Nutrition facts: 200 calories 20 grams fat
Rating: 5.0/5
( 1 voted )

Ingredients

  • 1 ½ cups of gluten-free all-purpose flour
  • 1/2 cup sugar
  • 2 tsp. baking powder
  • ¼ tsp.salt
  • ¾ cup milk of choice
  • 1 egg
  • ¼ cup of unsalted butter, melted
  • 1 tsp. vanilla extract
  • Cinnamon Sugar Topping:
  • 1/2 cup of unsalted butter, melted
  • 1/2 cup of light brown sugar, packed
  • 1 tsp. ground cinnamon
  • Vanilla Icing Drizzle:
  • 1 1/2 cups of powdered sugar
  • 3 Tbsp. milk
  • 1 tsp.vanilla extract

Instructions

Step 1: Ready the oven. Preheat to 350 degrees F.

Step 2: Grease a 9-inch cast-iron skillet. Set aside.

Step 3: Put flour, sugar, baking powder, and salt in a large bowl and stir to combine.

Step 4: Add the milk, egg, melted butter, and vanilla extract to the dry ingredients. Mix well and pour cake batter into the prepared greased pan.

Step 5: Using the handle of a mixing spoon, poke holes to the cake.

Step 6: In another bowl, add the cinnamon sugar topping ingredients. Mix well. Use a spoon to transfer topping onto the cake, make sure to fill the holes. With a butter knife, swirl cinnamon sugar topping into the cake batter.

Step 7: Put in the preheated oven and bake at 350 degrees for 27-30 minutes.

Step 8: Once done, remove the cake from the oven. Cool for 10 minutes.

Step 9: While waiting for the cake to cool. In a small bowl, combine the vanilla icing drizzle ingredients.

Step 10: Drizzle icing over the top of the cake using a spoon.

Step 11: And we're done! Have yourself a slice of this warm and amazing cake made from scratch. Enjoy!

April 30, 2020 0 comment
0 FacebookTwitterPinterestEmail
Main Dish Recipes

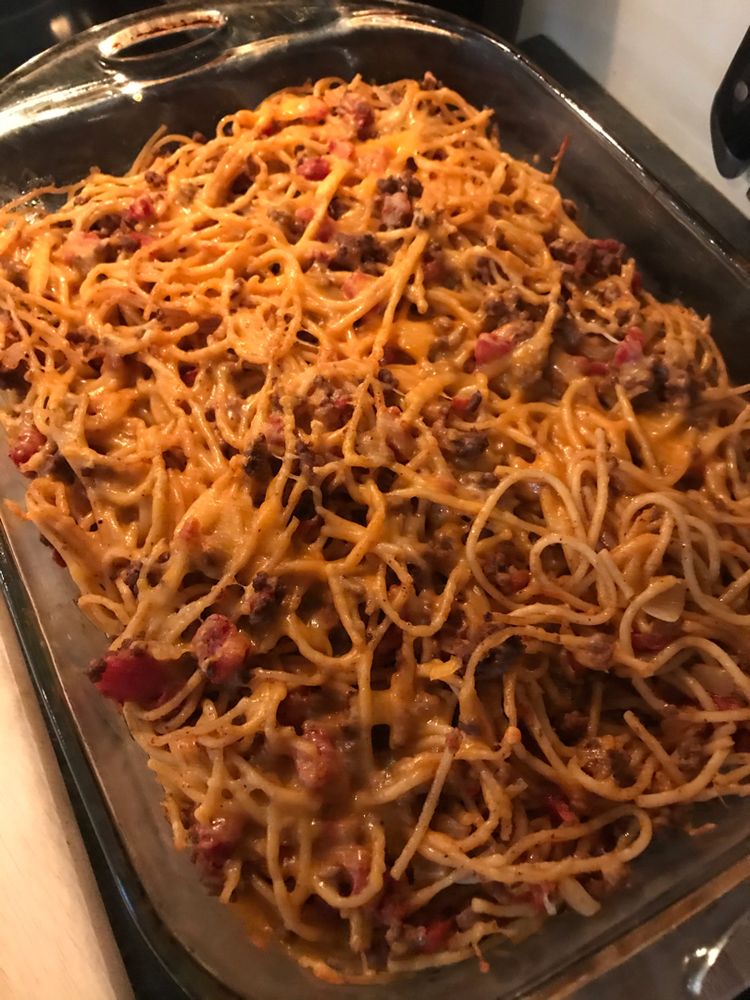
Taco Spaghetti Bake

by Rebecca April 30, 2020
written by Rebecca

Don’t have time to make taco and spaghetti? What if you can combine them in one insanely delicious dish that’s very easy to make? Yes, you heard me right! Two of the most requested meals into a pasta casserole dish! Fast and easy; it will only take about 10 minutes to prepare and another 20 minutes to cook, and your dinner is served.

Imagine the melted cheese, the taco flavoured beef, baked spaghetti pasta, and the diced tomatoes and chilis coming together to create a tasty dish that your family will surely go crazy about.

Ingredients

1 lb spaghetti, cooked al dente

1 to 1 1/2 lb of lean ground beef

1/3 c onions, diced

2 cloves garlic, minced

2 to 3 tbsp taco seasoning

2 cans of Rotel diced tomatoes and chilis (10-ounce cans)

2 tbsp butter

salt to taste

3 to 4 cups of Mexican or taco blend cheese, shredded (you can use less if desired)

How to make Baked Taco Spaghetti

Step 1: In a pasta pot, boil water with salt. Cook spaghetti pasta according to package instruction. Then drain in a colander.

Step 2: Saute onion and garlic for about 1 to 2 minutes or until translucent. Add the ground beef, then season with salt (you can use garlic salt as well) to taste. Stir the taco seasoning. Pour in two cans of Rotel diced tomatoes and chilis and mix.

Step 3: Combine the drained pasta into the meat sauce and add butter.

Step 4: Prepare a 9 x 13-inch casserole dish. Add half mixture of spaghetti and top with half of the cheese, then top with the rest of the spaghetti mixture, again top with the remaining cheese.

Step 5: Place casserole in the oven and bake at 350 degrees for 20 minutes or until cheese is melted.

Step 6: Serve as is or with sour cream, some cilantro, or with your favourite taco topping. Share and enjoy!

Taco Spaghetti Bake

Rebecca Don’t have time to make taco and spaghetti? What if you can combine them in one insanely delicious dish that’s very easy to make? Yes, you heard me right! Two… Main Dish Recipes Taco Spaghetti Bake European Print This
Nutrition facts: 200 calories 20 grams fat
Rating: 5.0/5
( 1 voted )

Ingredients

  • 1 lb spaghetti, cooked al dente
  • 1 to 1 1/2 lb of lean ground beef
  • 1/3 c onions, diced
  • 2 cloves garlic, minced
  • 2 to 3 tbsp taco seasoning
  • 2 cans of Rotel diced tomatoes and chilis (10-ounce cans)
  • 2 tbsp butter
  • salt to taste
  • 3 to 4 cups of Mexican or taco blend cheese, shredded (you can use less if desired)

Instructions

Step 1: In a pasta pot, boil water with salt. Cook spaghetti pasta according to package instruction. Then drain in a colander.

Step 2: Saute onion and garlic for about 1 to 2 minutes or until translucent. Add the ground beef, then season with salt (you can use garlic salt as well) to taste. Stir the taco seasoning. Pour in two cans of Rotel diced tomatoes and chilis and mix.

Step 3: Combine the drained pasta into the meat sauce and add butter.

Step 4: Prepare a 9 x 13-inch casserole dish. Add half mixture of spaghetti and top with half of the cheese, then top with the rest of the spaghetti mixture, again top with the remaining cheese.

Step 5: Place casserole in the oven and bake at 350 degrees for 20 minutes or until cheese is melted.

Step 6: Serve as is or with sour cream, some cilantro, or with your favourite taco topping. Share and enjoy!

April 30, 2020 0 comment
0 FacebookTwitterPinterestEmail
Main Dish Recipes

Taco Lasagna

by Rebecca April 30, 2020
written by Rebecca

Okay so today, I am making my favourite Taco Lasagna. This is a very easy Mexican dish, full of beef, beans, tomatoes, and flour tortillas. Every bite is simply heaven with all the flavours bursting in my mouth! You can even plan this meal ahead of time! So if you are maybe hosting a dinner party and you know you don’t have enough time to prepare, you can make this meal in advance. Just cover it, and refrigerate. Remember to remove from the fridge an hour before baking. Then, pop this baby in the oven and you are all set. And you know what’s amazing? This dish once inside the fridge, covered with plastic wrap, and foil can last up to two months!

Ingredients

2 pounds ground beef

1 poblano pepper (seeded and diced)

1/2 c chopped onion

1 c water

2 envelope taco seasoning

15 ounces of black beans rinsed and drained (1 can)

29 ounces Mexican diced tomatoes undrained (2 cans, 14.5 ounces each) (Rotel Mexican)

9 flour tortillas (8 inches)

16 ounces of refried beans (1 can)

4 cups of shredded Mexican cheese blend

How to make Taco Lasagna

Step 1: Prepare the oven. Preheat to 350 degrees F. With cooking spray, spray a 9 x 13-inch baking dish.

Step 2: Over medium heat, cook beef, pepper, and onion in a large skillet. Make sure that beef is no longer pink and drain fat (if any).

Step 3: Add water and the taco seasoning. Bring to a boil, next, reduce heat, then simmer for 2 minutes, uncovered.

Step 4: Stir in the black beans, and tomatoes with juice and simmer for another 10 minutes, uncovered.

Step 5: Place 2 tortillas in the prepared greased 13 x 9-inch baking pan. You may want to break the third tortilla and piece it in between holes to complete later of tortillas.

Step 6: Spread it with half of the refried beans and half of the beef mixture. Sprinkle with 1 cup cheese. Repeat the steps using the remaining tortillas, beef, beans, and 1 cup of cheese to make the other layers.

Step 7: Finally,  top with the remaining tortillas and 2 cups cheese.

Step 8: Before putting it in the oven, make sure to cover with foil. Bake at 350 degrees for 25-30 minutes or until heated through and cheese is melted.

As for the ingredients, you can substitute them if desired; use corn tortillas instead of flour tortillas, salsa instead of the tomatoes, skip the beans if you don’t like to add them (although, the creaminess of the refried beans help hold the lasagna together), use any type of meat (beef, pork, chicken or turkey), and you can use any homemade taco seasoning.

Once Taco Lasagna is done, serve it with sour cream and fresh pico de Gallo. Enjoy!

Taco Lasagna

Rebecca Okay so today, I am making my favourite Taco Lasagna. This is a very easy Mexican dish, full of beef, beans, tomatoes, and flour tortillas. Every bite is simply heaven… Main Dish Recipes Taco Lasagna European Print This
Nutrition facts: 200 calories 20 grams fat
Rating: 5.0/5
( 1 voted )

Ingredients

  • 2 pounds ground beef
  • 1 poblano pepper (seeded and diced)
  • 1/2 c chopped onion
  • 1 c water
  • 2 envelope taco seasoning
  • 15 ounces of black beans rinsed and drained (1 can)
  • 29 ounces Mexican diced tomatoes undrained (2 cans, 14.5 ounces each) (Rotel Mexican)
  • 9 flour tortillas (8 inches)
  • 16 ounces of refried beans (1 can)
  • 4 cups of shredded Mexican cheese blend

Instructions

Step 1: Prepare the oven. Preheat to 350 degrees F. With cooking spray, spray a 9 x 13-inch baking dish.

Step 2: Over medium heat, cook beef, pepper, and onion in a large skillet. Make sure that beef is no longer pink and drain fat (if any).

Step 3: Add water and the taco seasoning. Bring to a boil, next, reduce heat, then simmer for 2 minutes, uncovered.

Step 4: Stir in the black beans, and tomatoes with juice and simmer for another 10 minutes, uncovered.

Step 5: Place 2 tortillas in the prepared greased 13 x 9-inch baking pan. You may want to break the third tortilla and piece it in between holes to complete later of tortillas.

Step 6: Spread it with half of the refried beans and half of the beef mixture. Sprinkle with 1 cup cheese. Repeat the steps using the remaining tortillas, beef, beans, and 1 cup of cheese to make the other layers.

Step 7: Finally,  top with the remaining tortillas and 2 cups cheese.

Step 8: Before putting it in the oven, make sure to cover with foil. Bake at 350 degrees for 25-30 minutes or until heated through and cheese is melted.

As for the ingredients, you can substitute them if desired; use corn tortillas instead of flour tortillas, salsa instead of the tomatoes, skip the beans if you don't like to add them (although, the creaminess of the refried beans help hold the lasagna together), use any type of meat (beef, pork, chicken or turkey), and you can use any homemade taco seasoning.

Once Taco Lasagna is done, serve it with sour cream and fresh pico de Gallo. Enjoy!

April 30, 2020 0 comment
0 FacebookTwitterPinterestEmail
Newer Posts
Older Posts

Popular Posts

  • 1

    Crispy Crunchy Parmesan Potatoes

    March 21, 2020
  • 2

    CROCK POT SMOTHERED PORK CHOPS

    March 21, 2020
  • Facebook
  • Twitter

@2019 - All Right Reserved.


Back To Top