Cook it once
  • Home
  • Privacy Policy
  • Recipes
    • KETO
    • LC
    • WW
  • Tips
  • Contact
Cook it once
  • Home
  • Privacy Policy
  • Recipes
    • KETO
    • LC
    • WW
  • Tips
  • Contact
Monthly Archives

June 2020

Main Dish Recipes

My Amish Friend’s Caramel Corn

by Rebecca June 2, 2020
written by Rebecca

This is an amazing recipe for caramel corn. It does not need corn syrup, but still as amazing! It’s buttery and caramelly. An easy to make caramel corn that has been an all-time favorite. My kids most requested treat, it’s great for movie nights and sleepovers. I stored many in an airtight container because the kids are always craving for it.

My kids always bring some in school and share it with their friends. Their friends love it, too! They even come to our house to ask for a bucket. A truly loved and desired treat by kids and adults alike.

Ingredients

7 quarts plain popped popcorn

2 cups of dry roasted peanuts (optional)

2 cups of brown sugar

1/2 cup of light corn syrup

1 teaspoon of salt

1 cup margarine

1/2 teaspoon of baking soda

1 teaspoon of vanilla extract

How to make My Amish Friend’s Caramel Corn

Step 1: Into shallow greased baking pans, places the popped corn. You can opt to use roasting pans or jelly roll pans. Even disposable roasting pans. Stir in the peanuts and set aside.

Step 2: Meanwhile, prepare the oven. Preheat it to 250 degrees F or 120 degrees C.

Step 3: In a saucepan, combine the brown sugar, corn syrup, margarine, and salt. Boil over medium heat for 5 minutes while stirring constantly until blended.

Step 4: Remove from the heat and mix in the baking soda and vanilla. We are looking for a light and foamy mixture.

Step 5: Instantly pour the mixture over the popcorn and stir to coat. At this point, you don’t have to worry too much about coating the popcorn.

Step 6: Place in the preheated oven and bake for an hour. Make sure to remove from the oven and stir every 15 minutes.

Step 7: Line the countertop with waxed paper and dump the corn. Separate the pieces and allow to cool completely. Store in airtight containers or resealable bags.

My Amish Friend's Caramel Corn

Rebecca This is an amazing recipe for caramel corn. It does not need corn syrup, but still as amazing! It’s buttery and caramelly. An easy to make caramel corn that has… Main Dish Recipes My Amish Friend’s Caramel Corn European Print This
Nutrition facts: 200 calories 20 grams fat
Rating: 5.0/5
( 1 voted )

Ingredients

  • 7 quarts plain popped popcorn
  • 2 cups of dry roasted peanuts (optional)
  • 2 cups of brown sugar
  • 1/2 cup of light corn syrup
  • 1 teaspoon of salt
  • 1 cup margarine
  • 1/2 teaspoon of baking soda
  • 1 teaspoon of vanilla extract

Instructions

Step 1: Into shallow greased baking pans, places the popped corn. You can opt to use roasting pans or jelly roll pans. Even disposable roasting pans. Stir in the peanuts and set aside.

Step 2: Meanwhile, prepare the oven. Preheat it to 250 degrees F or 120 degrees C.

Step 3: In a saucepan, combine the brown sugar, corn syrup, margarine, and salt. Boil over medium heat for 5 minutes while stirring constantly until blended.

Step 4: Remove from the heat and mix in the baking soda and vanilla. We are looking for a light and foamy mixture.

Step 5: Instantly pour the mixture over the popcorn and stir to coat. At this point, you don't have to worry too much about coating the popcorn.

Step 6: Place in the preheated oven and bake for an hour. Make sure to remove from the oven and stir every 15 minutes.

Step 7: Line the countertop with waxed paper and dump the corn. Separate the pieces and allow to cool completely. Store in airtight containers or resealable bags.



June 2, 2020 0 comment
0 FacebookTwitterPinterestEmail
Main Dish Recipes

Amish Cinnamon Bread

by Rebecca June 2, 2020
written by Rebecca

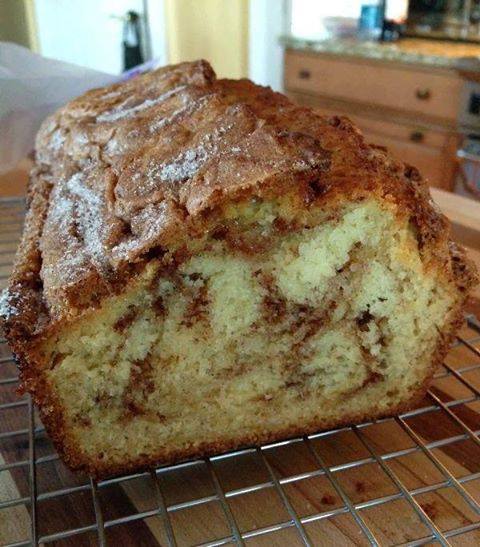
Amish cinnamon bread has been around for centuries. It’s an easy dessert and great enough for breakfast, too. Cinnamon is an awesome ingredient for anything even coffee. I like cinnamon bread paired with a freshly brewed coffee for an afternoon snack. If you want a classic with a hint this is worth everything. The dough is baked right into the dough. And the inside is lovely, moist, and cinnamony.
I made this many times for personal consumption or as a gift. It’s a great gift to give to friends, loved ones, and colleagues. This is a staple in our family. My grandmother made this, my mom, and now me. I don’t know if this an original recipe but one thing is for sure it’s amazingly delicious! I’ve shared the recipe with my friends and colleagues and they give it a 5-star rating. This is a simple recipe, easy to put together, overrated yet a crowd favorite!

Ingredients

Bread

1 cup of buter, softened

2 cups of sugar

2 eggs

2 cups of buttermilk or 2 cups milk plus 2 tablespoons of vinegar or lemon juice

4 cups of flour

2 teaspoons of baking soda

Cinnamon Sugar

2/3 cups of sugar

2 teaspoons of cinnamon

How to make Amish Cinnamon Bread

Step 1: Cream the butter, sugar, and eggs.

Step 2: Add in the milk, flour, and baking soda.

Step 3: Pour half of the butter or a little less into greased loaf pans. About 1/4 in each pan.

Step 4: Mix 2/3 cup of sugar and cinnamon in another bowl.

Step 5: Dust with 3/4 of cinnamon mixture over each pan.

Step 6: Pour the remaining batter into the pans. And sprinkle with the remaining cinnamon. And swirl with a knife.

Step 7:  Place inside the oven and bake for 45 to 50 minutes at 350 degrees. Insert a toothpick in the middle and when it comes out clean it’s done.

Step 8: Remove from the oven and cool in the pan for 20 minutes.

Amish Cinnamon Bread

Rebecca Amish cinnamon bread has been around for centuries. It’s an easy dessert and great enough for breakfast, too. Cinnamon is an awesome ingredient for anything even coffee. I like cinnamon… Main Dish Recipes Amish Cinnamon Bread European Print This
Nutrition facts: 200 calories 20 grams fat
Rating: 5.0/5
( 1 voted )

Ingredients

  • Bread
  • 1 cup of buter, softened
  • 2 cups of sugar
  • 2 eggs
  • 2 cups of buttermilk or 2 cups milk plus 2 tablespoons of vinegar or lemon juice
  • 4 cups of flour
  • 2 teaspoons of baking soda
  • Cinnamon Sugar
  • 2/3 cups of sugar
  • 2 teaspoons of cinnamon

Instructions

Step 1: Cream the butter, sugar, and eggs.

Step 2: Add in the milk, flour, and baking soda.

Step 3: Pour half of the butter or a little less into greased loaf pans. About 1/4 in each pan.

Step 4: Mix 2/3 cup of sugar and cinnamon in another bowl.

Step 5: Dust with 3/4 of cinnamon mixture over each pan.

Step 6: Pour the remaining batter into the pans. And sprinkle with the remaining cinnamon. And swirl with a knife.

Step 7:  Place inside the oven and bake for 45 to 50 minutes at 350 degrees. Insert a toothpick in the middle and when it comes out clean it's done.

Step 8: Remove from the oven and cool in the pan for 20 minutes.


June 2, 2020 0 comment
0 FacebookTwitterPinterestEmail
Main Dish Recipes

COCONUT CREAM PIE. THE OLD FASHIONED WAY!

by Rebecca June 2, 2020
written by Rebecca

The greatest Coconut Cream Pie that’s absolutely the best! It is an old-fashioned recipe that has been used for many years – a winner!

Ingredients

FOR THE PASTRY

1 cup of very cold butter cut into small cubes

2 ½ cups of flour

½ teaspoon salt

1/4 cup to 1/3 ice water, Only enough to make a dough form

FOR THE COCONUT CREAM FILLING

3 cups of whole milk

1/3 cup of flour

2/3 cup of sugar

pinch of salt

1 cup of unsweetened fine coconut

3 slightly beaten extra-large egg yolks

4 tablespoons butter

2 teaspoons vanilla extract

1/4 teaspoons pure almond extract

FOR THE VANILLA WHIPPED CREAM

1 cup of whipping cream

1 teaspoon vanilla extract

3 tablespoon icing sugar, powdered sugar

HOW TO MAKE COCONUT CREAM PIE

FOR THE PASTRY (SUFFICIENT FOR 2 PIE SHELLS)

Step 1: Mix the butter into the flour and salt using a food processor or a pastry blender until the mixture resembles a coarse meal. But small pieces of butter should still be visible.

Step 2: Blend in cold water over the mixture and toss with a fork until the dough begins to form. Use your hands and work the knead the dough as little as possible.

Step 3: Evenly divide the dough into 2 balls. Flatten the balls into 2 rounds and wrap in a plastic wrap. Put in the fridge to rest for a minimum of 20 minutes. Or you can freeze the second round for another time.

Step 4: The dough can be made the day before but make sure to take it out and let it rest for 10 to 20 minutes to slightly warm before rolling out.

Step 5: Roll the dough into a 12 inch round. Then, place in the bottom of a 10-inch plate. Tou can trim and flute the edges.

Step 6: Now, poke the bottom of the pastry with a few holes and let it rest in the fridge for 20 minutes more before baking.

Step 7: place inside the fridge and bake for 12 to 15 minutes at 400 degrees F or until golden brown.

Step 8: Remove from the oven and let it cool completely before adding the filling.

FOR THE COCONUT CREAM FILLING

Step 1: In the microwave or stovetop, scald the milk until almost boiling.

Step 2: Combine the flour, sugar, salt, and coconut in a saucepan. And cook over medium-low flame. Then, stir in a cup of the scalded milk while constantly whisking.

Step 3: Once the mixture begins to thicken, stir in another cup of the scalded milk while continuously stirring. Continue to cook over medium-low heat until slightly thickened.

Step 4: At this point, you want to remove from heat and pour about half a cup of this mixture onto the beaten egg yolks while whisking constantly.

Step 5: Then, pour the egg mixture back into the pot and continue to stir constantly.

Step 6: Coom for 2 to 3 minutes more until the filling reaches a pudding consistency. Remove from the flame when the mixture is about to boil.

Step 7: Mix in the butter, vanilla, and almond extract.

Step 8: Cool the filling for about 20 minutes. Then, pour into the baked pie shells.

Step 9: Place the pie in the fridge to chill for several hours or overnight before adding the vanilla whipped cream.

FOR THE VANILLA WHIPPED CREAM

Step 1: In a bowl, combine the whipping cream, icing sugar, and vanilla extract. Beat until soft peaks. Spread over the cooled coconut cream filling and garnish with roasted coconut and serve. Enjoy!

COCONUT CREAM PIE. THE OLD FASHIONED WAY!

Rebecca The greatest Coconut Cream Pie that’s absolutely the best! It is an old-fashioned recipe that has been used for many years – a winner! Ingredients FOR THE PASTRY 1 cup… Main Dish Recipes COCONUT CREAM PIE. THE OLD FASHIONED WAY! European Print This
Nutrition facts: 200 calories 20 grams fat
Rating: 5.0/5
( 1 voted )

Ingredients

  • FOR THE PASTRY
  • 1 cup of very cold butter cut into small cubes
  • 2 ½ cups of flour
  • ½ teaspoon salt
  • 1/4 cup to 1/3 ice water, Only enough to make a dough form
  • FOR THE COCONUT CREAM FILLING
  • 3 cups of whole milk
  • 1/3 cup of flour
  • 2/3 cup of sugar
  • pinch of salt
  • 1 cup of unsweetened fine coconut
  • 3 slightly beaten extra-large egg yolks
  • 4 tablespoons butter
  • 2 teaspoons vanilla extract
  • 1/4 teaspoons pure almond extract
  • FOR THE VANILLA WHIPPED CREAM
  • 1 cup of whipping cream
  • 1 teaspoon vanilla extract
  • 3 tablespoon icing sugar, powdered sugar

Instructions

FOR THE PASTRY (SUFFICIENT FOR 2 PIE SHELLS)

Step 1: Mix the butter into the flour and salt using a food processor or a pastry blender until the mixture resembles a coarse meal. But small pieces of butter should still be visible.

Step 2: Blend in cold water over the mixture and toss with a fork until the dough begins to form. Use your hands and work the knead the dough as little as possible.

Step 3: Evenly divide the dough into 2 balls. Flatten the balls into 2 rounds and wrap in a plastic wrap. Put in the fridge to rest for a minimum of 20 minutes. Or you can freeze the second round for another time.

Step 4: The dough can be made the day before but make sure to take it out and let it rest for 10 to 20 minutes to slightly warm before rolling out.

Step 5: Roll the dough into a 12 inch round. Then, place in the bottom of a 10-inch plate. Tou can trim and flute the edges.

Step 6: Now, poke the bottom of the pastry with a few holes and let it rest in the fridge for 20 minutes more before baking.

Step 7: place inside the fridge and bake for 12 to 15 minutes at 400 degrees F or until golden brown.

Step 8: Remove from the oven and let it cool completely before adding the filling.

FOR THE COCONUT CREAM FILLING

Step 1: In the microwave or stovetop, scald the milk until almost boiling.

Step 2: Combine the flour, sugar, salt, and coconut in a saucepan. And cook over medium-low flame. Then, stir in a cup of the scalded milk while constantly whisking.

Step 3: Once the mixture begins to thicken, stir in another cup of the scalded milk while continuously stirring. Continue to cook over medium-low heat until slightly thickened.

Step 4: At this point, you want to remove from heat and pour about half a cup of this mixture onto the beaten egg yolks while whisking constantly.

Step 5: Then, pour the egg mixture back into the pot and continue to stir constantly.

Step 6: Coom for 2 to 3 minutes more until the filling reaches a pudding consistency. Remove from the flame when the mixture is about to boil.

Step 7: Mix in the butter, vanilla, and almond extract.

Step 8: Cool the filling for about 20 minutes. Then, pour into the baked pie shells.

Step 9: Place the pie in the fridge to chill for several hours or overnight before adding the vanilla whipped cream.

FOR THE VANILLA WHIPPED CREAM

Step 1: In a bowl, combine the whipping cream, icing sugar, and vanilla extract. Beat until soft peaks. Spread over the cooled coconut cream filling and garnish with roasted coconut and serve. Enjoy!


June 2, 2020 0 comment
0 FacebookTwitterPinterestEmail
Main Dish Recipes

Caramel Apple Dump Cake

by Rebecca June 2, 2020
written by Rebecca

Desserts are like heaven on a plate. They bring a smile to everyone’s faces. It’s the highlight of every course, the most awaited in gatherings, and every kid and adults alike favorite. I’m no chef but I am always on the lookout for the easiest and the most scrumptious treat. Most of the time, I spend my days searching for dessert recipes. I have pinned and saved too many dessert recipes on my Pinterest account. Although, I have not tried them all yet, but one recipe stood out to me. This Caramel Apple Dump Cake is my favorite. With only 5 ingredients, this no-fuss dessert is the easiest and quickest to make. My lovely kids can even do this. It has become their most requested dessert. Dumping the ingredients in a pan seems to be a bit of a worry because what if it’s not as well, lucky for us it does taste amazing! The simplicity of this recipe is something that I love because you don’t have to have a lot of ingredients. It’s a no-sweat dessert that’s heavenly, and sweet. It deserves a spot for your dessert menu option.

Ingredients

2 cans of apple pie filling (you can also use cherry, blueberry,
Etc.)

1 box of yellow cake mix

1 cup of butter, melted

1/2 cup of ice cream, caramel sauce

Whipped cream for garnish (optional)

How to make Caramel Apple Dump cake

Step 1: Mix apple pie filling and caramel sauce in a greased 9 x 13-inch dish.

Step 2: Pour evenly into the pan.

Step 3: Spread evenly the dry cake mix directly on top of the pie filling.

Step 4: Drizzle the melted butter over.

Step 5: Place in the oven and bake for 45 to 50 minutes at 350 degrees until the top is golden brown and the apple pie filling is bubbly around the edges.

Step 6: Once done, remove from the oven and top with whipped cream. Serve and enjoy!

Caramel Apple Dump Cake

Rebecca Desserts are like heaven on a plate. They bring a smile to everyone’s faces. It’s the highlight of every course, the most awaited in gatherings, and every kid and adults… Main Dish Recipes Caramel Apple Dump Cake European Print This
Nutrition facts: 200 calories 20 grams fat
Rating: 5.0/5
( 1 voted )

Ingredients

  • 2 cans of apple pie filling (you can also use cherry, blueberry,
  • Etc.)
  • 1 box of yellow cake mix
  • 1 cup of butter, melted
  • 1/2 cup of ice cream, caramel sauce
  • Whipped cream for garnish (optional)

Instructions

Step 1: Mix apple pie filling and caramel sauce in a greased 9 x 13-inch dish.

Step 2: Pour evenly into the pan.

Step 3: Spread evenly the dry cake mix directly on top of the pie filling.

Step 4: Drizzle the melted butter over.

Step 5: Place in the oven and bake for 45 to 50 minutes at 350 degrees until the top is golden brown and the apple pie filling is bubbly around the edges.

Step 6: Once done, remove from the oven and top with whipped cream. Serve and enjoy!


June 2, 2020 0 comment
0 FacebookTwitterPinterestEmail
Main Dish Recipes

Sausage Gravy Breakfast Pizza For Dinner

by Rebecca June 1, 2020
written by Rebecca

Pizza for dinner? Well, why not? This Sausage Gravy Breakfast Pizza is great for the dinner menu too. Don’t be fooled it does say breakfast because of eggs, and sausages that’s been put to it but this makes a fulfilling, satisfying, and scrumptious dinner that the kids approved. I love this because it’s very easy and quick to make and whenever we have this for dinner, it’s like Christmas for everyone! My kids favored this over anything which makes sense because it’s truly delightful; cheesy, flavorful gravy, and when drizzled with the hot sauce it’s nothing like an ordinary pizza. This is a proven homemade breakfast pizza that’s great at any time of the day!

INGREDIENTS

2 packages crescent rolls

1 package Jimmy Dean cooked sausage crumbles

1 envelope country gravy mix

6 eggs

2 tablespoons of milk

1/2 teaspoon of salt

1/4 teaspoon of pepper

1 tablespoon of butter

8 ounces shredded cheddar cheese

4 ounces shredded pepper Jack cheese

How to make Sausage Gravy Breakfast Pizza

Step 1: Prepare the oven. Preheat it to 375 degrees F.

Step 2: Unroll the crescent dough and separate them into 16 triangles. Then, place them on a greased round pizza pan. Make sure that the points are placed toward the center.

Step 3: In a medium saucepan, prepare the gravy according to package instructions. Mix in the sausage crumbles into the thickened gravy and set aside.

Step 4: Whisk the eggs, milk, salt, and pepper into a small bowl.

Step 5: Heat the butter in a large skillet over medium heat. Add in the egg mixture and continue cooking and stirring until almost set.

Step 6: Pour the sausage gravy mixture over the crust and spread evenly. Top it with eggs and cheese.

Step 7: Place inside the preheated oven and bake for 5 to 10 minutes more or until the eggs are set and the cheese is melted.

Step 8: Once done, remove from the oven and cut into wedges. Serve immediately. Enjoy!

Sausage Gravy Breakfast Pizza For Dinner

Rebecca Pizza for dinner? Well, why not? This Sausage Gravy Breakfast Pizza is great for the dinner menu too. Don’t be fooled it does say breakfast because of eggs, and sausages… Main Dish Recipes Sausage Gravy Breakfast Pizza For Dinner European Print This
Nutrition facts: 200 calories 20 grams fat
Rating: 5.0/5
( 1 voted )

Ingredients

  • 2 packages crescent rolls
  • 1 package Jimmy Dean cooked sausage crumbles
  • 1 envelope country gravy mix
  • 6 eggs
  • 2 tablespoons of milk
  • 1/2 teaspoon of salt
  • 1/4 teaspoon of pepper
  • 1 tablespoon of butter
  • 8 ounces shredded cheddar cheese
  • 4 ounces shredded pepper Jack cheese

Instructions

Step 1: Prepare the oven. Preheat it to 375 degrees F.

Step 2: Unroll the crescent dough and separate them into 16 triangles. Then, place them on a greased round pizza pan. Make sure that the points are placed toward the center.

Step 3: In a medium saucepan, prepare the gravy according to package instructions. Mix in the sausage crumbles into the thickened gravy and set aside.

Step 4: Whisk the eggs, milk, salt, and pepper into a small bowl.

Step 5: Heat the butter in a large skillet over medium heat. Add in the egg mixture and continue cooking and stirring until almost set.

Step 6: Pour the sausage gravy mixture over the crust and spread evenly. Top it with eggs and cheese.

Step 7: Place inside the preheated oven and bake for 5 to 10 minutes more or until the eggs are set and the cheese is melted.

Step 8: Once done, remove from the oven and cut into wedges. Serve immediately. Enjoy!

June 1, 2020 0 comment
0 FacebookTwitterPinterestEmail
Main Dish Recipes

These brilliant cookies are taking the internet by storm: 3 ingredients and ready in no time

by Rebecca June 1, 2020
written by Rebecca

This recipe has been around for some time and many people are doing this already. This has taken the internet by storm! Everyone wants to have a piece. Well, anyone can make these brilliant cookies, it is such a simple recipe that is loved by many because it’s so easy to put together, straightforward, and you only need 3 key ingredients to make these awesome cookies; milk, butter, and sugar.

This recipe is just of the many easy to make recipes that crawling the internet. But this is one of the best, most cost-efficient, and reliable cookie recipe there is. I have been using this recipe for quite some time now and it never fails me. It’s a hit every time I make these delicious cookies, 5 stars are not enough, I would say these cookies deserve 10 stars! It’s really funny whenever they ask me how I make them because for a 3-ingredient cookie recipe this tastes complicated. Whenever I share the recipe, their reaction is priceless! They never thought that it’s very easy to make. I keep on telling them that this is the exact recipe we saw on the net.

Ingredients

3/4 cup butter, room temperature

1/2 cup superfine sugar

2 1/4 cup all-purpose flour

Optional: raw sugar or large granulated sugar for coating

Instructions

Step 1: In a bowl, mix the butter and sugar. Add in the flour and combine until the consistency is crumbly.

Step 2: Knead in a floured surface to form a dough.

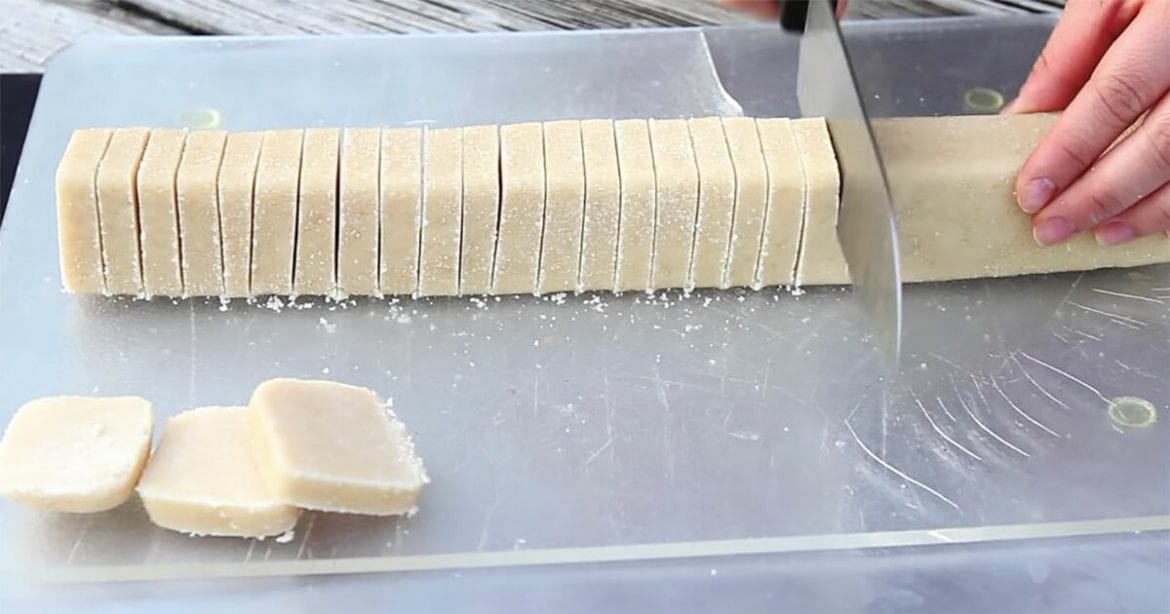
Step 3: Cover a parchment paper with sugar. Then, roll the dough on top forming a cylinder shape.

Step 4: Wrap the dough in saran wrap and refrigerate for about 30 minutes.

Step 5: Once cooled, remove the dough from the fridge and cut it into 1 cm slices.

Step 6: Place the cookies on an oven tray. Put inside the oven and bake for 20 minutes at 320 degrees F.

Note: These cookies can be stored in an airtight container.

These brilliant cookies are taking the internet by storm: 3 ingredients and ready in no time

Rebecca This recipe has been around for some time and many people are doing this already. This has taken the internet by storm! Everyone wants to have a piece. Well, anyone… Main Dish Recipes These brilliant cookies are taking the internet by storm: 3 ingredients and ready in no time European Print This
Nutrition facts: 200 calories 20 grams fat
Rating: 4.3/5
( 3 voted )

Ingredients

  • 3/4 cup butter, room temperature
  • 1/2 cup superfine sugar
  • 2 1/4 cup all-purpose flour
  • Optional: raw sugar or large granulated sugar for coating

Instructions

Step 1: In a bowl, mix the butter and sugar. Add in the flour and combine until the consistency is crumbly.

Step 2: Knead in a floured surface to form a dough.

Step 3: Cover a parchment paper with sugar. Then, roll the dough on top forming a cylinder shape.

Step 4: Wrap the dough in saran wrap and refrigerate for about 30 minutes.

Step 5: Once cooled, remove the dough from the fridge and cut it into 1 cm slices.

Step 6: Place the cookies on an oven tray. Put inside the oven and bake for 20 minutes at 320 degrees F.

Note: These cookies can be stored in an airtight container.

June 1, 2020 0 comment
0 FacebookTwitterPinterestEmail
Main Dish Recipes

MILLION DOLLAR SPAGHETTI

by Rebecca June 1, 2020
written by Rebecca

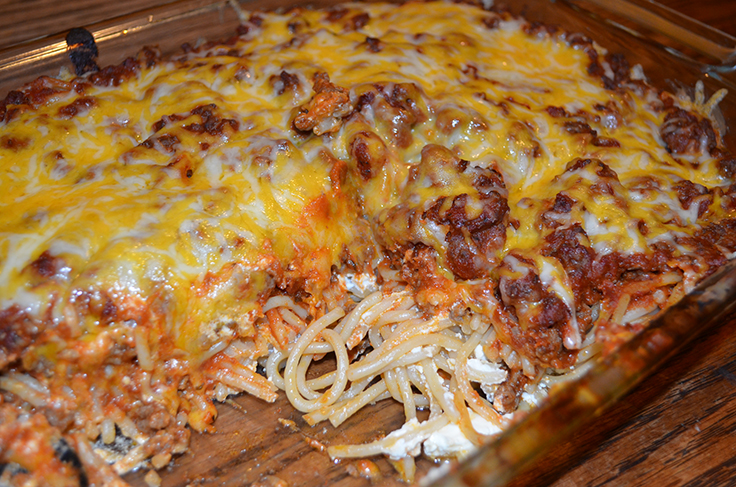
We all love spaghetti when we were kids, right? Now, that we are adults, we love it even more! Because it reminds us of the good things in life. I think that spaghetti is the best food in the world! As an avid fan of this dish, I somehow mastered cooking it. I don’t mean to brag but I kinda cook the Best Spaghetti. Just kidding. I’m just so proud of this recipe. I figured why keep it a secret when everyone loves a nice and cheesy spaghetti? I don’t want to be selfish so here you go! I hope you like it!

INGREDIENTS

1 lb of ground beef

1 jar of spaghetti sauce

8 oz of cream cheese

¼ cup sour cream

½ lb cottage cheese (equals 1 cup)

½ cup butter (1 stick)

1 pkg spaghetti 16 oz

Grated cheddar cheese

HOW TO MAKE MILLION DOLLAR SPAGHETTI

Step 1: Ready the oven and preheat to 350 degrees.

Step 2: Place a casserole on a stove and cook the pasta for 10 minutes or until al dente’. Drain the water and set it aside.

Step 3: In a medium bowl, add sour cream, cottage cheese, and cream cheese. Whisk until well-mixed.

Step 4: Place a skillet on the stove and add oil. When the oil is hot, cook the burger patty until it turns color brown or lightly toasted on the edges. Drain the excess oil and transfer the patties into the spaghetti sauce.

Step 5: In a 9×13 pan, put 2 or 3 slices of butter and add half of the cooked noodles on top.

Step 6: Pour the cream cheese mixture into the 9×13 pan with half of the pasta. Pour it on top of the pasta and make sure to cover the pasta with the sauce entirely.

Step 7: Get half of the pasta and put it on top of the cream cheese mixture and add top with 2 or 3 slices of butter.

Step 8: Transfer the spaghetti sauce with the patties into the pasta and cream cheese mixture.

Step 9: Place the pan inside the oven and bake for 30 minutes.

Step 10: Remove the pan from the oven and sprinkle grated cheese on top. Be very generous with the cheese!

Step 11: Put the pan back to the oven and bake for another 15 minutes until the cheese has melted.

Step 12: Serve and Enjoy!

MILLION DOLLAR SPAGHETTI

Rebecca We all love spaghetti when we were kids, right? Now, that we are adults, we love it even more! Because it reminds us of the good things in life. I… Main Dish Recipes MILLION DOLLAR SPAGHETTI European Print This
Nutrition facts: 200 calories 20 grams fat
Rating: 5.0/5
( 1 voted )

Ingredients

  • 1 lb of ground beef
  • 1 jar of spaghetti sauce
  • 8 oz of cream cheese
  • ¼ cup sour cream
  • ½ lb cottage cheese (equals 1 cup)
  • ½ cup butter (1 stick)
  • 1 pkg spaghetti 16 oz
  • Grated cheddar cheese

Instructions

Step 1: Ready the oven and preheat to 350 degrees.

Step 2: Place a casserole on a stove and cook the pasta for 10 minutes or until al dente'. Drain the water and set it aside.

Step 3: In a medium bowl, add sour cream, cottage cheese, and cream cheese. Whisk until well-mixed.

Step 4: Place a skillet on the stove and add oil. When the oil is hot, cook the burger patty until it turns color brown or lightly toasted on the edges. Drain the excess oil and transfer the patties into the spaghetti sauce.

Step 5: In a 9x13 pan, put 2 or 3 slices of butter and add half of the cooked noodles on top.

Step 6: Pour the cream cheese mixture into the 9x13 pan with half of the pasta. Pour it on top of the pasta and make sure to cover the pasta with the sauce entirely.

Step 7: Get half of the pasta and put it on top of the cream cheese mixture and add top with 2 or 3 slices of butter.

Step 8: Transfer the spaghetti sauce with the patties into the pasta and cream cheese mixture.

Step 9: Place the pan inside the oven and bake for 30 minutes.

Step 10: Remove the pan from the oven and sprinkle grated cheese on top. Be very generous with the cheese!

Step 11: Put the pan back to the oven and bake for another 15 minutes until the cheese has melted.

Step 12: Serve and Enjoy!

June 1, 2020 0 comment
0 FacebookTwitterPinterestEmail
Main Dish Recipes

CROCK POT PEPPER STEAK

by Rebecca June 1, 2020
written by Rebecca

Hi friends! Look at the beautiful picture of this Crock-Pot Pepper Steak! I made this yesterday and I was proud of the outcome that’s why I am sharing you now the recipe which is not mine, by the way, I stumbled upon this exact recipe years ago. Serve it with nice fried rice or just steamed rice, I know that you’re gonna love it! For additional flavor, you can add fried garlic on top and fresh chillis. It complements well with the taste of all the ingredients more importantly with the beef! Oh man, just looking at the photo makes me wanna cook this again today. Okay, off to the kitchen then! Enjoy!

INGREDIENTS

16 oz of beef stew meat

2 of each bell peppers

1 vegetable oil

3 tablespoons Of Worcestershire sauce

1 teaspoon of minced garlic

1 can of beef broth

1 can of stewed tomatoes

1 season salt

1 all-purpose flour

HOW TO MAKE CROCKPOT PEPPER STEAK

Step 1: Combine flour and salt in a large bowl. Whisk until well-mixed.

Step 2: Add the Beef into the bowl and coat entirely with the flour mixture.

Step 3: Place a skillet on the stove and turn the heat to medium and add oil.

Step 4: When the oil is hot, add minced garlic, beef, and bell pepper strips. Saute until the meat turns brown.

Step 5: Line a slow cooker with cooking spray.

Step 6: Take the meat and bell peppers away from the skillet and transfer it into the slow cooker. (Do not include the grease.)

Step 7: Add the stewed tomatoes including the juice into the skillet where we sauteed the beef followed by 1 can of beef broth.

Step 8: Add the flour a little at a time until the sauce becomes nice and thick.

Step 9: Pour the gravy into the slow cooker. Spread it on top of the beef.

Step 10: Cover the slow cooker and set the cooking time to low for 8 hours.

Step 11: Serve and Enjoy!

CROCK POT PEPPER STEAK

Rebecca Hi friends! Look at the beautiful picture of this Crock-Pot Pepper Steak! I made this yesterday and I was proud of the outcome that’s why I am sharing you now… Main Dish Recipes CROCK POT PEPPER STEAK European Print This
Nutrition facts: 200 calories 20 grams fat
Rating: 4.0/5
( 3 voted )

Ingredients

  • 16 oz of beef stew meat
  • 2 of each bell peppers
  • 1 vegetable oil
  • 3 tablespoons Of Worcestershire sauce
  • 1 teaspoon of minced garlic
  • 1 can of beef broth
  • 1 can of stewed tomatoes
  • 1 season salt
  • 1 all-purpose flour

Instructions

Step 1: Combine flour and salt in a large bowl. Whisk until well-mixed.

Step 2: Add the Beef into the bowl and coat entirely with the flour mixture.

Step 3: Place a skillet on the stove and turn the heat to medium and add oil.

Step 4: When the oil is hot, add minced garlic, beef, and bell pepper strips. Saute until the meat turns brown.

Step 5: Line a slow cooker with cooking spray.

Step 6: Take the meat and bell peppers away from the skillet and transfer it into the slow cooker. (Do not include the grease.)

Step 7: Add the stewed tomatoes including the juice into the skillet where we sauteed the beef followed by 1 can of beef broth.

Step 8: Add the flour a little at a time until the sauce becomes nice and thick.

Step 9: Pour the gravy into the slow cooker. Spread it on top of the beef.

Step 10: Cover the slow cooker and set the cooking time to low for 8 hours.

Step 11: Serve and Enjoy!

June 1, 2020 0 comment
0 FacebookTwitterPinterestEmail
Main Dish Recipes

LONG JOHN SILVER’S FISH BATTER

by Rebecca June 1, 2020
written by Rebecca

Who would have thought that this quick and easy delicious food could bring a smile to the faces of people? 2 days ago my family and I fed 20 homeless people with this amazing fried coated fish. We thought we could reach out to people in need of food by giving them well, food. Not just any food, this recipe is a part of our family. My grandpa always serves this when we were kids. It is part of our tradition as a family. So, going back to the story, 20 people were so happy when we gave them food packages containing this and other things. The smile on their faces will never be erased from our hearts and minds.

In this recipe, you can either use fish or chicken. Chicken is good too! I prefer chicken over fish but either way works for me as long as they are fried! With a very minimal set of ingredients, you can make something so amazing that even you wouldn’t believe how good it is! By the way, you won’t be needing gravy or any sauce to make this tasty. It is perfect the way it is!

Ingredients

3⁄4 cup of flour

2 tablespoons of cornstarch

1⁄4 teaspoon of baking soda

1⁄4 teaspoon of baking powder

1⁄4 teaspoon of salt

3⁄4 cup of water

HOW TO MAKE LONG JOHN SILVER’S FISH BATTER

Step 1: Sift or filter the flour, cornstarch, and baking powder and place it in a mixing bowl.

Step 2: Pour in the water into the mixing bowl with the sifted flour mixture.

Step 3: Add the chicken fillet or fish into the bowl. Coat entirely with the mixture.

Step 4: Place a frying pan on the stove and turn the heat to medium then add enough oil to submerge the chicken or fish.

Step 5: Deep fry the coated fish or chicken until it turns golden brown on each side.

Step 6: Serve hot. Enjoy!

LONG JOHN SILVER'S FISH BATTER

Rebecca Who would have thought that this quick and easy delicious food could bring a smile to the faces of people? 2 days ago my family and I fed 20 homeless… Main Dish Recipes LONG JOHN SILVER’S FISH BATTER European Print This
Nutrition facts: 200 calories 20 grams fat
Rating: 5.0/5
( 1 voted )

Ingredients

  • 3⁄4 cup of flour
  • 2 tablespoons of cornstarch
  • 1⁄4 teaspoon of baking soda
  • 1⁄4 teaspoon of baking powder
  • 1⁄4 teaspoon of salt
  • 3⁄4 cup of water

Instructions

Step 1: Sift or filter the flour, cornstarch, and baking powder and place it in a mixing bowl.

Step 2: Pour in the water into the mixing bowl with the sifted flour mixture.

Step 3: Add the chicken fillet or fish into the bowl. Coat entirely with the mixture.

Step 4: Place a frying pan on the stove and turn the heat to medium then add enough oil to submerge the chicken or fish.

Step 5: Deep fry the coated fish or chicken until it turns golden brown on each side.

Step 6: Serve hot. Enjoy!

June 1, 2020 0 comment
0 FacebookTwitterPinterestEmail
Main Dish Recipes

Crock Pot Cube Steak OMG!! THIS IS DELICIOUSS!!

by Rebecca June 1, 2020
written by Rebecca

Who’s up for Steak in gravy? Me too! Today, I’m gonna guide you to this amazing dish. It is best served with mashed potato but steamed rice works as well. It depends on how you would like to eat it. Sometimes I love mashed potatoes but there are days that I have a huge craving for nice and steamy rice. The most important thing about this recipe is the soup that you are gonna use. You can add your preferred soup by the way. Mushroom soup is good with this dish as well. I just prefer chicken soup. You can add more onions too! I recommend you be very generous with the onions because it gives a nice flavor to this dish. Anyway, I hope you like this recipe. Enjoy!

Ingredients

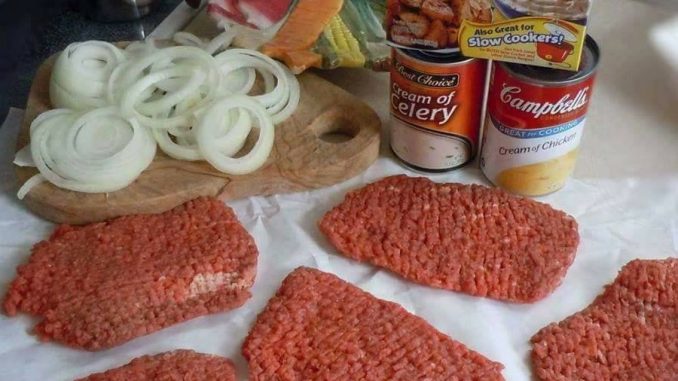
6 cube steaks

1 medium onion peeled and sliced into rings

1 can of cream of chicken soup

1 can of cream of celery soup

1 packet Lipton Onion Soup Mix

1/2 soup can of water

salt and pepper

How to make Crock Pot Cube Steak

Step 1: Wash the medium-sized onion and let it dry first.

Step 2: Peel the onions and cut them into ring shapes. Separate the rings from each other.

Step 3: Season the beef cube steak with salt and pepper.

Step 4: In a crock-pot, arrange 2 beef cube steaks on the bottom part.

Step 5: Put some onions on top of the cube steaks the follow with another 2 cubes steaks. Repeat this procedure over and over until you run out of cube steaks and onions. This will also help you separate them once you’re done.

Step 6: Combine water and cream of soups in a big bowl.

Step 7: Pour the soup mixture into the crock-pot with the cube steaks.

Step 8: Add the onion soup mix over the steaks and cover the pot and set the heat to low.

Step 9: Set the timer to 6 to 7 hours.

Step 10: Serve with mashed potato or salad. Enjoy!

Crock Pot Cube Steak OMG!! THIS IS DELICIOUSS!!

Rebecca Who’s up for Steak in gravy? Me too! Today, I’m gonna guide you to this amazing dish. It is best served with mashed potato but steamed rice works as well.… Main Dish Recipes Crock Pot Cube Steak OMG!! THIS IS DELICIOUSS!! European Print This
Nutrition facts: 200 calories 20 grams fat
Rating: 4.3/5
( 3 voted )

Ingredients

  • 6 cube steaks
  • 1 medium onion peeled and sliced into rings
  • 1 can of cream of chicken soup
  • 1 can of cream of celery soup
  • 1 packet Lipton Onion Soup Mix
  • 1/2 soup can of water
  • salt and pepper

Instructions

Step 1: Wash the medium-sized onion and let it dry first.

Step 2: Peel the onions and cut them into ring shapes. Separate the rings from each other.

Step 3: Season the beef cube steak with salt and pepper.

Step 4: In a crock-pot, arrange 2 beef cube steaks on the bottom part.

Step 5: Put some onions on top of the cube steaks the follow with another 2 cubes steaks. Repeat this procedure over and over until you run out of cube steaks and onions. This will also help you separate them once you're done.

Step 6: Combine water and cream of soups in a big bowl.

Step 7: Pour the soup mixture into the crock-pot with the cube steaks.

Step 8: Add the onion soup mix over the steaks and cover the pot and set the heat to low.

Step 9: Set the timer to 6 to 7 hours.

Step 10: Serve with mashed potato or salad. Enjoy!

June 1, 2020 0 comment
0 FacebookTwitterPinterestEmail
Newer Posts
Older Posts

Popular Posts

  • 1

    Crispy Crunchy Parmesan Potatoes

    March 21, 2020
  • 2

    CROCK POT SMOTHERED PORK CHOPS

    March 21, 2020
  • Facebook
  • Twitter

@2019 - All Right Reserved.


Back To Top