Cook it once
  • Home
  • Privacy Policy
  • Recipes
    • KETO
    • LC
    • WW
  • Tips
  • Contact
Cook it once
  • Home
  • Privacy Policy
  • Recipes
    • KETO
    • LC
    • WW
  • Tips
  • Contact
Monthly Archives

May 2020

Main Dish Recipes

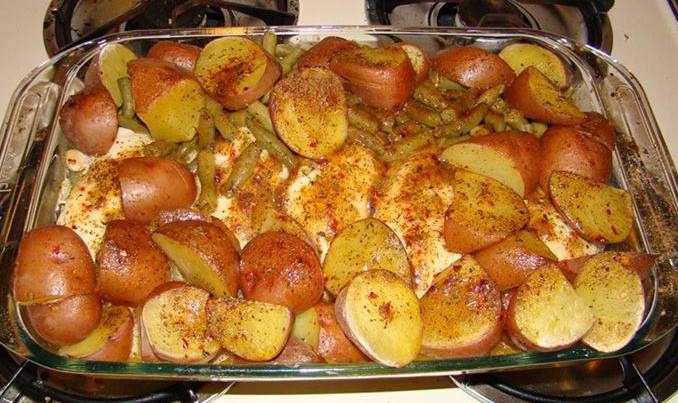
Baked Chicken, Green Beans and Red Potatoes

by Rebecca May 12, 2020
written by Rebecca

Baked Chicken, Green Beans, and Red Potatoes is another easy recipe that is worth trying and keeping. Serve this for a hearty and delicious dinner and I’m pretty sure everyone’s gonna love it! Make sure to roll the chicken, green beans, and potatoes in the salad dressing so they will be coated with an utterly savory flavor. I prefer to use fresh green beans though if I have them but the canned beans are a good substitute. Pop this in the oven and wait for an hour. Meanwhile, if you’re a Mom like me, one hour is enough to do other things. I am not kidding when I say it’s easy to prepare but the baking time is not. Well, it doesn’t matter because once it is cooked you are all ready for dinner. And all good things take time, right?

Try this tonight. Surprise your family with a scrumptious, hearty, and fabulous meal that they deserve. I’m sure they’re gonna enjoy this and pour yourself a wine for a job well done!

INGREDIENTS

3 boneless chicken breasts, cut in half

2 cans of Green Beans

5 red skin potatoes, cut in half

2 packets of Zesty Italian dressing mix

1 stick of butter, melted

How to make Baked Chicken, Green Beans, and Red Potatoes

Step 1: Prepare the oven by preheating it to 350 degrees.

Step 2: Cut the chicken breasts and red skin potatoes in half.

Step 3: Place the cut chicken, 2 cans of green beans on one side, and the other the red skin potatoes in a 9 x 13-inch pan.

Step 4: Sprinkle with one packet of Zesty Italian Dressing Mix on top.

Step 5: And melt 1 stick of butter and drizzle over the top.

Step 6: Make sure to cover the pan with aluminum foil before putting inside the preheated oven.

Step 7: Bake for an hour. Serve and enjoy!
Baked Chicken, Green Beans and Red Potatoes

Rebecca Baked Chicken, Green Beans, and Red Potatoes is another easy recipe that is worth trying and keeping. Serve this for a hearty and delicious dinner and I’m pretty sure everyone’s… Main Dish Recipes Baked Chicken, Green Beans and Red Potatoes European Print This
Nutrition facts: 200 calories 20 grams fat
Rating: 5.0/5
( 1 voted )

Ingredients

  • 3 boneless chicken breasts, cut in half
  • 2 cans of Green Beans
  • 5 red skin potatoes, cut in half
  • 2 packets of Zesty Italian dressing mix
  • 1 stick of butter, melted

Instructions

Step 1: Prepare the oven by preheating it to 350 degrees.

Step 2: Cut the chicken breasts and red skin potatoes in half.

Step 3: Place the cut chicken, 2 cans of green beans on one side, and the other the red skin potatoes in a 9 x 13-inch pan.

Step 4: Sprinkle with one packet of Zesty Italian Dressing Mix on top.

Step 5: And melt 1 stick of butter and drizzle over the top.

Step 6: Make sure to cover the pan with aluminum foil before putting inside the preheated oven.

Step 7: Bake for an hour. Serve and enjoy!
May 12, 2020 0 comment
0 FacebookTwitterPinterestEmail
Main Dish Recipes

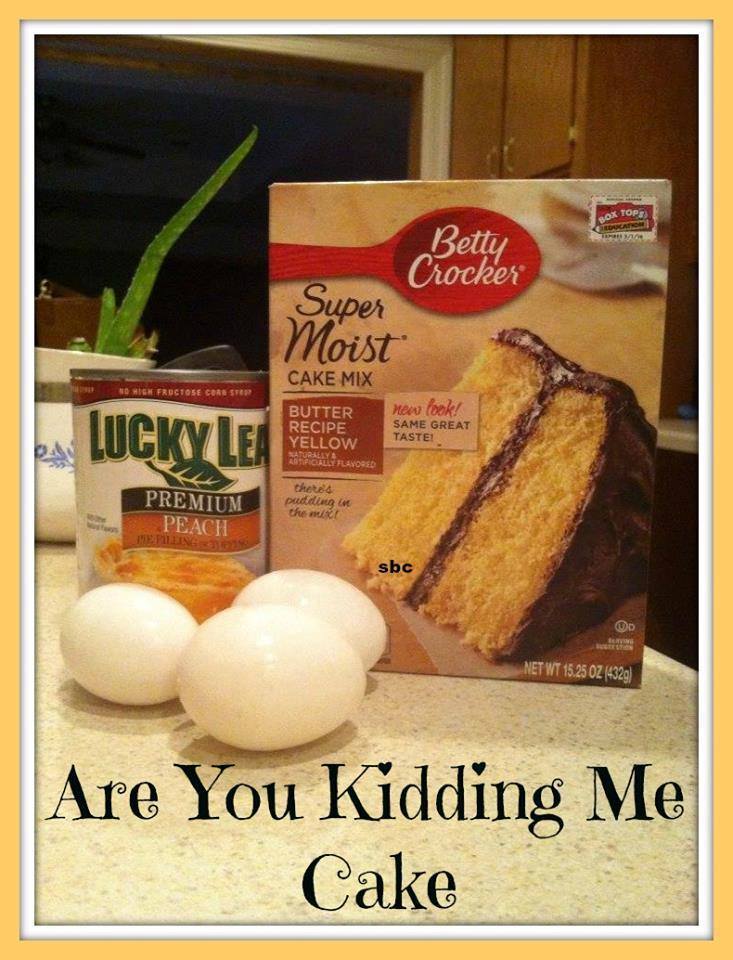
Are You Kidding Me Cake

by Rebecca May 12, 2020
written by Rebecca

The quickest and easiest cake recipe you’ll ever find! Worth every bite! And the combination ideas to make this are an absolute delish! My personal favorite though is the Butter cake with strawberry filling but you’ve got a lot of options that you can try like…

Pineapple Cake Mix and blueberry filling
Chocolate Cake Mix and cherry filling
Yellow Cake Mix and cherry filling
Yellow Cake Mix and blueberry filling
Butter pecan cake mix and apple filling
Yellow Cake Mix and apple filling
Yellow Cake Mix and blackberry filling
Strawberry Cake Mix and blueberry filling
I’m pretty sure you’ll enjoy making this cake. And if you’re feeling creative, you can drizzle over or pour some melted chocolate on top (or strawberry drizzle or anything that you prefer). I like mine with fresh fruits and some nuts on the side and a freshly brewed coffee for an afternoon dessert. This recipe you can use to make muffins and bundt cake too! You just need to reduce the baking time, 10 minutes less than if you’re making a cake (in a pan). Go crazy with this cake, try every combination, and bake maybe 2 or 3 cake with different fillings (like what I normally do when I have friends coming over).

Ingredients

3 large eggs

1 box of cake mix any flavor

1 can of pie filling any flavor

Instructions

Step 1: Prepare the oven by preheating it to 350 degrees. Grease a 9 x 13 pan with a cooking spray.

Step 2: In a bowl, place the eggs, cake mix, and pie filling. Mix until well combined.

Step 3: Carefully pour the mixture in the pan.

Step 4: Place inside the preheated oven and bake for 35 minutes or until you have a pudding-cake kind of consistency that’s lighter than a pound cake.

Step 5: Serve a slice and enjoy the little pieces of whatever fruit filling you used and the crispy edges like what you get on brownies.

Are You Kidding Me Cake

Rebecca The quickest and easiest cake recipe you’ll ever find! Worth every bite! And the combination ideas to make this are an absolute delish! My personal favorite though is the Butter… Main Dish Recipes Are You Kidding Me Cake European Print This
Nutrition facts: 200 calories 20 grams fat
Rating: 5.0/5
( 1 voted )

Ingredients

  • 3 large eggs
  • 1 box of cake mix any flavor
  • 1 can of pie filling any flavor

Instructions

Step 1: Prepare the oven by preheating it to 350 degrees. Grease a 9 x 13 pan with a cooking spray.

Step 2: In a bowl, place the eggs, cake mix, and pie filling. Mix until well combined.

Step 3: Carefully pour the mixture in the pan.

Step 4: Place inside the preheated oven and bake for 35 minutes or until you have a pudding-cake kind of consistency that's lighter than a pound cake.

Step 5: Serve a slice and enjoy the little pieces of whatever fruit filling you used and the crispy edges like what you get on brownies.

May 12, 2020 0 comment
0 FacebookTwitterPinterestEmail
Main Dish RecipesTips

Slow Cooker Brown Sugar Garlic Chicken

by Rebecca May 12, 2020
written by Rebecca

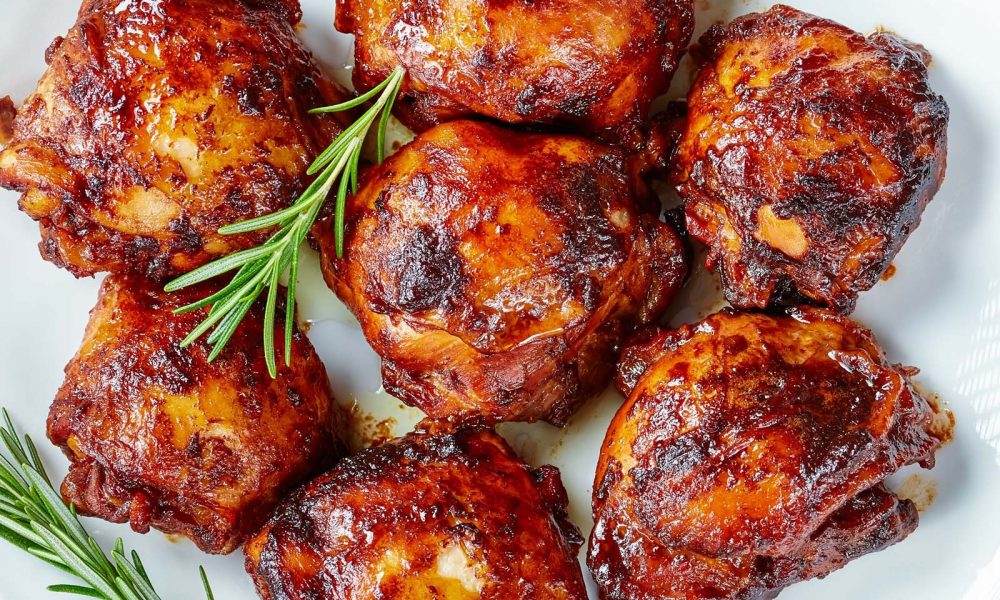
If you are like me who has a kid who’s crazy about chicken I’m sure you’ll need this recipe. When my daughter was just a toddler her favorite is the skin of the chicken but when she grew older she prefers the chicken meat. She will eat anything that has chicken on it or any chicken dish you can think of. Her favorite though is the classic fried chicken, well not until she tasted this gorgeous Brown Sugar Garlic Chicken. She was hooked, I’ll tell you that. I remember this one time that she requested for this to be served almost every dinner! Good thing this recipe is very easy to make and you just need 5 ingredients to make it happen. I have used different parts of the chicken (breasts, thighs, wings, or legs) for this and still, it’s delicious. Sometimes I add crushed red pepper or a squirt of Sriracha to spice it up a little or for a deeper caramel flavor, you can use dark brown sugar instead. And yes, you can make this meal in the oven, too! Just roast the chicken (don’t forget the foil though) over 400 degrees for 25-30 minutes. Then serve with rice or potato wedges and roasted vegetable or mashed potatoes (whatever works for you) and dinner is served! A perfect weeknight meal for you and your family.

Ingredients

5 chicken thighs

2 tablespoons of minced garlic

1/2 teaspoon of Kosher salt

1/4 teaspoon of black pepper

1/3 cup of brown sugar packed

How to make Slow Cooker Brown Sugar Garlic Chicken

Step 1: Place the chicken, salt, and garlic in the slow cooker.

Step 2: Mix and make sure that the skin of the chicken is flip side up.

Step 3: Splash the brown sugar over the chicken.

Step 4: Cook in low heat for 8 hours or in high for 4 hours. Serve with rice or potato wedges and vegetables. Enjoy!

Slow Cooker Brown Sugar Garlic Chicken

Rebecca If you are like me who has a kid who’s crazy about chicken I’m sure you’ll need this recipe. When my daughter was just a toddler her favorite is the… Main Dish Recipes Slow Cooker Brown Sugar Garlic Chicken European Print This
Nutrition facts: 200 calories 20 grams fat
Rating: 3.1/5
( 10 voted )

Ingredients

  • 5 chicken thighs
  • 2 tablespoons of minced garlic
  • 1/2 teaspoon of Kosher salt
  • 1/4 teaspoon of black pepper
  • 1/3 cup of brown sugar packed

Instructions

Step 1: Place the chicken, salt, and garlic in the slow cooker.

Step 2: Mix and make sure that the skin of the chicken is flip side up.

Step 3: Splash the brown sugar over the chicken.

Step 4: Cook in low heat for 8 hours or in high for 4 hours. Serve with rice or potato wedges and vegetables. Enjoy!

May 12, 2020 0 comment
0 FacebookTwitterPinterestEmail
Main Dish Recipes

BACON CHEESE BISCUITS

by Rebecca May 12, 2020
written by Rebecca

I had breakfast in bed today. My kids and my husband surprised me with a freshly brewed coffee and my favorite bacon cheese biscuits. I nearly cried because they don’t do this thing often. I’m super busy lately so I forgot what day today is. I can’t ask for anything anymore. I have a very loving family and had savory, delicious biscuits for breakfast! And I didn’t even know that my husband can cook! Well, he nailed it! That is all I can say.

It’s a pretty easy recipe, the ingredients are simple and if you are like me (who loves onions) you can add them too, and another layer of scrambled eggs to make this biscuit even more delicious. Happy Mother’s Day!

Ingredients

2 cans of crescent rolls (you can use biscuits too)

Cheese (Whatever type you like)

12oz or 16oz package of bacon, cooked

flour for dusting (optional)

HOW TO MAKE BACON CHEESE BISCUITS

Step 1: Prepare the oven by preheating it to 375 degrees. Grease a baking sheet with a non-stick cooking spray.

Step 2: Unroll one can of crescent rolls or half can of biscuit on a lightly floured table. Use a rolling pin or your hands to knead the dough. Lightly press the seams together and stretch a bit to make a nice triangle.

Step 3: Layer the cheese and add a layer of bacon over it.

Step 4: Now, unroll the other can of the crescent roll and layer on top pressing the seams together (top and all around).

Step 5: Slice into squares using a pizza cutter (or knife).

Step 6: Carefully place the slices (make sure the squares are touching each other) on the prepared baking sheet.

Step 7: Place inside the preheated oven and bake for 12-15 minutes or until the top are lightly browned. Remove from the oven and let it cool for about 3-5 minutes in a wire rack.

Step 8: Serve and Enjoy!

BACON CHEESE BISCUITS

Rebecca I had breakfast in bed today. My kids and my husband surprised me with a freshly brewed coffee and my favorite bacon cheese biscuits. I nearly cried because they don’t… Main Dish Recipes BACON CHEESE BISCUITS European Print This
Nutrition facts: 200 calories 20 grams fat
Rating: 5.0/5
( 1 voted )

Ingredients

  • 2 cans of crescent rolls (you can use biscuits too)
  • Cheese (Whatever type you like)
  • 12oz or 16oz package of bacon, cooked
  • flour for dusting (optional)

Instructions

Step 1: Prepare the oven by preheating it to 375 degrees. Grease a baking sheet with a non-stick cooking spray.

Step 2: Unroll one can of crescent rolls or half can of biscuit on a lightly floured table. Use a rolling pin or your hands to knead the dough. Lightly press the seams together and stretch a bit to make a nice triangle.

Step 3: Layer the cheese and add a layer of bacon over it.

Step 4: Now, unroll the other can of the crescent roll and layer on top pressing the seams together (top and all around).

Step 5: Slice into squares using a pizza cutter (or knife).

Step 6: Carefully place the slices (make sure the squares are touching each other) on the prepared baking sheet.

Step 7: Place inside the preheated oven and bake for 12-15 minutes or until the top are lightly browned. Remove from the oven and let it cool for about 3-5 minutes in a wire rack.

Step 8: Serve and Enjoy!

May 12, 2020 0 comment
0 FacebookTwitterPinterestEmail
Main Dish Recipes

Best Light & Fluffy Dinner Rolls

by Rebecca May 12, 2020
written by Rebecca

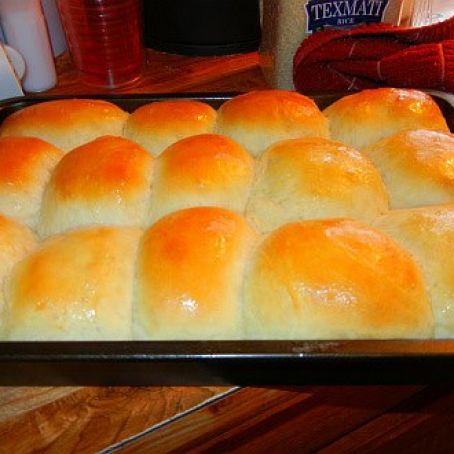
These are the best homemade meals I had ever had, and everything begins with a simple dough of 7 ingredients. Whenever I get the opportunity, I make these rolls and even bring a pot to my friend who welcomed a baby. They are soft pillows with the finest buttery and flaky texture. All of us are going to ask you to bake them again. When I pull them out of the oven even my youngest eyes light up!

Everyone must have a simple dinner roll recipe. These rolls for dinner are perfect. Like, perfect really. Soft and fluffy, the pillowy texture and buttery flavor will slow down your dinner roll recipe. They are extremely versatile and are essentially a welcome addition to all meals.

Ingredients:

4 cups all-purpose flour

1/3 cup sugar

1 teaspoon salt

1 package dry yeast

1 1/2 cups hot tap water

1 egg

1/3 c butter (softened), or vegetable shortening

Directions:

Sift the sugar, salt, and 2 c of the flour together, then stir the yeast.

At the low-speed mixer, mix in the flour mixture with shortcutting or butter.

Add the hot water and continue mixing. Add the other two cups of flour to make a soft dough and add it. The mixer works with the egg, the hottest of the tap.

I changed my beaters at this point for dough hooks and then allowed a dough to be kneaded for about 10 minutes, placed in an oiled bowl, covered with a towel and allowed it to rise in a warm place for approximately 2 hours.

Push the dough down

It may be cooled or shaped in rolls or loaves at this time and maybe raised for a second time up to double, usually about an hour.

Bake in a 375 ° F preheated oven to a slightly brown color.

It can be frozen and reheated for serving after baking.

Best Light & Fluffy Dinner Rolls

Rebecca These are the best homemade meals I had ever had, and everything begins with a simple dough of 7 ingredients. Whenever I get the opportunity, I make these rolls and… Main Dish Recipes Best Light & Fluffy Dinner Rolls European Print This
Nutrition facts: 200 calories 20 grams fat
Rating: 5.0/5
( 1 voted )

Ingredients

  • 4 cups all-purpose flour
  • 1/3 cup sugar
  • 1 teaspoon salt
  • 1 package dry yeast
  • 1 1/2 cups hot tap water
  • 1 egg
  • 1/3 c butter (softened), or vegetable shortening

Instructions

Sift the sugar, salt, and 2 c of the flour together, then stir the yeast.

At the low-speed mixer, mix in the flour mixture with shortcutting or butter.

Add the hot water and continue mixing. Add the other two cups of flour to make a soft dough and add it. The mixer works with the egg, the hottest of the tap.

I changed my beaters at this point for dough hooks and then allowed a dough to be kneaded for about 10 minutes, placed in an oiled bowl, covered with a towel and allowed it to rise in a warm place for approximately 2 hours.

Push the dough down

It may be cooled or shaped in rolls or loaves at this time and maybe raised for a second time up to double, usually about an hour.

Bake in a 375 ° F preheated oven to a slightly brown color.

It can be frozen and reheated for serving after baking.

May 12, 2020 0 comment
0 FacebookTwitterPinterestEmail
Main Dish Recipes

Easy Sour Cream Scalloped Potatoes

by Rebecca May 12, 2020
written by Rebecca

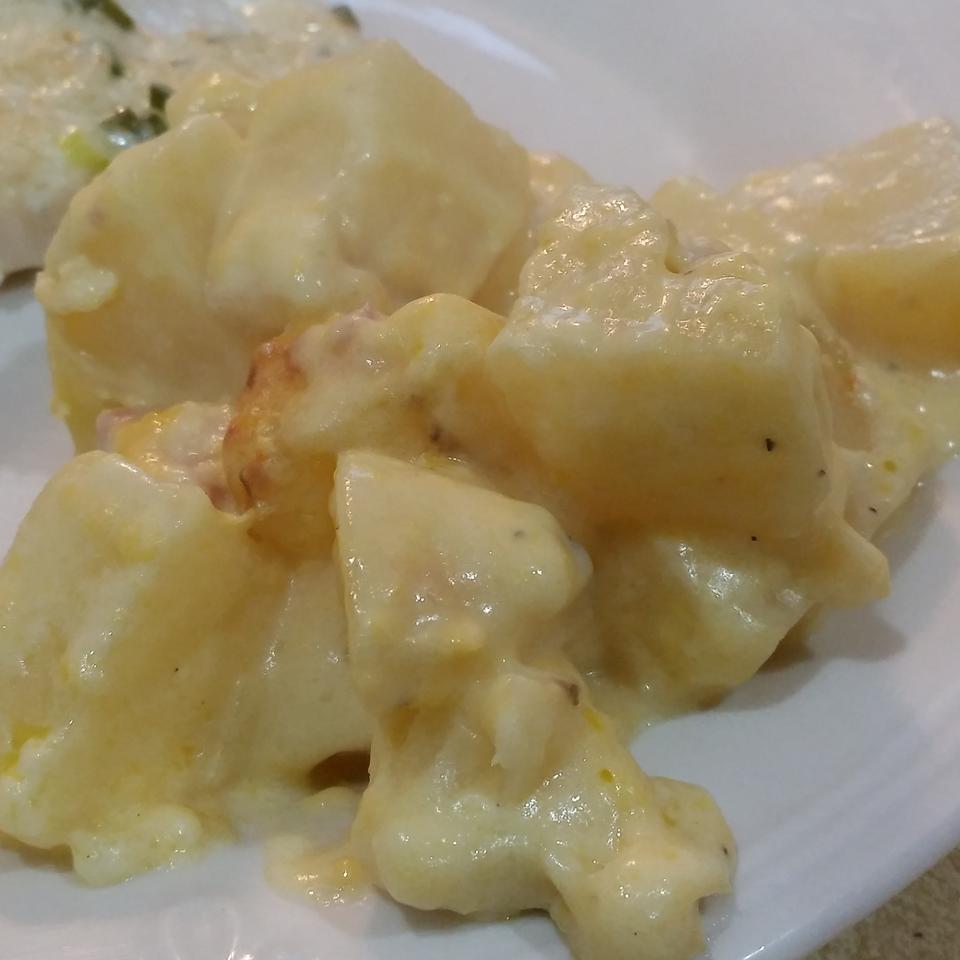
This is the favorite side dish of my family ever. For breakfast, lunch, or supper, you can eat it. They would eat it all day, each day, if I let them. Probably because this is not exactly a “skinny” side platter, I don’t make it too frequently. These potatoes are the symbol of comfort and taste, so good that they are worth any calorie. Not only has it been punched potatoes, but it is also both made from cream and cheese. It is not only made from scalloped potatoes. So for special occasions and holidays, I save this special side dish.

Actually, for every vacation dinner, I make this dish. Our Thanksgiving family, Christmas, Easter, and many more meetings have a must-have side. These potatoes are ideal for turkey, chicken, ham, beef, and any other protein you want to serve. This Easy Sour Cream Scalloped potato fits my favorite meat plates deliciously well. For the week I can make 1 saucepan, and have it with any protein I choose. Usually, I have most of those ingredients around my house and it makes these weekly recipes with so little preparation time. The creamy cheesiness of these potatoes ensures that the regular potatoes are regularly served up.

Ingredients:

12 large potatoes, peeled and halved

2 can of cream chicken soup

2 cups sour cream

2 cups shredded Cheddar cheese, divided

salt and ground black pepper to taste

Directions:

Preheat oven at about 350 ° F (175 ° C).

Into a large pot, place the potatoes and cover with salted water. Shrink to medium-low heat and simmer about 15 minutes until tender. Drain. Cut the bowls of potatoes into cubes.

Sprinkle the chicken soup, sour cream, and half of Cheddar cheese in the potato, then add black and salt. Sprinkle with the cheddar cheese and spread the potato mixture into the casserole dish with 9x13inches.

Bake in the preheated oven, then melt the Cheddar cheese for about 30 minutes.

Easy Sour Cream Scalloped Potatoes

Rebecca This is the favorite side dish of my family ever. For breakfast, lunch, or supper, you can eat it. They would eat it all day, each day, if I let… Main Dish Recipes Easy Sour Cream Scalloped Potatoes European Print This
Nutrition facts: 200 calories 20 grams fat
Rating: 4.1/5
( 9 voted )

Ingredients

  • 12 large potatoes, peeled and halved
  • 2 can of cream chicken soup
  • 2 cups sour cream
  • 2 cups shredded Cheddar cheese, divided
  • salt and ground black pepper to taste

Instructions

Preheat oven at about 350 ° F (175 ° C).

Into a large pot, place the potatoes and cover with salted water. Shrink to medium-low heat and simmer about 15 minutes until tender. Drain. Cut the bowls of potatoes into cubes.

Sprinkle the chicken soup, sour cream, and half of Cheddar cheese in the potato, then add black and salt. Sprinkle with the cheddar cheese and spread the potato mixture into the casserole dish with 9x13inches.

Bake in the preheated oven, then melt the Cheddar cheese for about 30 minutes.

May 12, 2020 0 comment
0 FacebookTwitterPinterestEmail
Main Dish Recipes

Caramel Shortbread Squares

by Rebecca May 12, 2020
written by Rebecca

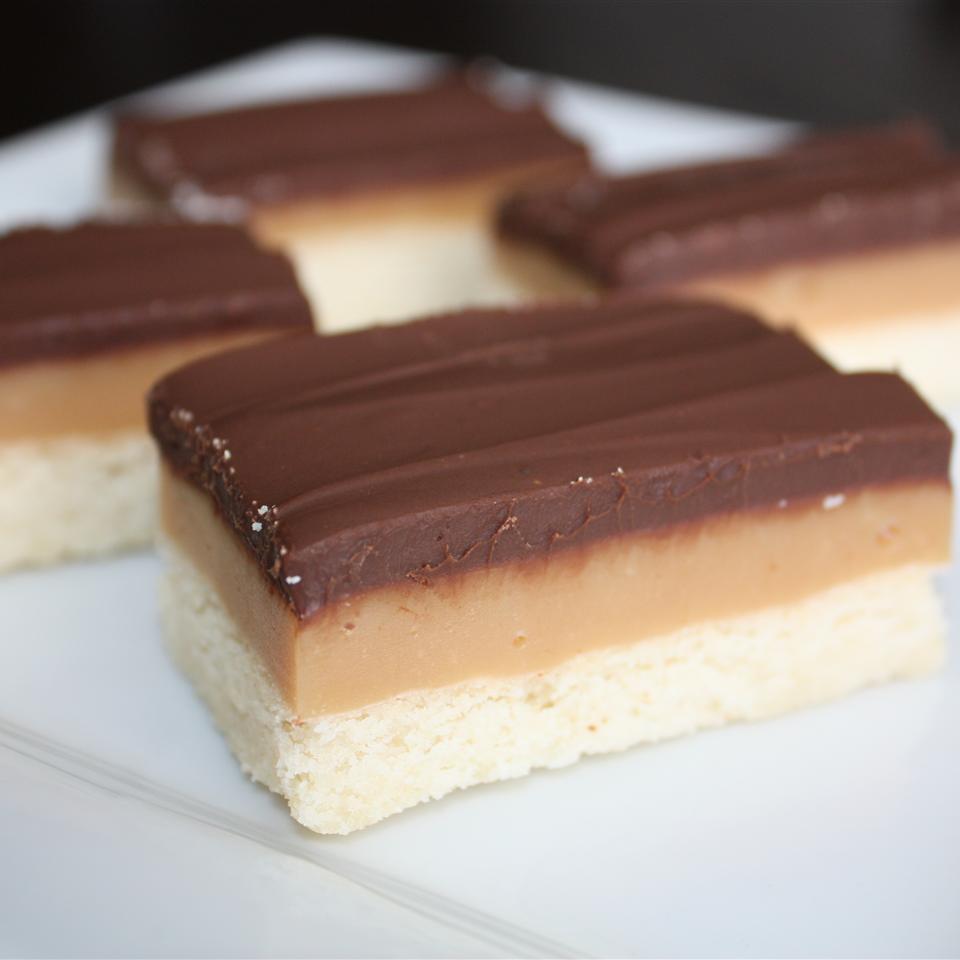
Caramel shortbread squares were published in Australian Women’s Weekly in the 1970s. The name is supposed to come from Scotland, however. This treat is known by many names: caramel squares, millionaire bars, candy shortcakes, and slices for caramel. Caramel Shortcake Squares has three sections (or layers): Shortbread, Caramel, and Chocolate.

Classic shorts are usually made with 3:2:1 ratio of flour, butter, and sugar. The name shortbread means that the proportion of butter cut into the meat “shortens,” which results in a damp but crumbly cookie. The result is the gluten strands. Shortcakes are unbelievably easy because it only requires butter to be creamed, and sugar to mix with the flour until dough is produced. Store at room temperature in an airtight container. You don’t have to store it in the freezer. At room temperature, the taste of each layer is so much better.

Preparation time: 10 minutes
Cooking time: 25 minutes
Serves: 40

Ingredients:

⅔ cup butter softened

¼ cup white sugar

1 ¼ cups all-purpose flour

½ cup butter

½ cup packed light brown sugar

2 tablespoons light corn syrup

½ cup sweetened condensed milk

1 ¼ cups milk chocolate chips

Directions:

Preheat oven at about 350 degrees F (175 C).

Mix butter, white sugar, and flour in a medium bowl until it is uniformly crumbled. Press into a baking pan of 9 inches square, and bake for 20 min.

In a 2-quarter pan combine 1/2 cup of butter, brown sugar, corn syrup, and condensed sweetened milk. Bring to a boil, keep cooking for a further five minutes. Remove and beat vigorously with a wooden spoon for about 3 minutes. Pour over the baked crust (hot or cool) on top. Cool until it gets firm.

Place the chocolate in a microwave-safe bowl. Then heat 1 minute and mix until 20 seconds of chocolates are melting. Disseminate the chocolate evenly on the layer of caramel. Chill. Slice into 1-inch squares. It must be small because it’s so rich.

Caramel Shortbread Squares

Rebecca Caramel shortbread squares were published in Australian Women’s Weekly in the 1970s. The name is supposed to come from Scotland, however. This treat is known by many names: caramel squares,… Main Dish Recipes Caramel Shortbread Squares European Print This
Nutrition facts: 200 calories 20 grams fat
Rating: 5.0/5
( 1 voted )

Ingredients

  • ⅔ cup butter softened
  • ¼ cup white sugar
  • 1 ¼ cups all-purpose flour
  • ½ cup butter
  • ½ cup packed light brown sugar
  • 2 tablespoons light corn syrup
  • ½ cup sweetened condensed milk
  • 1 ¼ cups milk chocolate chips

Instructions

Preheat oven at about 350 degrees F (175 C).

Mix butter, white sugar, and flour in a medium bowl until it is uniformly crumbled. Press into a baking pan of 9 inches square, and bake for 20 min.

In a 2-quarter pan combine 1/2 cup of butter, brown sugar, corn syrup, and condensed sweetened milk. Bring to a boil, keep cooking for a further five minutes. Remove and beat vigorously with a wooden spoon for about 3 minutes. Pour over the baked crust (hot or cool) on top. Cool until it gets firm.

Place the chocolate in a microwave-safe bowl. Then heat 1 minute and mix until 20 seconds of chocolates are melting. Disseminate the chocolate evenly on the layer of caramel. Chill. Slice into 1-inch squares. It must be small because it's so rich.

May 12, 2020 0 comment
0 FacebookTwitterPinterestEmail
Main Dish Recipes

Lemony Italian Cheesecake Cookies

by Rebecca May 12, 2020
written by Rebecca

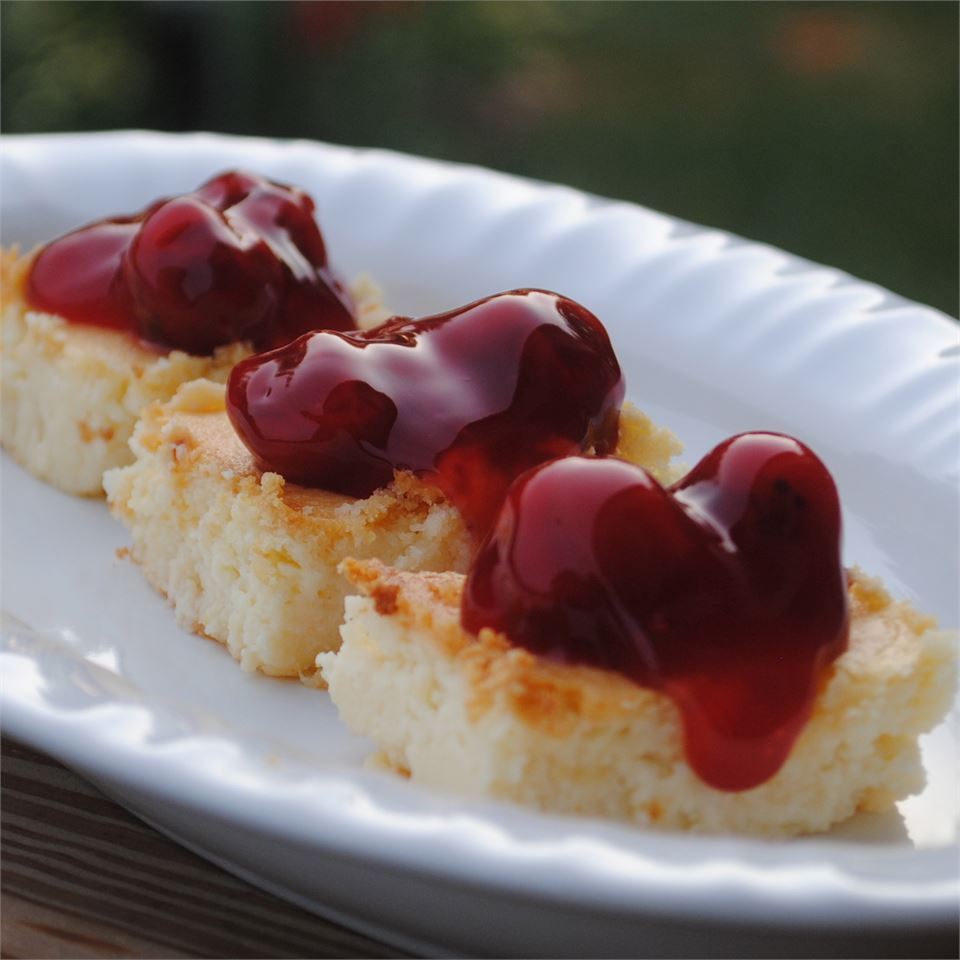
This is an excellent Easter cookie if you need some ideas. They’re sweet, dark, luminous, cheerful. I believe they taste the next day even better and you can make these completely in advance. These will be swallowed up by your friends and family, I know that for a fact … because mine did. Each last one had been gone. You can add your preferred filling on top of the cookies, I’d like to put strawberries because I am a big strawberry eater myself.

On the Greek island of Samos, the first “cheesecake” may have been made. Care molds dated around 2000 B.C. were excavated by physical anthropologists there. It was probably for thousands of years that cheese and cheese products had stood around but before this prehistory (that period in human history before the invention of writing) we will never really know. Cheese barbecue was considered a good energy supply in Greece and evidence shows that it was used by athletes during the first 776 B.C Olympic Games. Also known to use Greek brides and grooms as a wedding cake was cheesecake.

Ingredients:

1 pound ricotta cheese

2 packages of cream cheese (softened)

1 ½ cups white sugar

4 eggs

1 teaspoon vanilla extract

3 tablespoons cornstarch

3 tablespoons all-purpose flour

½ cup butter, melted and cooled

½ pint sour cream

½ lemon, juiced

1 cup cherry pie filling

Directions:

Cream the cream cheese and the ricotta. Add sugar and smooth. Stir well after each addition. Add lemon juice, vanilla, flour, and corn starch. Beat eggs one at a time. Beat in melted butter gradually. Continue mixing with sour cream to stir well up all the ingredients.

Put into a 9 x 13-inch ungreased pan. Bake for 1 hour at 320 ° F (160 ° C). Turn the oven off and leave for 2 hours inside.

Cut into a square shape. Top with a filling of strawberries, blueberries, or cherry pie. You can put the bars in the freezer

Lemony Italian Cheesecake Cookies

Rebecca This is an excellent Easter cookie if you need some ideas. They’re sweet, dark, luminous, cheerful. I believe they taste the next day even better and you can make these… Main Dish Recipes Lemony Italian Cheesecake Cookies European Print This
Nutrition facts: 200 calories 20 grams fat
Rating: 5.0/5
( 2 voted )

Ingredients

  • 1 pound ricotta cheese
  • 2 packages of cream cheese (softened)
  • 1 ½ cups white sugar
  • 4 eggs
  • 1 teaspoon vanilla extract
  • 3 tablespoons cornstarch
  • 3 tablespoons all-purpose flour
  • ½ cup butter, melted and cooled
  • ½ pint sour cream
  • ½ lemon, juiced
  • 1 cup cherry pie filling

Instructions

Cream the cream cheese and the ricotta. Add sugar and smooth. Stir well after each addition. Add lemon juice, vanilla, flour, and corn starch. Beat eggs one at a time. Beat in melted butter gradually. Continue mixing with sour cream to stir well up all the ingredients.

Put into a 9 x 13-inch ungreased pan. Bake for 1 hour at 320 ° F (160 ° C). Turn the oven off and leave for 2 hours inside.

Cut into a square shape. Top with a filling of strawberries, blueberries, or cherry pie. You can put the bars in the freezer

May 12, 2020 0 comment
0 FacebookTwitterPinterestEmail
Main Dish Recipes

Garlic Roasted Chicken and Potatoes

by Rebecca May 12, 2020
written by Rebecca

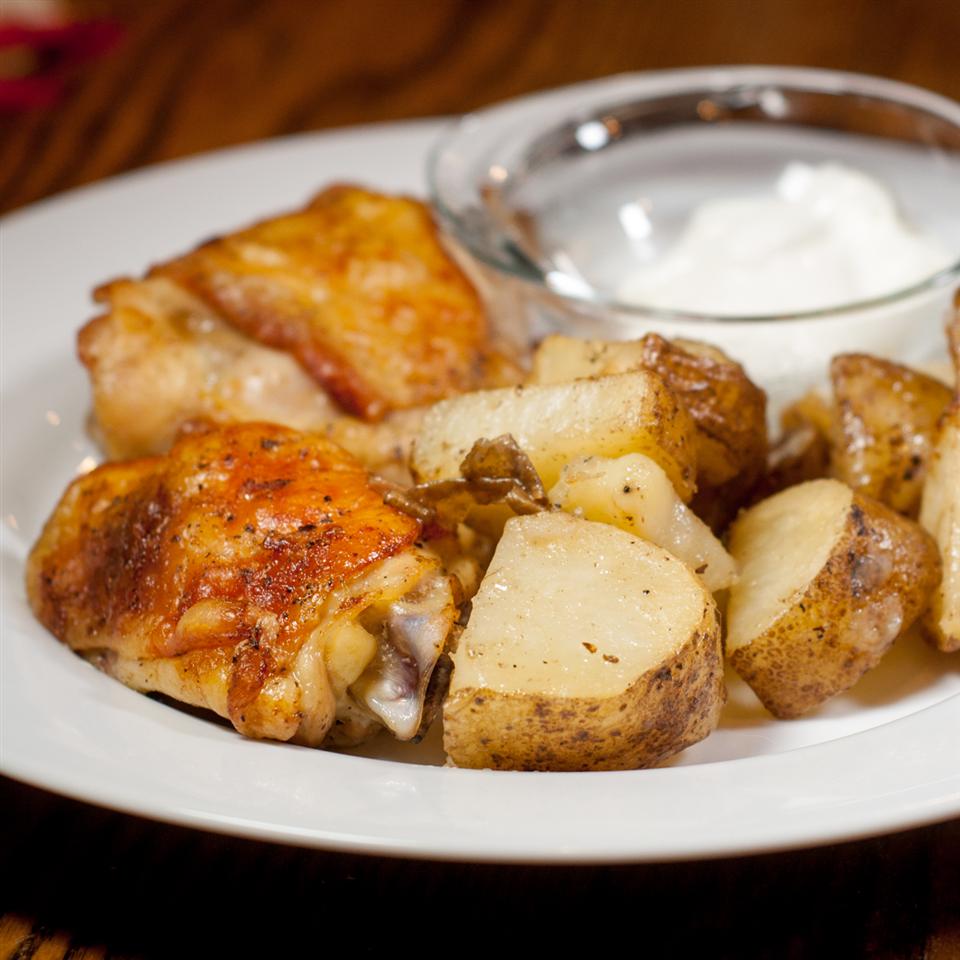
For so many years I have been making this recipe, I can’t remember where I got it. You throw together very quickly. My husband ‘discovered’ after fixing several times that the garlic was supposed to be spread across the chicken .. Now, she’s one of his favorites. You have to change this recipe up or down very easily. Make sure that your pan is large enough if it is adjusted. Usually, since we like them, I add more potatoes. A mixed salad is used for serving.

Preparation time: 20 minutes
Cooking time: 1 hour
Serves: 8

Ingredients:

¼ cup butter

6 chicken leg quarters (divided into drumsticks and thighs)

6 Yukon Gold potatoes (large), cut into chunks

24 cloves garlic, unpeeled

salt and ground black pepper to taste

¼ cup maple syrup

Directions:

Preheat oven at about 200 ° C (400 ° F). Preheat oven.

In a roasting pot, put the butter and melt in the oven. When the butter melts, swirl the bottom of the roast pan to coat, and put into the chicken batters in the bowl, thighs, potatoes, and unpeeled garlic clove. Turn the chicken, potatoes, and garlic to coat with butter. Sprinkle with salt and black pepper.

Bake in the preheated oven so that the chicken is not pink anymore inside it and the juices are smooth, about 40 minutes, with the pan dripping 3 times. Brush the chick pieces with maple syrup and stir the spoon over the potatoes.

Bake in the oven for about 20 more minutes until chicken and potatoes are browned. In a thick part of a thigh, an instant-read thermometer should read at least 165 F (74 C). Squeeze garlic from the baked cloves and spread the soft garlic on the chicken. In the chicken and potatoes, pour pan juices.

Tip:

The aluminum foil can be used to maintain moist food, to cook food evenly, and to facilitate cleaning.

Garlic Roasted Chicken and Potatoes

Rebecca For so many years I have been making this recipe, I can’t remember where I got it. You throw together very quickly. My husband ‘discovered’ after fixing several times that… Main Dish Recipes Garlic Roasted Chicken and Potatoes European Print This
Nutrition facts: 200 calories 20 grams fat
Rating: 5.0/5
( 1 voted )

Ingredients

  • ¼ cup butter
  • 6 chicken leg quarters (divided into drumsticks and thighs)
  • 6 Yukon Gold potatoes (large), cut into chunks
  • 24 cloves garlic, unpeeled
  • salt and ground black pepper to taste
  • ¼ cup maple syrup

Instructions

Preheat oven at about 200 ° C (400 ° F). Preheat oven.

In a roasting pot, put the butter and melt in the oven. When the butter melts, swirl the bottom of the roast pan to coat, and put into the chicken batters in the bowl, thighs, potatoes, and unpeeled garlic clove. Turn the chicken, potatoes, and garlic to coat with butter. Sprinkle with salt and black pepper.

Bake in the preheated oven so that the chicken is not pink anymore inside it and the juices are smooth, about 40 minutes, with the pan dripping 3 times. Brush the chick pieces with maple syrup and stir the spoon over the potatoes.

Bake in the oven for about 20 more minutes until chicken and potatoes are browned. In a thick part of a thigh, an instant-read thermometer should read at least 165 F (74 C). Squeeze garlic from the baked cloves and spread the soft garlic on the chicken. In the chicken and potatoes, pour pan juices.

Tip:

The aluminum foil can be used to maintain moist food, to cook food evenly, and to facilitate cleaning.

May 12, 2020 0 comment
0 FacebookTwitterPinterestEmail
Main Dish RecipesTips

3-Ingredient Apple Pie Cake-Mix Cake

by Rebecca May 12, 2020
written by Rebecca

This simple dessert is all you could expect from a traditional apple cake, but it needs only three elements — and much less work. When the cooking is finished, the candy and buttery cake-like cupboard welcome you. But dig through the top of your spoon and you will find a warm, tinged cinnamon apple. The lightly browned, slightly narrow top is contrasting to the cute saucy center so that this easy dessert can become another go-to. Just remember the vanilla ice cream scoop.

If you want to make a dessert fast and have very limited ingredients, it’s a perfect cake. The cake is cooked to have beautiful tender bits of apple. It is unbelievably simple because only 3 ingredients must be dumped into the oven. Like the pleasant apple crisp, it’s best served directly from your slow cooker or crockery. You can only eat this dump cake by yourself, or you can add ice cream, cream, or hot custard to the next level. They are all very good adds, but I prefer to have a delicious, slow-cooked dessert, personally with this unbelievable creamy vanilla bean ice cream.

Preparation time: 5 minutes
Cooking time: 40 minutes
Serves: 20

Ingredients:

2 (21 ounce) cans apple pie filling

1 (15.25 oz) package of yellow cake mix

½ cup butter, melted

Directions:

Preheat the oven at about 175 ° C (350 ° F).

Pour cake fill into a baking dish 9×13 “bowl. Sprinkle cake mix over the apple pie and melt the butter evenly.

Bake in the preheated oven for about 40 minutes before the top begins to turn brown. Set aside for 15 min to cool before serving.

Tip:

You can add some more flavor by adding nutmeg and cinnamon to your apple in cooking advice at the bottom of this page. This addition will lead to another but delicious spiced apple dump cake.

Keep all the remains as they are perfectly reheated to have a delicious cooked or dessert breakfast in the afternoon. Store them in a refrigerator or a freezer. It should last approximately a week before you have to be thrown out when you store in the fridge.

3-Ingredient Apple Pie Cake-Mix Cake

Rebecca This simple dessert is all you could expect from a traditional apple cake, but it needs only three elements — and much less work. When the cooking is finished, the… Main Dish Recipes 3-Ingredient Apple Pie Cake-Mix Cake European Print This
Nutrition facts: 200 calories 20 grams fat
Rating: 3.4/5
( 19 voted )

Ingredients

  • 2 (21 ounce) cans apple pie filling
  • 1 (15.25 oz) package of yellow cake mix
  • ½ cup butter, melted

Instructions

Preheat the oven at about 175 ° C (350 ° F).

Pour cake fill into a baking dish 9x13 "bowl. Sprinkle cake mix over the apple pie and melt the butter evenly.

Bake in the preheated oven for about 40 minutes before the top begins to turn brown. Set aside for 15 min to cool before serving.

Tip:

You can add some more flavor by adding nutmeg and cinnamon to your apple in cooking advice at the bottom of this page. This addition will lead to another but delicious spiced apple dump cake.

Keep all the remains as they are perfectly reheated to have a delicious cooked or dessert breakfast in the afternoon. Store them in a refrigerator or a freezer. It should last approximately a week before you have to be thrown out when you store in the fridge.

May 12, 2020 0 comment
0 FacebookTwitterPinterestEmail
Newer Posts
Older Posts

Popular Posts

  • 1

    Crispy Crunchy Parmesan Potatoes

    March 21, 2020
  • 2

    CROCK POT SMOTHERED PORK CHOPS

    March 21, 2020
  • Facebook
  • Twitter

@2019 - All Right Reserved.


Back To Top