Cook it once
  • Home
  • Privacy Policy
  • Recipes
    • KETO
    • LC
    • WW
  • Tips
  • Contact
Cook it once
  • Home
  • Privacy Policy
  • Recipes
    • KETO
    • LC
    • WW
  • Tips
  • Contact
Monthly Archives

April 2020

Main Dish Recipes

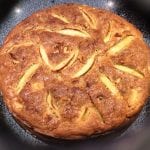
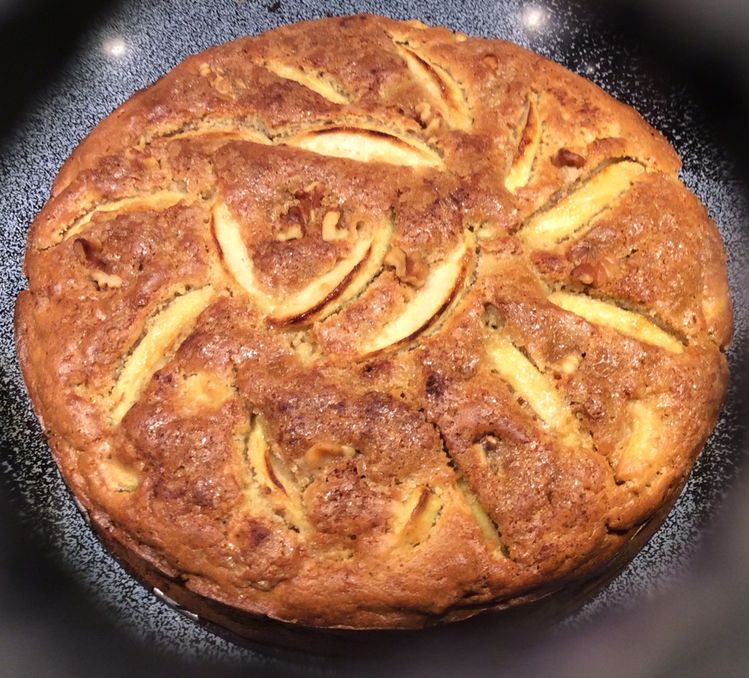
One Bowl Apple Cake

by Rebecca April 24, 2020
written by Rebecca

This One Bowl Apple Cake is very easy to make. A delicious dish in a nutshell. So prepare yourself for an amazing treat that your family will absolutely love!

In a world where most people rely on fast food chains for their day-to-day meals, it is frustrating to prepare something because of our busy schedule. Well, I have recently learned one dish that not only is simple but enjoyed by my kids. It will only take you about an hour to prepare and you can do this in between preparing for work and attending to your kid’s needs. The best thing about this dish is that you will only be needing one bowl to mix all the ingredients that are not difficult to buy and I bet you already have in your home.

Time to make something that is not only easy and hassle-free but your family and friends will also enjoy! So, let us start cooking!

Ingredients

2 eggs

1 3/4 cup of sugar

2 tsp cinnamon

1/2 cup oil

6 medium gala or fuji or honey crisp apples

2 cups of flour

2 tsp baking soda

How to make One Bowl Apple Cake

Step 1: Ready the oven. Preheat to 350 degrees.

Step 2: Mix the eggs, sugar, cinnamon, and oil in a large bowl.

Step 3: Wash the Apples. Peel and slice it into cubes. Finally, add the apples in the mixture. Make sure to coat evenly to keep apples from turning brown.

Step 4: Mix thoroughly the baking soda and flour and add it in the same bowl with all the other ingredients.

Step 5: For best result, use fork in mixing until the soaked ingredients absorbed all of the flour.

Step 6: To avoid burning, grease a one 9 x 13 or two 9-inches round pans. Pour the mixture.

Step 7: Now, you are ready to bake. Set the time for approximately 55 minutes.
One Bowl Apple Cake

Rebecca This One Bowl Apple Cake is very easy to make. A delicious dish in a nutshell. So prepare yourself for an amazing treat that your family will absolutely love! In… Main Dish Recipes One Bowl Apple Cake European Print This
Nutrition facts: 200 calories 20 grams fat
Rating: 4.3/5
( 3 voted )

Ingredients

  • 2 eggs
  • 1 3/4 cup of sugar
  • 2 tsp cinnamon
  • 1/2 cup oil
  • 6 medium gala or fuji or honey crisp apples
  • 2 cups of flour
  • 2 tsp baking soda

Instructions

Step 1: Ready the oven. Preheat to 350 degrees.

Step 2: Mix the eggs, sugar, cinnamon, and oil in a large bowl.

Step 3: Wash the Apples. Peel and slice it into cubes. Finally, add the apples in the mixture. Make sure to coat evenly to keep apples from turning brown.

Step 4: Mix thoroughly the baking soda and flour and add it in the same bowl with all the other ingredients.

Step 5: For best result, use fork in mixing until the soaked ingredients absorbed all of the flour.

Step 6: To avoid burning, grease a one 9 x 13 or two 9-inches round pans. Pour the mixture.

Step 7: Now, you are ready to bake. Set the time for approximately 55 minutes.
April 24, 2020 0 comment
1 FacebookTwitterPinterestEmail
Main Dish Recipes

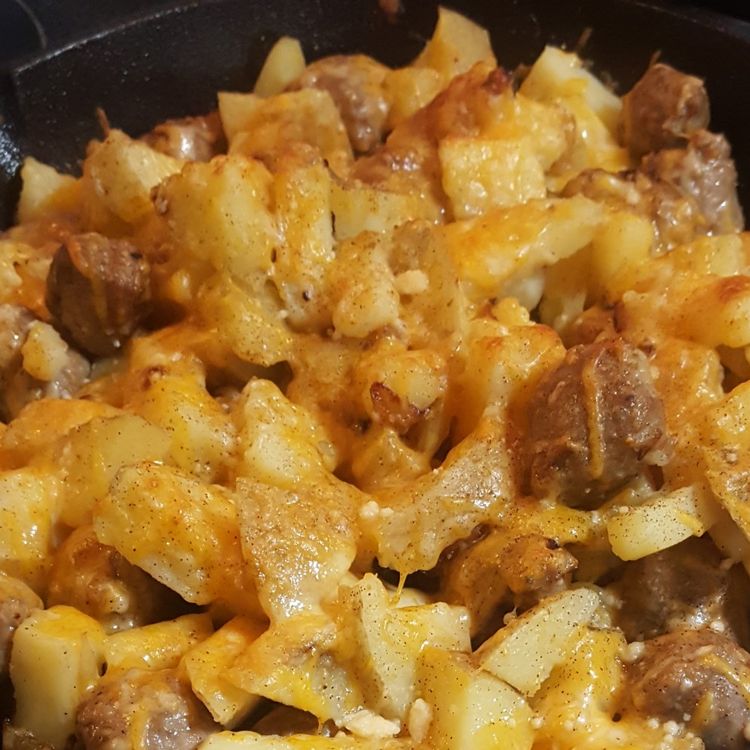
CHEESY SMOKED SAUSAGE AND POTATO CASSEROLE

by Rebecca April 24, 2020
written by Rebecca

Another all-time favourite! Meat and potatoes are a delicious combination that everybody loves. You can serve this for breakfast, lunch, brunch, or dinner! An inexpensive and very easy dish to make.

This Cheesy Smoked Sausage and Potato Casserole is so mouthwatering and is packed with flavours. Perfect for just any occasion and will surely be a crowd-pleaser. With every bite, you get both of the smoky sausages for a salty and meaty flavour and the sweetness of the potatoes.

Why wait for a special occasion if you can try this today! Wear that chef mask on and let’s get cooking.

Ingredients

3 cups potatoes, peeled, boiled and cubed

1 lb skinless smoked sausage

4 Tbsp butter

4 Tbsp flour

2 cups of milk

1/2 tsp salt

1/4 tsp pepper

1/8 tsp paprika

1/2 lb Velveeta cheese cubed

1/2 cup shredded cheddar cheese

How to Make Cheesy Smoked Sausage and Potato Casserole

Step 1: First, we want to cut the skinless smoked sausage in half, then lengthwise. Chop into 1/2 inches pieces.

Step 2: Then, cook skinless smoked sausage in a frying pan for about 15 minutes while turning regularly until slightly brown.

Step 3: Ready the oven. Preheat it to 350 degrees F.

Step 4: Wash potatoes. Boil and let it cool. Peel them after and cut potatoes into cubes.

Step 5: Place potato cubes in a 2-quart casserole.

Step 6: Add cooked skinless smoked sausage and toss gently.

Step 7: Over medium heat, mix the remaining ingredients; butter, flour, milk, salt, Velveeta cheese cubes in a saucepan while stirring constantly until warm, melted, and smooth.

Step 8: Pour the cheese sauce over potatoes and meat.

Step 9: Sprinkle shredded cheddar cheese on top of the casserole. And then, sprinkle paprika evenly over the top as well.

Step 10: Finally, bake the casserole for 35-45 minutes until the top is golden brown.

Step 11: Once done, get it out from the oven.

Step 12: Serve and enjoy!

CHEESY SMOKED SAUSAGE AND POTATO CASSEROLE

Rebecca Another all-time favourite! Meat and potatoes are a delicious combination that everybody loves. You can serve this for breakfast, lunch, brunch, or dinner! An inexpensive and very easy dish to… Main Dish Recipes CHEESY SMOKED SAUSAGE AND POTATO CASSEROLE European Print This
Nutrition facts: 200 calories 20 grams fat
Rating: 5.0/5
( 1 voted )

Ingredients

  • 3 cups potatoes, peeled, boiled and cubed
  • 1 lb skinless smoked sausage
  • 4 Tbsp butter
  • 4 Tbsp flour
  • 2 cups of milk
  • 1/2 tsp salt
  • 1/4 tsp pepper
  • 1/8 tsp paprika
  • 1/2 lb Velveeta cheese cubed
  • 1/2 cup shredded cheddar cheese

Instructions

Step 1: First, we want to cut the skinless smoked sausage in half, then lengthwise. Chop into 1/2 inches pieces.

Step 2: Then, cook skinless smoked sausage in a frying pan for about 15 minutes while turning regularly until slightly brown.

Step 3: Ready the oven. Preheat it to 350 degrees F.

Step 4: Wash potatoes. Boil and let it cool. Peel them after and cut potatoes into cubes.

Step 5: Place potato cubes in a 2-quart casserole.

Step 6: Add cooked skinless smoked sausage and toss gently.

Step 7: Over medium heat, mix the remaining ingredients; butter, flour, milk, salt, Velveeta cheese cubes in a saucepan while stirring constantly until warm, melted, and smooth.

Step 8: Pour the cheese sauce over potatoes and meat.

Step 9: Sprinkle shredded cheddar cheese on top of the casserole. And then, sprinkle paprika evenly over the top as well.

Step 10: Finally, bake the casserole for 35-45 minutes until the top is golden brown.

Step 11: Once done, get it out from the oven.

Step 12: Serve and enjoy!

April 24, 2020 0 comment
0 FacebookTwitterPinterestEmail
Main Dish Recipes

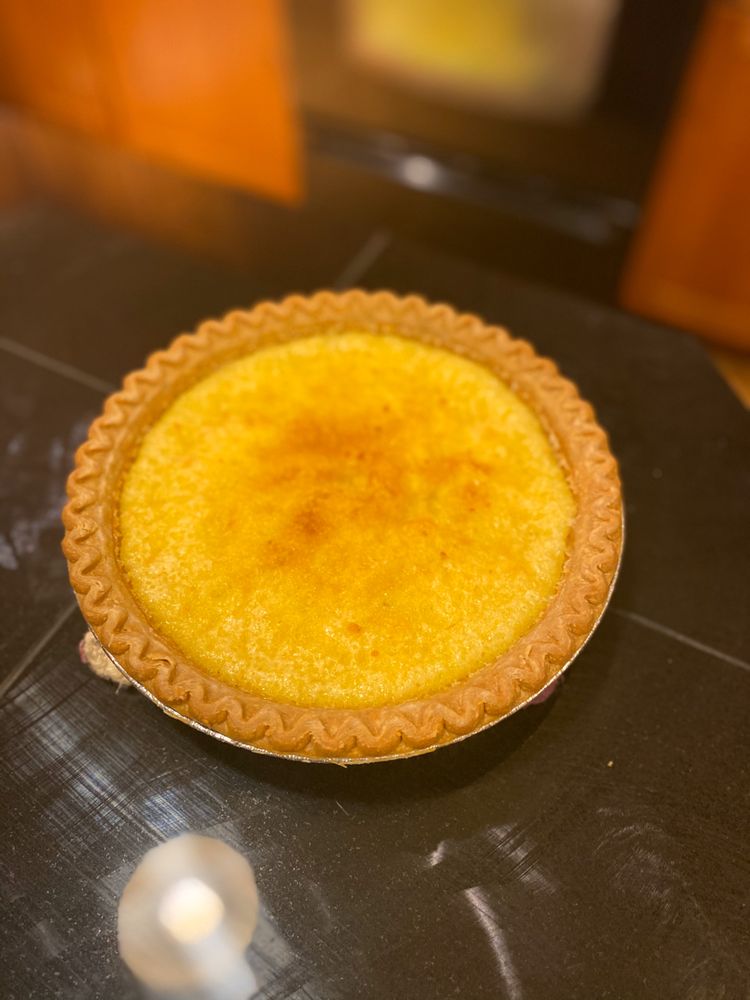
Buttermilk Pie

by Rebecca April 24, 2020
written by Rebecca

Many confuse Buttermilk pie with cheese pie but this custard-like pie is unique in its way. With just a few key ingredients, mixed wonderfully together, you can create your next family’s favourite!

This recipe is a very simple and delightful dish that is very easy to make and pleases your taste buds. I remember craving it when I was pregnant, my husband found some leftover pie shell and buttermilk in the fridge. He was so into it and I must admit it was so good! He was very proud and I was feeling superb. Cravings satisfied!

Ingredients

1 3/4 cup sugar

1 stick unsalted butter, room temperature

3 large eggs

1/4 tsp vanilla extract

3 Tbsp all-purpose flour

pinch of salt

1 cup buttermilk

1 9-inches unbaked pie crust

How to Make Buttermilk Pie

Mix sugar and butter until well blended. Make sure not to over-mixed because butter and sugar may separate. If well blended, it will give you a fluffy light yellow mix consistency.

Beat eggs one at a time until the mixture is smooth and nice.

Add 1/4 tsp vanilla extract, salt, and flour.

Mix in the buttermilk until thoroughly combined.

Prepare a baking sheet with foil. The foil will catch any overflow.

Place the pie shell on the prepared baking sheet.

Fill in the pie sheet with the buttermilk mixture just until the top of the sheet.

Pour any remaining mixture into an ungreased custard cup.

Preheat oven to 300 degrees.

Bake pie for an hour and ten minutes. The pie should turn a nice golden brown. It is done when a knife inserted comes out clean.

Finally, remove the baked pie from the oven and let it set just until almost cooled.

Buttermilk Pie is best to serve when it is just still warm.

You can store any leftover Buttermilk Pie in the fridge. Only if there is any left!

Buttermilk Pie

Rebecca Many confuse Buttermilk pie with cheese pie but this custard-like pie is unique in its way. With just a few key ingredients, mixed wonderfully together, you can create your next… Main Dish Recipes Buttermilk Pie European Print This
Nutrition facts: 200 calories 20 grams fat
Rating: 5.0/5
( 1 voted )

Ingredients

  • 1 3/4 cup sugar
  • 1 stick unsalted butter, room temperature
  • 3 large eggs
  • 1/4 tsp vanilla extract
  • 3 Tbsp all-purpose flour
  • pinch of salt
  • 1 cup buttermilk
  • 1 9-inches unbaked pie crust

Instructions

Mix sugar and butter until well blended. Make sure not to over-mixed because butter and sugar may separate. If well blended, it will give you a fluffy light yellow mix consistency.

Beat eggs one at a time until the mixture is smooth and nice.

Add 1/4 tsp vanilla extract, salt, and flour.

Mix in the buttermilk until thoroughly combined.

Prepare a baking sheet with foil. The foil will catch any overflow.

Place the pie shell on the prepared baking sheet.

Fill in the pie sheet with the buttermilk mixture just until the top of the sheet.

Pour any remaining mixture into an ungreased custard cup.

Preheat oven to 300 degrees.

Bake pie for an hour and ten minutes. The pie should turn a nice golden brown. It is done when a knife inserted comes out clean.

Finally, remove the baked pie from the oven and let it set just until almost cooled.

Buttermilk Pie is best to serve when it is just still warm.

You can store any leftover Buttermilk Pie in the fridge. Only if there is any left!

April 24, 2020 0 comment
0 FacebookTwitterPinterestEmail
Main Dish Recipes

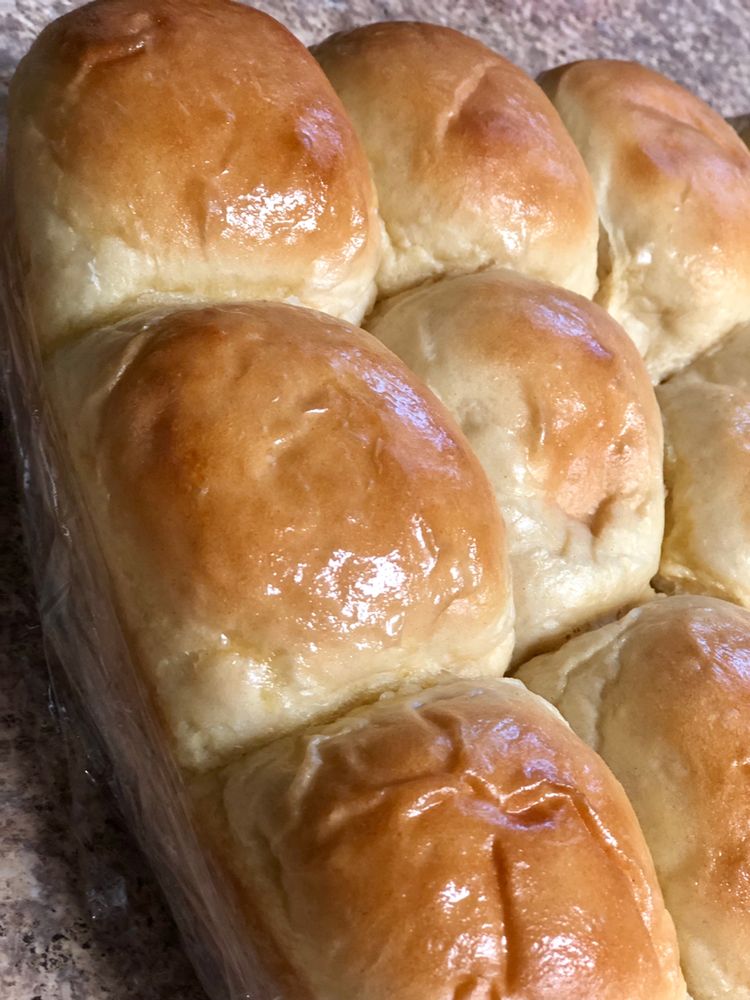
Old-Fashioned Soft and Buttery Yeast Rolls

by Rebecca April 24, 2020
written by Rebecca

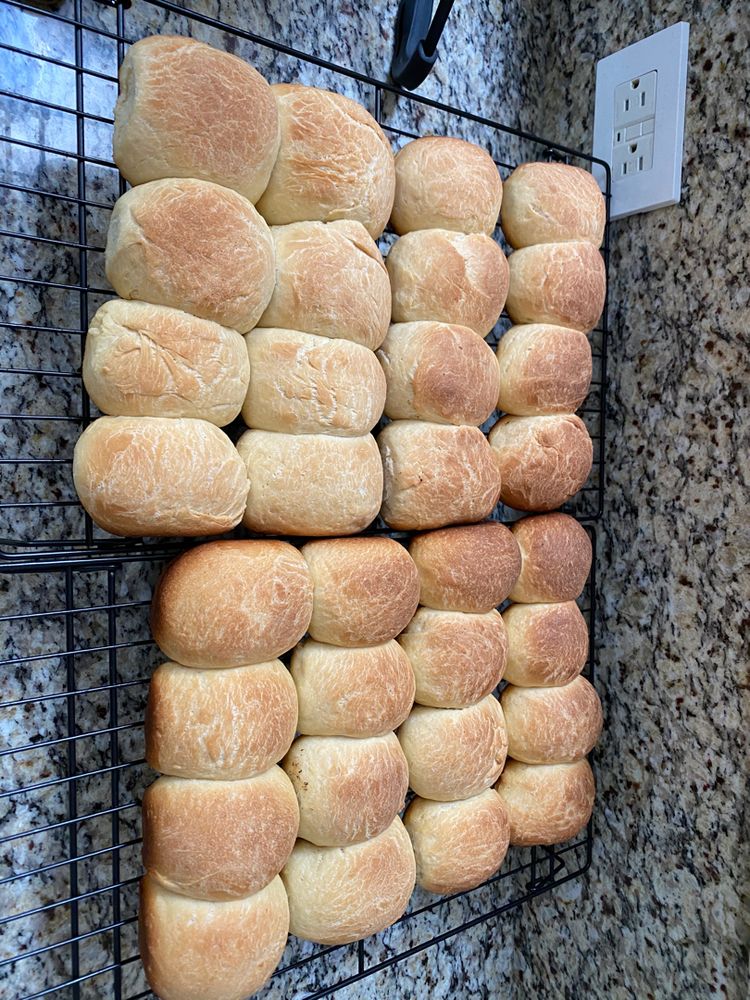
The aroma of freshly baked bread is so irresistible. This Old-Fashioned Soft and Buttery Yeast Rolls are simple enough to prepare. They are super soft and melts in your mouth.

Ingredients

1 pkg active dry yeast (equals 2 1/4 tsp)

1/4 c warm water

1/3 c white, granulated sugar

1/4 c butter, softened

1 tsp salt

1 c hot milk

1 egg, lightly beaten

4 1/2 c sifted all-purpose flour

2 Tbsp butter, melted (for brushing rolls)

How to Make Old-Fashioned Soft and Buttery Yeast Rolls

In a large bowl, pour in hot water and sprinkle yeast over. Stir until dissolved. Leave to foam for about 10 minutes.

Add sugar, 1/4 cup butter and salt to hot milk. Keep stirring until sugar is dissolved and butter is melted. Cool mixture to 105 to 115 degrees.

Pour milk mixture to yeast and add the egg. Beat 4 cups of flour, 1 cup at a time, to form a soft dough. Use some of the remaining flour to dust a pastry cloth.

You will need to knead the dough lightly for 5 minutes. Use remaining flour for flouring pastry cloth and your hands.

Place dough in a warm, buttered bowl. Turn greased side up. Cover and put in a warm place. Let it rise until about 1 1/4 to 1 1/2 hours.

Lightly floured pastry cloth. Punch dough down and knead for 4 to 5 minutes. The dough is sticky, but make sure to use just a little flour as possible for flouring, otherwise, rolls will not be as feathery light as they should be.

Use a large knife to cut dough into 4 pieces. Then, cut each piece into small pieces, roll into round balls, about 1 3/4 inches in diameter. While rolling, pull sides down and under to shape the roll. Place the bottom side down in neat rows in a well-buttered 13 X 9 X 2-inch pan.

Cover rolls and allow to rise for about 30-45 minutes or until doubled in bulk. Then, brush the top with melted butter.

Bake in a 375 degree F oven for 18 to 20 minutes or until nicely browned. Depends on your oven, you can adjust the oven temperature accordingly.

For a buttery soft crust, you can brush rolls with more butter while they are hot. The butter will sizzle down, side and bottom.

Old-Fashioned Soft and Buttery Yeast Rolls

Rebecca The aroma of freshly baked bread is so irresistible. This Old-Fashioned Soft and Buttery Yeast Rolls are simple enough to prepare. They are super soft and melts in your mouth.… Main Dish Recipes Old-Fashioned Soft and Buttery Yeast Rolls European Print This
Nutrition facts: 200 calories 20 grams fat
Rating: 5.0/5
( 2 voted )

Ingredients

  • 1 pkg active dry yeast (equals 2 1/4 tsp)
  • 1/4 c warm water
  • 1/3 c white, granulated sugar
  • 1/4 c butter, softened
  • 1 tsp salt
  • 1 c hot milk
  • 1 egg, lightly beaten
  • 4 1/2 c sifted all-purpose flour
  • 2 Tbsp butter, melted (for brushing rolls)

Instructions

In a large bowl, pour in hot water and sprinkle yeast over. Stir until dissolved. Leave to foam for about 10 minutes.

Add sugar, 1/4 cup butter and salt to hot milk. Keep stirring until sugar is dissolved and butter is melted. Cool mixture to 105 to 115 degrees.

Pour milk mixture to yeast and add the egg. Beat 4 cups of flour, 1 cup at a time, to form a soft dough. Use some of the remaining flour to dust a pastry cloth.

You will need to knead the dough lightly for 5 minutes. Use remaining flour for flouring pastry cloth and your hands.

Place dough in a warm, buttered bowl. Turn greased side up. Cover and put in a warm place. Let it rise until about 1 1/4 to 1 1/2 hours.

Lightly floured pastry cloth. Punch dough down and knead for 4 to 5 minutes. The dough is sticky, but make sure to use just a little flour as possible for flouring, otherwise, rolls will not be as feathery light as they should be.

Use a large knife to cut dough into 4 pieces. Then, cut each piece into small pieces, roll into round balls, about 1 3/4 inches in diameter. While rolling, pull sides down and under to shape the roll. Place the bottom side down in neat rows in a well-buttered 13 X 9 X 2-inch pan.

Cover rolls and allow to rise for about 30-45 minutes or until doubled in bulk. Then, brush the top with melted butter.

Bake in a 375 degree F oven for 18 to 20 minutes or until nicely browned. Depends on your oven, you can adjust the oven temperature accordingly.

For a buttery soft crust, you can brush rolls with more butter while they are hot. The butter will sizzle down, side and bottom.

April 24, 2020 0 comment
0 FacebookTwitterPinterestEmail
Main Dish Recipes

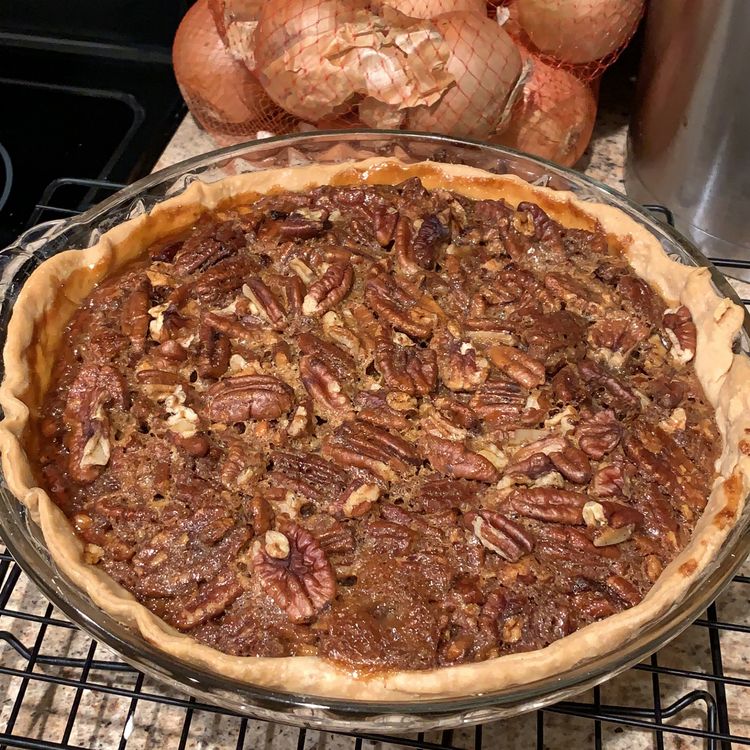
Easy Pecan Pie

by Rebecca April 24, 2020
written by Rebecca

A slice of pie is happiness! Make your own and put a smile on everybody’s face. This Pecan Pie is very easy to make. Make one for Thanksgiving, for any special occasions, or even on an ordinary day. This pecan pie not only will take your worries away but it is heavenly good to keep you in a satisfying mood all day!

This is my grandma’s favourite, so when she’s feeling stress, I always surprise her with my homemade Pecan Pie and her mood easily lights up! This Pecan Pie is a well-proven pick me up dessert. This can also be a great gift, for that office worker that is always stress. Or for your mom, to remind her of you. Believe me when I say that you will enjoy this recipe as much as I do!

Ingredients

1 c Karo light corn syrup

1 c sugar

3 eggs, well beaten

2 Tbsp butter, melted

1 tsp pure vanilla extract

1 1/2 c pecan halves

1 9 inches, deep-dish frozen pie crust

How to Make Easy Pecan Pie

Step 1: Preheat oven to 350 degrees.

Step 2: While preheating, place the cookie sheet in the oven.

Step 3: Using a spoon, mix corn syrup, eggs, sugar, butter, and vanilla together.

Step 4: Once all ingredients above are mixed well together, you can then add in the pecans and give it a good stir.

Step 5: Carefully and evenly pour filling into the frozen pie crust.

Step 6: Place pie on the baking sheet. Put inside the centre of the oven and bake for 60-70 minutes.

Step 7: To check if the pie is done, lightly tap the centre surface of the pie. It springs back then you know it is done.

Step 8: Don’t forget to check if the pie crust is over-browning. If so, you can cover edges with foil.

Step 9: Once your pie is done. Remove from the oven and cool it first on a wire rack for 2 hours before serving.

Easy Pecan Pie

Rebecca A slice of pie is happiness! Make your own and put a smile on everybody’s face. This Pecan Pie is very easy to make. Make one for Thanksgiving, for any… Main Dish Recipes Easy Pecan Pie European Print This
Nutrition facts: 200 calories 20 grams fat
Rating: 5.0/5
( 1 voted )

Ingredients

  • 1 c Karo light corn syrup
  • 1 c sugar
  • 3 eggs, well beaten
  • 2 Tbsp butter, melted
  • 1 tsp pure vanilla extract
  • 1 1/2 c pecan halves
  • 1 9 inches, deep-dish frozen pie crust

Instructions

Step 1: Preheat oven to 350 degrees.

Step 2: While preheating, place the cookie sheet in the oven.

Step 3: Using a spoon, mix corn syrup, eggs, sugar, butter, and vanilla together.

Step 4: Once all ingredients above are mixed well together, you can then add in the pecans and give it a good stir.

Step 5: Carefully and evenly pour filling into the frozen pie crust.

Step 6: Place pie on the baking sheet. Put inside the centre of the oven and bake for 60-70 minutes.

Step 7: To check if the pie is done, lightly tap the centre surface of the pie. It springs back then you know it is done.

Step 8: Don't forget to check if the pie crust is over-browning. If so, you can cover edges with foil.

Step 9: Once your pie is done. Remove from the oven and cool it first on a wire rack for 2 hours before serving.

April 24, 2020 0 comment
0 FacebookTwitterPinterestEmail
Main Dish Recipes

Homemade King Hawaiian Rolls or Loaf

by Rebecca April 24, 2020
written by Rebecca

I have been thinking of making homemade bread and since pineapple is my favourite I thought this would be perfect. Homemade King Hawaiian Rolls or Loaf is fairly easy to make but the result is surprisingly good! My family can’t get enough of it. It is sweet and rich in flavour. The roll is buttery and fluffy. And if making a loaf, it’ll be the perfect grilled cheese or french toast.

Ingredients:

6 cups all-purpose flour, divided in half; plus an additional 1/2 cup flour

3 large eggs

2 cups pineapple juice, room temperature

3/4 cup sugar or Splenda

1 tsp vanilla extract

2 pkg yeast (.25 oz each)

1/2 cup butter, melted (8 Tbsp)

How to Make Homemade King Hawaiian Rolls or Loaf:

In a small bowl, beat eggs.

Add the pineapple juice, sugar, vanilla extract, and melted butter. Mix well.

In a large bowl, put 3 cups flour.

Stir in egg mixture until well combined.

One at a time, sprinkle in yeast packets while constantly mixing.

Now, add the remaining 3 cups flour and mix all together. You can use your hands to mix just to make sure all of the flour is well incorporated.

The dough should tacky or sticky but not too sticky. If the dough is too wet, sprinkle in a bit extra flour but just a tablespoon or so at a time.

Cover bowl with a clean kitchen towel. Set in a warm place for 1 hour to rise.

After 1 hour, remove dough from the bowl. Knead in an additional 1/2 cup of flour. You can knead for maybe 10-15 times, making sure flour is incorporated well.

Form dough into rolls or loaf. Place them in buttered pans.

Cover dough and place in a warm place to rise until dough doubles in size. If making rolls, let rise for 1 hour and for loaves, for about 90 minutes.

Bake for 25 to 30 minutes at 350 degrees or until golden brown.

Finally, brush the top with melted butter. Best serve when warm.

Homemade King Hawaiian Rolls or Loaf

Rebecca I have been thinking of making homemade bread and since pineapple is my favourite I thought this would be perfect. Homemade King Hawaiian Rolls or Loaf is fairly easy to… Main Dish Recipes Homemade King Hawaiian Rolls or Loaf European Print This
Nutrition facts: 200 calories 20 grams fat
Rating: 5.0/5
( 1 voted )

Ingredients

  • 6 cups all-purpose flour, divided in half; plus an additional 1/2 cup flour
  • 3 large eggs
  • 2 cups pineapple juice, room temperature
  • 3/4 cup sugar or Splenda
  • 1 tsp vanilla extract
  • 2 pkg yeast (.25 oz each)
  • 1/2 cup butter, melted (8 Tbsp)

Instructions

In a small bowl, beat eggs.

Add the pineapple juice, sugar, vanilla extract, and melted butter. Mix well.

In a large bowl, put 3 cups flour.

Stir in egg mixture until well combined.

One at a time, sprinkle in yeast packets while constantly mixing.

Now, add the remaining 3 cups flour and mix all together. You can use your hands to mix just to make sure all of the flour is well incorporated.

The dough should tacky or sticky but not too sticky. If the dough is too wet, sprinkle in a bit extra flour but just a tablespoon or so at a time.

Cover bowl with a clean kitchen towel. Set in a warm place for 1 hour to rise.

After 1 hour, remove dough from the bowl. Knead in an additional 1/2 cup of flour. You can knead for maybe 10-15 times, making sure flour is incorporated well.

Form dough into rolls or loaf. Place them in buttered pans.

Cover dough and place in a warm place to rise until dough doubles in size. If making rolls, let rise for 1 hour and for loaves, for about 90 minutes.

Bake for 25 to 30 minutes at 350 degrees or until golden brown.

Finally, brush the top with melted butter. Best serve when warm.

April 24, 2020 0 comment
0 FacebookTwitterPinterestEmail
Main Dish Recipes

Apple Fritters Made Easy

by Rebecca April 24, 2020
written by Rebecca

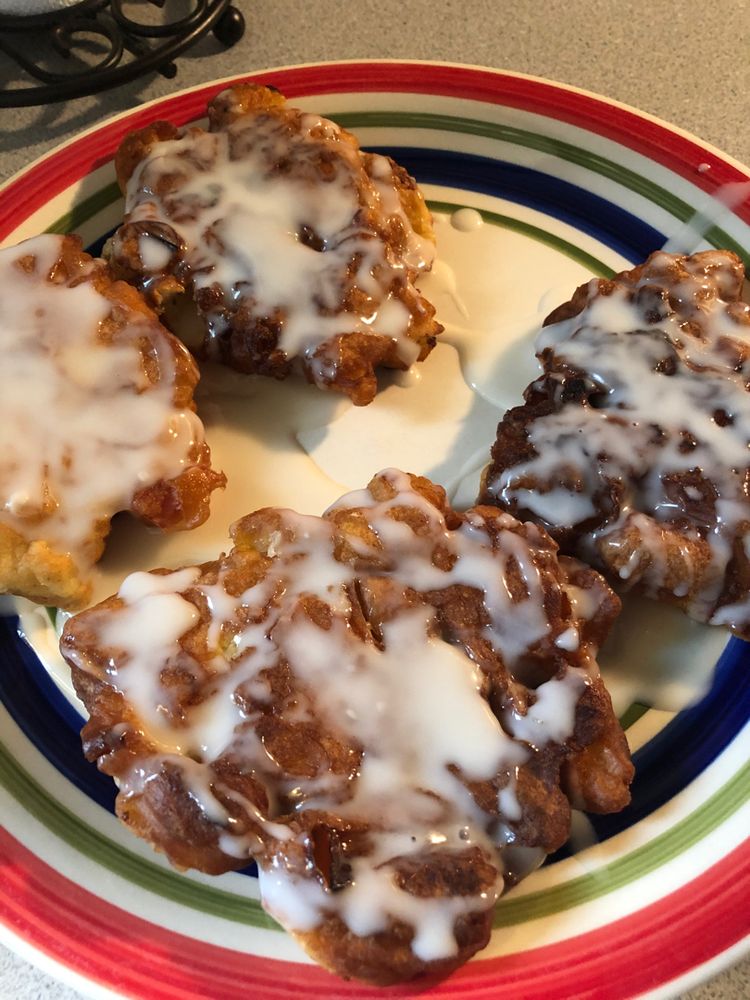
Looking for something that can curb your sweet cravings? Try this very simple but oooh so delicious Apple Fritters. You will love making these, the steps are easy to follow, all you need to do is just mix all the ingredients together then cook and viola! Your very own homemade Apple Fritters with fresh apples! And don’t forget, an apple a day keeps the doctor away… So this I think is also a guilt-free snack, although it is sweet, still, there are fresh apples used. Try this today and remember this is best served warm. Enjoy!

Ingredients:

1 cup all-purpose flour

1/4 cup sugar

3/4 teaspoon salt

1 1/2 teaspoons baking powder

1 teaspoon cinnamon

1/3 cup milk

1 egg

1 cup chopped apple

Glaze:

2 cups powdered sugar

1 1/2 tablespoons milk

Step by step instruction:

Step 1: Wash and chop apples into cubes. In a bowl, combine flour, sugar, salt, baking powder, cinnamon. Stir in milk and egg. Continue to stir until just combined. Finally, add the chopped apples. Make sure all ingredients are mix well together.

Step 2: In a skillet, pour in approximately 1 1/2 deep oil. Heat to 350 F. To make sure oil is ready, throw a little dough and when it floats on top you’re all set.

Step 3: One at a time, carefully add a tablespoon of dough in oil. Cook dough until brown or for about 2 minutes, then flip. Cook another side for another 1-2 minutes. Make sure both sides are browned.

Step 4: Once the dough is brown, transfer to paper towels just to adsorb excess oil then transfer to a cooling rack.

Step 5: To make the glaze, in a small bowl, stir in milk and powdered sugar together.

Step 6: Drizzle over apple fritters. Wait for about 3 minutes for glaze to harden, then flip fritter to the other side and drizzle as well.

Step 7: Apple fritters are best served warm. Enjoy!

Apple Fritters Made Easy

Rebecca Looking for something that can curb your sweet cravings? Try this very simple but oooh so delicious Apple Fritters. You will love making these, the steps are easy to follow,… Main Dish Recipes Apple Fritters Made Easy European Print This
Nutrition facts: 200 calories 20 grams fat
Rating: 5.0/5
( 1 voted )

Ingredients

  • 1 cup all-purpose flour
  • 1/4 cup sugar
  • 3/4 teaspoon salt
  • 1 1/2 teaspoons baking powder
  • 1 teaspoon cinnamon
  • 1/3 cup milk
  • 1 egg
  • 1 cup chopped apple
  • Glaze:
  • 2 cups powdered sugar
  • 1 1/2 tablespoons milk

Instructions

Step 1: Wash and chop apples into cubes. In a bowl, combine flour, sugar, salt, baking powder, cinnamon. Stir in milk and egg. Continue to stir until just combined. Finally, add the chopped apples. Make sure all ingredients are mix well together.

Step 2: In a skillet, pour in approximately 1 1/2 deep oil. Heat to 350 F. To make sure oil is ready, throw a little dough and when it floats on top you're all set.

Step 3: One at a time, carefully add a tablespoon of dough in oil. Cook dough until brown or for about 2 minutes, then flip. Cook another side for another 1-2 minutes. Make sure both sides are browned.

Step 4: Once the dough is brown, transfer to paper towels just to adsorb excess oil then transfer to a cooling rack.

Step 5: To make the glaze, in a small bowl, stir in milk and powdered sugar together.

Step 6: Drizzle over apple fritters. Wait for about 3 minutes for glaze to harden, then flip fritter to the other side and drizzle as well.

Step 7: Apple fritters are best served warm. Enjoy!

April 24, 2020 0 comment
1 FacebookTwitterPinterestEmail
Main Dish Recipes

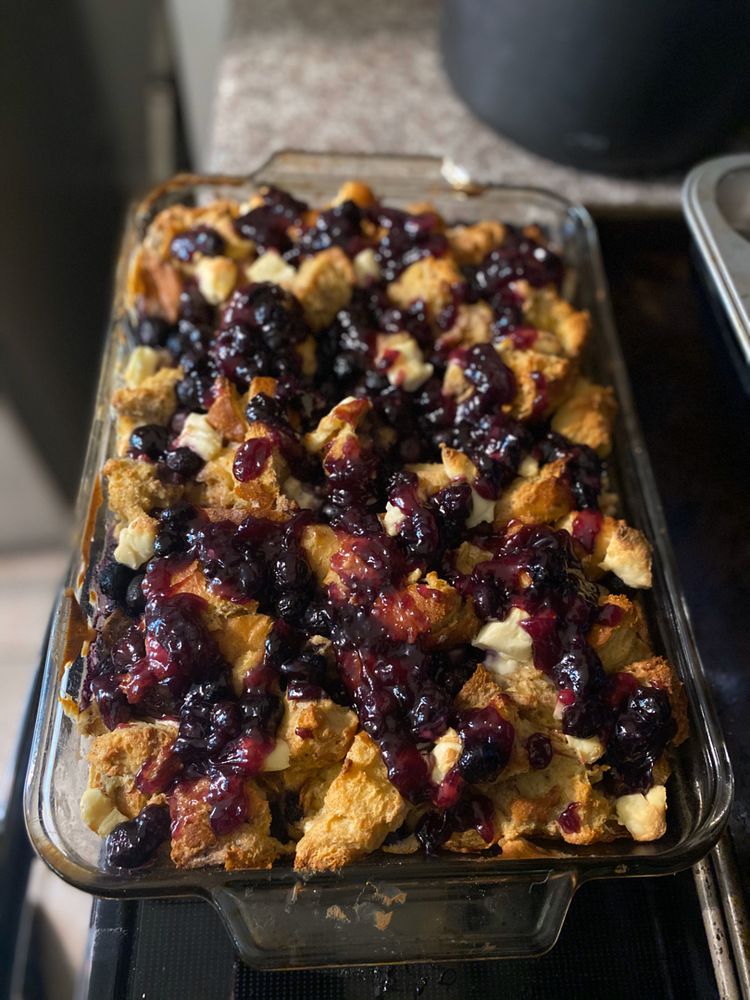
Blueberry Cream Cheese Filled French Toast Casserole

by Rebecca April 24, 2020
written by Rebecca

Good things come to those who wait. This is so true when preparing this extraordinary dessert? Well, it is a breakfast, dessert, brunch altogether! Everything should be prepared one night before and baked in the morning of the next day. Great for if you are planning for a special occasion. This Blueberry Cream Cheese Filled French Toast Casserole is something to brag about.

Ingredients:

FRENCH TOAST

12 slices bread, any loaf of French breads

2 Packages cream cheese

1 cup of fresh or frozen blueberries

12 eggs (large)

1 cup of milk, you’ll need to add a little at a time until the bread absorbs the milk.

1/3 cups of honey or maple syrup.

BLUEBERRY SAUCE

1 c sugar

2 Tbsp corn starch

1 c water

1 c blueberries, fresh or frozen1 Tbsp butter

Steps to make Blueberry Cream Cheese Filled French Toast Casserole:

French Toast Casserole:

Spray a 9×13-inch dish with Pam. Arrange in order the bread cubes in the bottom of the dish.

Cut cream cheese into 1-inch cubes. Put all over the top of the bread. Pour 1 cup blueberries evenly over the top.

Combine the 12 large eggs, 1 cup milk, 1/3 cup maple syrup or honey in a mixing bowl. Pour mixture a little at a time until the bread soaks up the milk.

Make sure it is not soggy before you bake it because it will be soggy even after baking it. Then, cover it with foil and refrigerate overnight.

Blueberry Sauce:

Can be made ahead of time, just refrigerate. Before serving, heat sauce first.

In a saucepan, combine 1 cup sugar and 2 Tbsp corn starch. Add one cup of water and stir until smooth to make sure corn starch is not clumpy. Bring to boil and stir for 2-3 minutes until thickened.

Add 1 cup blueberries. Simmer for 8-10 minutes while occasionally stirring until some blueberries start to burst. Depends on how you like it, you may want to leave some blueberries whole.

Turn off heat. Mix 1 Tbsp butter in the blueberry sauce. Put in a plastic or glass container then refrigerate until ready to use.

The next day, take out the casserole from the refrigerator. Preheat oven to 350 degrees. Bake covered casserole in the oven for 30 minutes.

After 30 minutes, take out the casserole and remove cover. And then bake it again for another 25-30 minutes or until the top is golden brown and the center is set.

Heat the blueberry sauce in a microwave until warm and serve over top of casserole.

You can use jam or preserves of whatever flavor of fruit you want to use as an alternate sauce. Pour preserves in a small saucepan, add 1 Tbsp corn starch. Mix until smooth.

You can add fruits as well, but this step is optional. Warm until smooth and thickened. Serve over french toasts, ice cream, or anything else!

Blueberry Cream Cheese Filled French Toast Casserole

Rebecca Good things come to those who wait. This is so true when preparing this extraordinary dessert? Well, it is a breakfast, dessert, brunch altogether! Everything should be prepared one night… Main Dish Recipes Blueberry Cream Cheese Filled French Toast Casserole European Print This
Nutrition facts: 200 calories 20 grams fat
Rating: 5.0/5
( 2 voted )

Ingredients

  • FRENCH TOAST
  • 12 slices bread, any loaf of French breads
  • 2 Packages cream cheese
  • 1 cup of fresh or frozen blueberries
  • 12 eggs (large)
  • 1 cup of milk, you'll need to add a little at a time until the bread absorbs the milk.
  • 1/3 cups of honey or maple syrup.
  • BLUEBERRY SAUCE
  • 1 c sugar
  • 2 Tbsp corn starch
  • 1 c water
  • 1 c blueberries, fresh or frozen1 Tbsp butter

Instructions

French Toast Casserole:

Spray a 9x13-inch dish with Pam. Arrange in order the bread cubes in the bottom of the dish.

Cut cream cheese into 1-inch cubes. Put all over the top of the bread. Pour 1 cup blueberries evenly over the top.

Combine the 12 large eggs, 1 cup milk, 1/3 cup maple syrup or honey in a mixing bowl. Pour mixture a little at a time until the bread soaks up the milk.

Make sure it is not soggy before you bake it because it will be soggy even after baking it. Then, cover it with foil and refrigerate overnight.

Blueberry Sauce:

Can be made ahead of time, just refrigerate. Before serving, heat sauce first.

In a saucepan, combine 1 cup sugar and 2 Tbsp corn starch. Add one cup of water and stir until smooth to make sure corn starch is not clumpy. Bring to boil and stir for 2-3 minutes until thickened.

Add 1 cup blueberries. Simmer for 8-10 minutes while occasionally stirring until some blueberries start to burst. Depends on how you like it, you may want to leave some blueberries whole.

Turn off heat. Mix 1 Tbsp butter in the blueberry sauce. Put in a plastic or glass container then refrigerate until ready to use.

The next day, take out the casserole from the refrigerator. Preheat oven to 350 degrees. Bake covered casserole in the oven for 30 minutes.

After 30 minutes, take out the casserole and remove cover. And then bake it again for another 25-30 minutes or until the top is golden brown and the center is set.

Heat the blueberry sauce in a microwave until warm and serve over top of casserole.

You can use jam or preserves of whatever flavor of fruit you want to use as an alternate sauce. Pour preserves in a small saucepan, add 1 Tbsp corn starch. Mix until smooth.

You can add fruits as well, but this step is optional. Warm until smooth and thickened. Serve over french toasts, ice cream, or anything else!

April 24, 2020 0 comment
0 FacebookTwitterPinterestEmail
Main Dish Recipes

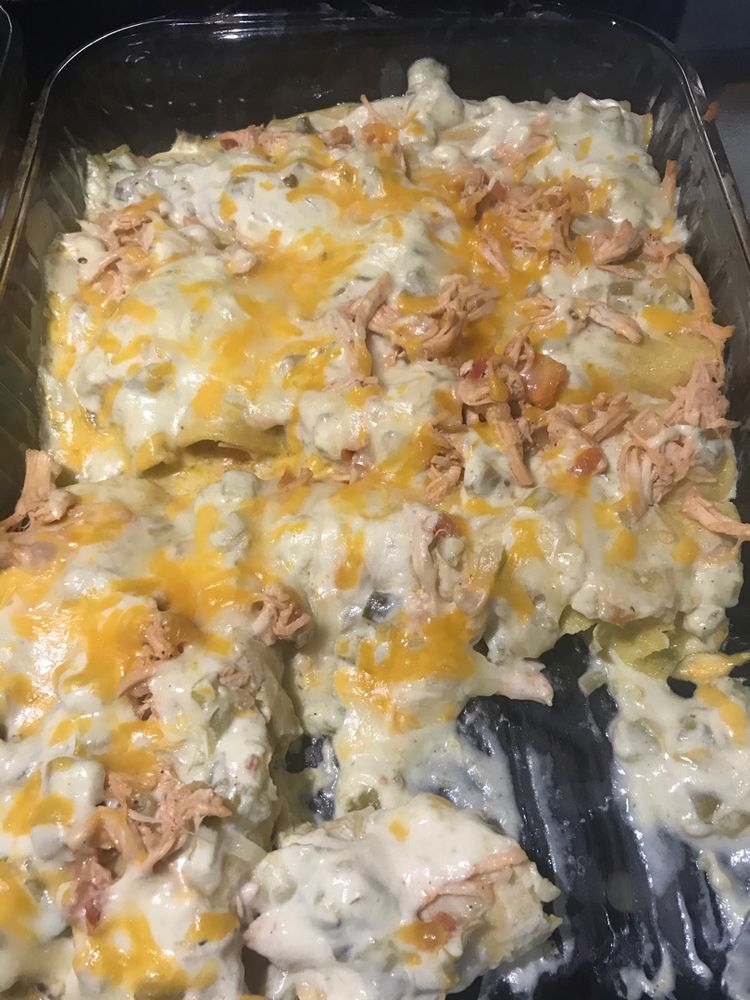
Easy to make Chicken Enchiladas with Sour Cream White Sauce

by Rebecca April 24, 2020
written by Rebecca

No sweat dish. Very easy to make, super yummy and everyone loves it! You can even add a little kick with some chilies. Or make your own version by adding extra ingredients like maybe chopped onions. And more white sauce on top and more cheese! This Chicken Enchiladas with Sour Cream White Sauce is a big hit, even for picky eaters. I remember, during every occasion or even on an ordinary day, this dish is always on the table. This casserole by far is the most requested!

Try it and I am sure that your family will enjoy it. And because it is very easy to make, children can even help. A great bonding time for parents and kids at home!

Ingredients:

10 small soft flour tortillas (you can use corn but I like flour with chicken)

3 tablespoons flour

2 cups chicken broth

1 cup sour cream

2 1/2 cups shredded and cooked chicken (we like to use rotisserie chicken)

3 cups Monterey Jack cheese – shredded

3 tablespoons butter

4oz can diced green chilies (I like medium – they are not spicy at all)

Directions:

Preheat oven to 350 degrees.

In a bowl, combine shredded chicken and 1 cup of cheese.

Fill tortillas with the combined shredded chicken and cheese mixture. Place them in a greased 9×13 pan.

Melt butter over medium heat.

Stir flour into the melted butter and whisk for 1 minute overheat.

Add the chicken broth and whisk together.

Cook over heat until thick and bubbles up.

Take off from the heat. Make sure that it is not too hot before adding the sour cream and chilies or else the sour cream will curdle.

Pour mixture over the enchiladas.

And of course, you can add the remaining cheese on top. (Don’t be afraid, the more cheese, the creamier!)

Bake for 20-23 minutes in a 350 degrees oven.

Then, you may want broil for another 3 minutes to brown the cheese.

Easy to make Chicken Enchiladas with Sour Cream White Sauce

Rebecca No sweat dish. Very easy to make, super yummy and everyone loves it! You can even add a little kick with some chilies. Or make your own version by adding… Main Dish Recipes Easy to make Chicken Enchiladas with Sour Cream White Sauce European Print This
Nutrition facts: 200 calories 20 grams fat
Rating: 5.0/5
( 2 voted )

Ingredients

  • 10 small soft flour tortillas (you can use corn but I like flour with chicken)
  • 3 tablespoons flour
  • 2 cups chicken broth
  • 1 cup sour cream
  • 2 1/2 cups shredded and cooked chicken (we like to use rotisserie chicken)
  • 3 cups Monterey Jack cheese – shredded
  • 3 tablespoons butter
  • 4oz can diced green chilies (I like medium – they are not spicy at all)

Instructions

Preheat oven to 350 degrees.

In a bowl, combine shredded chicken and 1 cup of cheese.

Fill tortillas with the combined shredded chicken and cheese mixture. Place them in a greased 9×13 pan.

Melt butter over medium heat.

Stir flour into the melted butter and whisk for 1 minute over heat.

Add the chicken broth and whisk together.

Cook over heat until thick and bubbles up.

Take off from heat. Make sure that it is not too hot before adding the sour cream and chilies or else the sour cream will curdle.

Pour mixture over the enchiladas.

And of course, you can add the remaining cheese on top. (Don't be afraid, the more cheese, the creamier!)

Bake for 20-23 minutes in a 350 degrees oven.

Then, you may want broil for another 3 minutes to brown the cheese.

April 24, 2020 0 comment
0 FacebookTwitterPinterestEmail
Main Dish Recipes

Mouthwatering Squash Casserole from the South

by Rebecca April 23, 2020
written by Rebecca

Defined as the Southern Comfort Food – this mouthwatering dish is rich and satisfying. Add meat or rice to it to make it a meal. You can even add turkey or chicken, maybe some leftovers – or anything! The natural sweetness of the squash underneath and the buttery crushed cracker on top are a perfect match. Either, mash the squash or cut it into small pieces, it does not matter. And don’t hesitate to add your favorite seasoning as well!

Ingredients

3 lb yellow squash, sliced or diced

1/2 cup diced Vidalia onion, optional

1 can cream of mushroom or chicken soup, 10.5 oz.

1 cup mayonnaise

1 egg

8 oz shredded cheddar cheese (sharp is my favorite)

1 tsp salt

1/2 tsp fresh ground black pepper

TOPPING

2 sleeves of Ritz crackers, crushed

1 stick melted butter

How to make this Mouthwatering Squash Casserole from the South

Preheat oven to 350 degrees.

Wash the squash. Slice into smaller pieces or mash it, depends on how you like it. Then put into a large bowl.

In a separate bowl, mix the soup, mayo, eggs, cheese, onions, salt, and pepper.

Pour the sliced or mashed squash with the mixed ingredients.

Give it a good stir until all ingredients are well mixed.

Pour into a casserole dish.

Put the crackers inside a resealable plastic bag and crush using a rolling pin or meat tenderizer.

Melt butter in the microwave.

Put crushed crackers in a bowl and pour in the melted butter. Stir until moist.

Drizzle on top of casserole. You can add more or less topping but more is what I prefer.

Finally, baking time! Bake casserole at 350 degrees until top is bubbly and brown. It usually will take about 45-50 minutes.

Then, bake for another 30 minutes. Don’t forget to cover it with foil to prevent a cracker from burning.

After 30 minutes, remove foil and bake for additional 20 minutes until the top is golden brown.

Mouthwatering Squash Casserole from the South

Rebecca Defined as the Southern Comfort Food – this mouthwatering dish is rich and satisfying. Add meat or rice to it to make it a meal. You can even add turkey… Main Dish Recipes Mouthwatering Squash Casserole from the South European Print This
Nutrition facts: 200 calories 20 grams fat
Rating: 5.0/5
( 2 voted )

Ingredients

  • 3 lb yellow squash, sliced or diced
  • 1/2 cup diced Vidalia onion, optional
  • 1 can cream of mushroom or chicken soup, 10.5 oz.
  • 1 cup mayonnaise
  • 1 egg
  • 8 oz shredded cheddar cheese (sharp is my favorite)
  • 1 tsp salt
  • 1/2 tsp fresh ground black pepper
  • TOPPING
  • 2 sleeves of Ritz crackers, crushed
  • 1 stick melted butter

Instructions

Preheat oven to 350 degrees.

Wash the squash. Slice into smaller pieces or mash it, depends on how you like it. Then put into a large bowl.

In a separate bowl, mix the soup, mayo, eggs, cheese, onions, salt, and pepper.

Pour the sliced or mashed squash with the mixed ingredients.

Give it a good stir until all ingredients are well mixed.

Pour into a casserole dish.

Put the crackers inside a resealable plastic bag and crush using a rolling pin or meat tenderizer.

Melt butter in the microwave.

Put crushed crackers in a bowl and pour in the melted butter. Stir until moist.

Drizzle on top of casserole. You can add more or less topping but more is what I prefer.

Finally, baking time! Bake casserole at 350 degrees until top is bubbly and brown. It usually will take about 45-50 minutes.

Then, bake for another 30 minutes. Don't forget to cover it with foil to prevent a cracker from burning.

After 30 minutes, remove foil and bake for additional 20 minutes until the top is golden brown.

April 23, 2020 0 comment
0 FacebookTwitterPinterestEmail
Newer Posts
Older Posts

Popular Posts

  • 1

    Crispy Crunchy Parmesan Potatoes

    March 21, 2020
  • 2

    CROCK POT SMOTHERED PORK CHOPS

    March 21, 2020
  • Facebook
  • Twitter

@2019 - All Right Reserved.


Back To Top